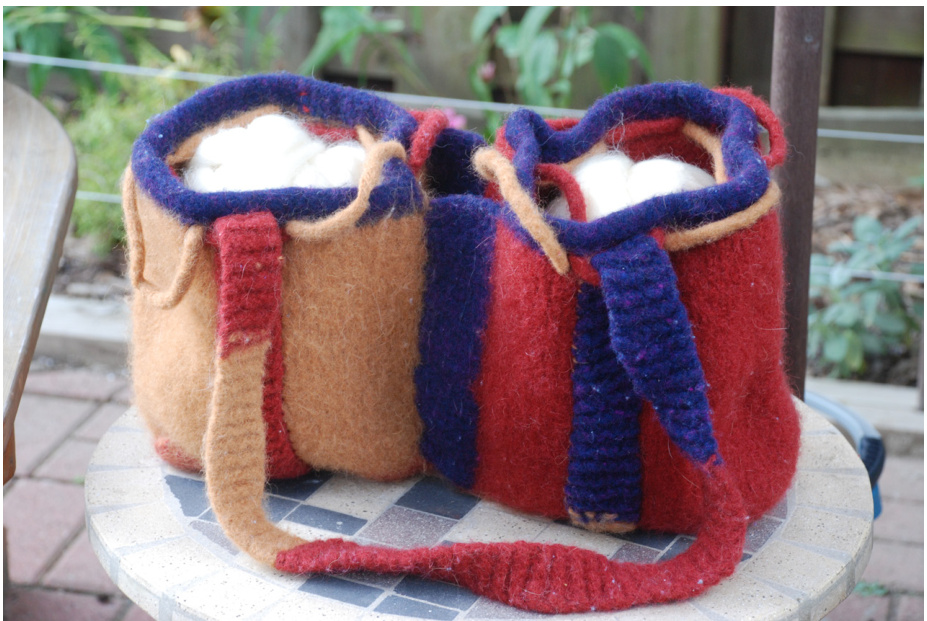
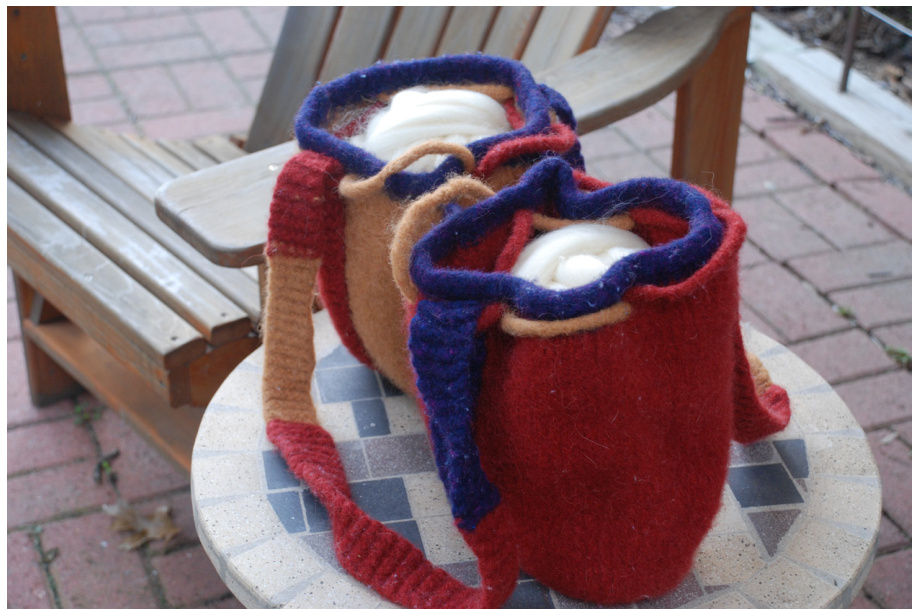
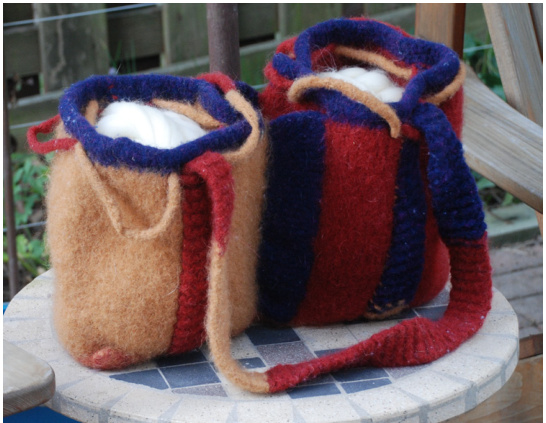
Spinner's Project Bag
Dakota Designs Original Pattern I wanted a bag to hold whatever I was spinning on one side, and knitting, or extra (pre-measured) fiber on the other, with a space in the middle for car keys, wallet, needles. whatever. I designed this bag to fit my needs. I knit it out of some handspun that was a little on the coarse side, but would felt perfectly!
Gauge
11 st7/ 4 inch and 9 rows / 4 inch using 2 strands worsted weight yarn over garter stitch in Size 11 Needles.
Needles
$24^{\prime\prime}$ Circular - size 11
Yarn
Red - 9.5 oz of approx 400 yds Gold - 9.8 oz of approx 431 yds Purple - 3.4 oz of approx 180 yds
The Bag Base (Bottom)
Cast on 50 stitshes using 1 strand red and 1 strand gold. Knit 15 ridges. The finished size of the base should be $z1"$ long by $6.6^{\,\prime\prime}$ wide You don't have to be slavish to this measurement. To determine the size of my bag, I found one I liked and enhanced the measurements by $30\%$ (the average shrinkage when felting)
Knitting the First Compartment ( Red Side)
Next Row: Switch to round needles and 2 strands of the Red, knit 23 of the 50 stitches that are on your needles. Put the rest on a holder. Place a marker (you are marking the corners of the bag). At this point pick up and knit 15 stitches from the center place a marker, turn the work and pick up and knit 23 stitches from the cast on edge, place a marker, then pick up and knit 15 stitches from the knit edge, placing the last marker. Now you are ready to knit in the round until you reach the height you want. I knit until it was $14^{\bar{\prime}\bar{\prime}}$ high (remember it will shrink about $30\%$ DrawString Hole and Finishing Top Using the stich markers as reference points place drawstring holes (k2 tog, yo) in the center of each of the short sides, and 2 spaced evenly in the long side. For my bag this ended up being: k6, k2tog yo, k6 slip marker k6,k2tog yo,k7,slipmarker k6,k2tog yo,k6,sliparker k6, k2tog yo, k7,slip marker Change Colors (purple) and knit 3 rounds with 2 strands. On the fourth round do a 3 stitch icord bind off by doing the following: CO 3 stitches on left needle $\ast\mathsf{K}2$ K2tog, slip the 3 stitches back to the left needle and repeat from \* until there are 3 stitches left, slip them back to left needle and cast off normally.
Making the Second Compartment (Gold Side)
You have 27 live stitches on a holder. Leave the first FOUR stitches on the holder and knit the remaining 23 stiches with a double strand of gold, place ;marker, pick up and knit 15 ridges from the far side (knit edge), place marker, pick up and knit 23 stitches from the cast on edge, place marker, pick up and knit 15 stitches from the center, place marker. Now you are ready to knit as for the GOLD side! Center Compartment (purple) You have 4 stitches 'between' the two bag compartments, this will be used to form your extra, secret compartment! Using 2 strands of purple, pick up SIX stiches from these center stitches and knit a 'flap' in garter until it comes just under the icord bind off of the tops of your red/gold sides., do an icord bindoff on these 6 stitches. Repeat these directions for the other side, and stich your flaps down to the "corner" edges of each bag.
Straps
Using double strands, CO 6 stitches and knit up a $56^{\,\prime\prime}$ strap. You can do blocks of color as pictured, use 1 strand of red with gold, and then switch to red/purple, gold/purple -- whatever strikes your fancy. I waited to attach until after I felted, but you can attach it before felting. In any case, position the strap So that it is goes around the botton and up the center of the Red and the Gold compartments. Since the bag is longer than wide, this gives a better support. Once you have pinned the strap to the bag, and have ensured you have no wierd twists sew the ends together (now you have a continuous strap!).
Draw Strings
I made 4 drawstrings (2 _gold, 2 red) with a single strand $48{-}50^{\prime\prime}$ long, and interwove them through the individual bag holes so that they each followed a different path. I thought it looked better this way, and gave me the most flexibility in closing the tops.
Felting
Here's the EASY par!! The bag is put together and ready to felt. Make sure that you have put the drawstrings in, and sewn the ends together. You will need to pull these a little when checking your felting progress. Fire up the washing mashine, place your bag in a net bag, use hot water and soap, and set your timer to check the progress ever 10 minutes or so. Once you are happy with the level of felting, remove from the washing machine, rinse the soap out, and roll in in a towel (maybe a couple of times) to draw out the extra moisture. DO NOT spin it out in the washer, or it will really stretch out and not look right. Put your bag in a warm dry place and shape it by opening or pulling it -- some people like to put wadded up newspapers inside the bags to keep their shape. Once dry you are ready to go, enjoy your Project bag.