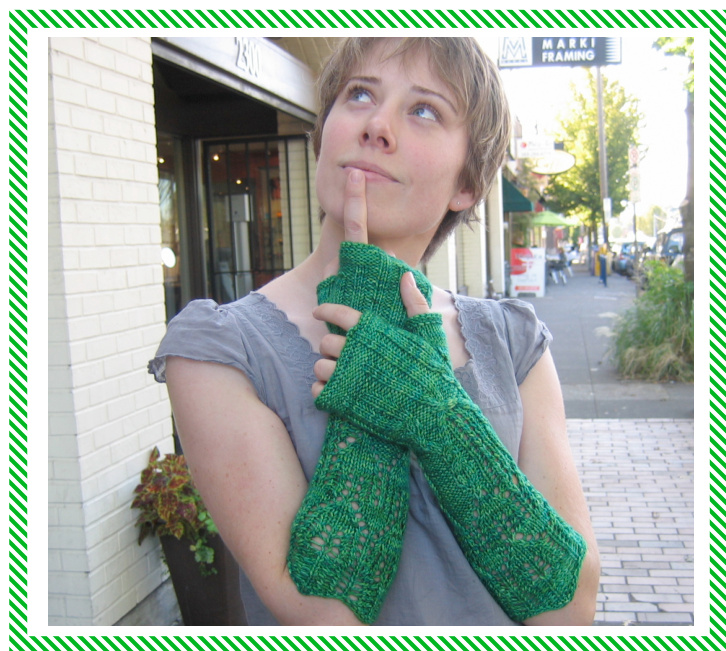
Emerald City Mitts
Emerald City Mitts by Star Athena
Size Women's Medium
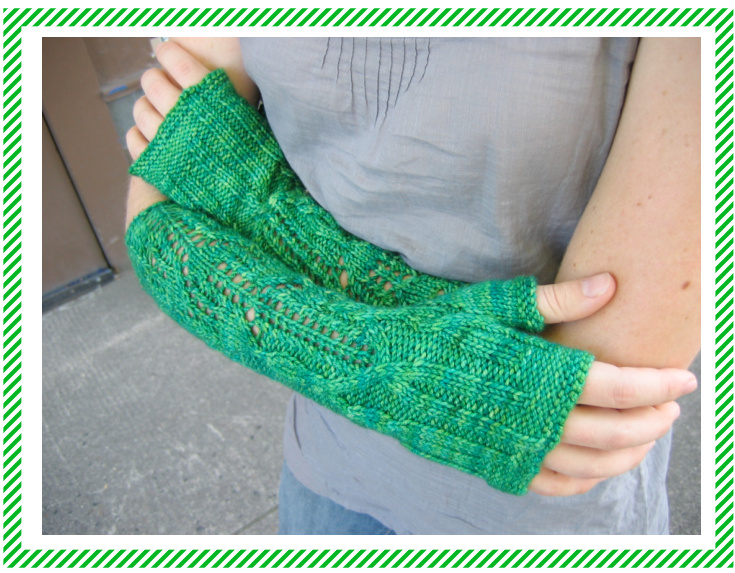
Wrist circumference: 7 inches (17.5 cm) unstretched. Will stretch to fit 10 inches (25.5 cm). Gauge: 24 sts/32 rows = 4" in st st Needles: 1 set US #4/3.5mm 32" circular needles (magic loop), 2 sets of 24” circulars, or double pointed needles, or size to get gauge. Yarn: Fresh From the Cauldron MCN Sport Yarn [80% Merino, 10% Cashmere 10% Nylon; 250yd/229m per 113g/4oz skein]; color: Emerald City; 1 skein. (Or any sport to DK weight yarn that gives you proper gauge) Notions: Darning needle, stitch holder, and stitch marker. The Emerald City beckons with these arm-warmers inspired by the stylized buildings of Oz. Gothic Lace starts on cuff and flows into twisted lacy cables, ending on the hand with a motif that echoes the silhouette of the Emerald City. Wear these when you need a dose of the magic of Oz. NOTES: This pattern includes instructions to make a pair of lacy, cabled wrist warmers. This is an advanced pattern! You'll need to know how to read a pattern, cast on, knit, purl, increase, decrease, work lace and cables, and work in the round. The lace pattern is charted as well as written; take your pick. This pattern is written using the magic loop or 2-circular method, where half the stitches are on N1, and the other half are on N2. You can easily divide these stitches again for double pointed needles.
KEEP ON KNITTING IN THE FREE WORLD!
Emerald City Mitts
star athena: spinner, knitter, fiber lover
ABBREVIATIONS:
CQ: Cast on K: Knit K2tog: Knit two stitches together as one stitch M: Marker. M1L: Make one, left leaning. Bring the tip of the left-hand needle under the strand between stitches, from front to back. Knit through the back of the loop. M1R: Make one, right leaning: Bring the tip of the left-hand needle under the strand between stitches, from back to front. Knit this loop. One stitch increased LN: Left needle P: Purl PM: Place marker P2tog: Purl two stitches together as one stitch PSSQ: Pass slipped stitch over RN: Right needle Rnd: Round. RS: Right (or public) side of work stitches left. from left to right purl-wise. 8. Continue picking up one CO edge stitch and knitting it together with a live stitch until there are no more needle into front of these two stitches and knit them together. St: stitch Tbl: Through back loop WS: Wrong (or non-public) side of work YQ: Yarn over NOTE: To make cuffs larger to accommodate wider arms, go up one needle size for the cuff instructions, then use suggested needle for the hand (cable chart) section.

Cuff: CO 40 sts. Divide evenly between needles and join to begin working in the round, being careful not to twist sts when joining. If needed, place marker to indicate the beginning of the round. Rnd 1: Knit. Rnd 2: Purl. Rnd 3: Knit.
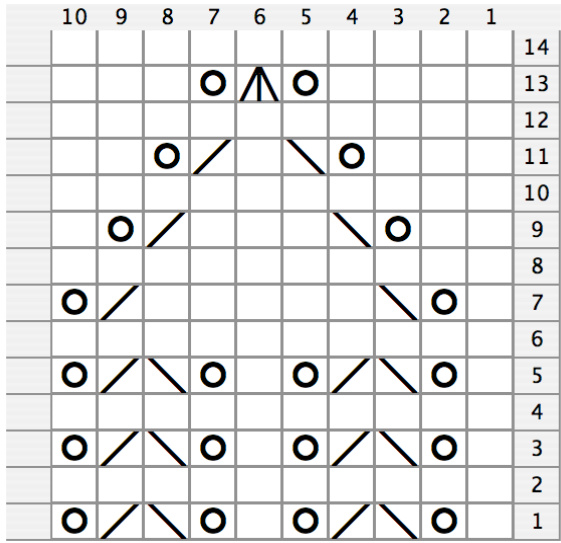
Start Cuff Chart A:
Rnds 4-15: Work rnds 1-2 of Cuff Chart A, repeating the ten stitches four times across all 40 sts in the round. Work chart six times for a total of 12 roundsworked.
Cuff Chart A
| 10 | 9 | 8 | 7 | 6 | 5 | 4 | 3 | 2 | 1 | ||
| o | o | o | 1 |
Legend:
| .egena. knit knit stitch |
| yo Yarn Over |
| ssk Slip one stitch as if to knit, Slip another stitch as if toknit.Insert left-hand needle into frontofthese2stitchesandknitthem together |
| CentralDouble Dec Slipfirst andsecond stitchestogether asif to knit. Knit 1 stitch. Pass two slipped stitches overtheknitstitch. |
| k2tog Knittwostitchestogetherasonestitch |
Start Cuff Chart B:
Next: Work rnds 1-14 of Cuff Chart B, repeating the ten stitches four times across all 40 sts in the round.
Cuff Chart B
| Legend: | |
| knit knit stitch | |
| yo | YarnOver |
| ssk | Sliponestitchasif toknit,Slip anotherstitch asiftoknit.Insertleft-handneedleinto frontofthese2stitchesandknitthem together |
| k2tog | Knittwostitchestogetherasonestitch |
| CentralDoubleDec Slipfirstandsecondstitchestogetherasifto knit.Knit 1 stitch.Pass two slipped stitches over theknitstitch. | |
Cuff Chart B
Cuff Chart C

Legend:
| knit knit stitch | |
| yo YarnOver | |
| ssk | Slip onestitchasif toknit,Slipanotherstitch asiftoknit.Insertleft-handneedleinto frontofthese2stitchesandknitthem together |
| k2tog Knit two stitches together as one stitch | |
| purl purl stitch | |
| CentralDoubleDec Slipfirstandsecondstitchestogetherasifto knit.Knit1 stitch.Pass two slipped stitches over the knit stitch. | |
| knit tbl Knit stitch through back loop |
@ 2009 Star Athena http://keeponknittinginthefreeworld.blogspot.com/ star athena:pinner,nittr, fiberlov
Cuff Chart C
Pattern: R1 (Rs): kl, yo, ssk, k2tog, yo, kl, yo, ssk, k2tog, yo, kl, yo, ssk, k2tog, yo, kl, yo, ssk, k2tog, yo R2: k20 R3: kl, yo, ssk, k2tog, yo, kl, yo, ssk, k2tog, yo, kl, yo, ssk, k2tog, yo, kl, yo, ssk, k2tog, yo R4: k20 R5: kl, yo, ssk, k2tog, yo, kl, yo, ssk, k2tog, yo, kl, yo, ssk, k2tog, yo, k1, yo, ssk, k2tog, yo R6: k20 R7: p1, yo, ssk, k5, k2tog, yo, k1, yo, ssk, k5, k2tog, yo R8: p2, k17, p1 R9: p2, yo, ssk, k3, k2tog, yo 2 times, dbl dec, yo 2 times, ssk, k3, k2tog, yo, p1 R10: p3, k6, k tbl, k2, k tbl, k5, p2 R11: p3, yo, ssk, kl, k2tog, yo, kl, yo, dbl dec, yo, kl, yo, ssk, kl, k2tog, yo, p2 R12: p4, k13, p3 R13: p4, yo, dbl dec, yo, k2, yo, dbl dec, yo, k2, yo, dbl dec, yo, p3 R14: p5, k11, p4
Start Cuff Chart C:
Next: Work rnds 1-14 of Cuff Chart C, repeating the twenty stitches twice across all 40 sts in the round.
Start Cable Chart D:
Important: Read through this section before continuing knitting! Next: Work rnds 1-36 of Cable Chart D, repeating the indicated stitches twice across all the sts in the round and working thumb gusset as described below. NOTES: On rnd 3 you will make increases, bringing your total stitch count to 48. Then, on rnd 38 you will make decreases, bringing your total stitch count to 44.
Start Thumb Gusset Shaping:
You will continue to work the Cable Chart D pattern while making increases for your thumb AT THE SAME TIME. The thumb stitches will be worked in stockinette stitch (knit all sts). Rnd 19: M1R, YO, pm, work in Cable Chart D until the end of the round. Next rnd: Knit to marker, slip marker, continue in established pattern. Next rnd: M1R, k to next marker, M1L, sl m, continue Cable Chart D pattern until the end of the rnd. Rep these 2 rnds until there are 14 thumb sts in between markers. Next rnd: M1L, k to marker, sl m, continue as established. Next rnd: Sl1 st from LN to RN, place 12 sts onto stitch holder, return sl st back from RN to LN, sl1, k2tog tbl, psso, remove marker, cont as est. Next rnd: P2tog this last gusset st with the first st of Cable Chart D. star athena:pinner,nittr, fiberlov
Cable Chart D
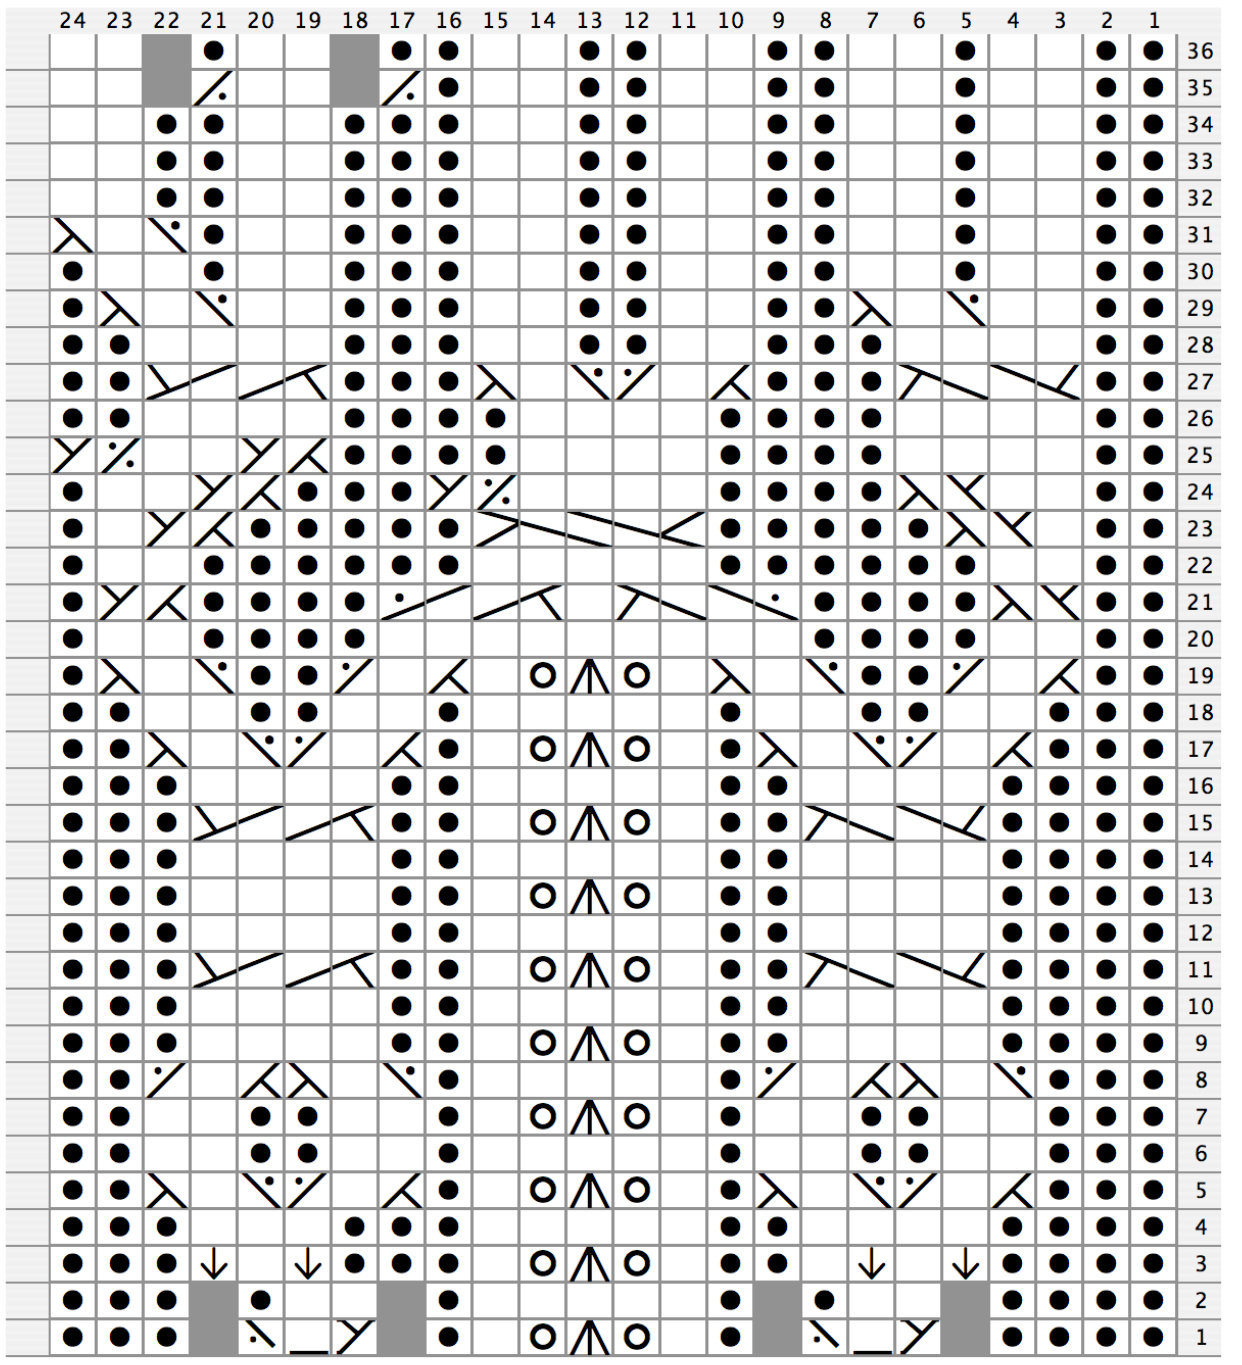
Notes:
By knitting into st below and then knitting into the same sticth above, you are increasing one Stitch. \* - Rnd 19: Start Thumb gusset shaping.
Cable Chart D
| Legend: purl | |
| purl stitch | |
| No Stitch Placeholder-No stitch made. | |
| Cable V Sl 1 st to cn and hold back, sl 1 st to cn and hold front, kl, k1 from front cn, pl from back cn. | |
| knit knit stitch | |
| yo Yarn Over Central Double Dec | |
| Slip first and second stitches together as if toknit. Knit 1 stitch. Pass two slipped stitches over the knit stitch. | |
| ↑ | k in st below Knit into stitch below, inserting needle from front through the st in the row below |
| c2 over 1 right P sl1 to CN, hold in back. k2, p1 from CN | |
| N | c2 over 1 left P sl2 to CN, hold in front. p1, k2 from CN |
| c2 over 2 left sl 2 to CN, hold in front. k2, k2 from CN | |
| c2 over 2 right sl2 to CN, hold in back. k2, k2 from CN | |
| Left Twist sll to CN, hold in front. k1, k1 from CN | |
| c2 over 2 left P sl 2 to CN, hold in front. p2, k2 from CN | |
| c2 over 2 right P sl2 to CN, hold in back. k2, p2 from CN | |
| YK | Right Twist Skip the first stitch, knit into 2nd stitch, then knit skipped stitch. Slip both stitches from needle together OR k2tog leaving sts on LH needle, then k first st again, sl both sts off needle. |
| c2 over 3 left sl2 to CN, hold in front. k3, k2 from CN | |
| Purled Right Twist sl1 to CN, hold in back. p1, p1 from CN. OR p into 2nd st, then p 1st st | |
| p2tog Purl 2 stitches together | |
Cable Chart D
| Pattern: R1 (RS): p4, CV, p1, k1, yo, dbl dec, yo, kl, pl, CV, p3 R2: p4, k2,p2,k5,p1,k2,p4 R3: p4, k in st below, k1, k in st below, k1, p2, k1, yo, dbl dec, yo, k1, p3, k in st below, k1, k in st below, p3 R4: p4, k4,p2,k5,p3,k3,p3 |
| R5: p3, c2 over 1 right P, c2 over 1 left P, p1, k1, yo, dbl dec, yo, k1, p1, c2 over 1 right P, c2 over 1 left P, p2 R6: p3,k2, p2, k2, p1,k5, p1, k2, p2, k2, p2 R7: p3, k2,p2,k2,p1,k1, yo, dbl dec, yo, kl, p1, k2, p2, k2,p2 R8: p3, c2 over 1 left P, c2 over 1 right P, p1, k5, p1, c2 over 1 left P, c2 over 1 right P, p2 R9: p4,k4, p2, k1, yo, dbl dec, yo, k1, p2, k4, p3 R10: p4,k4, p2, k5, p2,k4, p3 R11: p4, c2 over 2 left, p2,k1, yo, dbl dec,yo, k1, p2,c2 over 2 right, p3 R12: p4, k4, p2, k5,p2, k4, p3 R13: p4, k4, p2, k1, yo, dbl dec, yo, k1, p2, k4, p3 R14: p4, k4, p2,k5,p2,k4, p3 R15: p4, c2 over 2 left, p2, k1, yo, dbl dec, yo, k1, p2, c2 over 2 right, p3 R16: p4, k4, p2, k5,p2, k4,p3 R18: p3, k2, p2, k2, pl, k5, pl, k2, p2,k2, p2 R19: p2, c2 over 1 right P, p2, c2 over 1 left P, k1, yo, dbl dec, yo, k1, c2 over 1 right P, p2, c2 over 1 left P, p1 R20: p2,k2, p4, k9, p4, k2, p1 R21: p2, Left Twist, p4, c2 over 2 left P, k1, c2 over 2 right P, p4, Right Twist, p1 R22: p2,k2,p6,k5,p6, k2,p1 R23: p2, k1, Left Twist, p5, c2 over 3 left, p5,Right Twist, k1, p1 R24: p2, k2, Left Twist, p4, k4, Purled Right Twist, p3, Right Twist, k2, p1 R25: p2, k4, p4, k4, p4,Right Twist, k2, Purled Right Twist R26: p2,k4,p4,k4,p4,k4,p2 R27: p2, c2 over 2 left,p3, c2 over 1 right P, c2 over 1 left P, p3, c2 over 2 right, p2 R28:p2,k4,p3,k2,p2,k2,p3,k4,p2 R29:p2,k2,c2 over 1left P, p2,k2,p2,k2,p3,k2, c2 over 1 left P, p1 R30:p2,k2,pl,k2,p2,k2,p2,k2,p3,k2,p1, k2, p1 R31: p2, k2, p1, k2, p2, k2, p2, k2, p3, k2, p1, c2 over 1 left P R32: p2, k2, p1, k2, p2, k2, p2, k2, p3,k2,p2,k2 R33: p2, k2, pl, k2, p2, k2, p2, k2, p3, k2, p2, k2 R34: p2, k2, pl, k2, p2, k2,p2,k2, p3, k2, p2,k2 R35:p2,k2,p1,k2,p2,k2,p2,k2,p1,p2tog,k2,p2tog,k2 R36: p2, k2, p1, k2, p2, k2,p2, k2,p2,k2,p1,k2 |
Start Hand Chart E:
Next: Work rnds 1-12 of Hand Chart E, repeating the indicated stitches twice across all the sts in the round.
KEEP ON KNITTING IN THE FREE WORLD!
star athena:pinner,nittr, fiberlov Emerald City Mitts
Hand Chart E
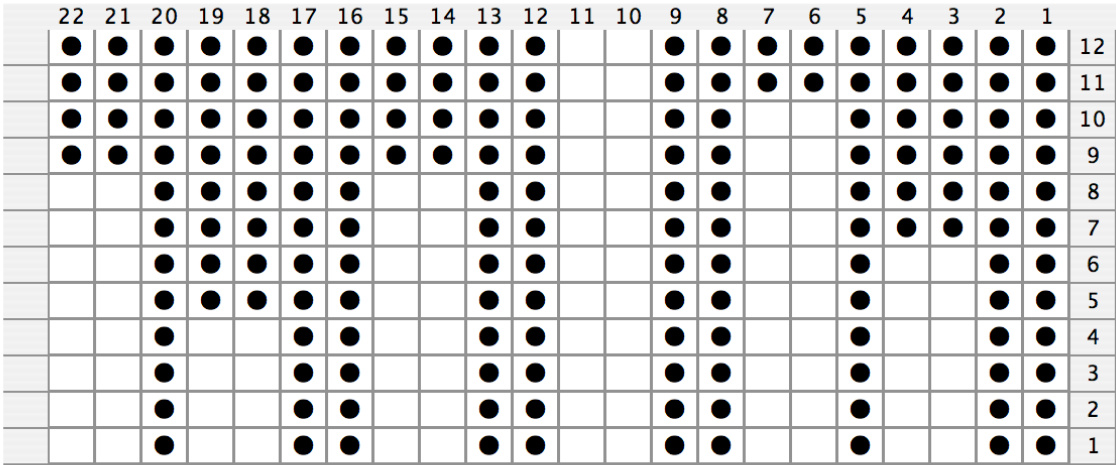
Legend:
purl purl stitch
Pattern:
End Hand:
Next rnd: Knit. Next rnd: P9, k2, p11. Rep these two rnds once more.
Bind off:
BO using an elastic, stretchy bind off method of your choice. I prefer the sewn bind off as follows: Break yarn, leaving a tail that is five times longer than your bind off edge. Thread yarn tail onto a tapestry needle. \*Sew needle through the first two sts on knitting needle purl-wise, then sew through the first st on knitting needle knit-wise. Drop the first st off the knitting needle. Repeat from \* until all sts are bound off. 2009 Star Athena http://keeponknittinginthefreeworld.blogspot.com/ Emerald City Mitts
Thumb:
Slide the sts on hold to working needles and divide to work in the round. Attach yarn (leaving a long tail to sew up holes later) and knit across the 12 sts. Pick up and knit 4 sts along the hand side of the mitt. Rnds 1-4: Knit around all sts. Rnd 5: Purl. Rnd 6: Knit. Rnd 7: Purl. Bind off using the sewn bind off described above. Finishing: Weave in ends. Block as desired. Blocking is important! This pattern was test-knitted by aredhelstar and Dorothy D'Ascanio (a.k.a. Pheelya). Thanks! Thanks to Emily Shmemily for modeling! → This design is for personal, non-commercial use only. If you wish to share the pattern please don't distribute, instead, direct people to my site, or to Ravelry, so they can acquire their own copy. Thank you! Email: starina@hotmail.com