INGVOLDARAN PATTERN by Helen Burros
Introduction
This sweater is designed to introduce knitting an Aran sweater from the top down, including making a swatch cap, choosing final stitch patterns, measuring for a good fit, order of construction, solving fit problems, and monitoring desired fit as the knitting progresses. 'm calling the sweater Ingvold, a personal family name, and the basic pattern will be a cardigan, although it will be easy to change to a pullover, if desired. The pattern calls for a firm worsted yarn, such as Cascade 220, to give good definition to the cable stitches. For my personal sweater Ill be using size 5 needles, as I know from previous experience that I like the gauge I get with the yarn and needles. By doing the swatch cap, you will be able to try different needle sizes and choose the one that gives you the gauge you want with the yarn you've chosen. I'm calling for a worsted weight yarn for this pattern, so the sweater will knit up in a reasonable time and youll be able to wear it sooner. Aran weight yarns are heavier and tend to stand away from the body more, which can add bulk to one's silhouette. They also reduce the amount of stitch detail one can put in a sweater. Sport weight yarns, on the other hand, enable the knitter to add more detail and more stitches, but the garment takes longer to knit. Since this sweater is knit to fit the individual, there aren't a range of sizes to pick and choose from. Rather, the knitter should find a sweater that fits you well and measure it carefully - length, shoulder width, sleeve length, sleeve cuff, upper sleeve, chest and neck. There is a schematic included in the instructions and I suggest that folks copy it and put the original away for safekeeping, then write your measurements on the copy and put it in your page protector along with your working project. Another thing to check is front neck to hem length versus back neck to hem length. Many folks have curves in their spines which need more fabric to achieve the same hem length all the way around. There will usually be a few inches difference between the two, because of the front drop at the neck, but more than about 4 inches will need to be noted and accounted for when you start your sweater body. Each knitter will need to decide how long they want their sweater to be, based on their idea of fit and comfort. Iask that all instructions, diagrams, and charts I provide be kept intact with the copyright info, as designing a sweater is a lot of work. The next page has a bibliography of books and PDFs that I suggest for more information and reference for kniting Arans from the top down and designing your own sweaters. Most of these are still in print and available through Tangled Purls Fine Yarn Studio. When I design a pattern, I set up a folder for it and keep my notes, charts, plans, schematics, and a list of the references I used for the design in it. Later, if Ihave a question or someone needs to know how I did something, I can refer back to my folder to answer the question.
Materials
Yarns: firmly spun worsted weight such as Cascade 220 in desired color, 2200-2800 yards depending on size garment planned and complexity of cable patterns chosen - the more times stitches cross in cables, the more yarn is required for the garment. Needles: While Ilike the gauge I get using Cascade 220 regular yarn with size 3.75mm (Us5) needles, others may prefer other gauges and yarns, so knit your swatch cap starting with size Us 5 needles and, if the fabric is too stiff for you, do a round of purl sts and change to size 4.0mm (Us6) needles for two ins to see how you like that fabric. Conversely, you may need to go down to a size 3.5mm (US4) needle to get a fabric you prefer. Always separate the sections on your swatch where you change needle sizes with a very definite break, such as a round of purl stitches. This way, you don't have to put a lot of coilless pins in your knitting to mark the change and you will know later exactly where you changed needle sizes. Some folks knit a round of purl, a round of knit with a number of knit/purl sets identifying the whole size number of the needle being changed to, then another round of purl before starting to knit the pattern stitches with the new needles. Find what works for you, make notes about it in your project notes, and carry on. Good notes are really a knitter's best friend later on, when you want to repeat a well-loved sweater or someone asks about how you did some part of your design and you can impress them with the clear notes you made while the sweater was being knit. You don't have to write a book, but a simple comment about 'don't like the sleezy fabric this yarn produces on size 7 needles' willsave you a lot of grief later on. You will need sixteen inch circulars and either twenty-four inch or larger circulars in the main size and one size smaller for the ribbing. You will also need dpns in both sizes, unless you prefer to do magic loop or two circs when the sleeves get small enough. Stitch holders (l prefer to use lengths of yarn to avoid the metal holders catching on things, popping open and losing stitches, they are also lighter in weight and most folks carry an extra ball of yarn with them anyway). Stitch markers. Darning needle. Equal numbers of design buttons and smaller backing buttons. You can choose the buttons later after you have some progress on your sweater so you can lay the buttons on the cables and decide which ones you like. Ialways put smaller backing buttons behind my design buttons to take the strain off the fabric and avoid stretching the button band out with use.
Bibliography
)ixie. Aran From the Neck Down, self-published, 1986. Righetti, Maggie. Sweater Design in Plain English, St. Martin's Press, 1990. Aran Sweater Design, Big Sky Knitting Designs, 2006 Szabo, Janet. Handbook of Aran Sweater Design, Golden Fleece Publications, 1998. Szabo, Janet. The Follow the Leader Aran KnitAlong (FLAK), PDF from Big Sky Knitting Designs, 2006-2006.
Section 1 - Cable Patterns
We will start with the charts for the cables I plan to use in the design. As always, each knitter can decide which patterns to include but I suggest knitting them allinto a swatch or swatch cap, ala Elizabeth Zimmermann, so you have a good idea of how they are knit and how they look. I prefer to knit a swatch cap, so I have a useful item when I'm done. I can unravel the hat if I need the yarn, as the hat is knit in the round. The swatch should have each individual pattern measured, as well as the full size, both before and after washing, with careful notes made so you know your gauge for each pattern stitch. I lay my swatch cap flat on a towel to dry, without stretching it so I get accurate measurements to use. Start by writing down the order you want the patterns to be across the back of the sweater, including any columns of separating sts such as a column of ktb between patterns. Estimate, as best you can, how many fller sts you will need to achieve the back width of your sweater and add those to either side of your pattern list. I'm rather fond of sand stitch for a filler, as it's a 2-row repeat and I can add or subtract at the sides as needed. Sand stitch is simply - p1, \*k1 p1, repeat from \* across section, then turn and knit back if working flat or purl second round if working in the round. I usually try for an odd number of sts to get full bumps to appear, but it's not critical. Add up the number of sts you will need and make sure it's an even number, as we will start with a couple of inches of k2 p2 ribbing before starting the cable patterns. Don't forget to include any separating sts in your count. Write this number down in your notes and mark it as the swatch cap cast on number. Cast on the sts using your preferred stretchy cast on, Ilike knitted cast on as it's quick and easy and I can just keep going when I join in the round. I place a marker every 20 sts to make counting easier for me, then remove them on the first round. When you have the correct number and have checked it twice, join into a circle without twisting and begin k2 p2 ribbing, for about 3 ins. This gives a nice fold over ribbing for the bottom of your swatch cap, enough to anchor the cables. To make transitioning to the cables easier, knit one round even. Begin working your cables, placing markers between each patterm if desired until the paterns are established so you can read your kniting. After you have worked about three ins, or one time through all the cables, whichever is more, set your knitting down and look at the fabric you have created - do you like the feel and look of it and the cables? Do you want the fabric more drapey or less? Are the cables looking the way you want them to? Do you like the arrangement of the cables or would you rather move some of them to a different order? Do you want more separating stitches? Make notes about all these questions and your answers to them so you can incorporate them into your sweater. Continue knitting on your swatch cap until the patterned section is at least five ins tall, then begin decreasing at regular intervals until you are down to about 8 sts at the top. Run a strand of yarn through those sts, pull it to the inside and fasten it off. Carefully measure each pattern and record the measurements on your notes, measuring to the half st for accuracy. Then wash and dry your swatch cap flat, not over something which will stretch it out and remeasure each pattern, noting washed measurements next to unwashed measurements. Again, measure to the half st for accuracy.
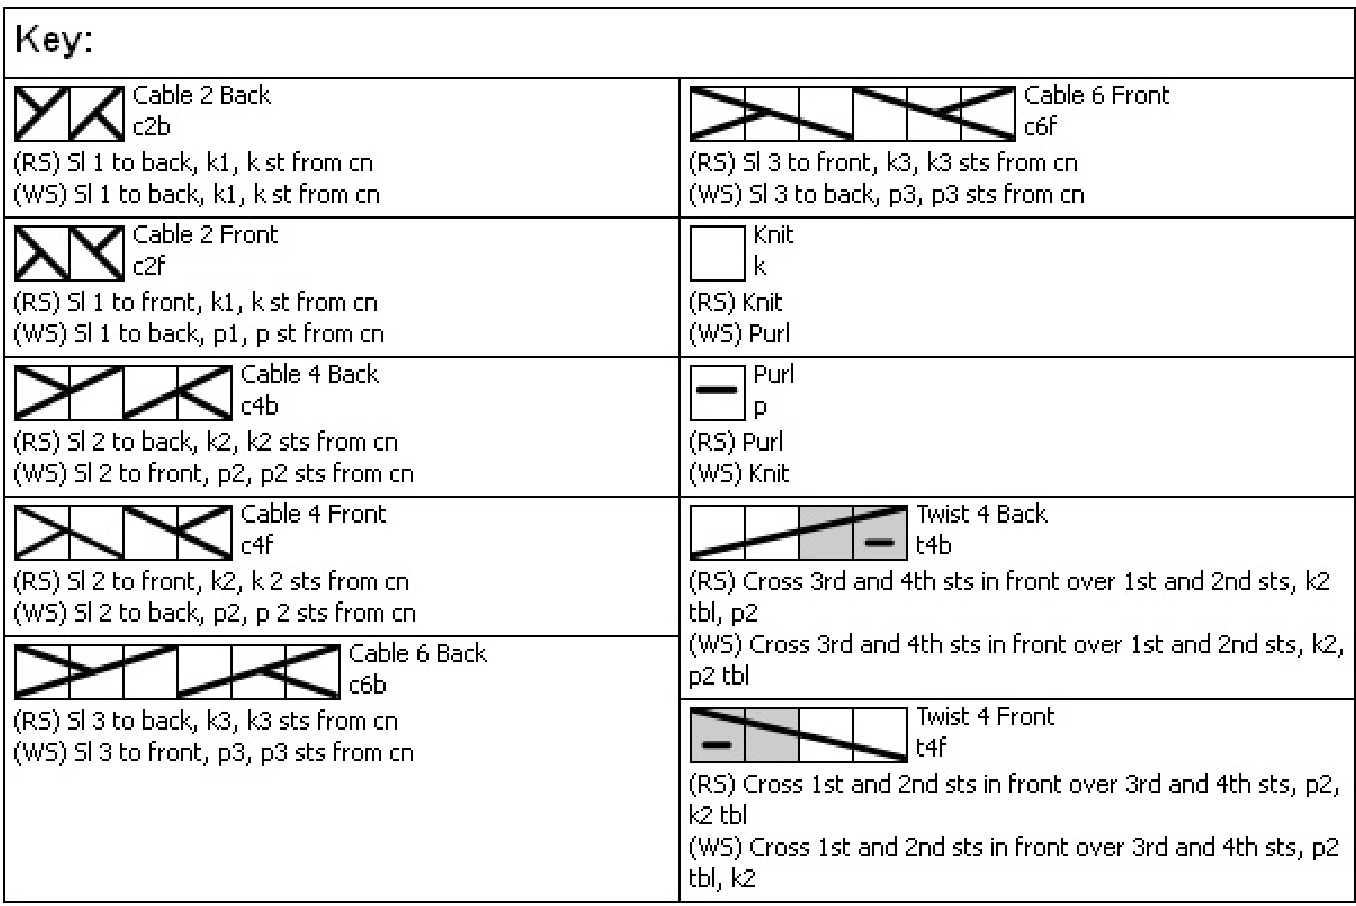
Four Strand Braid
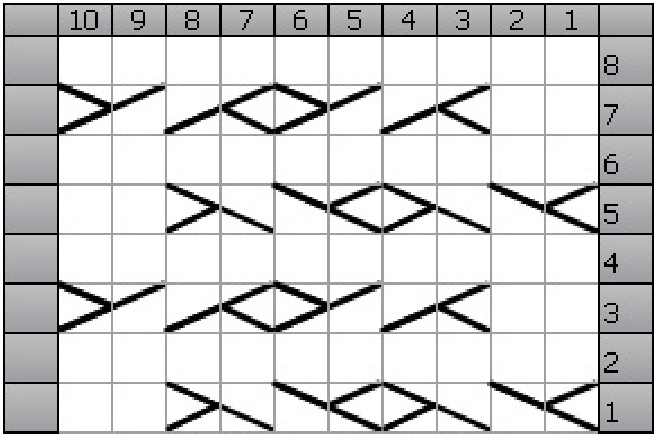
Chart: Four Strand Braid
Round 1: c4f2, k2 Round 2: k10 Round 3: k2, c4b2 Round 4: k10 Round 5: c4f2, k2 Round 6: k10 Round 7: k2, c4b2 Round 8: k10
Double Cable
| 121110 9 | 876 | 65 | 对 | 3 | 2 | 1 | |||||||
| 8 | |||||||||||||
| 7 | |||||||||||||
| 6 | |||||||||||||
| 5 | |||||||||||||
| + | |||||||||||||
| 2 | |||||||||||||
| 1 | |||||||||||||
Chart: Double Cable
Round 1: k12 Round 2: k12 Round 3: k12 Round 4: k12 Round 5: c6f, c6b Round 6: k12 Round 7: k12 Round 8: k12
Ribbon Cable
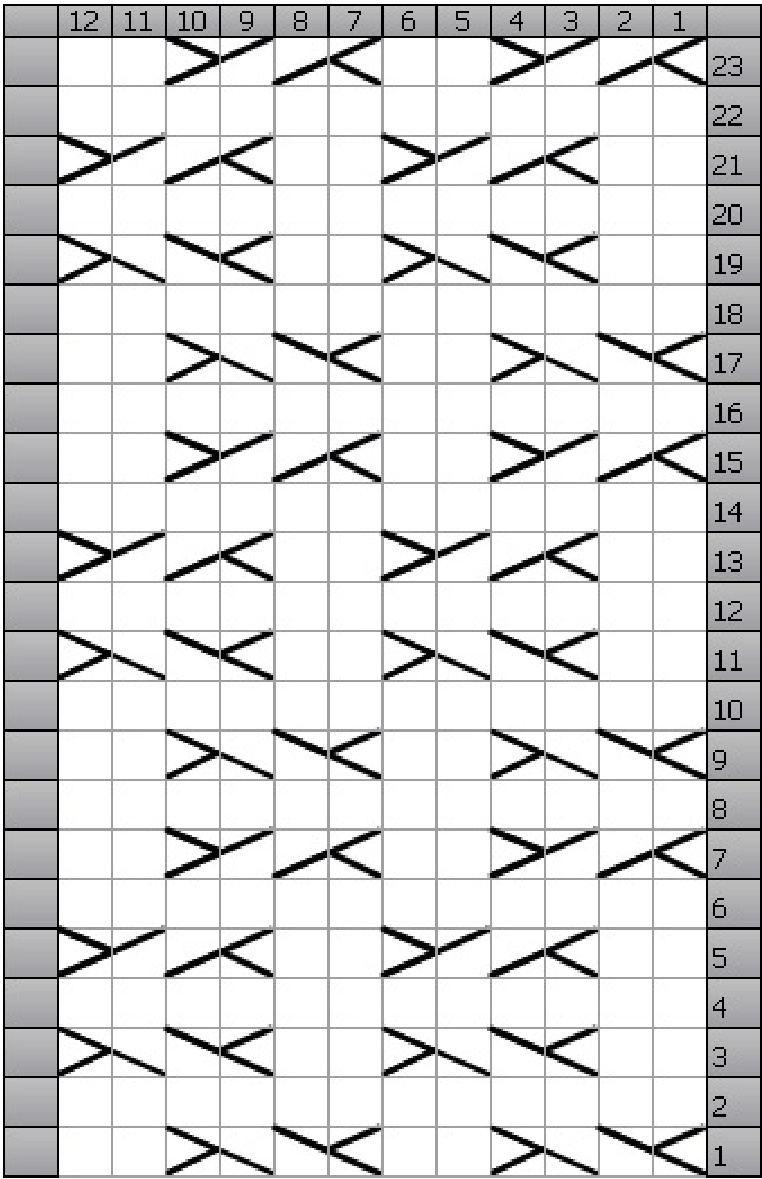
Chart: Ribbon Cable
Round 1: c4f, k2, c4f, k2 Round 2: k12 Round 3: k2, c4f, k2, c4f Round 4: k12 Round 5: k2, c4b, k2, c4b Round 6: k12 Round 7: c4b, k2, c4b, k2 Round 8: k12 Round 9: c4f, k2, c4f, k2 Round 10: k12 Round 11: k2, c4f, k2, c4f Round 12: k12 Round 13: k2, c4b, k2, c4b Round 14: k12 Round 15: c4b, k2, c4b, k2 Round 16: k12 Round 17: c4f, k2, c4f, k2 Round 18: k12 Round 19: k2, c4f, k2, c4f Round 20: k12 Round 21: k2, c4b, k2, c4b Round 22: k12 Round 23: c4b, k2, c4b, k2
Little Waving Cable
Chart: Little Waving Cable
Round 1: c2b, k1, c2f Round 2: p5 Round 3: c2f, k1, c2b Round 4: p5
Flat Rope Cable
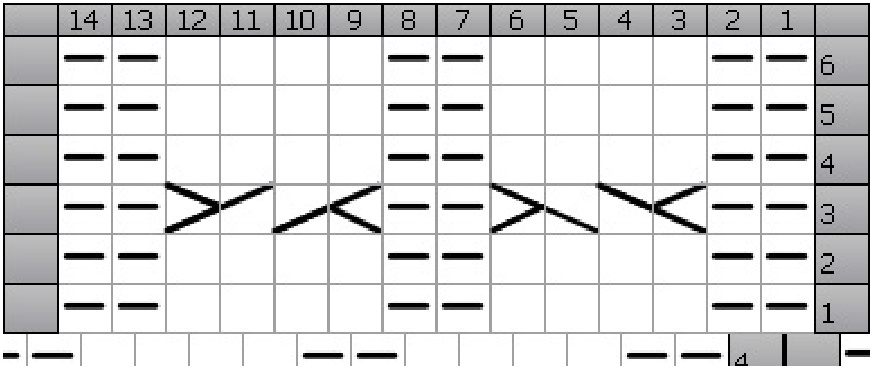
Chart: Flat Rope Cable
Round 1: p2, k4, p2, k4, p2 Round 2: p2, k4, p2, k4, p2 Round 3: p2, c4f, p2, c4b,p2 Round 4: p2, k4, p2, k4, p2 Round 5: p2, k4, p2, k4, p2 Round 6: p2, k4, p2, k4, p2 Ingvold Back Braid
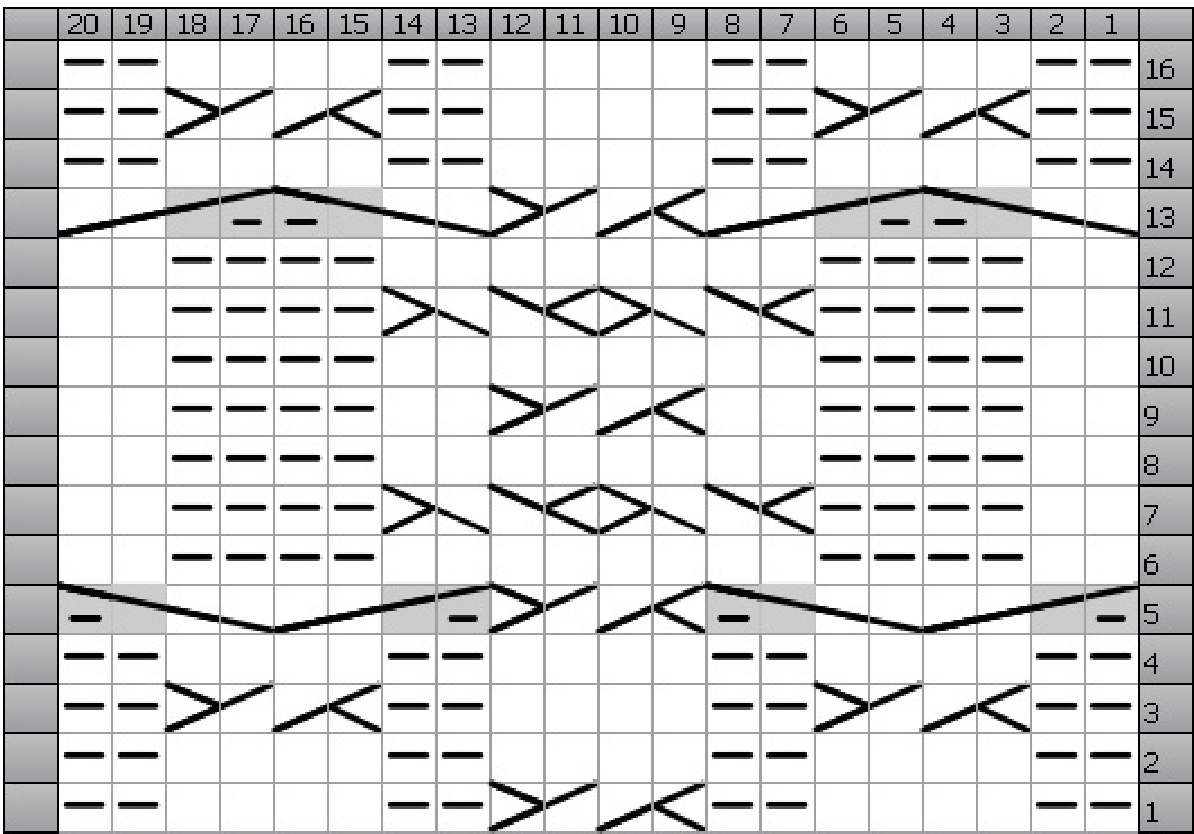
Chart: Ingvold Back Braid
Round 1: p2, k4, p2, c4b, p2, k4, p2 Round 2: p2, k4, p2, k4, p2, k4, p2 Round 3: p2, k4, p2, c4b, p2, k4, p2 Round 4: p2, k4, p2, k4, p2, k4, p2 Round 5:t4b, t4f, c4b, t4b, t4f Round 6: k2, p4, k8, p4, k2 Round 7: k2, p4, c4f2, p4, k2 Round 8: k2, p4, k8, p4, k2 Round 9: k2, p4, k2, c4b, k2, p4, k2 Round 10: k2, p4, k8, p4,k2 Round 11: k2, p4, c4f2, p4, k2 Round 12: k2, p4, k8, p4, k2 Round 13: t4f, t4b, c4b, t4f, t4b Round 14: p2, k4, p2, k4, p2, k4, p2 Round 15: p2, c4b, p2, k4, p2, c4b,p2 Round 16: p2, k4, p2, k4, p2, k4, p2
Left Short Cable
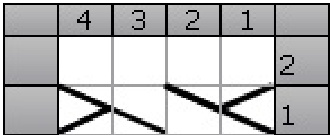
Chart: Left Short Cable
Round 1: c4f
Round 2: k4
Right Short Cable

Chart: Right Short Cable
Round 1: c4b Round 2: k4
Section 2 - Shoulder Straps
Cast on 16 stitches for each shoulder strap, starting at the neck edge. I prefer a knitted cast on, so the stitches don't stretch out when the sweater is worn. Knit back across wrong side. Set up the pattern as follows: P1, K1, P1, 4-strand braid (10 sts), P1, K1, P1. Do not slip the first stitch of each row, you will need the loops to pick up your back and front stitches in. If you slip stitches, you won't have enough loops to use. Work even until shoulder strap is length needed as per individual schematic, place stitches on a piece of yarn and make second shoulder strap.
Section 3 - Upper Back
Using your swatch as a guide, decide on the order you want the cables to be in across the back of the sweater. For mine, I used the Ingvold Back Braid as the center design and worked outward from that. I placed two purl stitches between most of the cables, reducing to one between the waving cable and the ribbon cable. Ialso have one purl between the ribbon cable and the twisted stitch, and one between the twisted stitch and the sand stitch Iam using as a filler stitch. So my order across the back of my sweater is as follows: 15 Sand st, P1, 1 TBL, P1, 12 Ribbon Cable, P1, 5 Waving Cable, P2, 12 Double Cable (aka Horseshoe Cable), P2, 4 Right Short Cable, P2, 20 Ingvold Back Braid, P2, 4 Left Short Cable, P2, 12 Double Cable, P2, 5 Waving Cable, P1, 12 Ribbon Cable, P1, 1 TBL, P1, 15 Sand St. Place your shoulder straps in front of you, with the held stitches to the left and right and the cast on edges facing each other directly in front of you. Begin picking up and knitting stitches in the right shoulder strap, working from the held stitches (which is your shoulder point now) towards the cast on edge which is the neck edge. Count the number of stitches you picked up in the first shoulder strap, add an equal number for the second shoulder strap, and subtract from the number of stitches you will need across the back of your sweater. This number is the stitches you will now cast on using a knitted cast on across the back neck. Place a marker between the shoulder strap stitches and the ones you are casting on to make counting easier. When you have cast on the number you need for your center back, place another marker. Begin picking up stitches in the second shoulder strap, making sure you start at the cast on edge, which is now your neck edge. When you reach the edge with the held stitches you should have the number you need across the back of yoursweater. ss allthe stitches, placing markers for each different cable stitch as you c to double check you have picked up the correct number of stitches. When you reach the edge you started at, you should have used up allthe stitches you picked up. Take time to check your count and make sure all the cables have the correct number of stitches between the markers. Ieven put markers between the cables and the separating purl stitches to double check my count and my knitting as I work. Begin working the patterns, making sure you cross the cables on the correct rows. All of the cables in this project cross on the right side of the fabric, to make the work easier. I use hash marks on paper to keep track of my work. For the back they are in sets of 16, the number of stitches in the Back Braid pattern, which is the longest cable. For my sweater I worked four complete sets of 16 plus two rows of the 5th set to reach 8-3/4" the length I need from the shoulder to the bottom of the armhole. Once I reach the length I need, I put the stitches on a length of yarn, including the markers in their correct places so when I am ready to finish the body I can just transfer everything to my working needle and not have to recount stitch patterns.
Section 4 - Upper Left Front
Next I place the work with the back portion I have just finished closest to me and the shoulder straps away from me. I pick up the stitches in the left shoulder strap, the same count I used for the back shoulder strap. In this sweater, I decided that I wanted to change the cable order between the front and back of the sweater, but still pick up the same number of stitches in the shoulder strap. For my sweater I picked up 52 stitches in each side of each shoulder strap for the back and the fronts. Then I turned and knit back, placing markers for my desired cable patterns. When I reached the beginning, in this case the left front edge, I double checked my stitch counts for each cable before starting to knit. Since I willbe knitting the buttonhole and button bands as I work the fronts, I decided to have the ribbon cable next to the front bands for a strong visual line. So my order is: 12 Ribbon Cable, P2, 20 Ingvold Back Braid, P2, 1 TBL, 15 Sand Sts. This puts the Braid pattern down the side of the front so Idon't have to worry about fiddling with it next to the front bands. On row 15 of the second set, I begin adding stitches for the front v-neck by making a backward loop on every right side row at the front. On row 8 of the third set, I begin the purl 2 ditch I want between the Ribbon Cable and the front band, putting in a marker to separate it. On row 15 of the 3rd set, I begin working Left Short Cable on the four stitches right next to the purl ditch. On row 11 of the 4th set I begin working Right Short Cable leaving four knit stitches between the cables for the buttonholes (12 stitches for the buttonhole band total). On row 11 Ialso added the final stitch to the lef front band, making a total of 15 stitches added. On row 13 I turned the edge stitch to a purl stitch to make a neat edge for the band.


