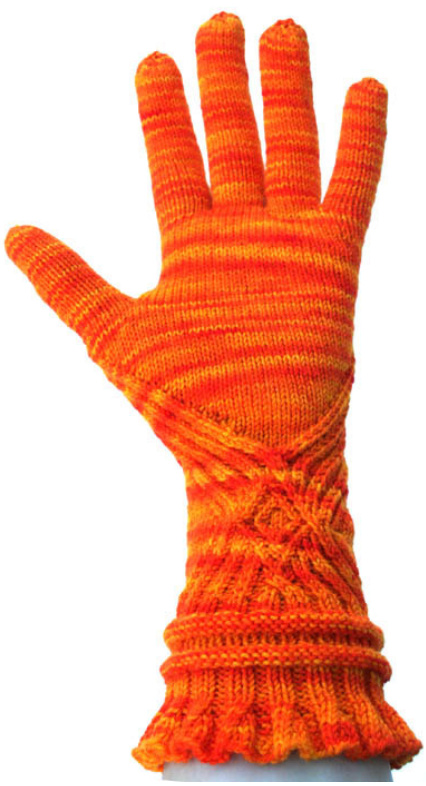
Materials:
$\mathbb{S}\,100\mathbf{g}$ of Wollmeise $100\%$ superwash in "Sonne" or any other fingering weight yarn (as with most cable designs, the cables will show up most with light colored, smooth yarns without much variegation) $\S2,5\,\mathrm{mm}$ circular needle (80 or ${100}\,{\mathsf{c m}}$ ) or size to obtain gauge $\S$ Tapestry needle $\mathbb{S}\,\mathsf{A}$ little piece of waste yarn, preferably smooth cotton thread
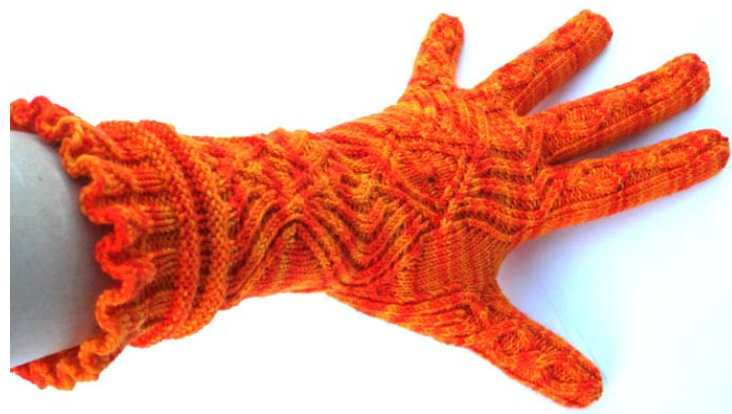
36 stitches and 48 rows on 10 x 10 cm (stockinette stitch)
Size:
8 / women's M-L
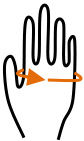
Will fit for 17 - 19,5cm hand circumference (look at the picture below where to measure) It's important to check the fit of the glove while knitting, so try it on from time to time. Length of the fingers: Thumb: 6 cm Index finger: 8 cm Middle finger: 8,5 cm Ring finger: 8 cm Pinky: 6,5 cm
Downsizing:
Because of the rather complicated cable pattern downsizing is done by using a finer gauge instead of leaving out stitches. Depending on the length of your fingers you may need to add or delete (the non-cabled) rounds in the finger charts.
Notes, abbreviations and symbols:
These gloves are done using magic loop (much easier because no cable crossings between dpns) but you can nevertheless use dpns. Just be aware that the instruction often refers to needle 1 and 2 (meaning both halves on the total stitch count) and the charts show a line dividing these parts (blue). [R]:... $=$ instructions for the right glove [L]: .. $=$ instructions for the left glove At the beginning of each section (cuff, hand, fingers) the round numbers start anew at 1. Sections in between 2 asterisks need to be repeated to the end of the round The cabling symbols used in the charts are described on a separate page. Read the whole pattern before you start knitting!
Instructions:
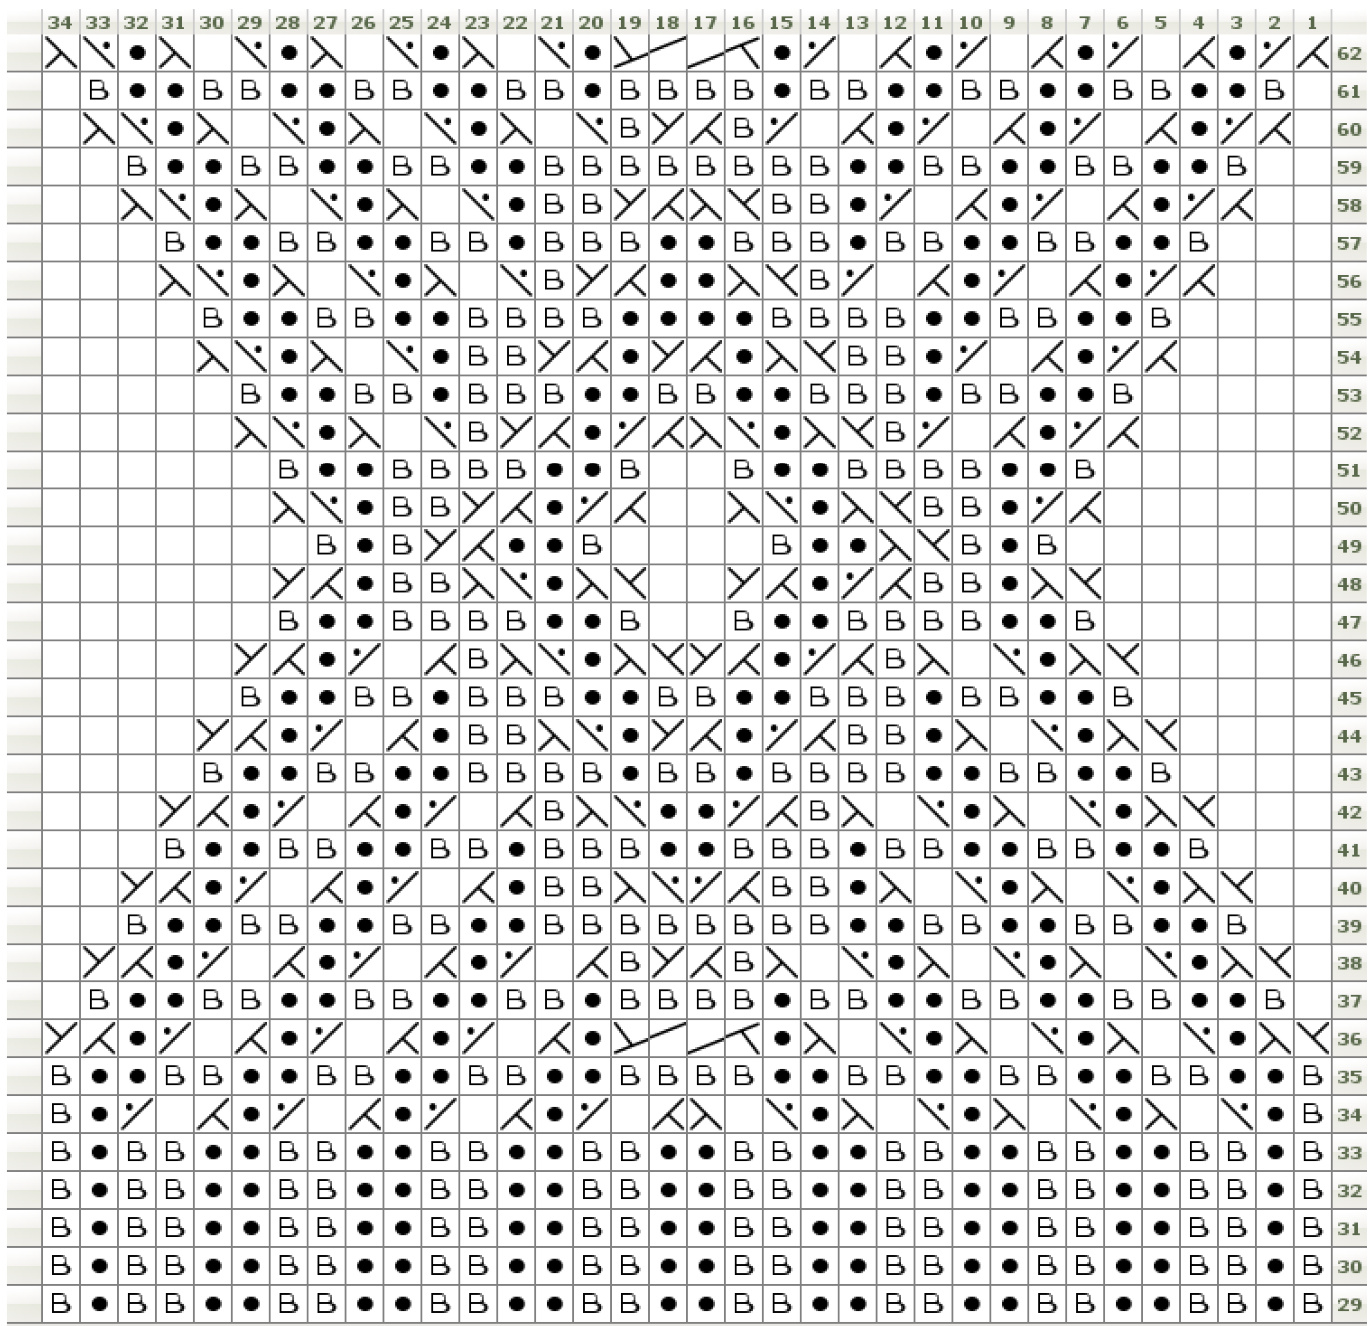
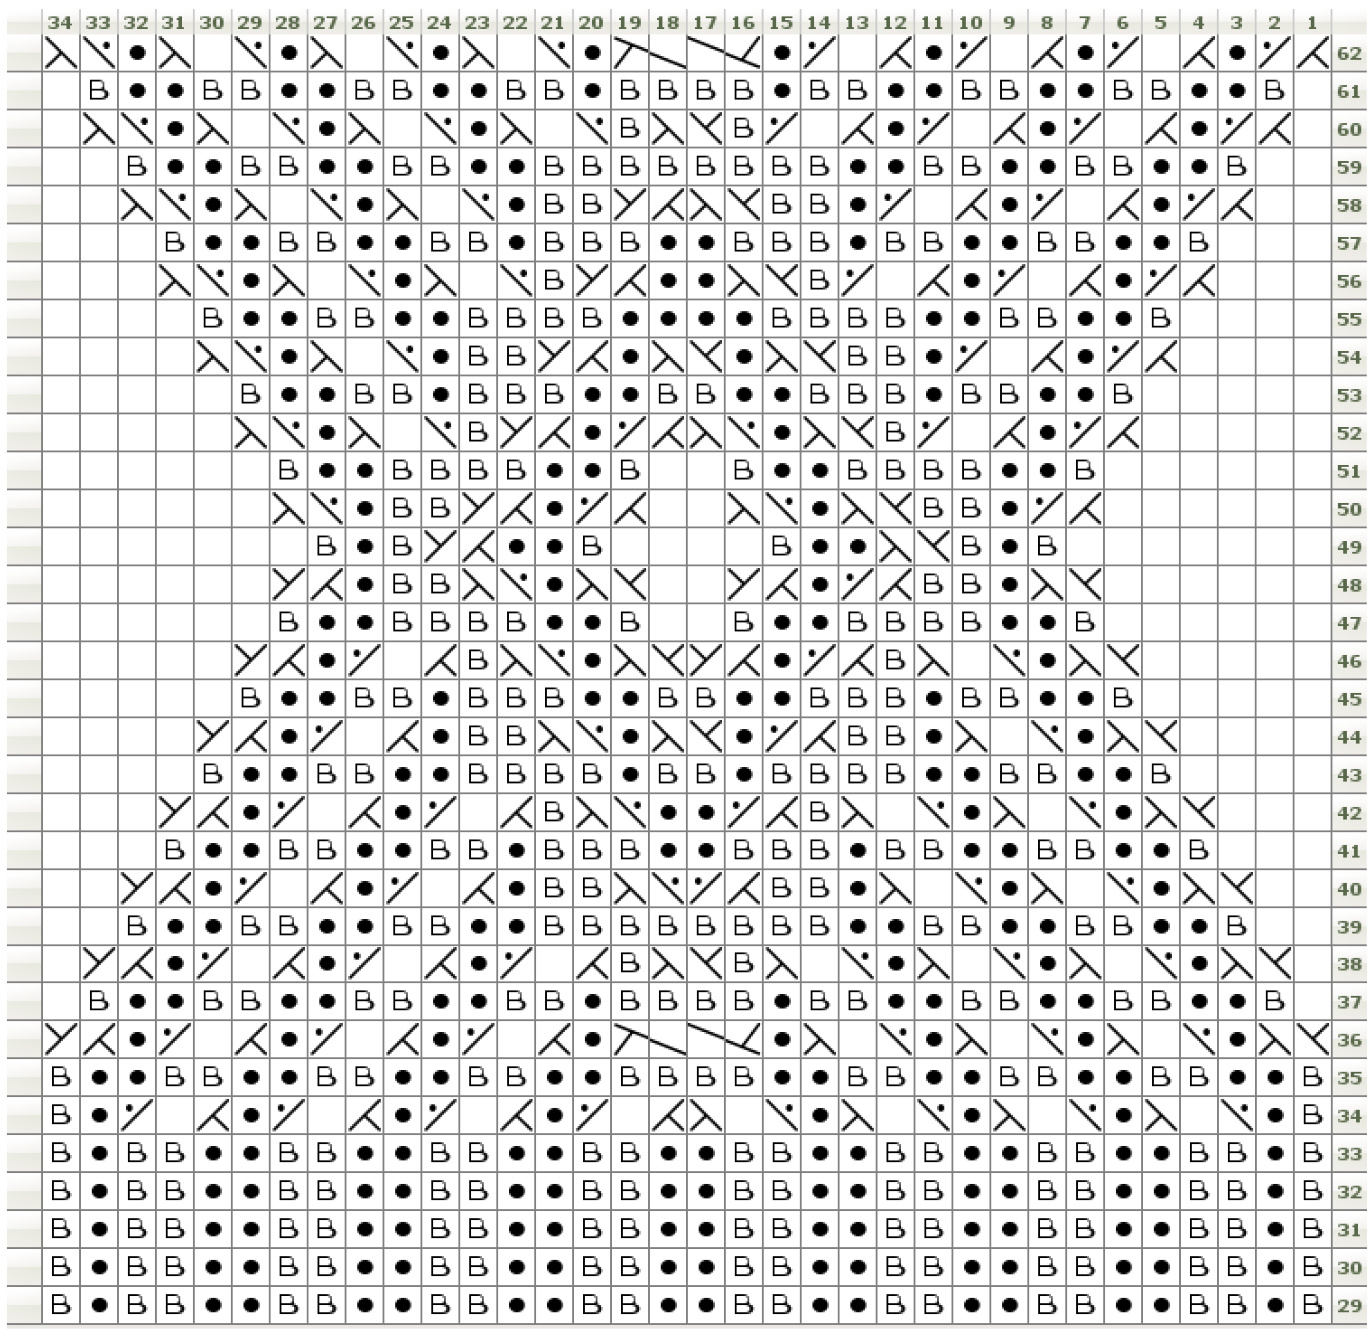
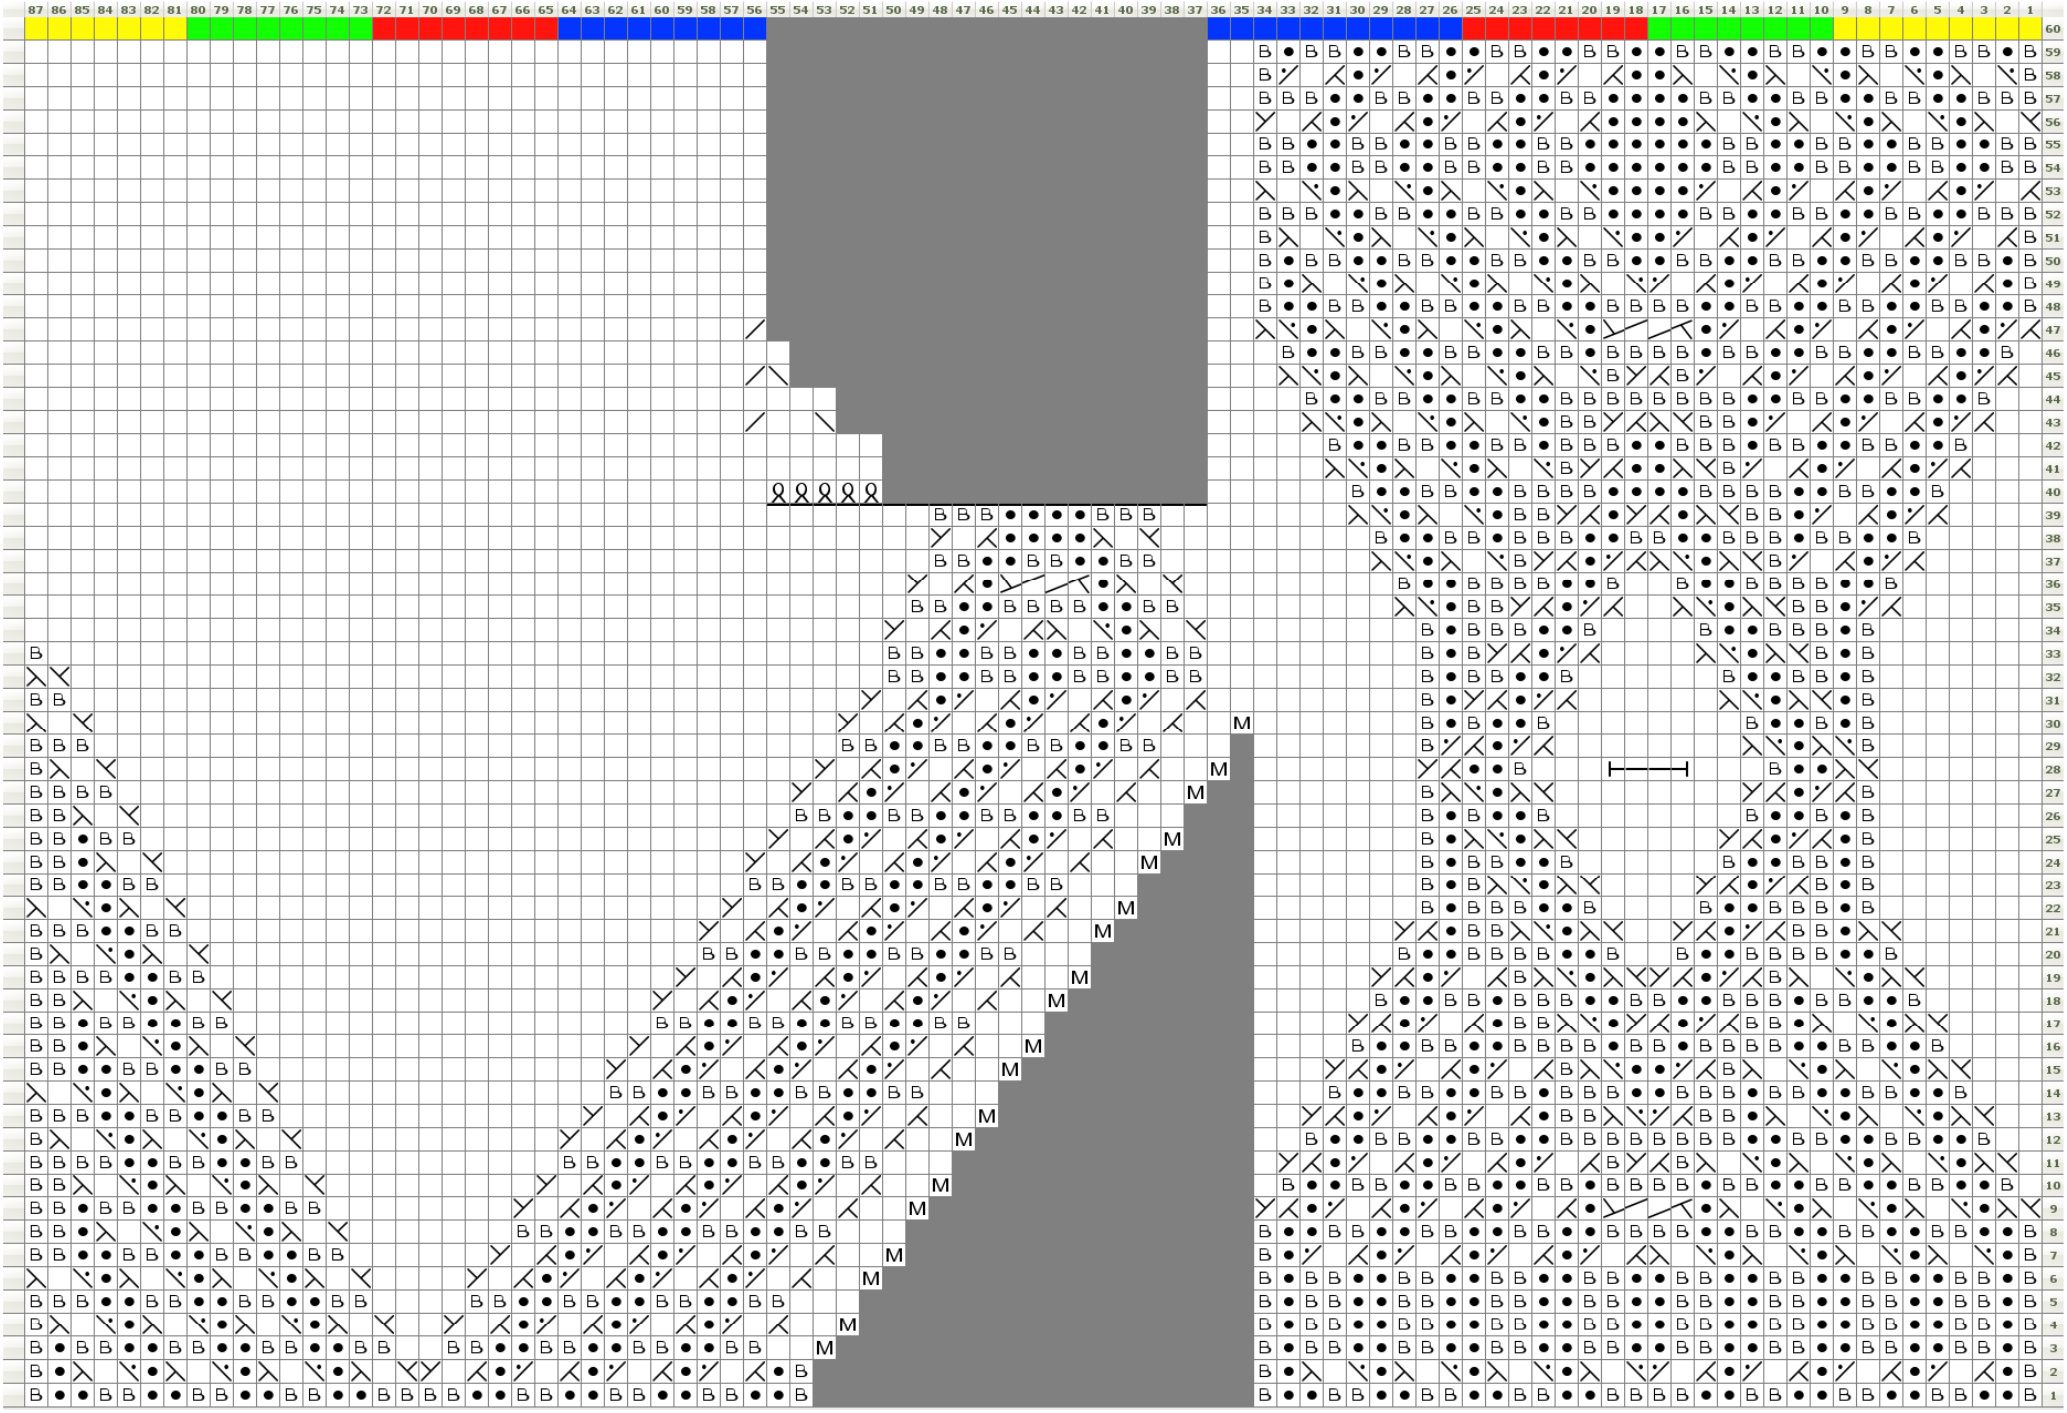
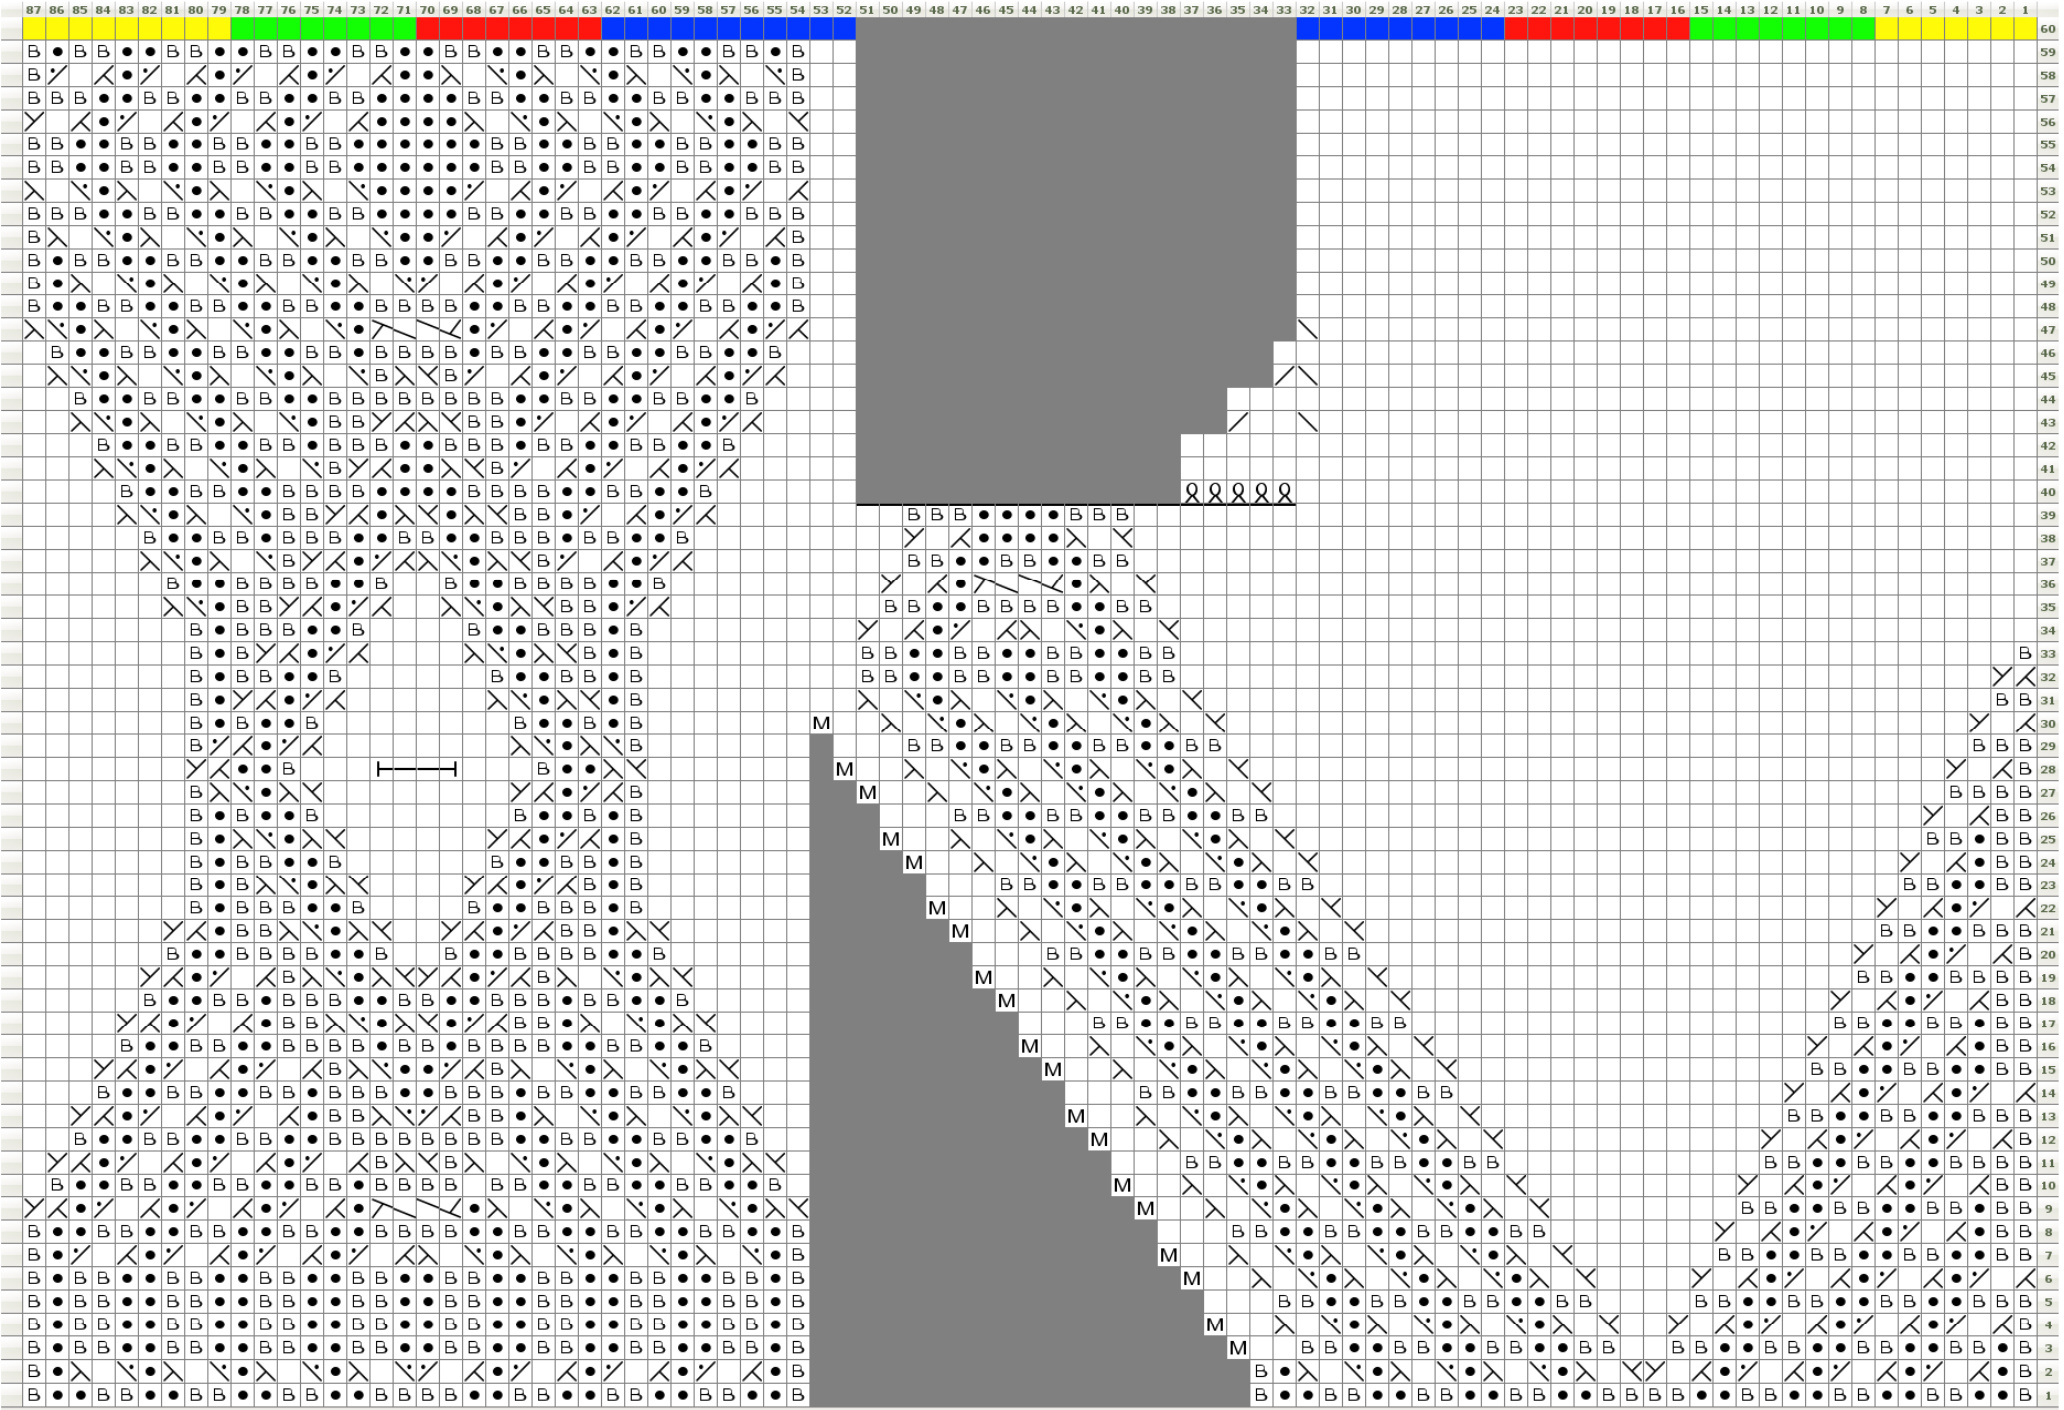
Both [R] and [L]: CO 170 stitches and separate into two times 85 stitches. Section 1 (Cuff) [R] $^+$ [L]: Round 1-2: $^{*}\mathsf{k}_{5}$ , ${\mathsf p}5^{*}$ [170] Round 3: $\ast_{\mathsf{k}2}$ , k2tog, k1, p5\* [153] Round 4: \*k4, p2 p2tog, p1\* [136] Round 5: \*k1, k2tog, k1, p4\* [119] Round 6: \*k3, p1, p2tog, p1\* [102] Round 7: \*k2tog, k1, p3\* [85] Round 8: $\ast_{\mathsf{k}2}$ , p2tog, ${\mathsf{p}}1^{*}$ [68] Round 9-13: $\ast_{\mathsf{k}2}$ , $\mathsf{p}2^{*}$ Round 14: k all Round 15-18: p all Round 19: k all Round 20-22: \*k1, p1\* Round 23: k all Round 24-27: p all Round 28: k all Work Chart "Section 1 - Cuff[R]" / "Section 1 - Cuff [L]" both on needle 1 and needle 2 (Round 29-62) Section 2 (Gusset and Hand): [R]: Work Rounds 1-59 of Chart "Section 2 - Thumb gusset and hand [R]" (DO NOT KNIT ROUND 6O This round just shows with different colors which stitches are used for which finger in the next section.) In round 40 the stitches created for the thumb need to be transferred onto waste yarn. The stitches needed for this are marked with a black bar. Afterwards cast on stitches as shown in the chart to close the gap. [L]: Work Rounds 1-59 of Chart "Section 2 - Thumb gusset and hand [L]" (DO NOT KNIT ROUND 60 This round just shows with different colors which stitches are used for which finger in the next section.) In round 40 the stitches created for the thumb need to be transferred onto waste yarn. The stitches needed for this are marked with a black bar. Afterwards cast on stitches as shown in the chart to close the gap.
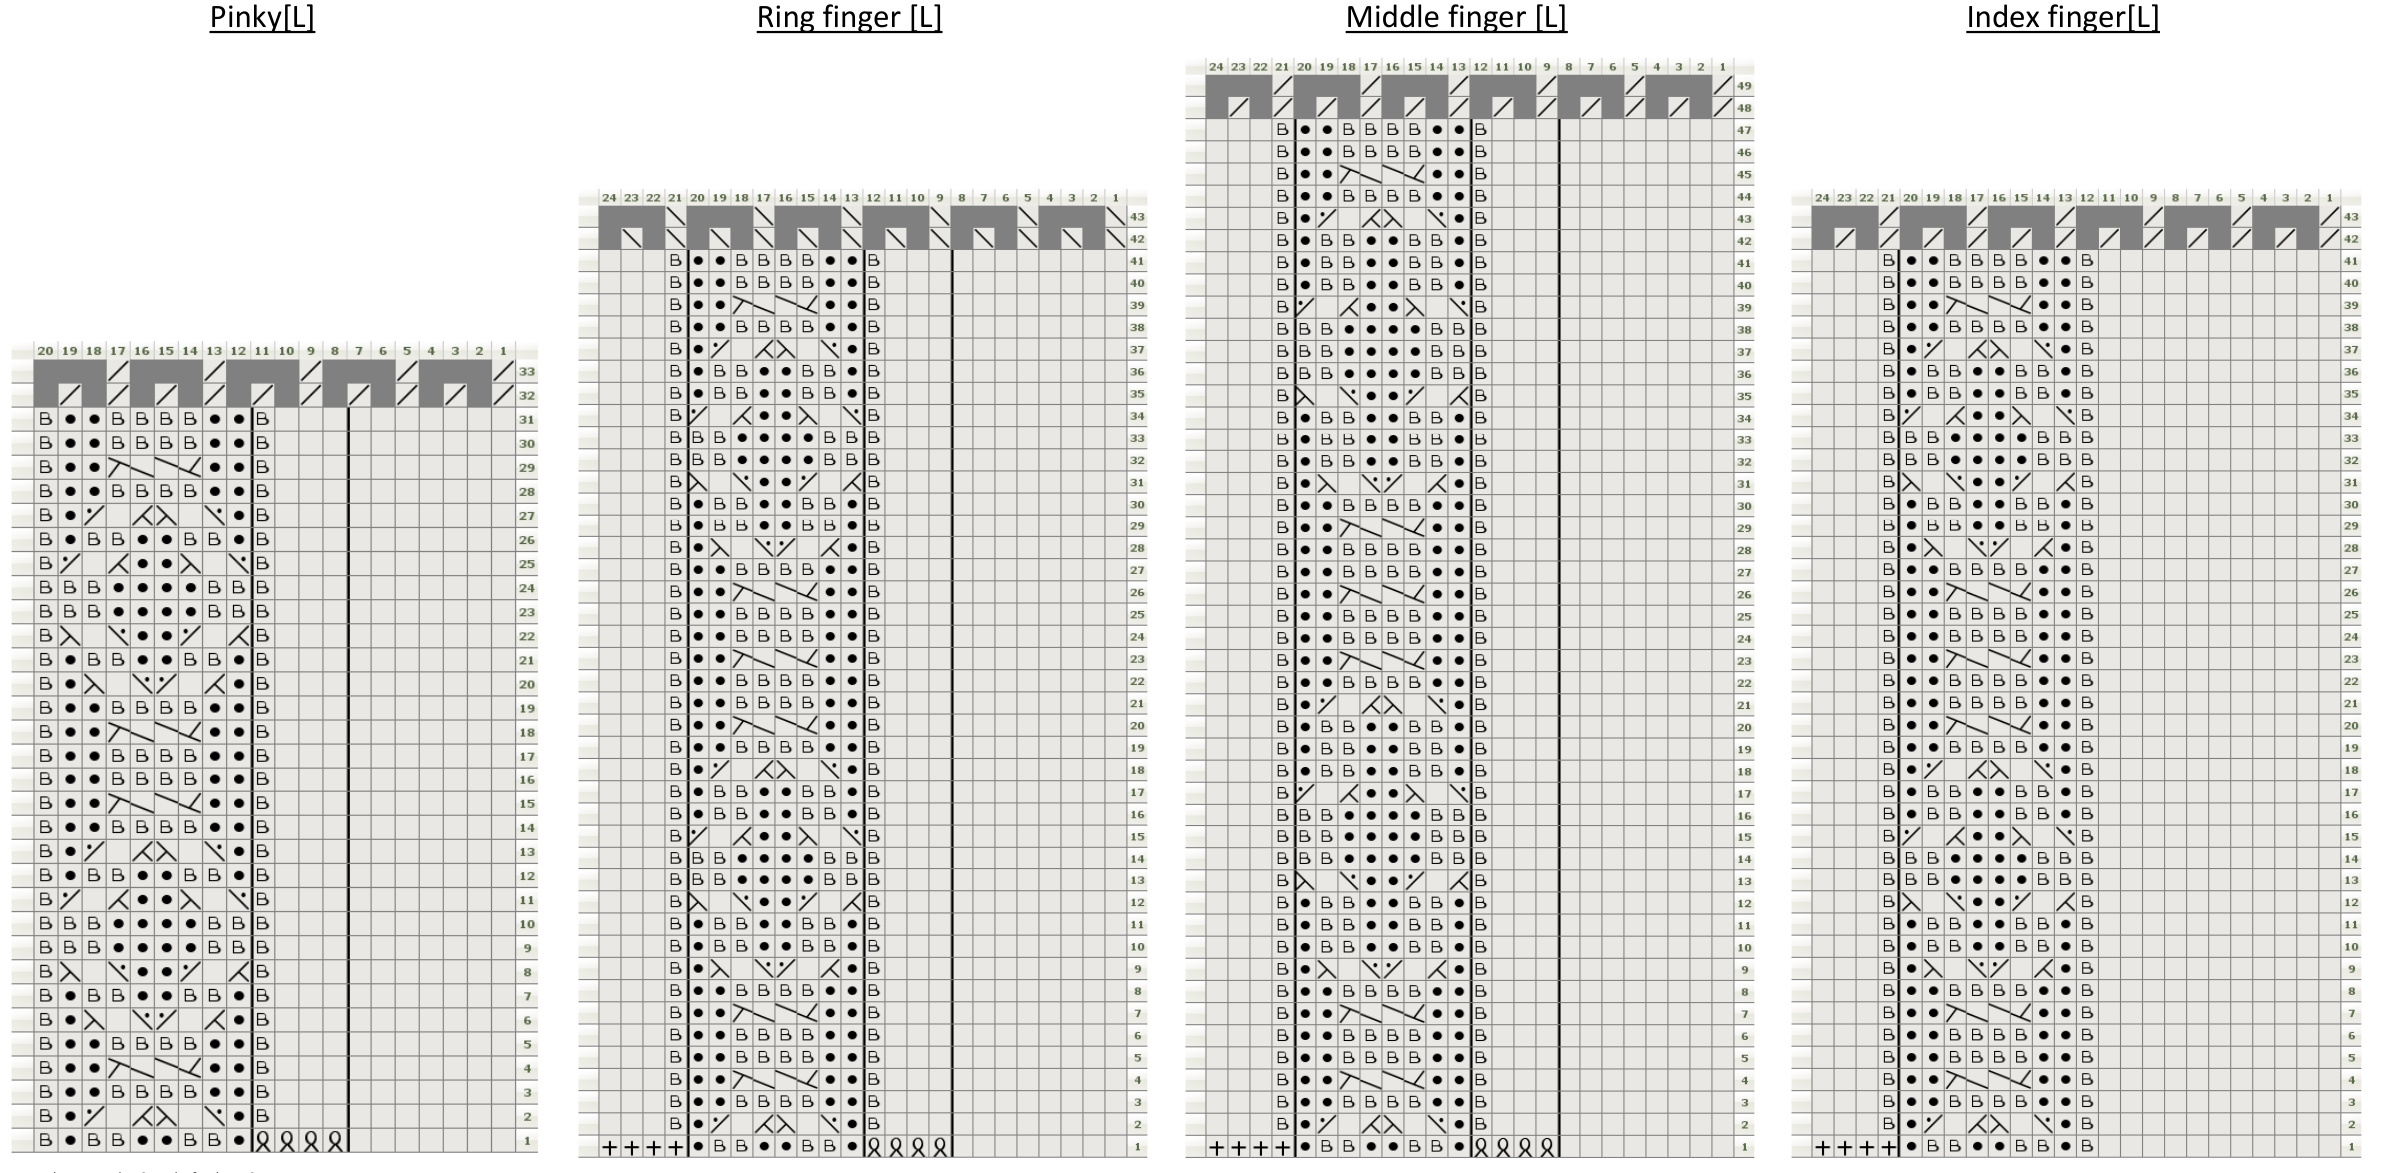
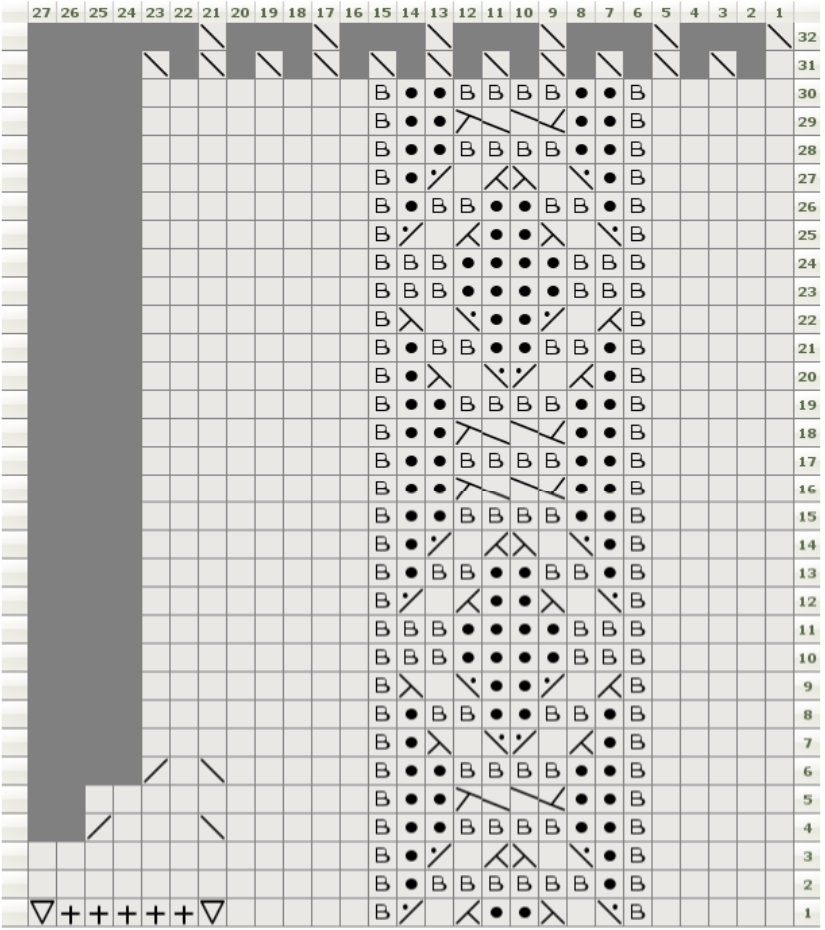
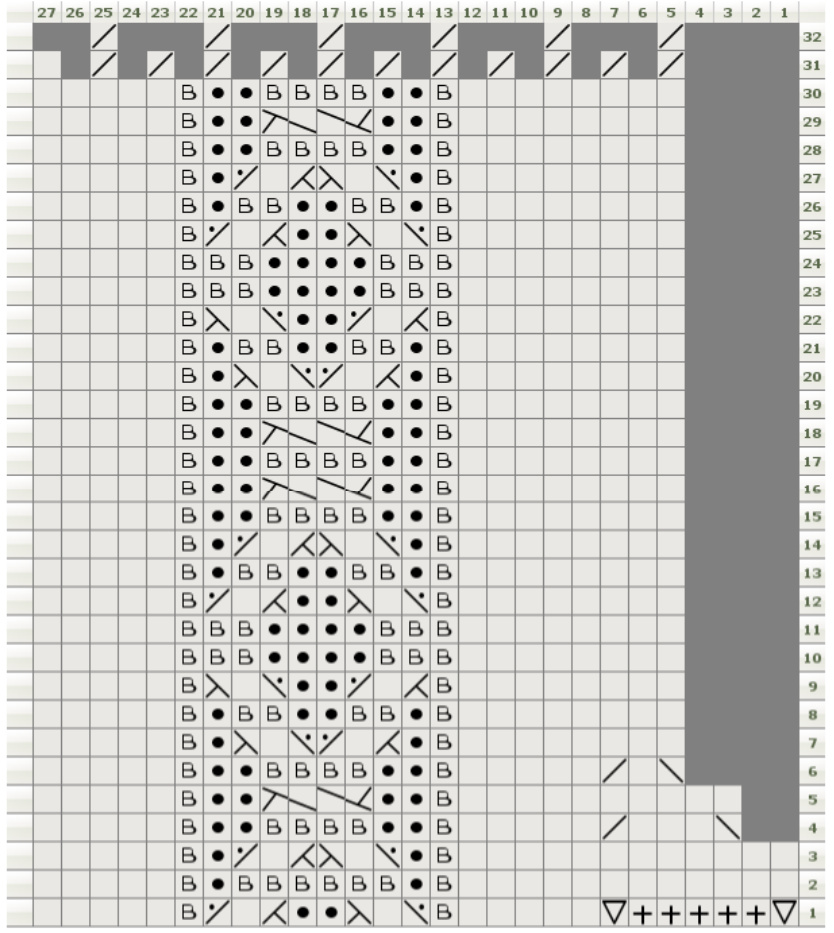
Section 3 (fingers):
The fingers are worked starting with the pinky. If you are not sure which stitches belong to which finger look at the charts in section 2 and use the colored fields in round 95: blue $=$ indexfinger red= middle finger green $=$ ring finger yellow $^\prime=$ pinky Each finger is charted out separately! When joining the yarn leave a long tail. To get you on the way I will explain how the pinky of the right hand is worked: transfer 9 stitches from the back of hand and 7 stitches from the palm (all marked yellow) on the needles. Now begin working the chart, starting with the first stitch from the back of the hand. When you have worked all 8 stitches, you need to cast on 4 stitches using the backward loop method. Afterwards, work the 7 stitches from the palm. First row finished! When knitting the other fingers you sometimes need both to cast on 4 stitches and pick up 4 stitches from the cast on edge from a finger you already did. Take for example the ring finger of the right glove: First the 8 stitches from the back of hand, then cast on 4 stitches, work 8 stitches from the palm and then pick up 4 stitches from the cast on edge you did when working the pinky. Concerning holes between the fingers: I do not recommend picking up extra stitches between existing stitches to prevent holes. I prefer using the tail left when joining the yarn to tighten up stitches at the corners which might get loose. Don't do this right after you finish one finger. Wait until the whole glove is done. Pull it on and then look where you really need to tighten stitches. Take a tapestry needle and rework the stitches when wearing the glove so that you can see how much is necessary to tidy things up. Work the fingers using the charts (there are separate charts for each finger on both hands). When you finish the last round in one of the charts: cut the yarn and thread it through the remaining stitches. Pulltight and weave in the end.
Thumb:
Both thumbs are charted out. Contrary to the thing I wrote before concerning picking up extra stitches between fingers I recommend doing so when working the thumb because the thumb can be forced apart from the hand much more than the fingers.
Weave in all the ends. Use them to close any holes between the fingers (if necessary).
Description of charting symbols:
Pleaseretderipofthesthevnfyretthsitlydifereenfe iefthcallss marked bold) Knit stitch

Knit stitch through back loop

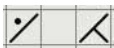
Slip one to cable needle, hold in front, k1 tbl, k1 tbl from cable needle Slip one to cable needle, hold in front, p1, k1 tbl from cable needle Slip one to cable needle, hold in back, k1 tbl, k1 tbl from cable needle Purl stitch No Stitch

Slip one to cable needle, hold in back, k1 tbl, p1 from cable needle Cast on stitches using backward loop method Pick up stitches from the cast on edge Pick up one stitch in the gap between the cast on edge and the stitches which were on waste yarn. Twist it to prevent holes.
Slip one to cable needle, hold in back, k2 tbl, p1 trom cable needl Slip two stitches to cable needle, hold in front, p1, k2 tbl from cableneedle Slip two to cable needle, hold in back, k2 tbl, k2 tbl from cable needle Slip two to cable needle, hold in front, k2 tbl, k2 tbl from cable needle k2tog ssk
next stitch, knit into back of this thread Slip 4 stitches with yarn in back on cable needle. Wrap the yarn 3 times in anti-clockwise direction around the stitches on the cable needle. Transfer 4 wrapped stitches from the cable needle back to the right hand needle.
Thblackveialliinthatsfrthinehhhtwheethstntwethlifrakfhadstchstchrthstith in between these groups (Co/Pick up).
Section 3- [R]
Pinky [R]

Section 3- [L]
Created in Knit Visualzer (www.kifoudy.cm)
Please note: This pattern is for personal use only. Any commercial use is strictly prohibited. If you have any questions, suggestions or corrections, please get in contact with me over my blog http:/larisknit.wordpress.om


