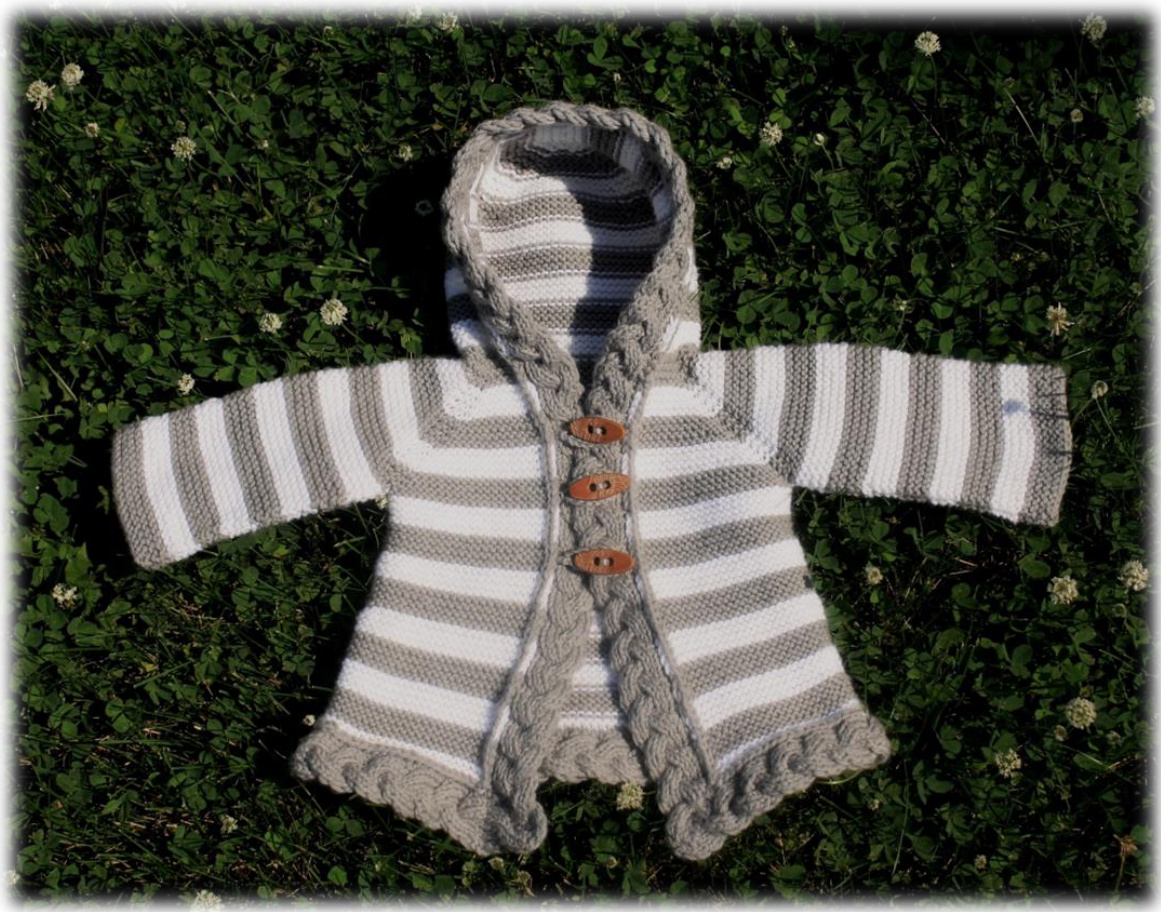
Camden
By Knits Who Say Needle
Gauge: 22 stitches/4 inches in Garter Stitch Needles: US Size 4 (3.5 mm) 24" circular needles, or size to obtain gauge. 2 DPNs in one size smaller. Yarn: Knit Picks Stroll Sport (75% Superwash Merino, 25% Nylon; 137 yd/50g): 2 (3, 4, 5) skeins Whisker, 2 (2, 3, 3) skeins White oximate): Main Color: 250 (350, 390, 600) yd; Contrast Color: 150 (190, 240, 350) y Notions: Yarn needle, 4 stitch markers, cable needle, waste yarn Sizes: 3-6, (6-12, 12-18, 18-24) months Finished Chest Measurement of Hoodie: 18"(20", 22", 24") For pattern support, contact: kristentfanning@gmail.com
The Basics
Construction
The body of the sweater is worked first from the neck down. Then the hood is worked from the neck up. Afterward, the edging is worked in MC starting at the hem and then going around the neck.
Measurements
Chest (A): 18"(20", 22", 24") Sleeve Length (B): 6.25" (6.75", 7.75", 8.25") Body to Underarm (C): 6.5" (7", 7.5", 8") OThis is hip length; just stop knitting an inch shorter for a regular length Sleeve Width (D): 6.75" (7. 25", 7.75", 8.25") ?Hood (E): 5" (5.5", 6", 6.5") Armhole Depth (F): 3.5" (3.75", 4",4.25")

Invisible Cast On
Any form of provisional cast on will work, but my favorite is the Invisible Cast On. It is hard to describe in words, so here is a video from Knitting Help that is useful: http://www.knittinghelp.com/video/play/invisible provisional-cast-on
Grafting
Grafting is the process of sewing two sets of live stitches together so that you cannot tell they were the beginning and the end. Here is a good explanation of the technique that will work for the hood: http://www.knittinghelp.com/video/play/kitchener-stitch For the edging graft, I have found that the best method for a seamless join is to put both halves on waste yarn and then mimic the movement of the yarn in a similar row. Another resource useful for grafting ribs is from the TECHknitting blog: http:/techknitting.blogspot.com/2012/12/grafting-ribbingwithout-12-stitch.html
Short Rows
The short rows at the corner are a variation on Cat's Sweet Tomato Heel. You knit to the short row marker on the chart. Then knit the marked stitch and turn. Slip that first stitch and pull tight. Work the rest of the row. On the rows where there is a k2tog or a p2tog, do the following on those stitches: insert right needle into the stitch below and bring it back onto the left needle. K2tog/p2tog the stitch just placed on the needle and the stitch that was lying above it. For a good video, visit: www.youtube.com/watch?v=IRc3309JUyc
Abbreviations
C8B rib: slip 4 stitches onto Cable Needle and hold in back; (k1, p1) x 2 from left needle, (k1, p1) x 2 fromCableNeedle C8F rib: slip 4 stitches onto Cable Needle and hold in front; (k1, p1) x 2 from left needle, (k1, p1) x 2 from CableNeedle CC: Contrast Color k: knit k2tog: knit two stitches together. L1p2tog: lift the stitch directly below the one being worked and place it on the needle, then purl it together with the original stitch (see short row tutorial). m1: make 1, insert left needle beneath the bar between the two stitches from the front, knit through thebackloop MC: Main Color p: purl pm: place marker p2tog: purl two stitches together RS: Right Side Row sl: slip stitch purlwise slm: slip marker srr: short row right. Purl this stitch, pull tight. Then turn the work. ssk: slip, slip, knit 2 stitches together WS: Wrong Side Row (you are looking at the inside of the sweater as you work)
Instructions
Yoke
Provisionally cast on 54 (54, 56, 64) stitches in MC Knit 7 rows. Switch to CC. From now on, switch colors every 8 rows. Next Row (RS): k6 (7,8, 10), m1, k1, pm, k1, m1, k8 (6, 6, 6), m1, k1, pm, k1, m1, k18 (20, 20, 24), m1, k1, pm, k1, m1, k8 (6, 6, 6), m1, k1, pm, k1, m1, k6 (7, 8, 10) Next Row: knit all stitches Row 1 (Rs): kto 1 before marker, m1, k1, slm, k1, m1, k to 1 before marker, m1, k1, slm, k1, m1, k to 1 before marker, m1, k1, slm, k1, m1, k to 1 before marker, m1, k1, slm, k1, m1, knit to end Row 2: knit all stitches Repeat Rows 1 & 2 until you have 166 (182, 192, 216) stitches and the piece measures at least 3.5 (3.75, 4, 4.25) inches. This means you will have done a total of 14 (16, 17, 19) increase rows. End having completedRow2.
Body
Next Row (Rs): k21 (24, 26, 30), remove marker, k1, place 36 (38, 40, 44) stitches onto waste yarn, pm, k1, remove marker, k48 (54, 56, 64) stitches, remove marker, k1, place 36 (38, 40, 44) stitches onto waste yarn, pm, k1, remove marker, k21 (24, 26, 30). (24, 26, 30). [94 (106, 112, 128) stitches remaining] the first and last stitches of each sleeve section are being moved to the body sectio Knit 13 (17, 21, 25) rows Next row (RS): kto 1 before marker, m1, k1, slm, k1, m1, knit to 1 before marker, m1, k1, slm, k1, m1, k to end [98, (110,116, 132) stitches] Knit 13 (17, 21, 25) rows Next row (RS): kto 1 before marker, m1, k1, slm, k1, m1, knit to 1 before marker, m1, k1, slm, k1, m1, k to end [102 (114,120, 136) stitches] Knit until piece measures 5.5 (6, 6.5, 7) inches from underarm, ending having completed a Ws Row -Note: this is fora hip length garment. If you want a regular length sweater, stop about 1 inch early Place stitches on Waste Yarn
Sleeves
Place the stitches reserved for the sleeves back on the needle. Continue with the 8 row stripes. Set Up Row (RS): m1, k36 (38, 40, 44), m1, pm, and join in the round. (Garter stitch in the round is knit 1 round, purl 1 round. Knit 6.25 (6.75, 7.75, 8.25) inches in garter stitch, measuring from the underarm, ending having completed a Ws (purl) Round. Bind off.
Hood
Place the provisionally cast on stitches at the neck back on the needle. Start with RS facing you, using CC. Continue with the 8 row stripes Knit 2 rows. Next Row (RS): k2, m1, k2, m1, k2 (3, 4, 6), m1, k2, m1, k8 (6, 6, 6), m1, k2, m1, k18 (20, 20, 24), m1, k2, m1, k8 (6, 6, 6), m1, k2, m1, k2, m1, k2, m1, k2 (3, 4, 6) [66 (66, 68, 76) stitches] Knit even until piece measures 3.5 (4, 4.5, 5) inches from Cast On, ending having completed a Ws Row Set Up Row (Rs): k19 (18, 19, 21), ssk, k1, pm, k1, k2tog, k16 (18, 18, 22), ssk, k1, pm, k1, k2tog, k19 (18, 19, 21) [62 (62, 64, 72) stitches] Knit 3 rows Decrease Row (RS): knit to 3 before marker, ssk, k1, slm, k1, k2tog, knit to 3 before marker, ssk, k1, slm, k1, k2tog, knit to end Knit 3 Rows Repeat the last 4 rows 1 time [54 (54, 56, 64) stitches] Decrease Row (Rs): knit to 3 before marker, ssk, k1, slm, k1, k2tog, knit to 3 before marker, ssk, k1, slm, k1, k2tog, knit to end Knit 1 Row @ 2013 by Knits Who Say Needle, Kristen Fanning. This pattern is for personal, noncommercial use only. All rights reserved. The selling or distribution of this pattern without the permission of the author is prohibited. Repeat the last 2 rows 5 (6, 6, 8) times [30 (26, 28, 28) stitches] Divide stitches evenly on two needles and Graft together.
Edging
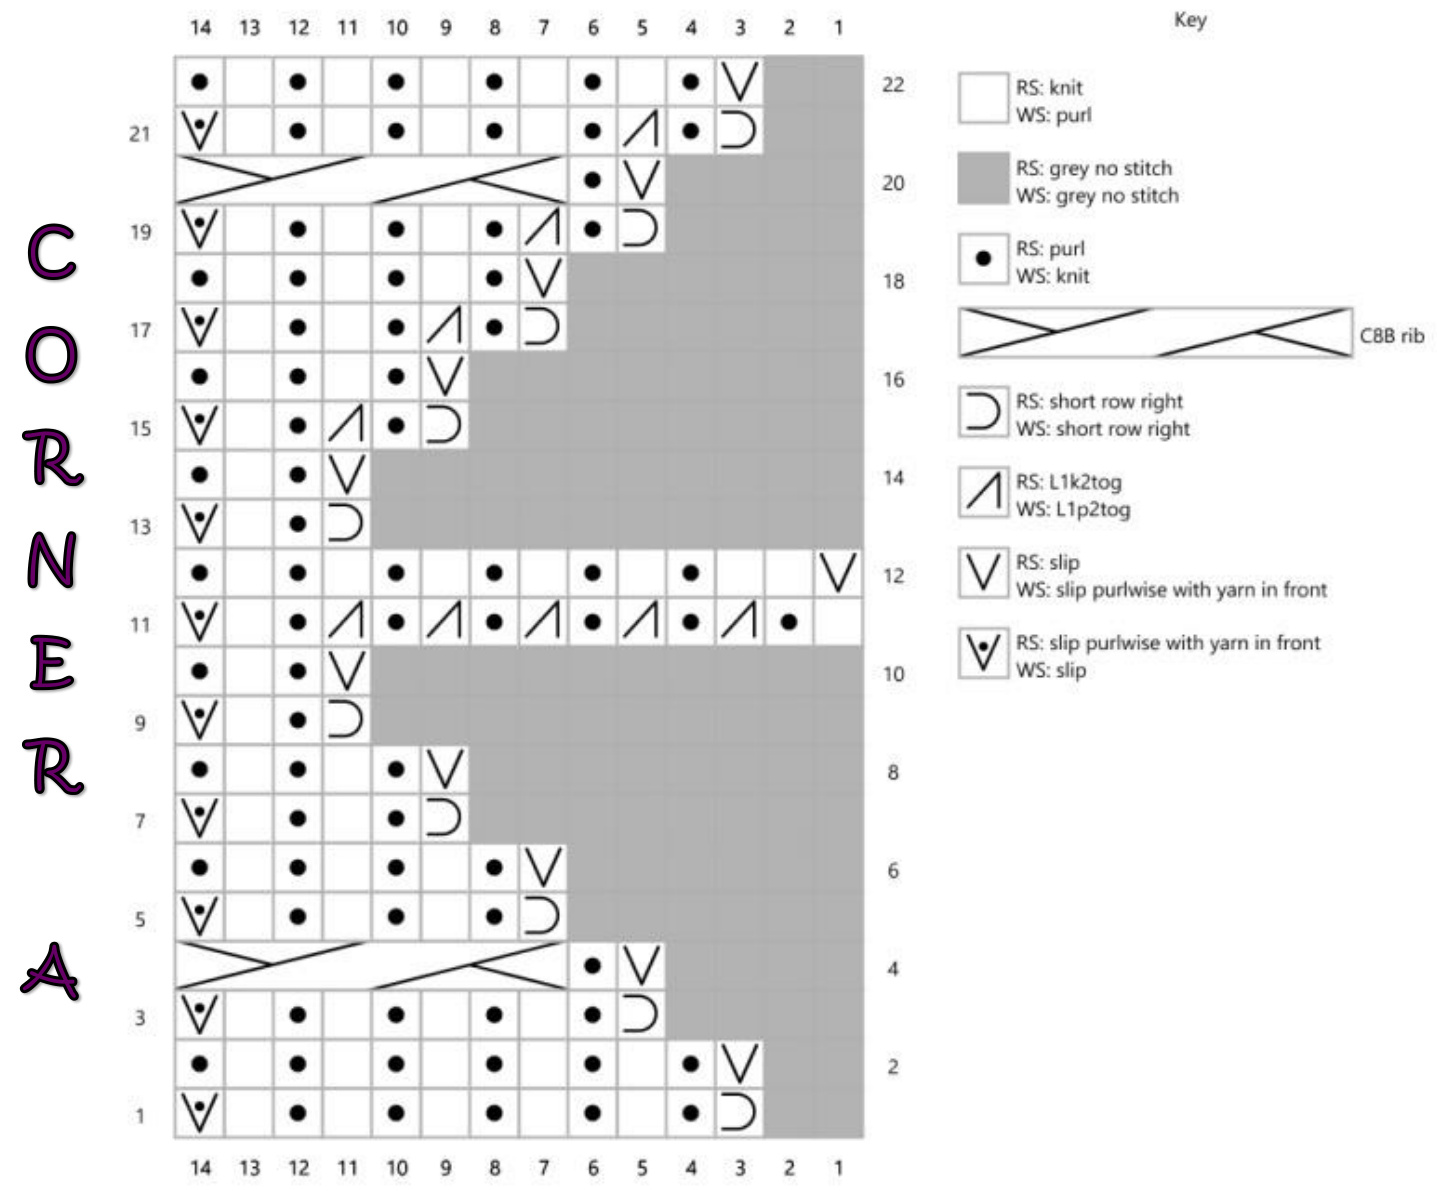
: abbreviations and techniques section on cables and short rows before proceedin
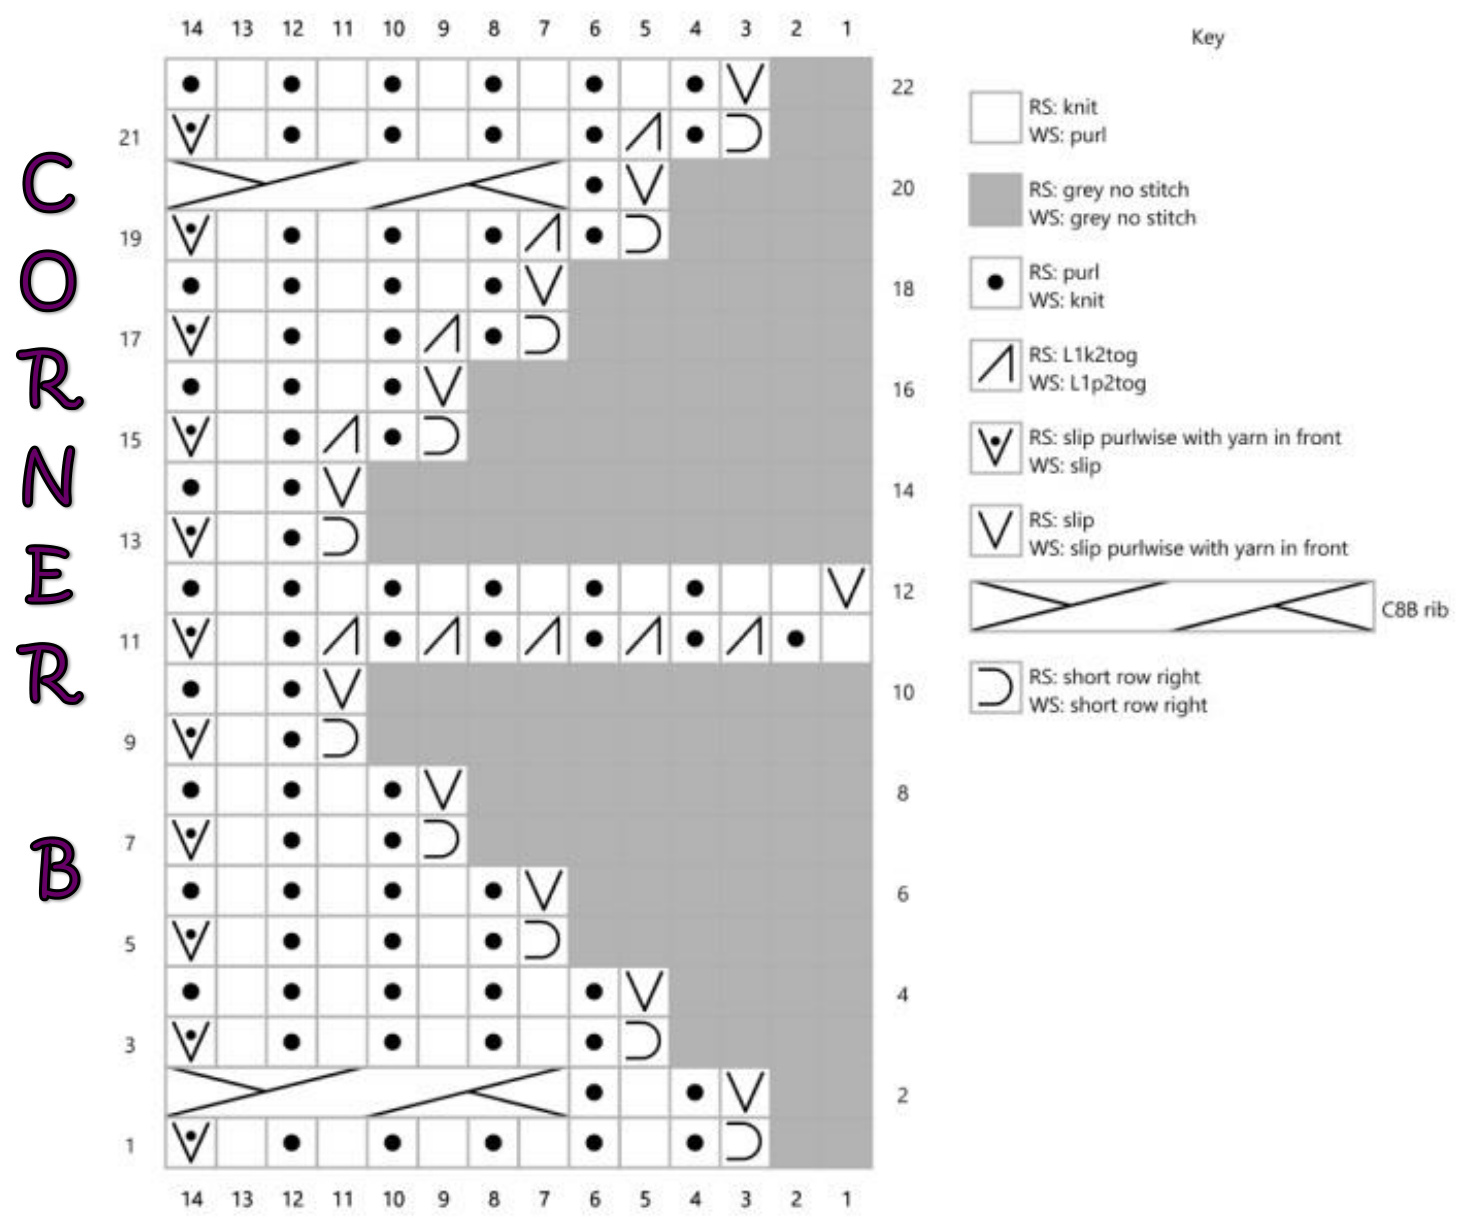
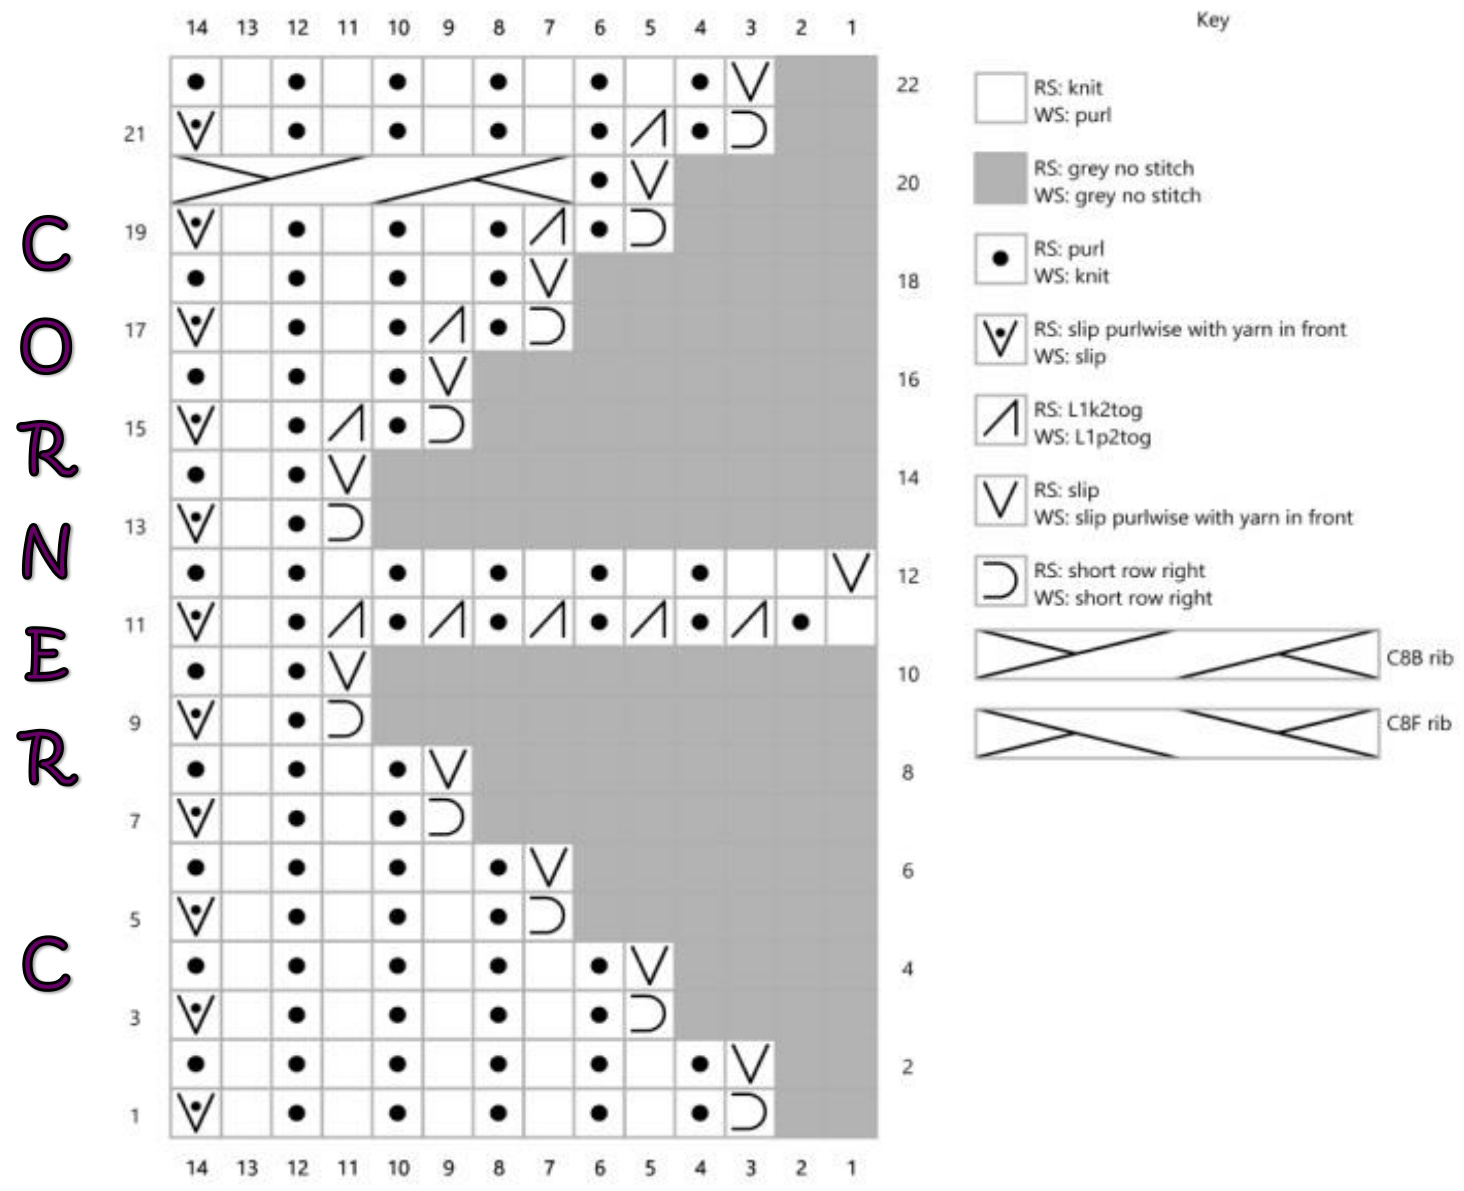
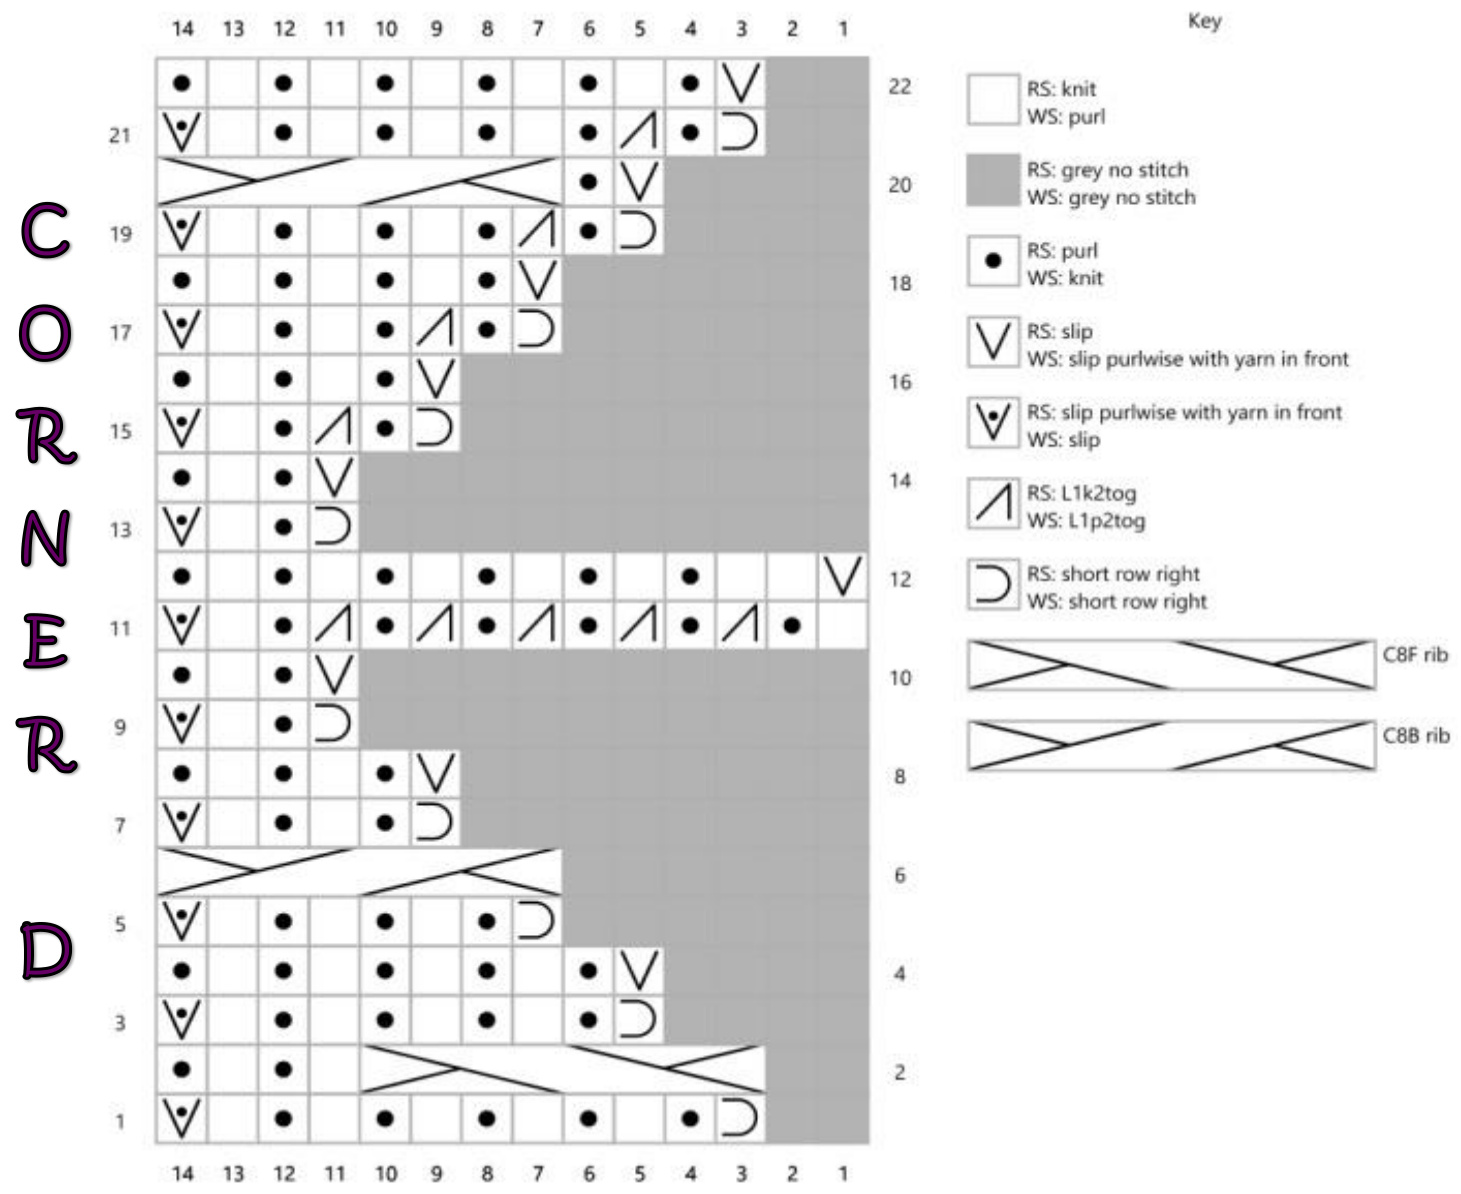
Place stitches from hem onto the smaller needles. -Note: I used two DPNs for this, placing 4 stitches from the hem onto the needle at a time, the same number of stitches consumed by one repeat. Provisionally cast on 14 stitches on the same needle as the live stitches in MC. (To orient you, it's the bottom left hand corner if you are facing the piece from the front). The first row of the Edging Chart is a WS. For a photo tutorial, visit: http://knitswhosayneedle.blogspot.com/p/camden-edging-phototutorial.html Work the Edging Chart until you have used up all the hem stitches and have completed a RS Row. -Note: None of the decreases shown on any Edging Chart, including the corners, actually decrease the number of stitches. For the Edging Chart, the p2tog shown are joined the edging to the body, so it will consume a stitch from the body but the number of stitches being worked will not change. For the Corners, the second stitch of L1p2tog is the stitch directly below the one being worked. See the video linked in the tutorial section for a full explanation. Work the Corner Chart that corresponds to the last row you knit. -If you just finished line 2, chose Corner A -If you just finished line 4, chose Corner B -lf you just finished line 6, chose Corner C -lf you just finished line 8, chose Corner D Now work the edging around the body. The second stitch in the p2tog will now come from the garter ridge. Pick it up by inserting the needle into the loop created by the ridge. Use every ridge. Work your way around the garment until you reach the cast on for the edging. Work the Corner Chart that corresponds to the last row you knit (see above). Graft the two edges together.
Finishing
Weave in all ends. Attach buttons where desired. Button loops: on the Ws of where you want to attach the button loop, weave in about an inch of yarn and poke through to the front. Then chain the length of loop that you desire (you don't actually need a hook for this, just do a chain of slip knots). Poke the yarn back through to the Ws of the piece in the same spot as it went through and secure.
Edging Chart
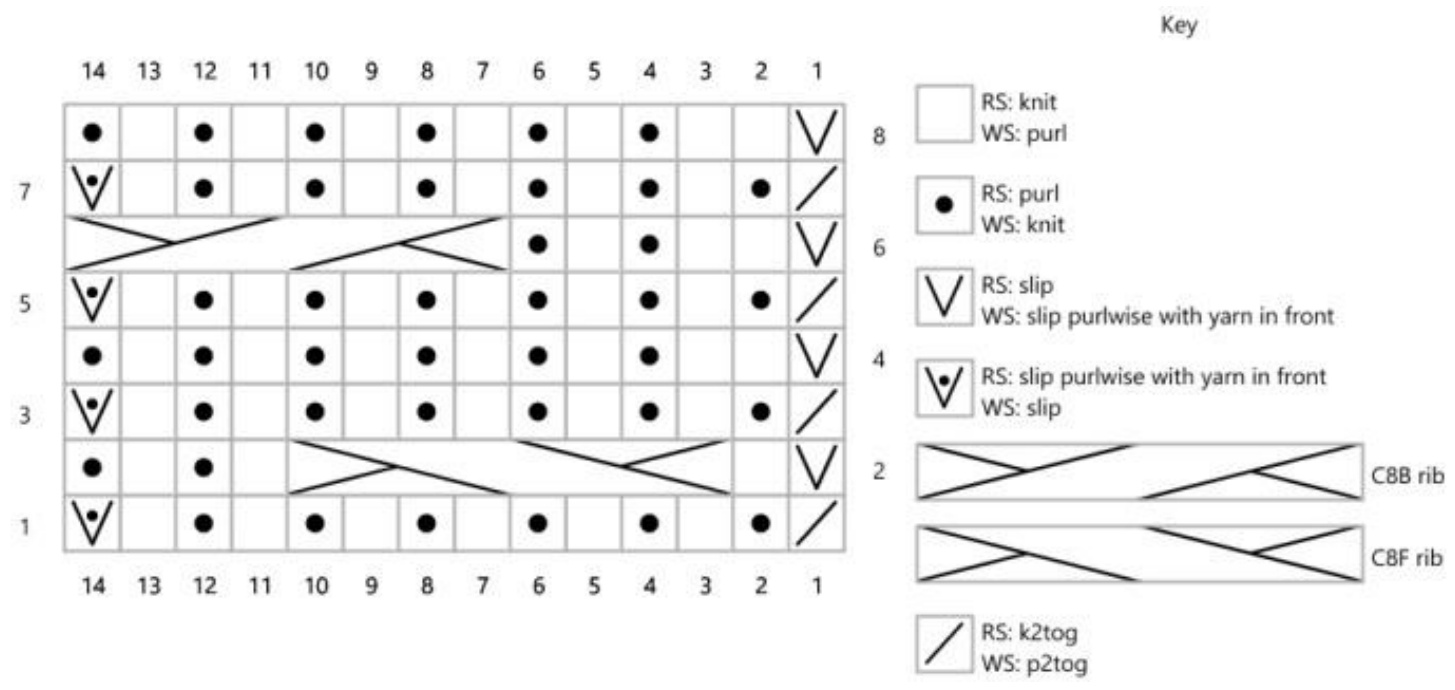
Row 1 (Ws): sl1, (p1, k1) x 6, p2tog. Row 2 (RS): sl1, k1, C8F rib, (k1, p1) x 2. Row 3 (Ws): sl1, (p1, k1) x 6, p2tog. Row 4 (RS): sl1, k2, (p1, k1) x5, p1. Row 5 (Ws): sl1, (p1, k1) x 6, p2tog. Row 6 (RS): sl1, k2, p1, k1, p1, C8B rib. Row 7 (Ws): sl1, (p1, k1) x 6, p2tog. Row 8 (RS): sl1, k2, (p1, k1) x 5, p1. Row 1 (ws): sl1, (p1, k1) x 5, srr. Row 2 (RS): sl1, (p1, k1) x 5, p1. Row 3 (WS): sl1, (p1, k1) x 4, srr. Row 4 (RS): sl1, p1, C8B rib. Row 5 (WS): sl1, (p1, k1) x 3, srr. Row 6 (Rs): sl1, (p1, k1) x 3, p1. Row 7 (WS): sl1, (p1, k1) x 2, srr. Row 8 (Rs): sl1, (p1, k1) x 2, p1. Row 9 (Ws): sl1, p1, k1, srr. Row 10 (RS): sll, p1, k1, p1. Row 11 (WS): sl1, p1, (k1, L1p2tog) x 5, k1, p1. Row 12 (RS): sl1, k2, (p1, k1) x 5, p1. Row 13 (Ws): sl1, p1, k1, srr. Row 14 (RS): sl1, p1, k1, p1. Row 15 (Ws): sl1, p1, k1, L1p2tog, k1, srr. Row 16 (RS): sl1, (p1, k1) x 2, p1. Row 17 (Ws): sl1, (p1, k1) x2, L1p2tog, k1, srr. Row 18 (RS): sl1, (p1, k1) x 3, p1. Row 19 (Ws): sl1, (p1, k1) x3, L1p2tog, k1, srr. Row 20 (RS): sl1, p1, C8B rib. Row 21 (Ws): sl1, (p1, k1) x 4, L1p2tog, k1, srr. Row 22 (RS): sl1, (p1, k1) x 5, p1. Row 1 (Ws): sl1, (p1, k1) x 5, srr. Row 2 (RS): sl1, p1, k1, p1, C8B rib. Row 3 (WS): sl1, (p1, k1) x 4, srr. Row 4 (RS): sl1, (p1, k1) x 4, p1. Row 5 (WS): sl1, (p1, k1) x 3, srr. Row 6 (RS): sl1, (p1, k1) x 3, p1. Row 7 (Ws): sl1, (p1, k1) x 2, srr. Row 8 (RS): sl1, (p1, k1) x 2, p1. Row 9 (ws): sl1, p1, k1, srr. Row 10 (Rs): sl1, p1, k1, p1. Row 11 (WS): sl1, p1, (k1, L1p2tog) x 6. Row 12 (RS): sl1, k2, (p1, k1) x 5, p1. Row 13 (Ws): sl1, p1, k1, srr. Row 14 (RS): sl1, p1, k1, p1. Row 15 (Ws): sl1, p1, k1, L1p2tog, k1, srr. Row 16 (RS): sl1, (p1, k1) x 2, p1. Row 17 (Ws): sl1, (p1, k1) x 2, L1p2tog, k1, srr. Row 18 (RS): sl1, (p1, k1) x 3, p1. Row 19 (Ws): sl1, (p1, k1) x 3, L1p2tog, k1, srr. Row 20 (RS): sl1, p1, C8B rib. Row 21 (WS): sl1, (p1, k1) x4, L1p2tog, k1, srr. Row 22 (RS): sl1, (p1, k1) x 5, k1. Row 1 (Ws): sl1, (p1, k1) x 5, srr. Row 2 (RS): sl1, (p1, k1) x 5, p1. Row 3 (Ws): sl1, (p1, k1) x4, srr. Row 4 (RS): sl1, (p1, k1) x 4, p1. Row 5 (Ws): sl1, (p1, k1) x 3, srr. Row 6 (RS): sl1, (p1, k1) x 3, p1. Row 7 (Ws): sl1, (p1, k1) x2, srr. Row 8 (RS): sl1, (p1, k1) x 2, p1. Row 9 (Ws): sl1, p1, k1, srr. Row 10 (RS): sl1, p1, k1, p1. Row 11 (WS): sl1, p1, (k1, L1p2tog) x 6. Row 12 (RS): sl1, k2, (p1, k1) x 5, p1. Row 13 (Ws): sl1, p1, k1, srr. Row 14 (Rs): sl1, p1, k1, p1. Row 15 (WS): sl1, p1, k1, L1p2tog, k1, srr. Row 16 (RS): sl1, (p1, k1) x 2, p1. Row 17 (WS): sl1, (p1, k1) x 2, L1p2tog, k1, srr. Row 18 (RS): sl1, (p1, k1) x 3, p1. Row 19 (Ws): sl1, (p1, k1) x 3, L1p2tog, k1, srr. Row 20 (RS): sl1, p1, C8B rib. Row 21 (WS): sl1, (p1, k1) x 4, L1p2tog, k1, srr. Row 22 (RS): sl1, (p1, k1) x 5, p1. Row 1 (WS): sl1, (p1, k1) x 5, srr. Row 2 (RS): C8F rib, (k1, p1) x 2. Row 3 (WS): sl1, (p1, k1) x 4, srr. Row 4 (RS): sl1, (p1, k1) x 4, p1. Row 5 (Ws): sl1, (p1, k1) x 3, srr. Row 6 (RS): C8B rib. Row 7 (Ws): sl1, (p1, k1) x 2, srr. Row 8 (Rs): sl1, (p1, k1) x2, p1. Row 9 (Ws): sl1, p1, k1, srr. Row 10 (RS): sl1, p1, k1, p1. Row 11 (WS): sl1, p1, (k1, L1p2tog) x 6. Row 12 (RS): sl1, k2, (p1, k1) x 5, p1. Row 13 (ws): sl1, p1, k1, srr. Row 14 (RS): sl1, p1, k1, p1. Row 15 (Ws): sl1, p1, k1, L1p2tog, k1, srr. Row 16 (RS): sl1, (p1, k1) x 2, p1. Row 17 (Ws): sl1, (p1, k1) x 2, L1p2tog, k1, srr. Row 18 (RS): sl1, (p1, k1) x 3, p1. Row 19 (WS): sl1, (p1, k1) x 3, L1p2tog, k1, srr. Row 20 (RS): sl1, p1, C8B rib. Row 21 (Ws): sl1, (p1, k1) x 4, L1p2tog, k1, srr. Row 22 (RS): sl1, (p1, k1) x 5, p1.