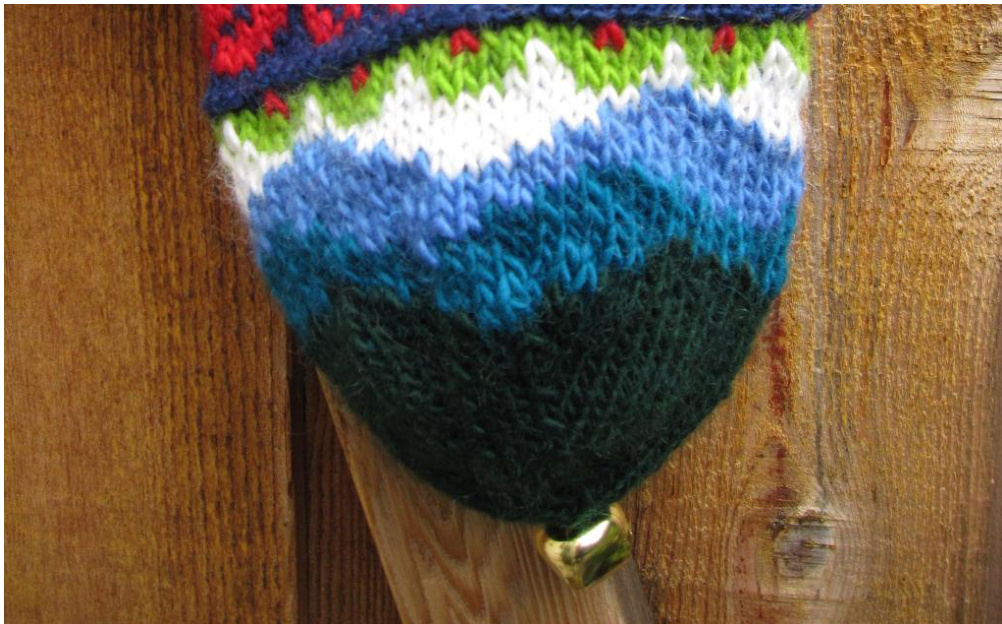
Spindleknitter's Stockings
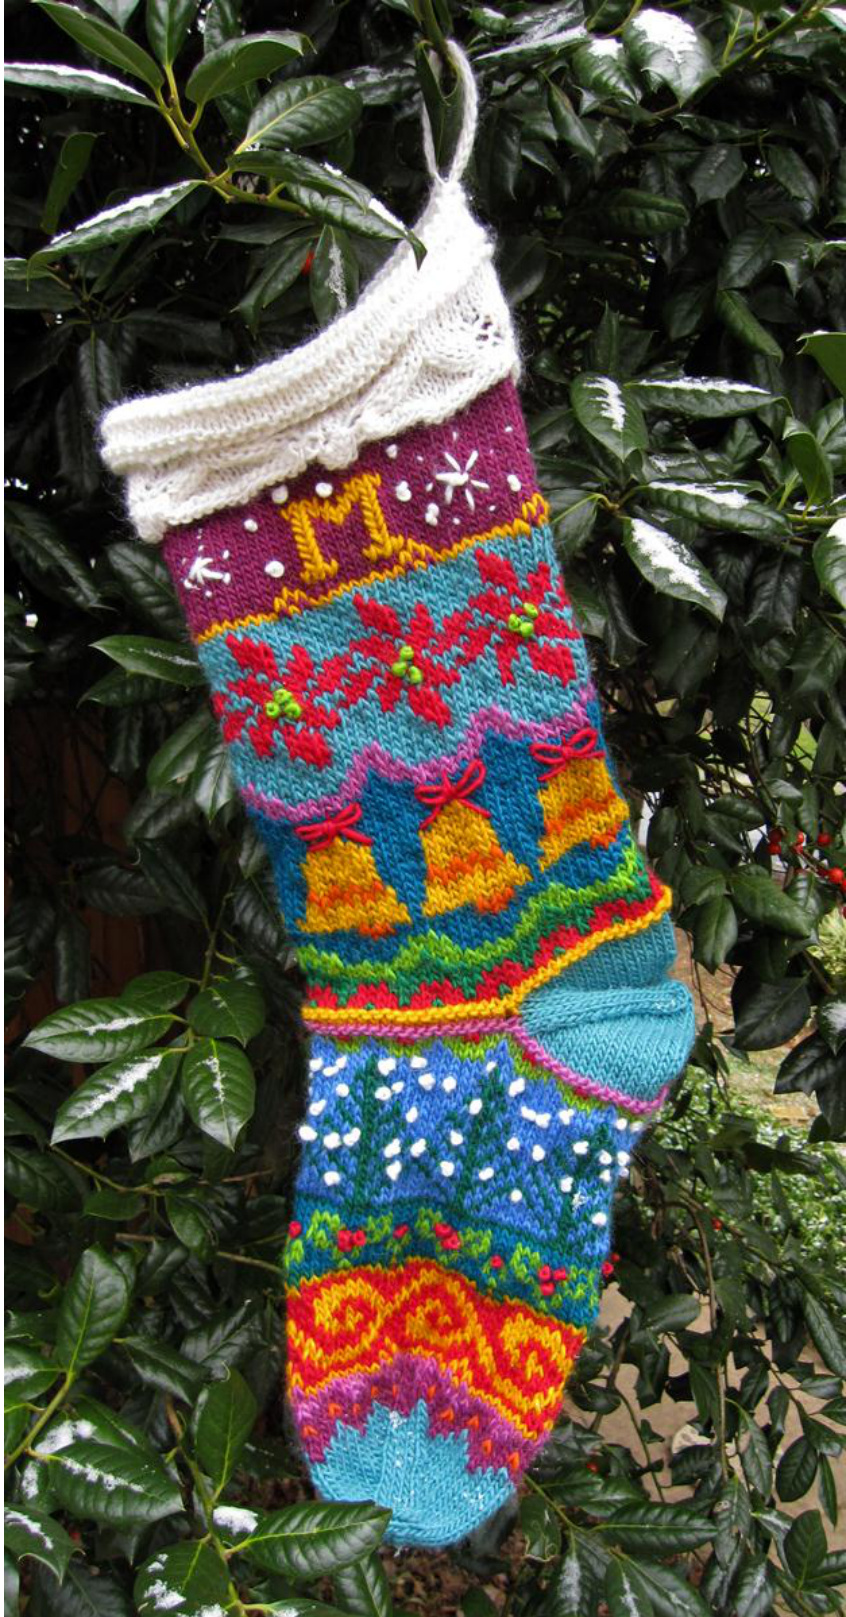
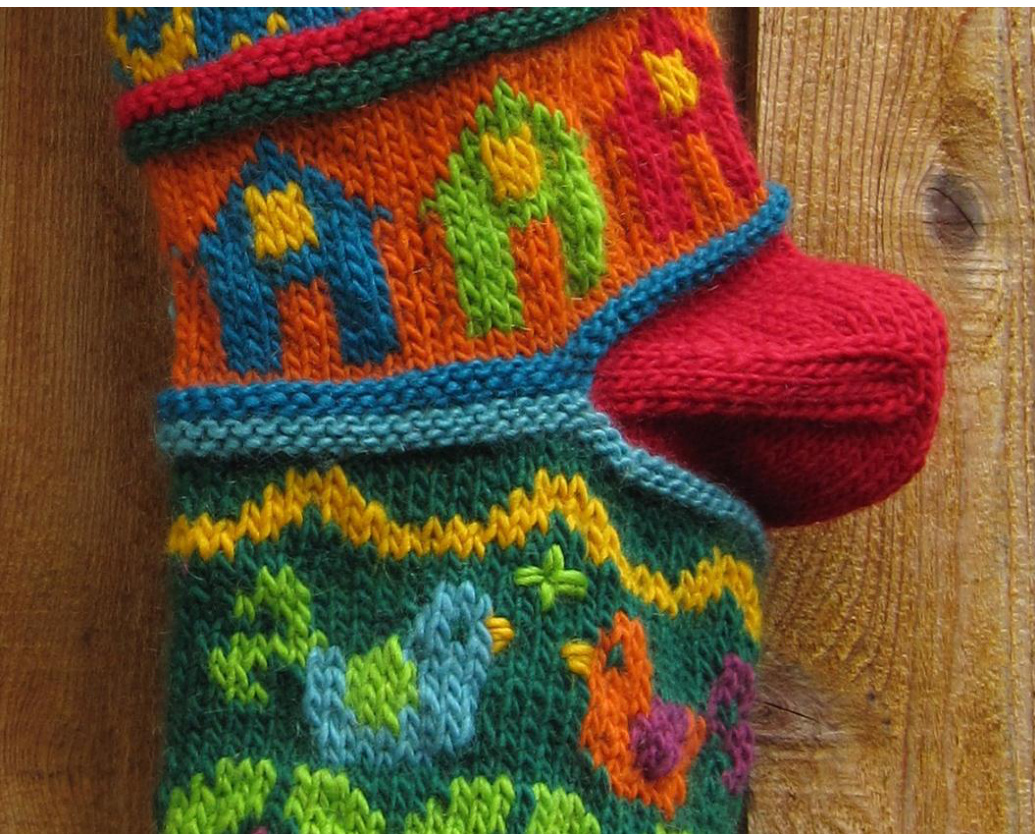
General Instructions This isn't exactly a pattern, and it is untested, so please send me corrections and I'll update it as needed. This is a guide for folks who would like to knit the stockings shown on my Ravelry page. I never followed any set of instructions myself for these, other than my scribbles on graph paper. Nonetheless, I know that folks like instructions, so I'm writing some. I encourage you to skim them, get the gist of it, and then do your own thing. Grab your Kristin Nicholas books, Nicky Epstein books, and all the nutty old charts you can find for children's sweaters or counted cross stitch. Time to put them to work. What you should know before you start These instructions assume you have basic sock-knitting knowledge: that you can cast on and work in the round, form an afterthought heel, work decreases for heels and toes, graft or otherwise bind off a toe, weave in ends, etc. Also it is assumed you have experience with stranded color knitting. If you haven't tried duplicate stitch and embroidery before, this is a good place to learn. It's where I am learning. In the stocking at the right, the orange detail on the bells is worked duplicate stitch, as is the letter M.
Supplies
Yarn: Worsted weight, about 400 yards, many colors. Needles: Size 7 or size to obtain gauge. Either use four or five double-pointed needles, or a 32" circular and do the magic loop. Gauge: Not a big deal. About 5 sts and rows/inch in stranded pattern, and 5 sts and 6 or 7 rows/inch in stockinette. Is it dense enough for you? Not too tight to be soft or too airy to hold the goodies? Then you're fine. Tools: Tapestry needle for embroidery, duplicate stitch and finishing Doo-dahs: Bell for the toe, any desired buttons, sequins, and sparkly things
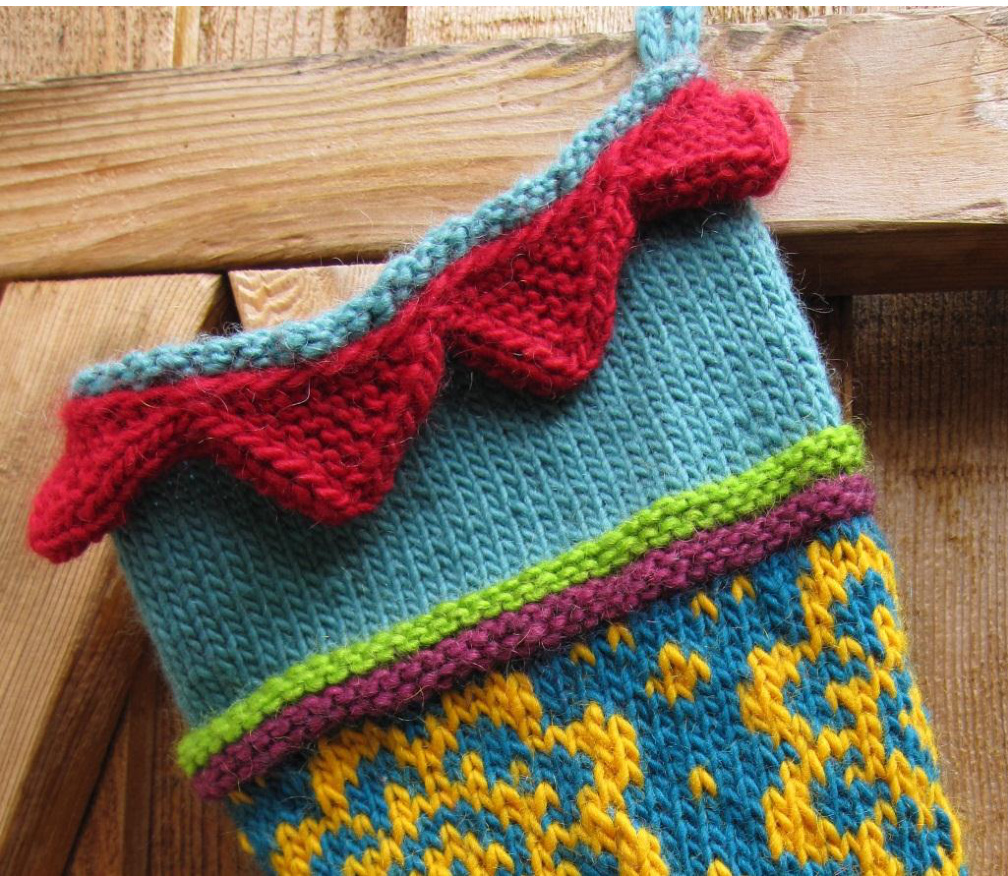
Cast on 72 stitches, join in the round. Simple cuff: Work a couple of welts (a knit round followed by two purl rounds, repeat) followed by two inches of plain knitting so you can embroider a name, followed by more welts. Folded cuff, method 1: Work the cuff inside-out, in reverse stockinette (purl side out, knit side in) for the cuff. Then, when you are ready to fold the cuff and start the leg, switch to working knit on the outside and purl on the inside. Work this under-cuff portion the same length as the cuff before beginning leg patterns. Folded cuff, method 2: This may be the easier way if your cuff has a complicated stitch pattern. Knit the cuff right side out. When you're ready to start the leg, turn the cuff inside out, slip a stitch, and start working the inside of the cuff as the new “right side." You'll be reversing the direction of your knitting without having to knit backward or inside out. Work the inside of the cuff in plain stockinette until it is as long as the cuf. Any irregularity where you change direction in your knitting can be hidden just inside the stocking, below the fold of the cuff. Also, that can be where you attach the hanging loop. Changing colors at this point makes the transition smoother.
Work any of the charts, in any order or color sequence you like. Make the leg as long as you like. I worked as many rows as you see on a page of the chart, because that's what fits on the page. The start of the round becomes the middle back of the stocking.
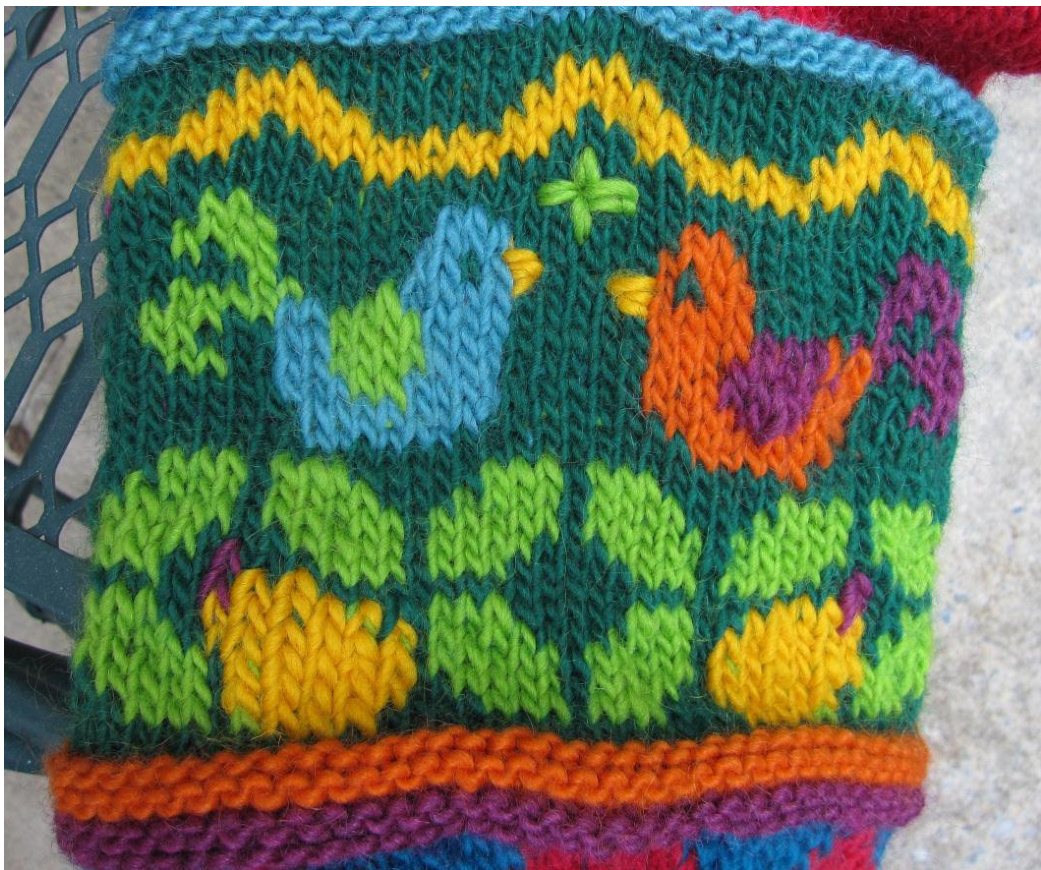
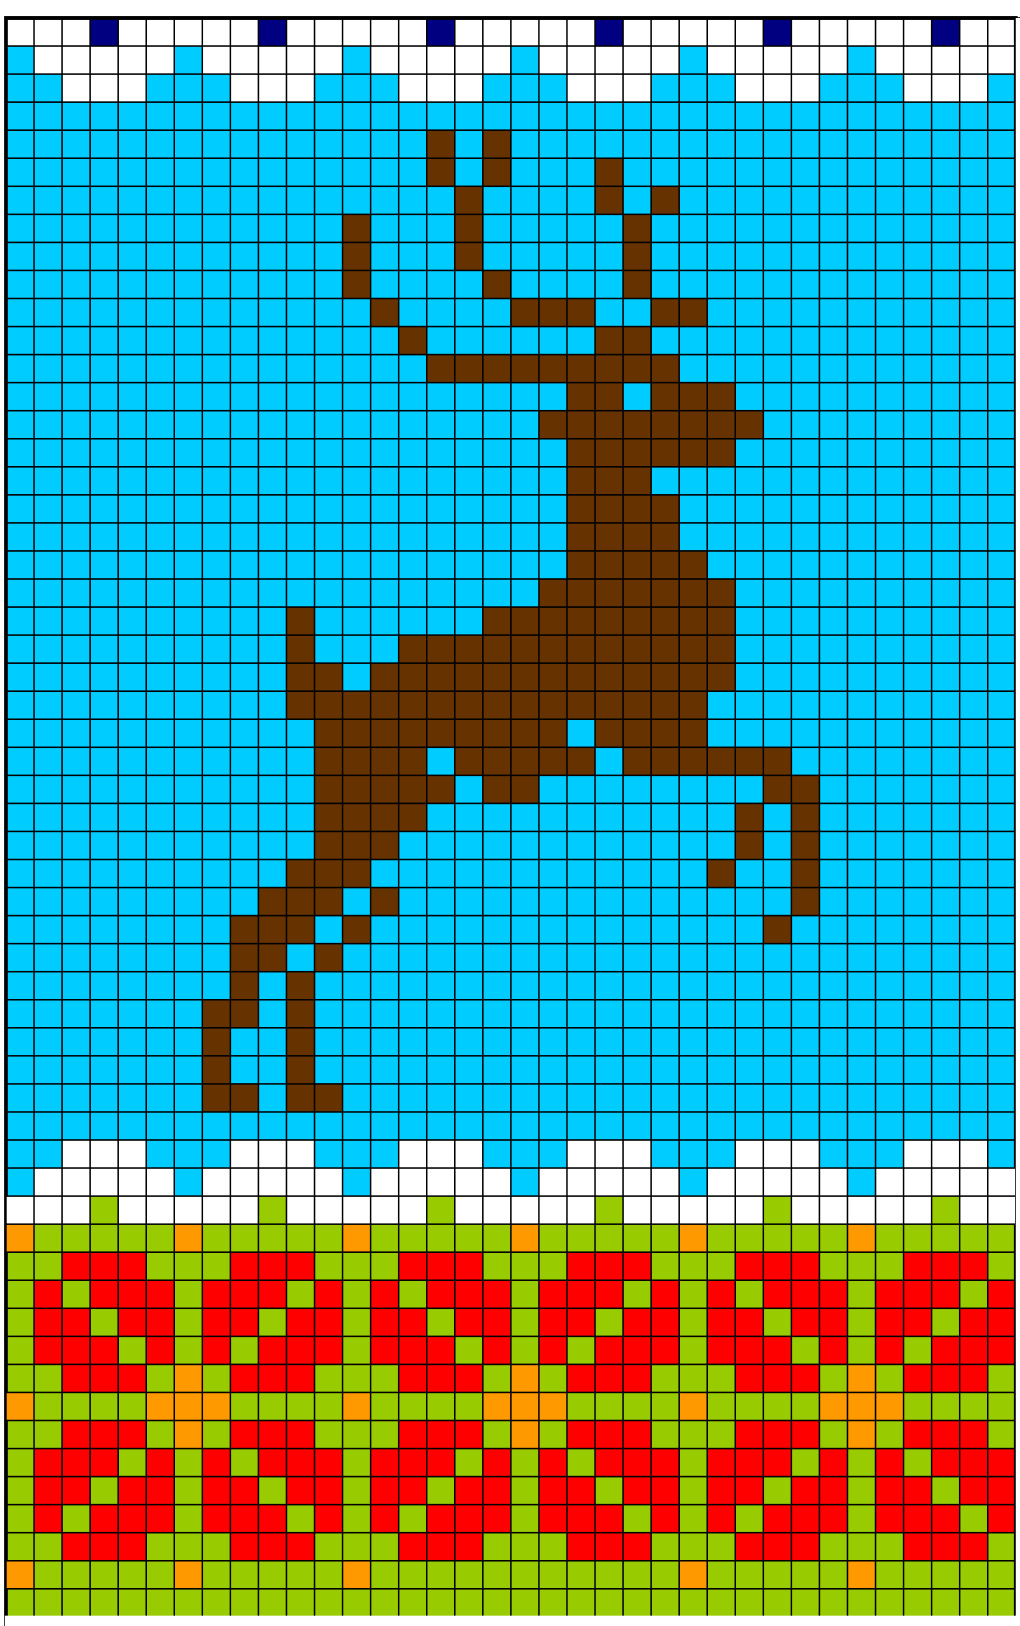
I recommend working only two colors at a time and embroidering any additional colors in duplicate stitch. Definitely embroider the reindeer in duplicate stitch. Also probably the little houses and birds, unless they are all to be the same color.
Reserving Heel Placement
These stockings use an afterthought heel, which means that the heel will be temporarily bypassed and worked after the rest of the stocking (including toe) is done. It's nice to put a welt just before and after the heel placement. You will reserve the place where the heel goes by knitting halfway around the sock with some scrap yarn, which later will be pulled out so the heel can be worked from the surrounding stitches. Drop working yarns: Beginning at the middle back of the stocking (beginning of the round), cut your yarns. Drop them and leave them to be woven in when the stocking is finished. Do not weave them in along with the scrap yarn, or carry them to be worked after the scrap yarn; the heel will be inserted where the scrap yarn is. Back up 18 sts: Next, transfer the last 18 sts you worked to the needle of stitches waiting to be worked (for right-handed knitters, that means from the right needle to the left needle). Reserve the heel stitches with scrap yarn: With a 36" length of scrap yarn, and leaving a 6" tail, knit 36 sts. In doing so, you continue 18 sts beyond the beginning of the round. Now back up again, transferring 18 of the scrap yarn sts from the just-worked needle to the to-be-worked needle so you end up back at the start of the round. On either side of this point, which is the center back of the stocking, you'll have 18 sts of scrap yarn worked over the leg stitches. Join new yarns: Start working the rest of the foot in the round and right over the top of the scrap yarn, about 2/3 the length of the leg. If you weave in ends as you go, be sure to do so on the next round, and do not weave the ends into the scrap yarn. Work the foot section in patterns of your choice until it is about two thirds the length of the leg section. Now get ready to start the toe. Toe At start of round (center back of stocking): Rnd 1 K15, k2tog, k1, place marker, k1, ssk, k30, k2tog, k1, place marker, k1, ssk, k15. 4 sts decreased, 68 sts on needles. Rnd 2 Knit. Rnd 3 K to 3 sts before first marker, k2 tog, k2, ssk, k to 3 sts before second marker, k2 tog, k2, ssk, k to end of round. 4 sts decreased. Repeat rnds 2 and 3 until 36 sts remain. Repeat just rnd 3 until 16 sts remain. Finishing toe: Graft remaining sts with kitchner stitch or repeat rnd 3 two more times and cinch up the remaining 8 sts. Break yarn, weave in ends.
Pick up the heel stitches on either side of the scrap yarn, leaving the scrap yarn in place: Begin at the center back of the stocking (start of round), and insert your needle(s) through the stitches on the first half of the back of the leg, then the front of the leg, and then the second half of the back of the leg Be sure to insert the needle tip into each stitch so that it is mounted correctly. You'll have 36 sts on the leg side of the scrap yarn and 37 on the foot side, because those stitches were picked up upside-down. When all stitches surrounding the scrap yarn are on needles, cut and remove the scrap yarn. 73 sts. Rnd 1 Knit 17 sts, k2tog (to absorb the extra stitch on the foot side), k to end of round. The stitches at the gap between leg and foot can be worked along with one or more lifted strands from below to tighten up the gap. 72 sts remain on needles.
Rnd 2 K15, k2tog, k1, place marker, k1, ssk, k30, k2tog, k1, place marker, k1, ssk, k15. 4 sts decreased, 68 sts. Rnd 3 Knit. Rnd 4 K to 3 sts before first marker, k2 tog, k2, ssk, k to 3 sts before second marker, k2 tog, k2, ssk, k to end of round. 4 sts decreased. Repeat rnds 3 and 4 until 36 sts remain. Repeat rnd 4 until 16 sts remain. Finishing heel: Graft remaining sts with kitchner stitch, or repeat rnd 4 two more times and cinch up the remaining 8 sts. Break yarn, weave in ends. Finishing and Embellishing Hanging loop: My method was to work i-cord for about 3" and attach it to the cuff. Slipping a ribbon through and knotting it from the underside of the cuff would also work well. Bell: With a tapestry needle and 12" of matching yarn, sew a bell securely onto the toe and tie it off from inside. Embellish to your heart's content and weave in all your inside ends. If you like and know how, you can sew in a fleece lining.
Charts
The following charts were used for the stockings pictured here, but not always exactly. Accidents do happen as we knit. But, if you make the same mistake repeatedly, it looks like you did it on purpose. That goes for colors too: If you find you don't like a color you've used, be sure to use it again one or two more times and it will look like it belongs there.
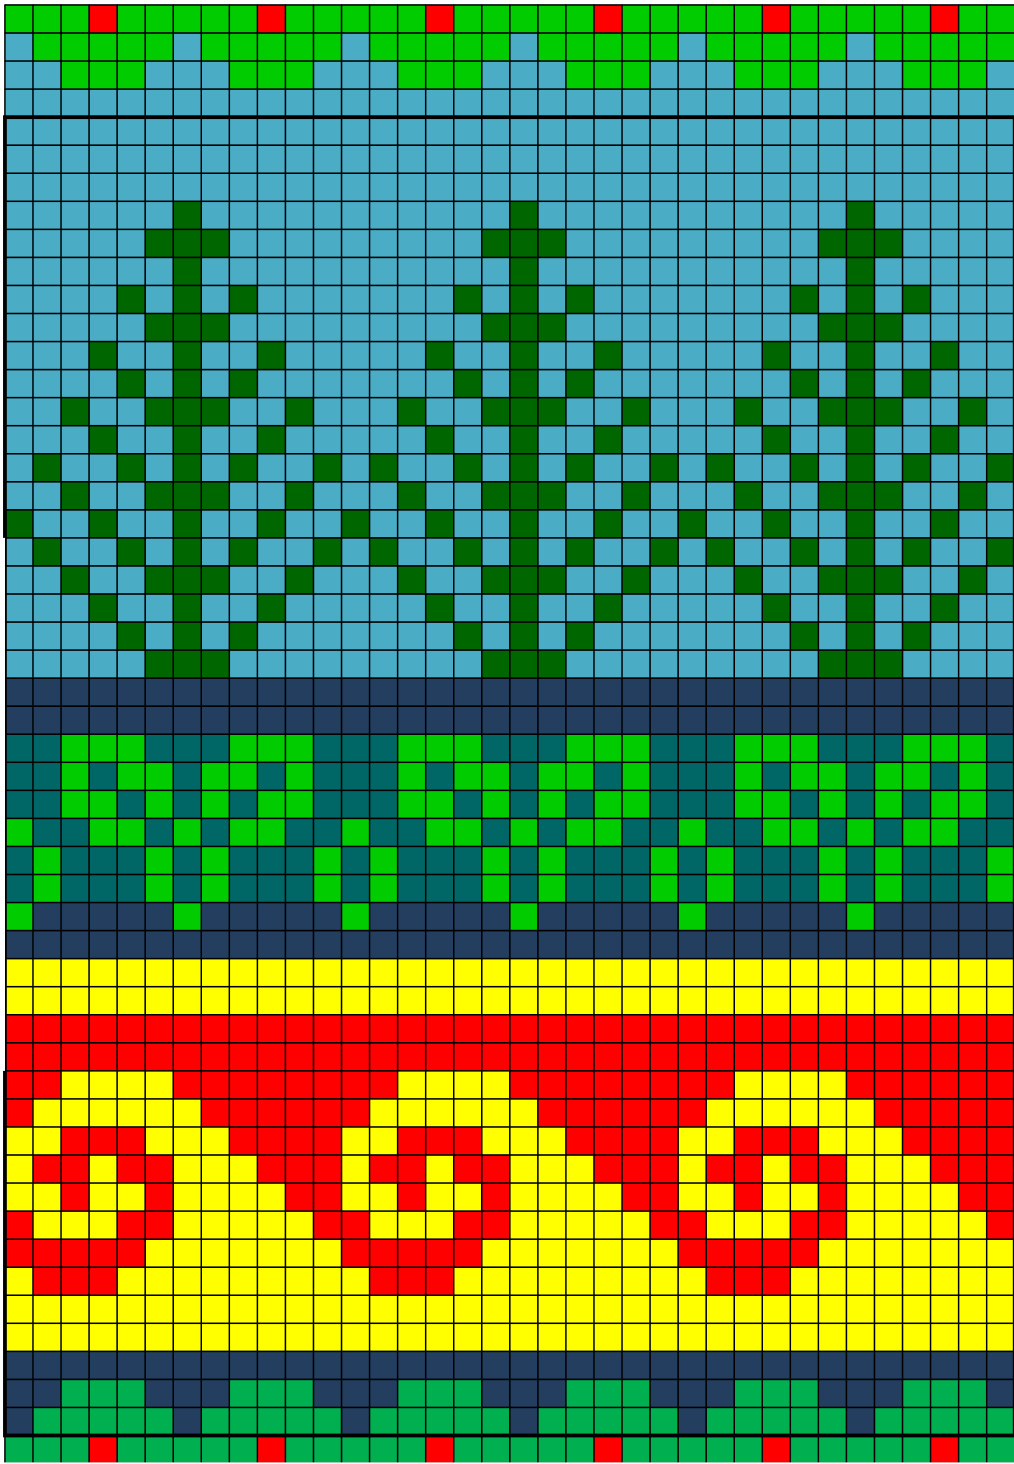
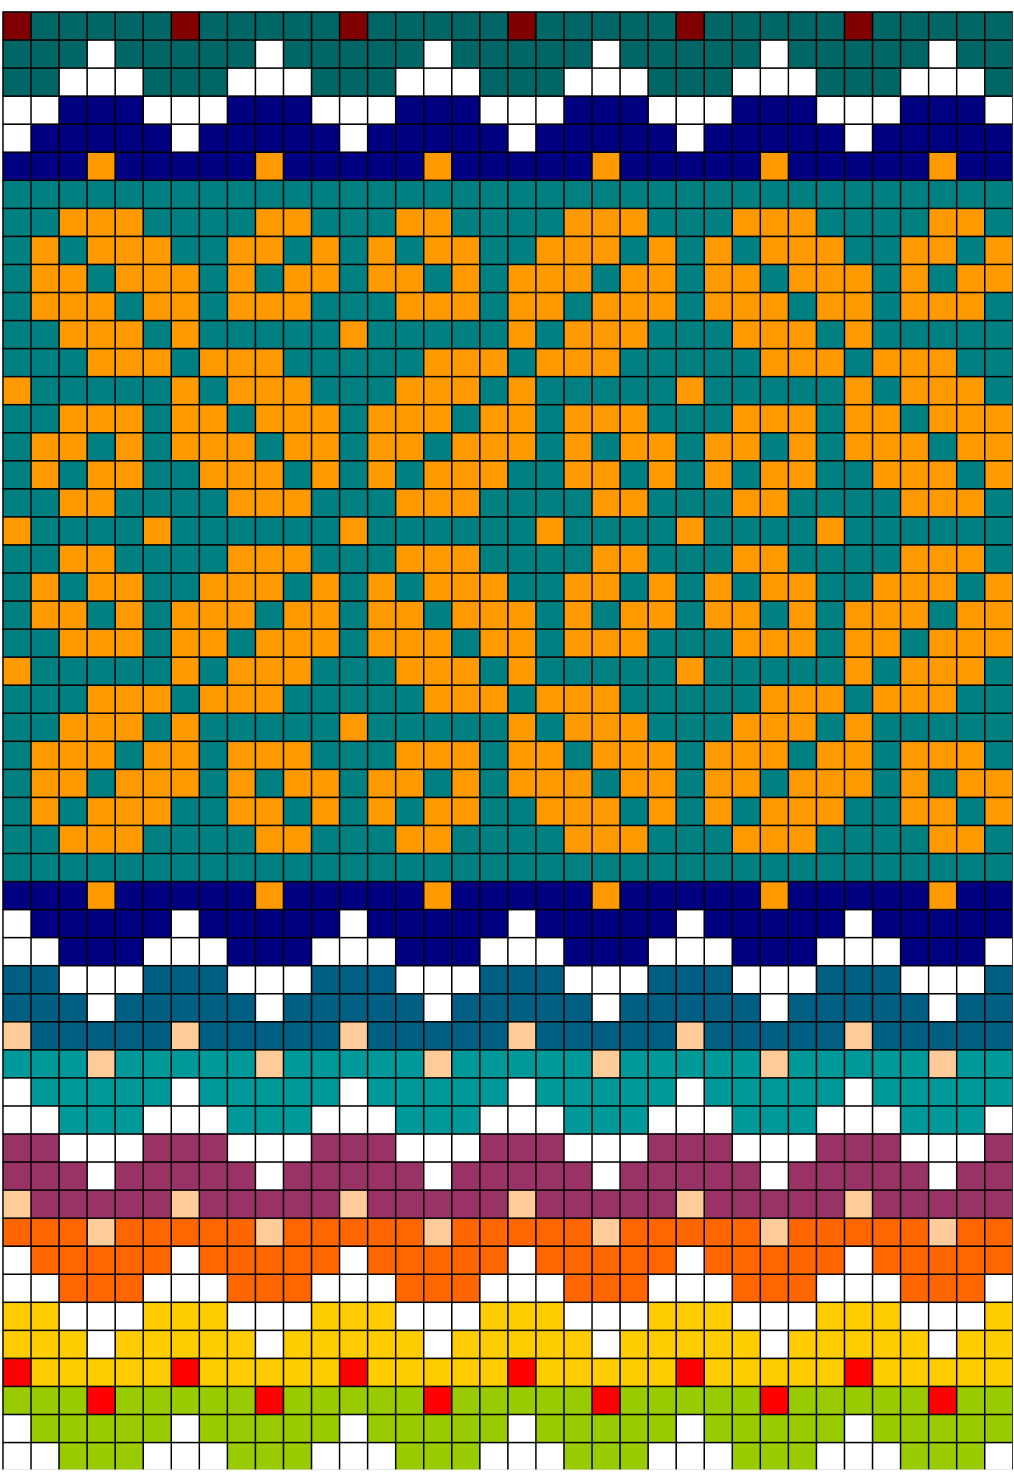
Charts for Stockings ——- Stockings are 72 sts around. 36 sts shown on chart. Note the box around the swirl pattern: That's the repeating unit, 24 sts wide. Repeat three times around the stocking. Charts drawn by Kirsten Hall, December 2010. Visit me on Ravelry as Spindleknitter, or see my blog: http://zekslite.typepad.com/
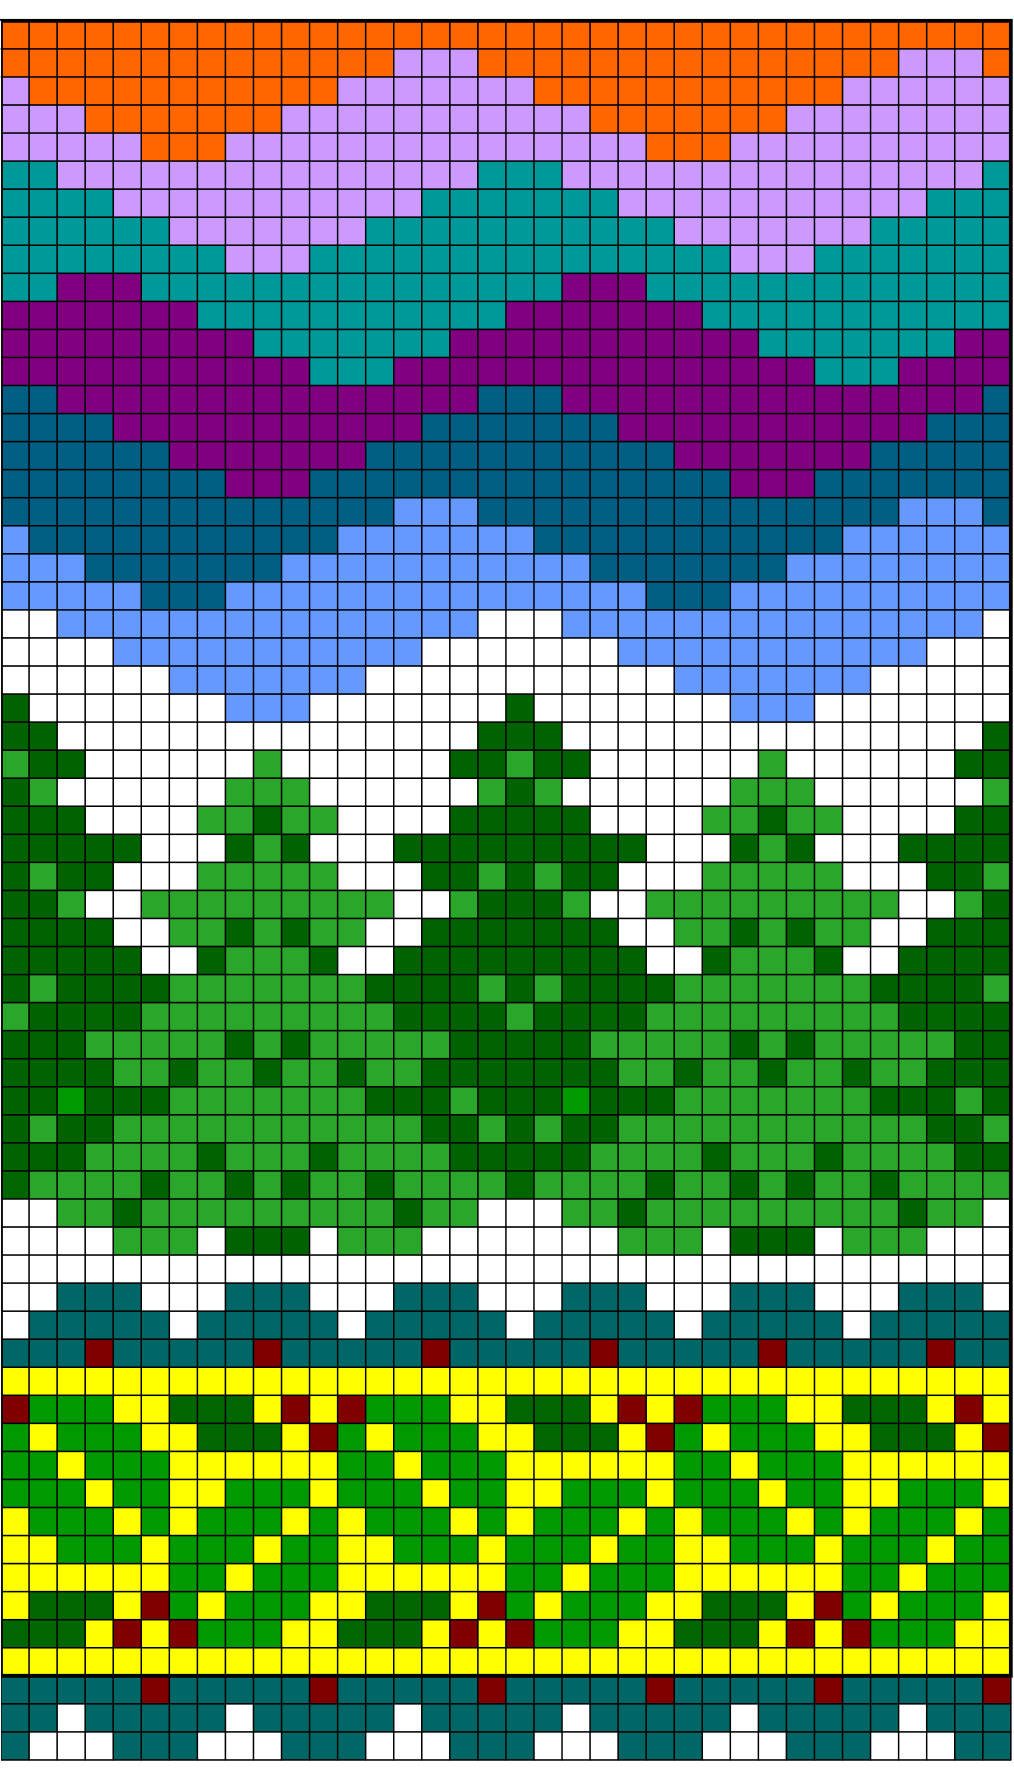
Charts for Stockings ——- Stockings are 72 sts around. 36 sts shown on chart. Charts drawn by Kirsten Hall, December 2010. Visit me on Ravelry as Spindleknitter, or see my blog: http://zekslite.typepad.com/

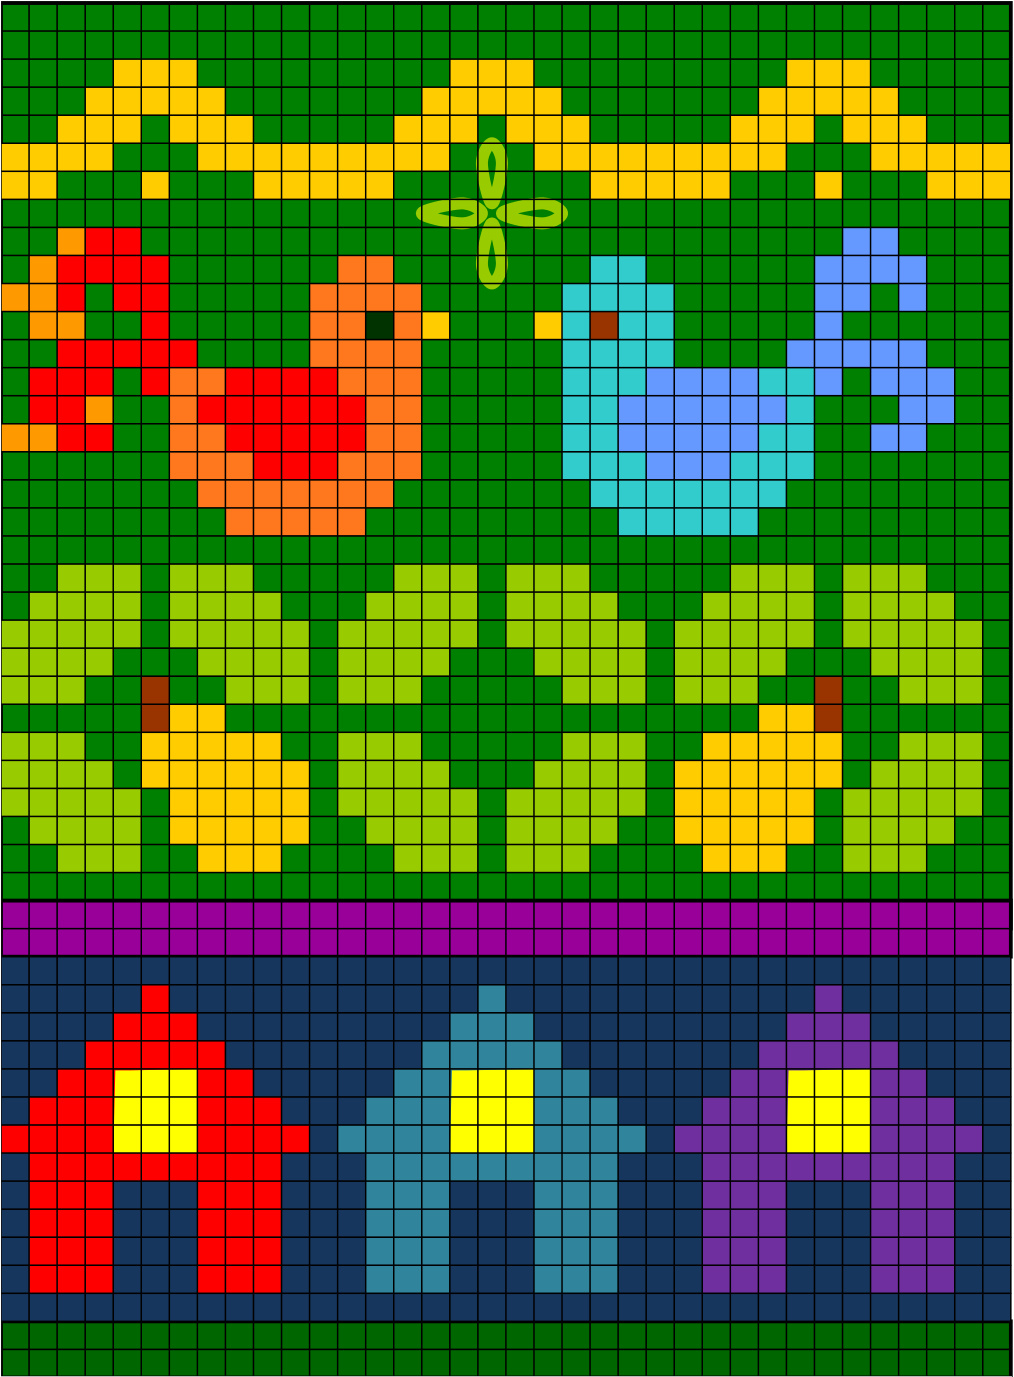
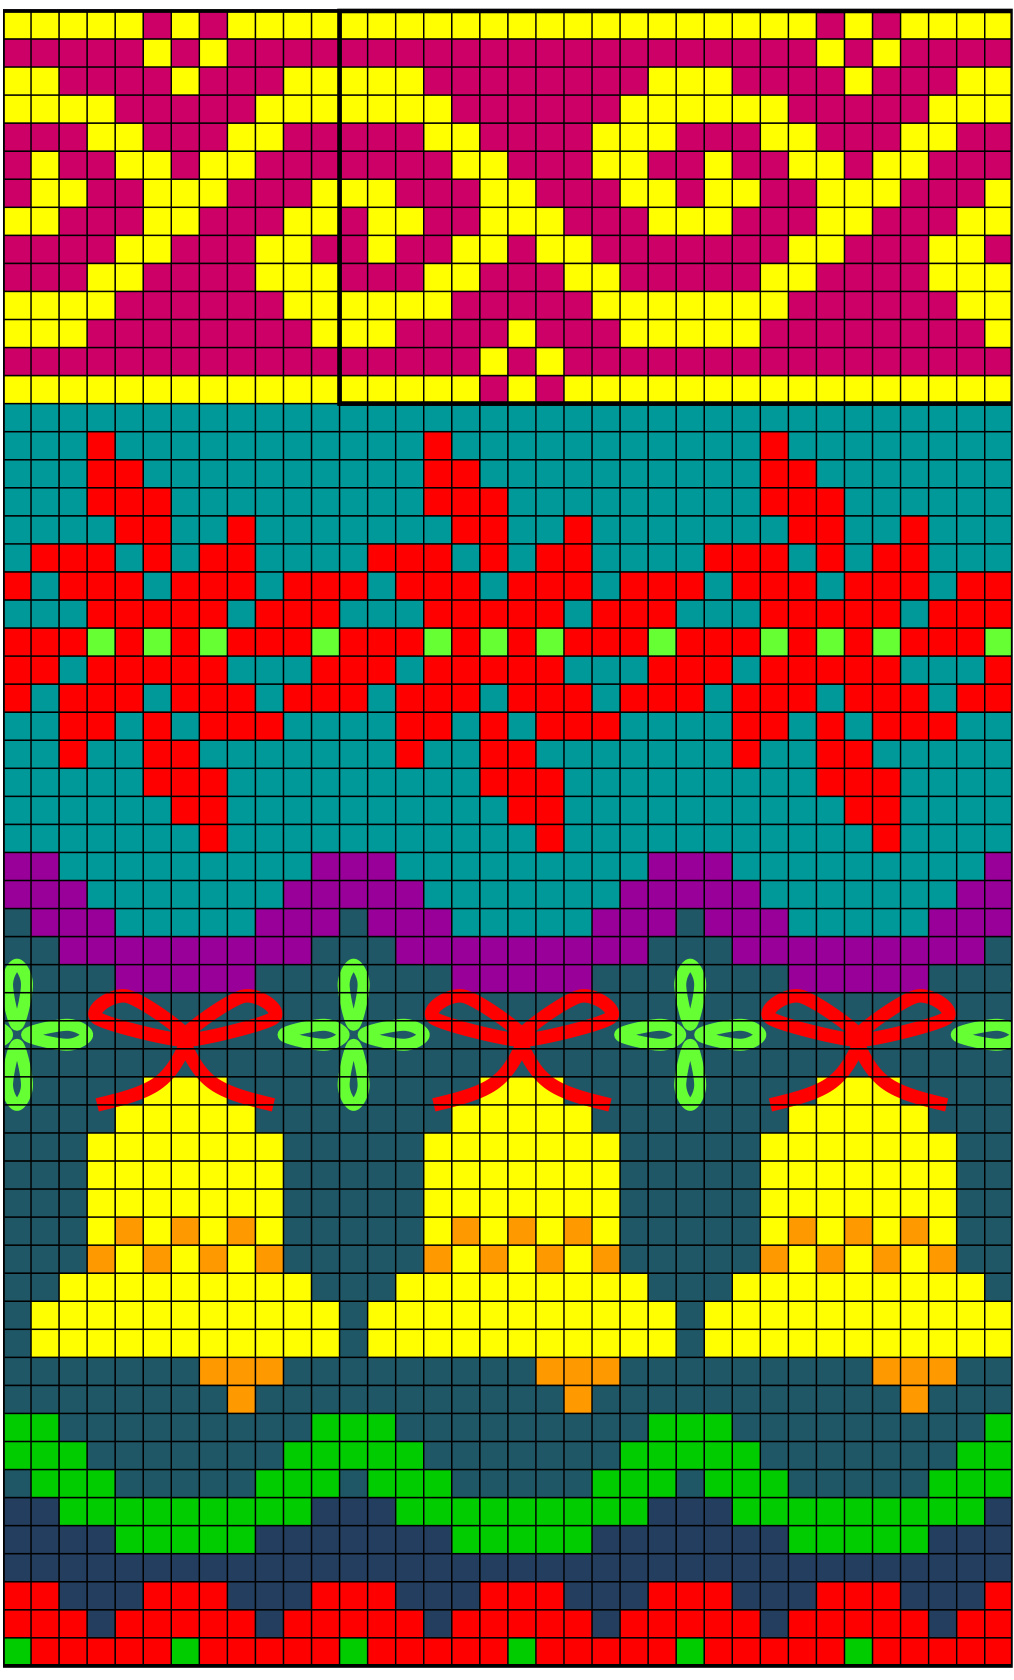
Charts for Stockings —— Stockings are 72 sts around. 36 sts shown on chart. Note the box around the flower pattern: That's the repeating unit, 24 sts wide. Repeat three times around the stocking. Charts drawn by Kirsten Hall, December 2010. Visit me on Ravelry as Spindleknitter, or see my blog: http://zekslite.typepad.com/