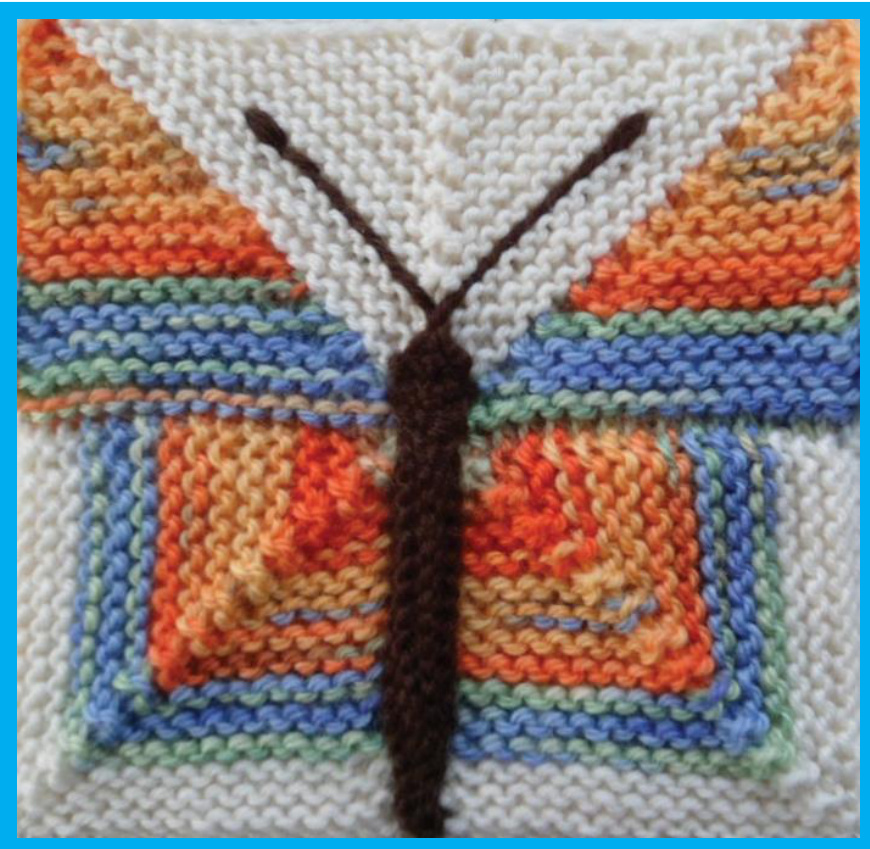
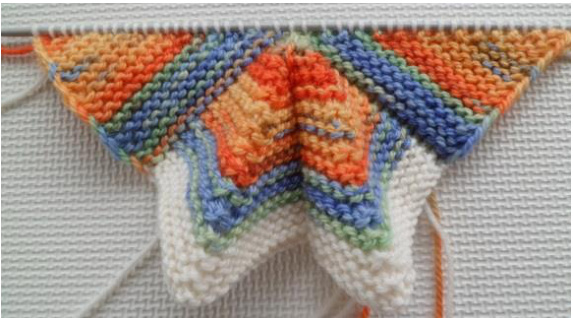
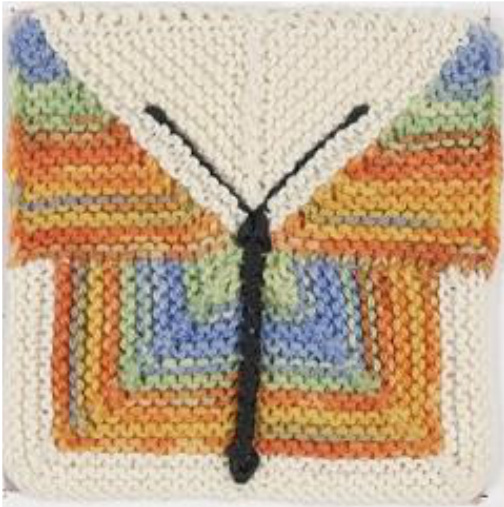
MODULAR BUTTERFLY DESIGN 6 Blanket Square
Designer's notes:
This is my first attempt at designing and publishing my own knitting pattern. I designed this butterfly square for a magazine knitting competition a few years ago, where it gained second place for me. I got the idea from an inspirational 'moment' when I was knitting a modular square one day, the butterfly potential just came to me! It has taken all that time for me to be brave enough to write it up and publish it. So here it is! This butterfly square is knitted in garter- stitch throughout and made up of five sections. These sections are either cast on or made by picking up stitches. See diagram A. I have incorporated chain selvedges where possible to give structure and definition to the edges, ready to join together. CC EVERY BUTTERFLY WILL GROW IN FRONT OF YOU AND BECOME A 'LITTLE WORK OF ART', JUST LIKE A CATERPILLAR METAMORPHOSING IN ITS CHRYSALIS, EVENTUALLY EMERGING AS A BEAUTIFUL BUTTERFLY. \~krisserliss I hope you enjoy the challenge and the end results!
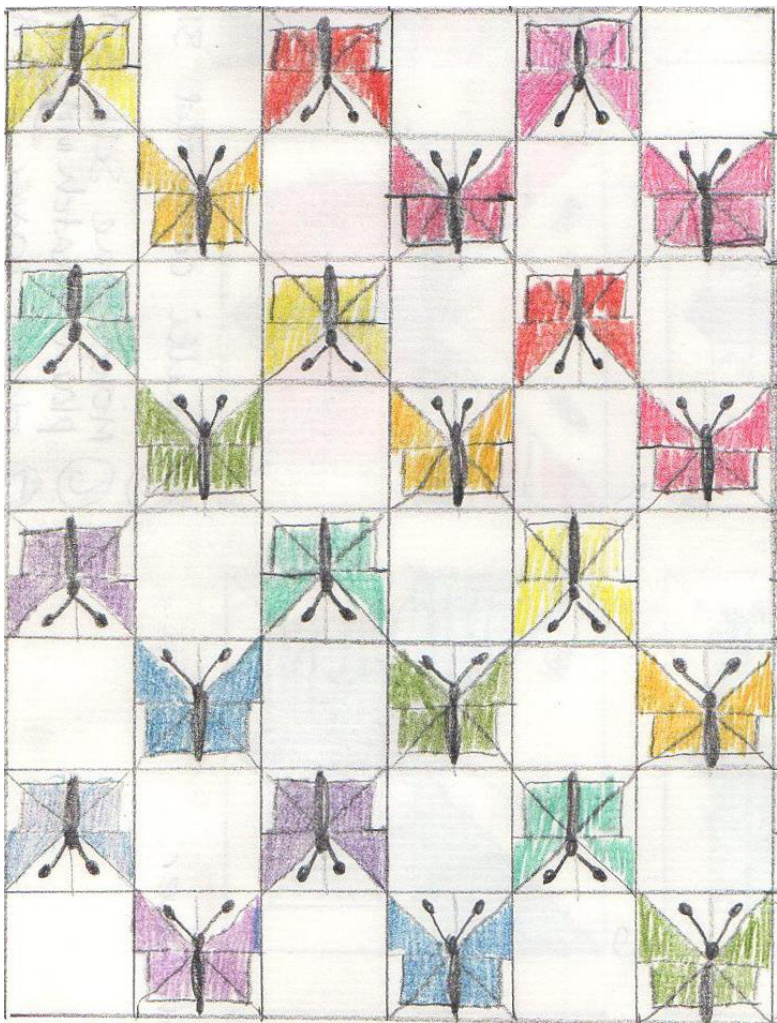
Design idea for a 6 x 8 modular throw
Modular Butterfly Pattern
Modular Butterfly 6" Blanket Square
By Janis Higgs (krisserliss)
Materials:
Double Knitting yarn or Light worsted / 11 Wpi / 8 ply For the butterfly, I used Patons Fairytale Dreamtime DK Pure Wool (Shade 04970) Quantities: MC = Wings Approx. 30 metres / 33 Yards CC = Background Approx. 25 metres / 27 Yards SCC = Abdomen & Antennae Approx. 6 metres / 7 Yards (I used washable tapestry wool) Note: Use like yarns for your project in order to keep gauge/ dimensions correct. Notions: One pair of 4mm (UK 8/US 6) needles One pair 3 mm needles (UK 11/US 3), for knitting abdomen & head Tapestry needle Removable markers / safety pins
Tension/Gauge:
20 sts and 40 rows to 10cm, using 4 mm needle and garter stitch - every row knit. (Or size to obtain gauge).
Abbreviations:
MC = Main Colour tbl = through back of loop CC = Contrast Colour Wyif = with yarn in front SCC = Second Contrast Colour st/s = stitch /stitches WS = Wrong Side psso = pass slipped stitch/stitches over RS = Right Side tog = together K = knit dd = double decrease; P = purl slip 2 sts k wise, k 1, psso k/wise= knitwise (centre st uppermost) p/wise= purlwise ml = make 1 st by picking up sl = slip strand between sts and k tbl
Special abbreviation
slpwiyf /b = slip stitch purlwise with yarn at front/ then move yarn to the back between the needles ready to proceed with a knit row.
IMPORTANT NOTE:
When using a space dyed or striped yarn for the whole butterfly, start at same point along the pattern repeat to ensure symmetry in the wings.
Order of Construction:
1. Left Wing - Lower 5.Large Triangle 2. Left Wing - Upper 6.Abdomen 3. Right Wing - Lower 7. Head & Antennae 4. Right Wing - Upper 8.Finishing NOTE: Numbers refer to instruction sections with the corresponding numbers. e.g. (1) next to a heading would refer to number 1 in the above list.
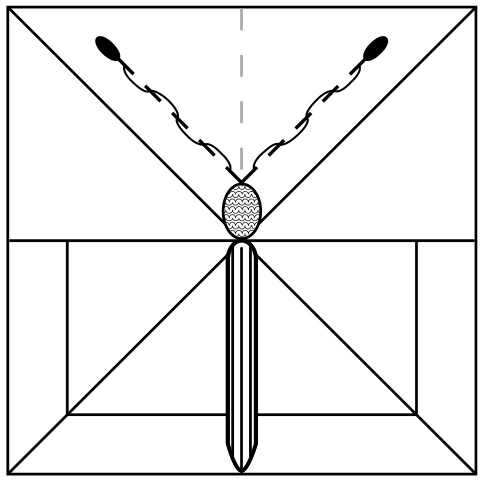
Diagram A: Showing component parts of butterfly
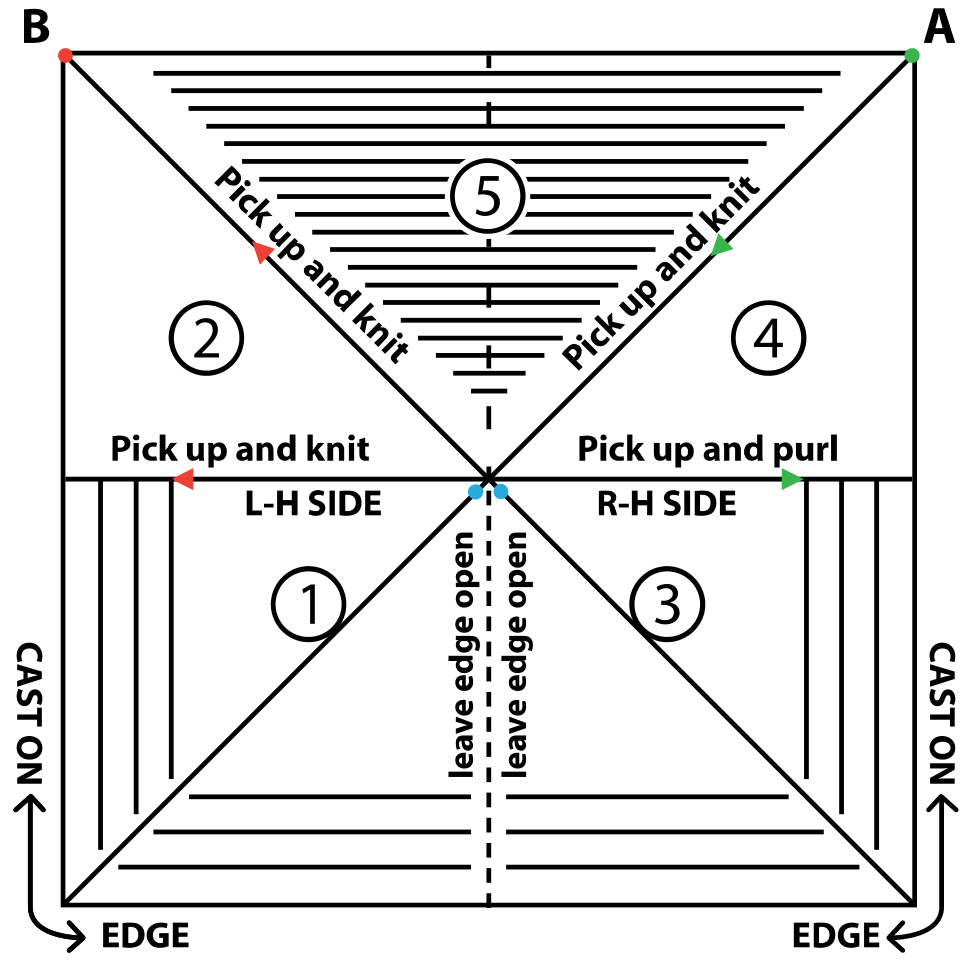

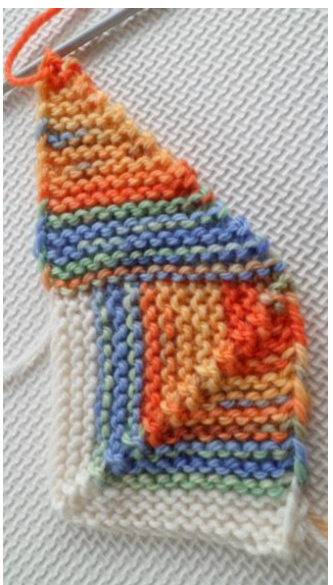
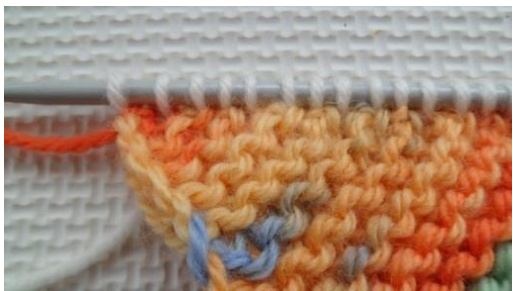
INSTRUCTIONS: (SEE DIAGRAM A). 1 ST SECTION - Lower Left Wing & Background Border (1) \*Using 4 mm needles and CC cast on 31 sts. Set up row: (WS) Slpwyif/b, k to last stitch, wyif sl st p/wise. Turn. [Place marker at stitch 16 to show right side & centre stitch]; Row 1: (RS) K1 tbl, k to centre 3 sts, dd, k to last st, wyif sl st p/wise. Row 2: (WS) K1 tbl, k to last st, wyif sl st p/wise. Rows 4 & 5: Repeat rows 1 & 2 Row 6: (RS) Change to MC; K as row 1. Continue repeating rows 1 & 2 until 3 sts remain, ending on a R.S. row; Next: (WS) Sl 2 tbl, kl, psso. 1 stitch remains. Without breaking yarn, 1 stitch on the right hand needle and \* R.S. facing, selvedges to your left, continue as follows:-

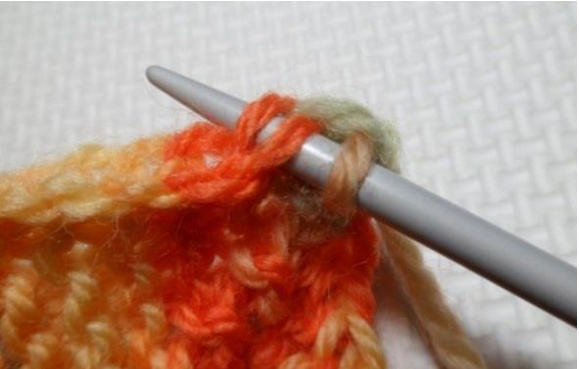
Picking up sts. along chain selvedge of 1 ST section KNITwise for 2ND section. 2 ND SECTION - Upper Left Wing (2) 1 st remains on the right hand needle; pick up and k 1 st in both bars of every chain, including last. (15 more sts). Total 16sts. Set up row: (WS) Slpwyif/b, k to end. Row 1: (RS) Sl1 k/wise, kl, psso, k to last stitch, wyif sl st p/wise. Row 2: (WS) K1 tbl, k to end. Repeat rows 1 & 2 until 2 sts remain ending on a R.S. row. Next row: (WS) k2 tog tbl, 1 st left on needle. Cut yarn approx. 30 cm pull yarn through loop LEFT SIDE COMPLETED.
Left side completed
Modular Butterfly Pattern
3 RD SECTION: - Lower Right Wing & Background Border (3) 3 RD section is knit as 1 ST section from \* to \*. 3RD section completed. Continue as follows 4 TH SECTION: - Upper Right Wing (4) TURN work and with WS facing, selvedges to your left 1 st on your right hand needle; Pick up and PURL 1 st in both bars of every chain, including last. (15 more sts). Total 16sts. Set up row: (RS) Sl1 k/wise, k to end Row 1: (WS) Sl1 k/wise, kl, psso, k to last st, wyif sl st p/wise. Row 2: (RS) K1 tbl, k to end. Repeat rows 1 & 2 until 2 sts remain, ending on a WS row;
Picking up stitches through chain selvedge, PURLwise. 4 TH Section Next row: (RS): K2 tog tbl, 1 st remains. Cut yarn approx. 30 cms pull yarn through loop.
RIGHT SIDE COMPLETED
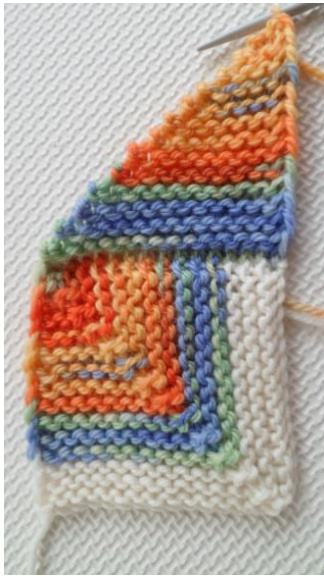
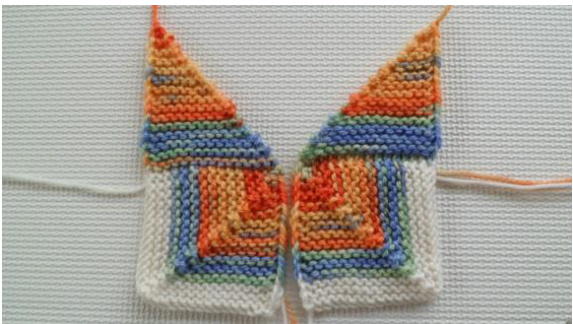
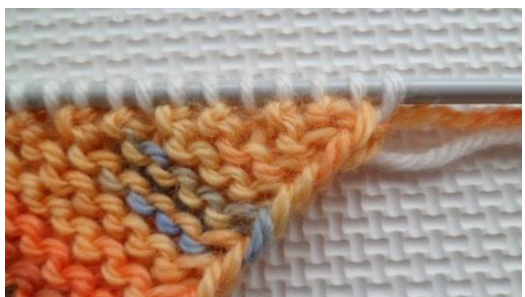
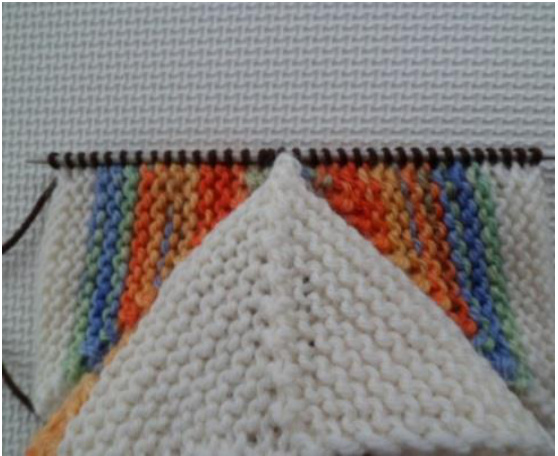
Right side completed Both sides of butterfly completed. 5 TH SECTION: Picking up stitches for Large Triangle (5)
Two halves become one!
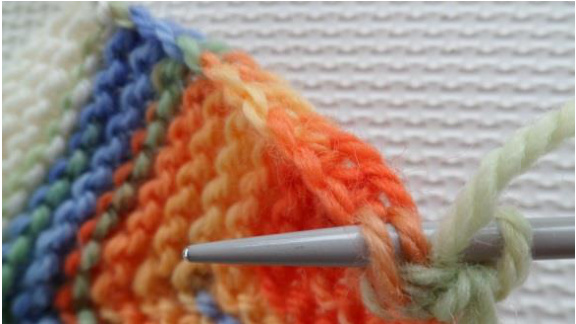
You will now be picking up stitches along the diagonal edges of the wings,here you will see garter bumps, alternating with ‘horizontalbars'. Some are knit and some are skipped, each one counts for one stitch. I have worked out the maths so you don't have to, (that is if everything has gone all right so far!). (continued on page 6).
Modular Butterfly Pattern
PICKING UP STITCHES FOR LARGE TRIANGLE (continued from page 5) For a neat finish pick up each group of 3 stitches thus; garter bump/ \*\*bar/ garter bump. \*\*knit into the uppermost bar only. Change to CC with RS facing and starting in garter bump at tip A;
Right-hand Side:
Pick up and knit (3 sts, skip 1), 7 times [21 sts].
Centre Sts:
Knit next garter bump, pick up 1 stitch each from centre of sections 1 and 2, and k tog (mark this as the centre st), skip 1 bar, k1 garter bump. [3 centre sts].
Left-hand side:
(Skip 1 bar, k3), 7 times, ending in last garter bump at tip B. [21 sts]. Total 45 sts. Don't worry if you have to jiggle it a litte, as long as the stitches are evenly spaced and symmetrical.
Point A : Picking up stitches along right wing
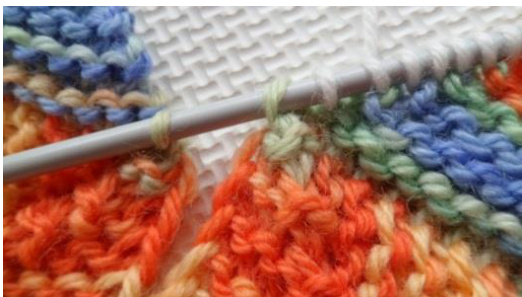
Close up of two centre stitches prior to knitting 2 tog.

Right wing picked up, plus 2 centre stiches
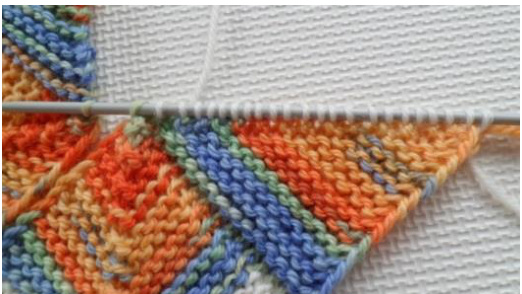
Picking up stitches along left wing ending at point B.
All stitches picked up along both wings ready for knitting large triangle. Page 6 Okrisserliss 5 TH SECTION: Knitting Large Triangle (5) Set up row (WS) Slpwyif/b, kl, psso, k to last 2 sts, k 2 tog. Row 1 (RS) Slpwyif/b, k to 3 centre sts, dd, k to last st, Wyif sl st p/ wise. Row 2 (WS): K 2 tog tbl, k to last 2 sts, k 2 tog. Repeat rows 1 & 2 until 3 sts remain;
Next Row: (RS) Slpwyif/b, k 2 tog, psso. 1 st remains, cut yarn approx. 30 cm pull yarn through loop. Congratulations you have now completed the main part of the Butterfly Square!
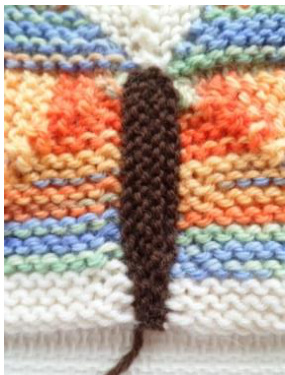
ABDOMEN, HEAD AND ANTENNAE.
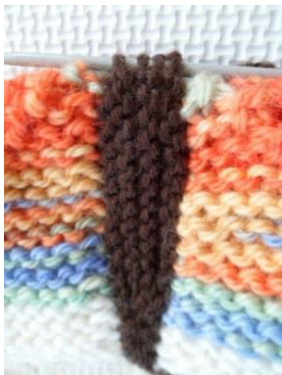
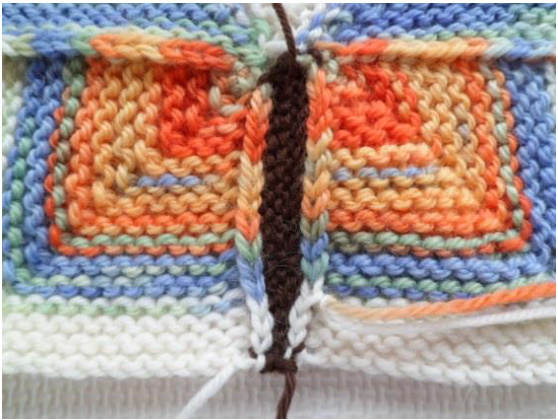
KNITTING THE ABDOMEN (6): (SEE DIAGRAM B). The abdomen, head and antennae are made with one continuous length of yarn, each stage flows into the next so there is no need to cut the yarn. Change to 3 mm & SCC. With RS facing and working from right to let, pick up and knit; 1 st from corner of cast edge, plus 1 st in each of the 15 chains and 1 before centre; (17 sts). THEN 1 st after centre, plus 1 st in each of the 15 chains, plus 1 st from corner of cast on edge; (17 sts). Total 34 sts. NOTE: DO NOT pick up a centre stitch. Row 1: (WS) K to end, turn. Row2: Slpwyif/b, k to last 4 sts, Wrap the next st, (wrap = sl next stitch pwise to right needle, move yarn to front between needles, place slipped stitch back onto the left hand needle), turn. Row3: Knit to last 4 sts, wrap and turn. (The wraps are not picked up). RoW 4: (RS) Knit to the middle of the row; 17 sts on each needle. (34 sts.). End of knitting. DO NOT CUT YARN. Proceed to grafting instructions for abdomen on page 8;
Abdomen stitches picked up along open seems (RS facing)

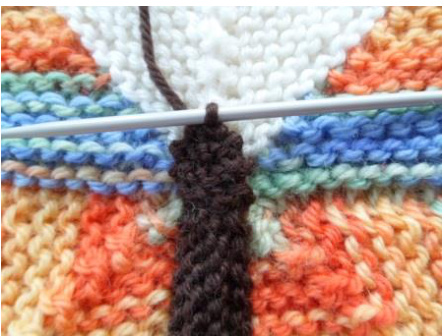
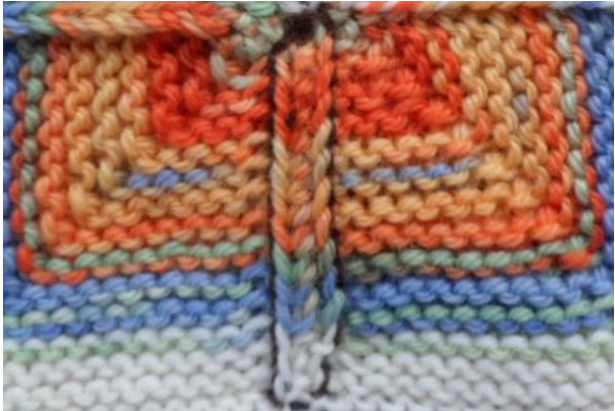
Completed abdomen ready for zipper bind-off
Grafting the seam/abdomen:
I am giving instructions for a 'zip' graft bind-off , it is invisible and does not add extra rows. You may have your own favorites but I highly recommend this method here! I discovered this bind-off in a sock pattern designed by Spindleknitter, (Kirsten Hall), called 'ZIPRELAXAGON'. I realised that it would work really well as a bind-off for the abdomen on my butterfly design, so I asked Kirsten if I could use it and she kindly gave her permission. If you have not used this method before you can follow the YouTube link below. It offers a video demonstration of the technique: http://www.youtube.com/watch?v=P9lmWXkXxwY Alternatively, follow written instructions below: (You might want to practice this, you need to concentrate but it is worth it). s the 'no knit zipper progresses the work will start to fold round so taking shape. CONTINUE;- Make sure the yarn is hanging from the back and that you have 17 STS. ON EACH NEEDLE, (keep the yarn taught until you have worked past it).
Zipper Instructions:
1. Transfer 1 st from the left needle to the right needle. Pass second stitch on right needle over the transferred st. 2. Transfer 2 sts from right needle to left needle. Pass left st over right st. 3. Transfer 2 sts from left needle to right needle. Pass right st over left st. 4. Repeat steps 2 and 3until 1 st remains on needle, pull yarn through loop. You should now have a neatly grafted symmetrical abdomen! See pictures on page 8.
Modular Butterfly Pattern
Abdomen after graft
Pick up four stitches for the head
Head completed
Head & Antennae (7): (SEE DIAGRAM B on page 10).
Here you will be knitting the head and embroidering the antennae without the need to cut the yarn, this cuts down on those horrible ends.
Knitting the head:
Bring yarn up from graft through to the top right of the abdomen then; Pick up and k 4 sts evenly across the top of abdomen through the garter bumps. Turn; (WS): Knit to end. (RS): K1, m 1, k2, ml, k1. 6sts. (WS): Knit to end, turn. (R.S.): K2 tog 3 times. (W.R.): K 3 tog. Pull yarn through loop. Do not cut yarn.
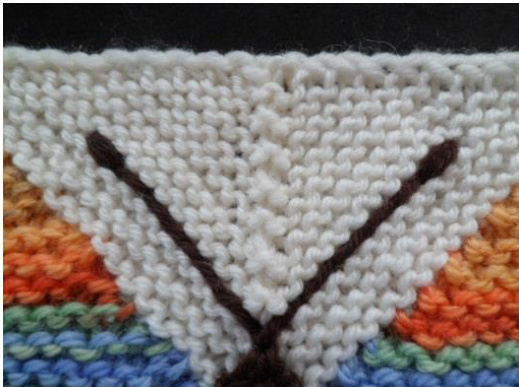
Embroidering the Antennae:
Centralise and secure nose tip level with a furrow, I usually find that it works out to be the third one in. Embroider 1st antennae using back-stitch along the furrow for the desired length over every 3 stitches, back-stitching in the final stitch, (the club), 3 or 4 times, then reverse direction weaving yarn in and out through the back-stitching returning to point of nose. Embroider second antennae in the same way ensuring they are of equal length. Secure head invisibly and weave in ends.
Antennae
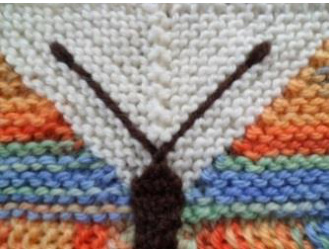
Diagram B: Showing suggestions for embroidery

Garter stitch head
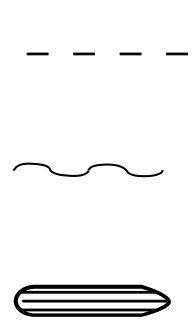
Back Stitch Weave in and out through back-stitch Garter stitch Abdomen
Finishing (8):
With W.S. facing, close seam behind the abdomen by oversewing, weave in ends through the tunnel created. Weave in all other ends. CONGRATULATIONS! You have completed your Butterfly Square.
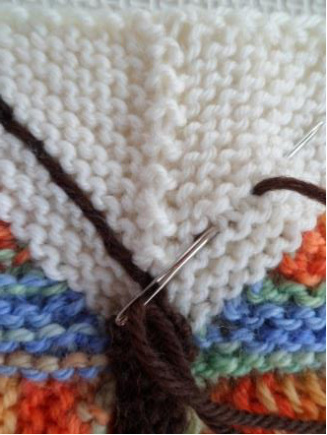
Seam before oversewing
Seam after oversewing
Embroidering the abdomen:
Using CC sew the edges of border together between cast on edge and wings. With doubled SCC yarn embroider the head and abdomen by brining the chain selvedges together with satin or cross-stitch forming a point at the tip of the abdomen if desired. Weave in ends.
Example of an alternative abdomen design


