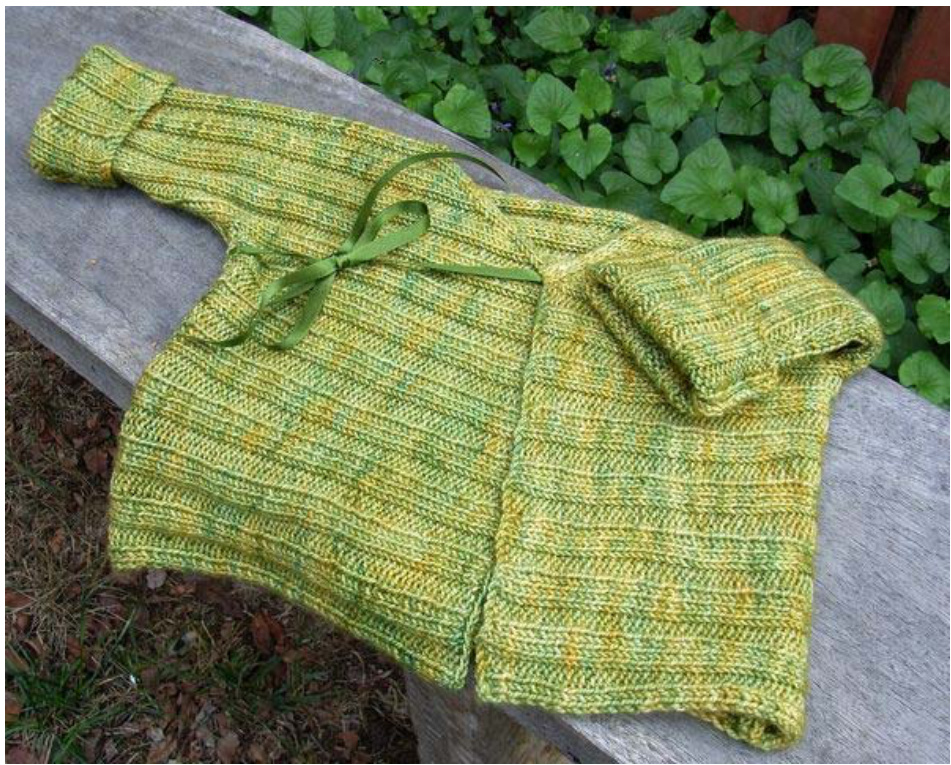
Clementine's Baby Kimono
A ribbed wrap cardigan, inspired by a couple of baby jacket patterns, including one featured in Australian Family Circle magazine, June 2005. This pattern is written in a single size for newborn to 4 months, with a couple of suggestions for variations.
Information
Materials: [See notes regarding yarn quantity and pattern variations.] $3\times509$ skeins Koigu KPPPM (175 yards/160 metres per skein), or other fingering/baby/sock/4ply weight yarn to achieve required tension 1m narrow ribbon for ties Needles: 3.5mm straights Tension (gauge): 36 rows and 28 sts to 10 cm, worked in K3 P3 ribbing, when blocked and pressed flat.
Notes:
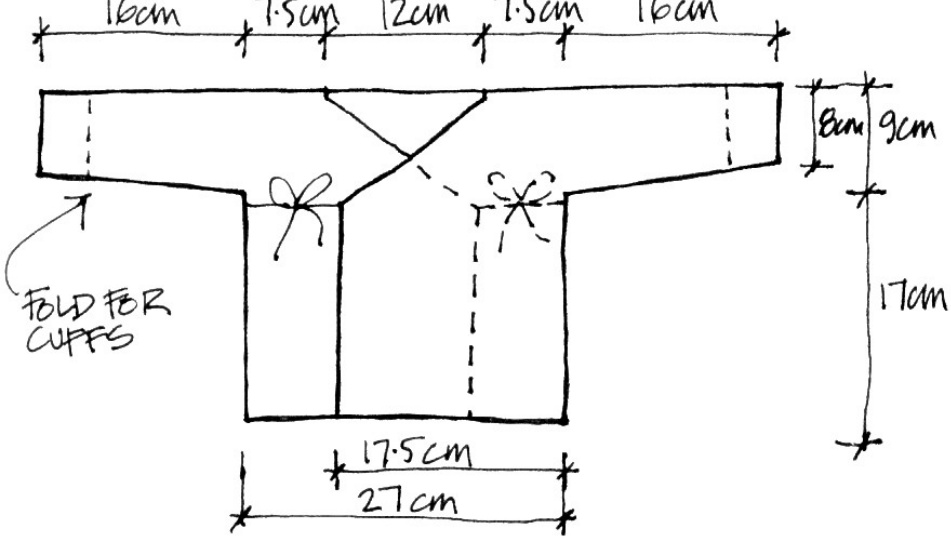
The Kimono is knitted from right to left sleeve, in a K3 P3 rib. The left front piece is knitted separately and live stitches picked up when you reach the left shoulder. The fronts overlap, with a tapered neck edge and ties to the side seam at the underarm. The Kimono uses approximately $360\mathsf{m}$ of yarn, but can be knitted from 2 skeins Koigu (320m of yarn) by using the alternative asymmetrical left front, as photographed. Another variation, (not written, and requiring more yarn), would be to knit both fronts without any decreases, and providing button closures to the top corner of the fronts. The buttons can be moved to suit the baby's girth and growth. To finish the garment, ribbon ties are attached. You could substitute knitted 3 stitch i-cord if you have enough yarn (and don't get bored by knitting i-cord!). Alternatively, you can use button closures with loop buttonholes. For a loop buttonhole, thread the yarn onto a sewing needle, and stitch back and forth to create a loop (with two strands) the required size for the button. Then stitch over the loop strands with blanket stitch, pulling each stitch close, along the fuil length of the loop.
Techniques:
M1 increases are used throughout. You can see instructions at http://knittinghelp.com/knitting/basic techniques/increase.php (1 suggest the M1F and M1R instructions). Alternatively, use your preferred increase type. Instructions for backwards loop cast on method can be found at http://knittinghelp.com/knitting/basic techniques/index.php Neck and bottom edges are worked with a slip stitch edging, slipping the first stitch of each row knit-wise (Sl1). The cast off method used for the right front is the “"Decorative Bind-off" from "Vogue Knitting: The UIltimate Knitting Book". This provides a more decorative cast off edge. Conventional cast off can be used for the left side seams and left sleeve cuff.
Pattern
Right cuff:
Cast on 49 sts. Row 1 (RS): P2, $^{\star}\mathsf{K}3$ , P3, repeat from \* until last 2 sts, P2. Row 2 to 8: continue in rib as set by Row 1. Row 9: P1, M1 P1, $^{\star}\mathsf{K}3$ , P3, repeat from \* until last 2 sts, P1, M1 P1. [51 sts] Row 10 to 16: continue in rib as set by Row 9, with K3 (WS rows) or P3 (RS rows) for first and last 3 sts. Row 17: K1, M1, P2 \*K3, P3, repeat from \* until last 3 sts, P2, M1, K1. [53 sts]
Right sleeve:
Row 18 to 24: continue in rib as set by Row 17, with P1, K3 (WS rows) or K1, P3 (RS rows) for first and last 4 sts. Row 25: K1, M1, ${}^{\star}\mathsf{P}\mathsf{3}$ , K3, repeat from \* until last st, M1, K1. [55 sts] Row 26 to 32: continue in rib as set by Row 25, with P2 (WS rows) or K2 (RS rows) for first and last 2 sts. Row 33: K1, M1, K1 ${}^{\star}\mathsf{P}\mathsf{3}$ , K3, repeat from \* until last 2 sts, K1, M1, K1. [57 sts] Row 34 to 40: continue in rib as set by Row 33, with P3 (WS rows) or K3 (RS rows) for first and last 3 sts. Row 41: P1, M1, K2 ${}^{\star}\mathsf{P}3$ , K3, repeat from \* until last 3 sts, K2, M1, P1. [59 sts] Row 42 to 48: continue in rib as set by Row 41, with P1, K3 (WS rows) or K1, P3 (RS rows) for first and last 4 sts. Row 49: P1, M1, $^{\star}\mathsf{K}3$ , P3, repeat from \* until last st, M1, P1. [61 sts] Row 50 (WS): K2, ${}^{\star}\mathsf{P}3$ , K3, repeat from \* until last 2 sts, K2.
Right shoulder:
Row 51 (RS): Work across row in rib as set, then cast on 40 sts using backwards loop method. [101 sts] Row 52 (WS): SI1, P2, $^{\star}\mathsf{K}3$ , P3, repeat from \* until last 2 stitches, K2, then cast on 40 sts using backwards loop method. [141 sts] Row 53 (RS): SI1, K2 \*P3, K3, repeat from \* to end. Row 54 to 79: continue in rib as set, and starting each row with Sl1. Row 80 (ws): work across first 69 sts in rib as set, cast off next 3 sts and continue in rib across remaining 69 sts. The first 69 sts of row 80 will form the Centre back- place these on a stitch holder. The last 69 sts of row 80 will form the Right front. Continue on these sts as follows (Right front Row 1):
Right front:
Row 1 (RS): SI1, K2, ${}^{\star}\mathsf{P}3$ , K3, repeat from \* to last 4 stitches, K2tog, K2. Row 2 (WS): SI1, P2, $^{\star}\mathsf{K}3$ , P3, repeat from \* to end. Repeat Rows 1 and 2 a total of 18 times. [51 sts] Row 37 (RS, Cast off): \*K2togTBL, place stitch back on left hand needle being careful not to twist the stitch, Repeat from \* to end.
Left front:
[See below for Alternative asymmetrical left front if making with 2 skeins of Koigu as described in the Notes] Cast on 51sts. Row 1 (RS): $^{\star}\mathsf{K}3$ , P3, repeat from \* to end. Row 2 (WS): SI1, P2, M1, $^{\star}\mathsf{K}3$ , P3, repeat from \* to end. [52 sts] Row 3: SI1, K2, ${}^{\star}\mathsf{P}3$ , K3, repeat from \* to end. Repeat rows 2 and 3 a total of 18 times, increasing 1 st every WS row, 3 sts from the neck edge, and also maintaining the K3, P3 rib pattern with the new stitches. [69 sts, ending with a RS row] Place stitches on a stitch holder.
Alternative asymmetrical left front (See Notes):
Cast on 51sts. Row 1 (RS): $^{\star}\mathsf{K}3$ , P3, repeat from \* to end. Row 2: SI1, P2, M1, $^{\star}\mathsf{K}3$ , P3, repeat from \* to end. [52 sts] Row 3: SI1, K2, ${}^{\star}\mathsf{P}3$ , K3, repeat from \* to last 4 sts, K1, M1, K3. [53 sts] Repeat rows 2 and 3 a total of 9 times, increasing 1 st every row, 3 sts from the neck edge, and also maintaining the K3, P3 rib pattern with the new stitches. [69 sts, ending with a RS row] Place stitches on a stitch holder.
Centre back:
Rejoin yarn at Right Shoulder neck edge and continue working on the 69 sts of the Centre back. Row 81 to 115: work in rib as set, and starting each row with Sl1.
Left shoulder:
Row 116 (ws): sl1, work across sts in rib as set, cast on 3 sts with backwards loop method, and work across Left front sts. [141 sts] Row 117 to 141: continue in rib as set, and starting each row with Sl1. Row 142: Cast off 40 sts, then work across row in rib as set. [101 sts] Row 143: Cast off 40 sts, then work across row in rib as set. [61 sts]
Left sleeve:
Row 144 (WS): K2, \*P3, K3, repeat from \* until last 2 sts, K2. Row 145: P2tog, $^{\star}\mathsf{K}3$ , P3, repeat from \* until last 2 sts, P2tog. [59 sts] Row 146 to 152: continue in rib as set by Row 145, with K1 (WS rows) or P1 (RS rows) for first and last stitch. Row 153: K2tog, K2, \*P3, K3, repeat from \* until last 4 sts, K2, K2tog. [57 sts] Row 154 to 160: continue in rib as set by Row 153, with P3 (WS rows) or K3 (RS rows) for first and last 3 sts. Row 161: K2tog, K1, \*P3, K3, repeat from \* until last 3 sts, K1, K2tog. [55 sts] Row 162 to 168: continue in rib as set by Row 161, with P2 (WS rows) or K2 (RS rows) for first and last 2 sts.
Left cuff:
Row 169: K2tog, ${}^{\star}\mathsf{P}\mathsf{3}$ , K3, repeat from \* until last 2 sts, K2tog. [53 sts] Row 170 to 176: continue in rib as set by Row 169, with P1 (WS rows) or K1 (RS rows) for first and last stitch. Row 177: P2tog, P2,\*K3, P3, repeat from \* until last 4 sts, P2, P2tog. [51 sts] Row 178 to 184: continue in rib as set by Row 177, with K3 (WS rows) or P3 (RS rows) for first and last 3 sts. Row 185: P2tog, P1,\*K3, P3, repeat from \* until last 3 sts, P1, P2tog. [49 sts] Row 186 to 192: continue in rib as set by Row 185, with K2 (WS rows) or P2 (RS rows) for first and last 2 sts. Row 193: Cast off 49 sts
Making up
Before sewing the seams, the knitting needs to be blocked and pressed to open out the rib. This changes the height of the garment substantially. I recommend a steam pressing in addition to blocking to help set the rib open. Sew the underarm and side seams with mattress stich. Cut ribbon into four equal lengths (lf you're making the alternative front, cut into $2\times20\mathsf{c m}$ and $2\times30\mathsf{c m}$ lengths). Attach ribbon to the top corner of left and right fronts, and to the side seams at the underarm, so that the left front laps over the right front. When washing the Kimono in the future, stretch it back out to shape.