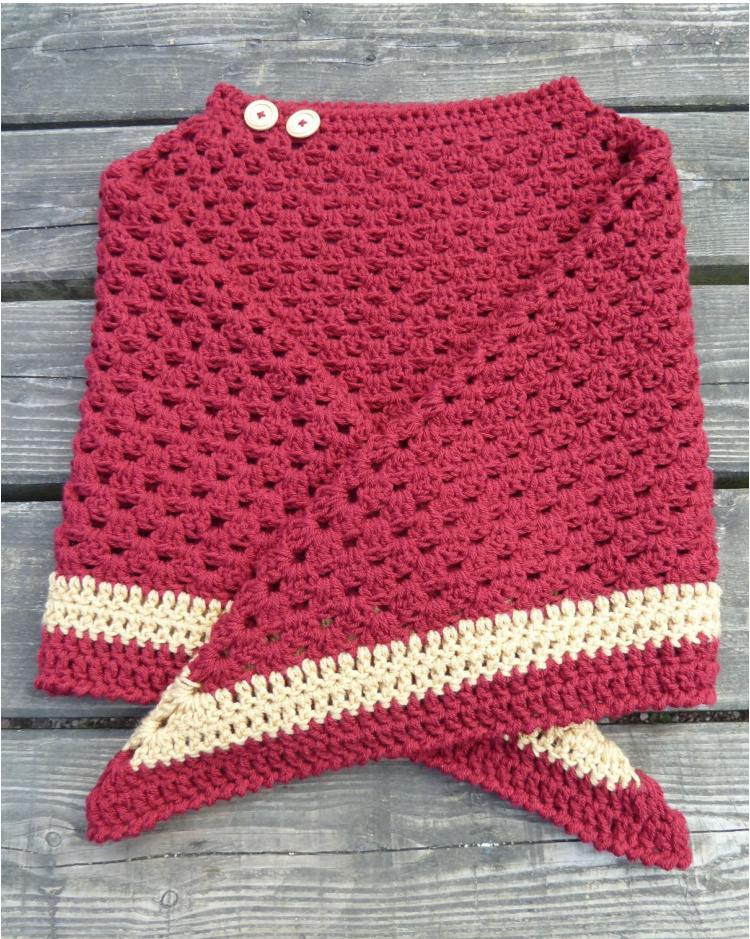
Kimono-s0- Cosy Ladies Poncho
This pattern is @ designed by Heather C Gibbs 2014 and is for Personal use only, not for resale. However, you are welcome to donate, gift as well as sell any of your finished items (if you are an Individual Crafter). If you sell your work online, please credit the work as appropriate and link to my pages where you can: www.facebook.com/KeepCalmAndCrochetOnUk www.keepcalmandcrochetonuk.wordpress.com/ www.mummymakers.co.uk/kcacouk/ www.kcacouk.storenvy.com/ www.ravelry.com/designers/heather-c-gibbs www.craftsy.com/user/pattern/store/833712 www.pinterest.com/KCAcOuK/ www.twitter.com/KCAcOUK www.tinyurl.com/KCACOUK-on-Google
Materials:
Yarn:
600g of YARN A 100g of YARN B (8ply / yarn weight #3) Note: This pattern is worked by holding two strands of yarn together. Hook: 7 mm (US size K or L)
You will also need:
Yarn needle 2 × buttons (optional)
Gauge:
3 tr/dc = 1%4 inches / 3.1 cm
Size:
22 inches / 56 cm at the front; 38 inches / 96.5 cm at centre sleeve point These measurements are approximated, and actual subjects may vary. Pattern will work in other yarns though gauge/size will be different. CHECK YOUR GAUGE, use any size hook to obtain gauge.
Abbreviations:
st(s) = stitch(es) sp = space sl st = slip stitch ch(s) = chain dc/sc = UK double / US single crochet htr/hdc = UK half treble / US half double crochet tr/dc = UK treble / US double crochet rev.dc/rev.sc = reverse single crochet / US reverse single crochet
Stitch Guidance:
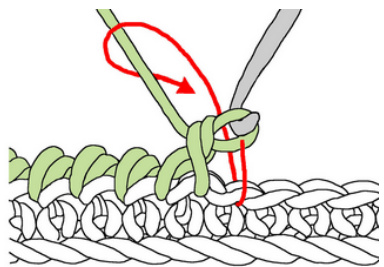
Slip Stitch (sl st): Insert hook in st indicated, yarn over and draw through all loops. Double Crochet/Single Crochet (dc/sc): Insert hook in st indicated and draw up a loop (two loops on hook), yarn over, draw through both loops on hook. Half Double Treble / Half Double Crochet (htr/hdc): Yarn over, insert hook in next st and draw up a loop (three loops on hook), yarn over, draw through all three loops on hook. Treble / Double Crochet (tr/dc): Yarn over, insert hook in next st and draw up a loop (three loops on hook), yarn over, draw through two loops, yarn over, draw through remaining two loops on hook. Reverse Single Crochet (rev.dc/rev.sc): A reverse single crochet stitch is worked the same as for a regular single crochet — except in reverse. Instead of working from right to left, you work from left to right. Insert hook, from front to back, in the next st to the right and draw up a loop (two loops on hook), yarn over, draw through both loops on hook
Pattern:
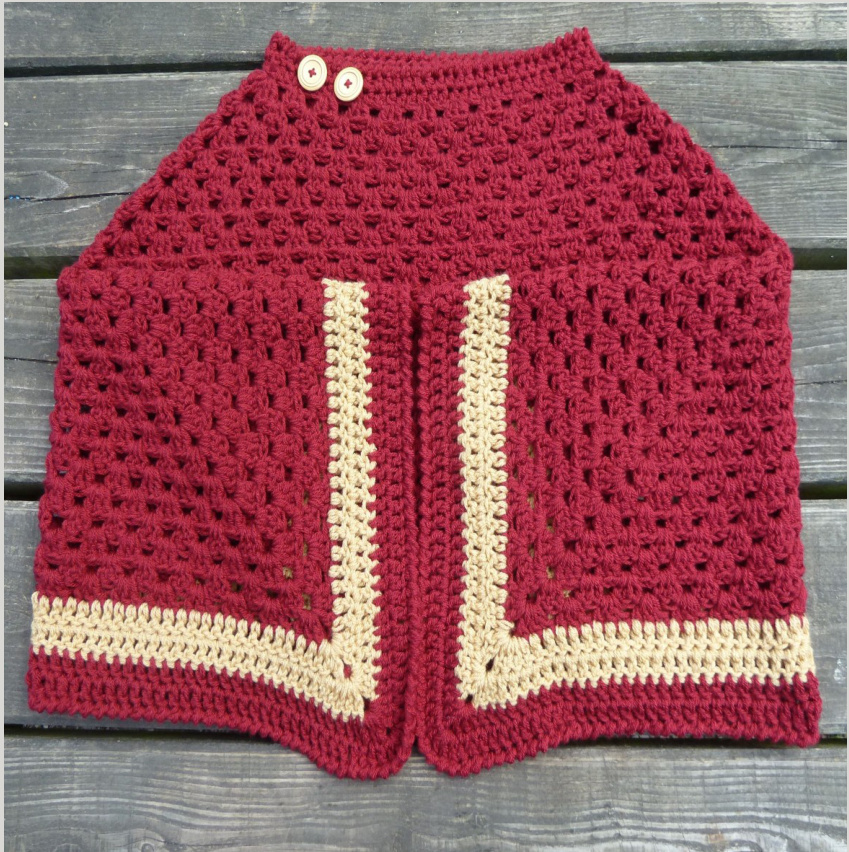
The poncho is worked from the neck downwards. One size fits most but you can lengthen shorten the poncho by increasing or decreasing the number of rows. A block consists of 3 x tr/dc in one st Rnd 1: With Yarn A, ch 66 loosely and taking care to not twist your ch join with sl st in first ch to form a ring. Ch 3, work 2 more tr/dc in same ch as join (first block made), skip next 2 chs, \*3 tr/dc in next ch (next block made), skip next 2 chs\*; repeat from \* to \* 8 times, then work [3 tr/dc, ch 2, 3 tr/dc] in the next st (first increase made); repeat from \* to \* again 10 times then work [3 tr/ dc, 2 ch, 3tr/dc] (second increase made) in the remaining ch join with sl st in top of beginning ch, turn (24 Blocks).
Rnd 2: Sl st into the sp between last blocks made and ch 3 (counts as first tr/dc), 2 tr/dc in same sp (first Block made), then work [3 tr/dc, ch 2, 3 tr/dc] into the 2 ch sp of the previous increase (next increase made); \* 3 tr/dc in sp\* repeat from \* to \* 11 times, [3 tr/dc, ch 2, 3 tr/ dc] into 2 ch sp of the previous increase (next increase made); repeat from \* to \* again 10 times join with sl st in top of beginning ch, turn (26 Blocks). Rnds 3-12: Repeat each row with a block in each sp and an increase on each 2 ch increase of the previous rnd, join with sl st in top of beginning ch to join, finish off and weave in ends (46Blocks) Rnd 13: Attach Yarn B to any 2 ch increase sp, Ch 3 (counts as first tr/dc), 2 tr/dc in same sp, ch 2, 3 tr/dc in same sp, then work 1 tr/dc in each st along until the next 2 ch sp increase, then work [3 tr/dc, ch 2, 3 tr/dc] into the 2 ch sp of the previous increase. Continue with 1 tr/dc in each st along until end, sl st in top of beginning ch to join (150 sts + 2 x 2 ch sps) Rnd 14: Ch 3 (counts as 1st tr/dc) work 1 tr/dc in each st around working [3 tr/dc, ch 2, 3 tr/dc] into each of the 2 ch sp of the previous increases, finish off and weave in ends (162 sts + 2 x 2 ch sps) Rnd 15: Attach Yarn A to any 2 ch increase sp, Ch 3 (counts as first tr/dc), 2 tr/dc in same sp, ch 2, 3 tr/dc in same sp, then work 1 tr/dc in each st along until the next 2 ch sp increase, then work [3 tr/dc, ch 2, 3 tr/dc] into the 2 ch sp of the previous increase. Continue with 1 tr/dc in each st along until end, sl st in top of beginning ch to join (174 sts + 2 x 2 ch sps) Rnd 16: Ch 3 (counts as 1st tr/dc) work 1 tr/dc in each st around working [3 tr/dc, ch 2, 3 tr/dc] into each of the 2 ch sp of the previous increases, sl st to the top of the beginning ch to join, do not fasten off go to edging (186 sts + 2 x 2 ch sps)
Edging:
Ch 1, skip first dc, 1 rev dc/sc in each tr/dc ending 1 rev dc/sc in 1 ch. Finish off and weave in ends.
Collar:
Rnd 1: With right side facing, Join yarn with sl st, at neck edge, in any st, ch 1 (does not count as a st), 1 htr/hdc in same st as beginning ch and each ch around; sl st to top of beginning htr/hdc to join (66 sts). Rnd 2: Ch 1 (does not count as a st), 1 htr/hdc in same st as beginning ch and each ch around; sl st to top of beginning htr/hdc to join. Do not fasten off; edge the collar in the same way you have the body of the poncho (66 sts). Optional: Arrange the poncho so that the 'points' of the poncho are positioned for the arms, then add two buttons for decoration purposes to the collar front.