Calais Shaw/

Calais Shawl
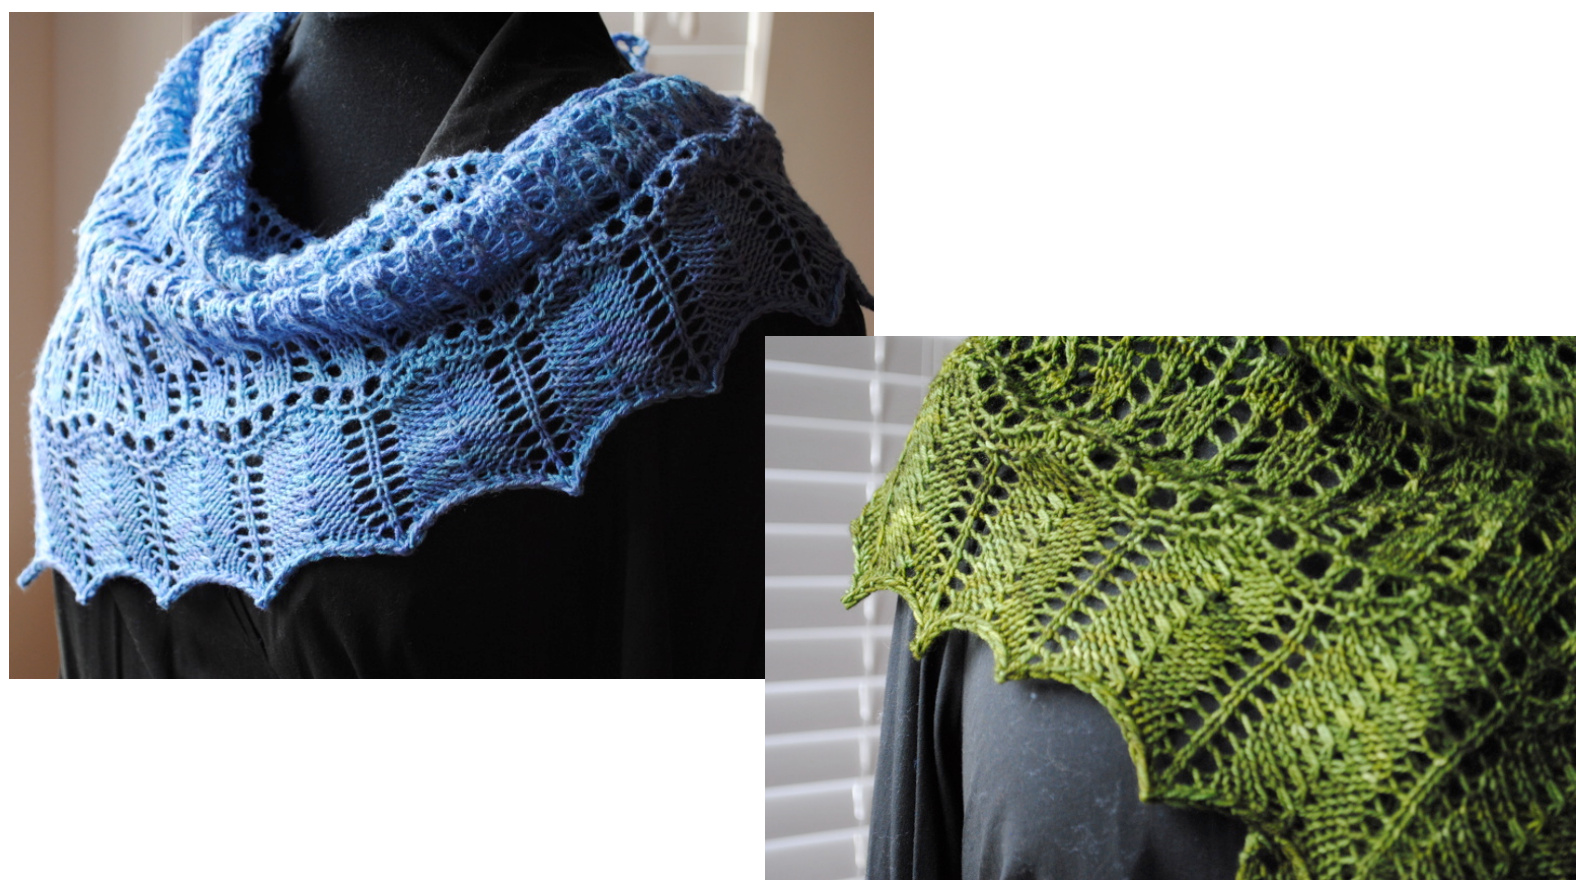
I was given a skein of beautiful blue yarn that inspired this shawl. The stitch pattern that I designed for the body of the shawl reminds me alternately of raindrops or tulips depending on the light and perhaps, my mood. I love how the row of eyelets separating the body from the edging gently curves like a wave. The edging is a very popular Estonian pattern and so to honor Estonian knitting I used their traditional double strand cast off which is a favorite of mine. It gives a beautiful, sturdy and defined edge with plenty of stretch for blocking. I named my shawl after the town of Calais, France, which is on the north coast of France facing England across the narrowest part of the English Channel. I am told that on a clear day you can see the White Cliffs of Dover (England) from the beach. One of their principal industries is Lace Making and Calais Lace is famous throughout the world. This is an easy knit, with quick to memorize pattern repeats. It is top down construction beginning at the neck edge with a few stitches. The pattern makes it so easy to dream while you knit. My dream was of sandy beaches and blue, blue sky and the white cliffs on the horizon as I walked barefoot along the edge of the incoming tide. To have your very own knit-dream you will require: 350 metres (382 yards) of fingering weight yarn in the color that makes youswoon The blue sample was knit with one skein of Yarn Candy Sweet Fiber Silk Merino Fingering. The green sample was knit with one skein of Handmaiden Casbah. 3.75mm (5 US) Addi Lace Needle, 32-inch length Blocked size - 48 inches wide by 22 inches deep
Abbreviations used
Yo - yarn over Pm - place marker rs - right side ws - wrong side
Notes on reading the Charts
The charts provided represent only one half of the shawl. There are two edge stitches at either end of your needle that are not shown on the charts. There is also one center stitch that is not shown on the charts and divides the two halves of the shawl. The four edge stitches are worked in garter stitch (knit every row) and the center stitch is worked in stocking stitch (knit on the right side and purl on the wrong side). When working the charts, begin by working two edge stitches, work through the appropriate row of the chart, work the center stitch, repeat the same row of the chart for the second half of the shawl and end with two edge stitches. All wrong side rows (even numbered rows) are worked as follows: Knit 2 edge stitches, purl until there are two stitches remaining, knit 2 edge stitches. All right side rows (odd numbered rows) are read from right to left and from the bottom to the top of the chart.
Chart $A-s2,\!k\eta,\!p2s s o$ is meant to be knit as follows: Slip two stitches together knit wise, knit 1 stitch, pass 2 slipped stitches over the knit stitch.
Please note that all wrong side rows (even numbered rows) on both charts are purled not knitted.
Beginning the shawl
Cast on two stitches by making two backward loops onto the needle. Knit 6 rows. Next row: Knit 2 stitches, do not turn work, but rotate your work one quarter turn to the right and pick up and knit 3 stitches along the edge of the garter ridges (one stitch for each garter ridge). Turn the work another one-quarter turn to the right and pick up and knit two stitches from the cast on edge. You should have a total of 7 stitches on the needle. Next row (ws): knit 2, purl 1, pm, purl 1, pm, purl 1, knit 2. You now have a marker on either side of the center stitch. As you increase on either side of the center stitch be sure to keep your markers right next to the center stitch.
Chart A
Begin chart A and work rows 1 to 22. Repeat rows 17 to 22 a further 12 times. The red box marks the 6- stitch repeat. Each time you repeat rows 17 to 22 you will add enough stitches for another 6 stitch repeat. Work repeats until you have 195 stitches on the needle, ending after row22. You should have 2 edge stitches, 95 pattern stitches, 1 center stitch, another 95 pattern stitches, and 2 edge stitches for a total of 195 stitches on the needle.
The next eyelet section is not part of either chart- written instruction only.
Eyelet row 1 (rs): Knit 2, yo, knit to center stitch, yo, knit center stitch, yo, knit until 2 stitches left, yo, knit 2. Eyelet row 2 (ws): Knit to center stitch, purl center stitch, knit to end. Eyelet row 3 (rs): Knit 2, yo, (knit 2 together, yo) repeat between () until there is one stitch left before the center stitch. Knit 1, yo, knit center stitch, yo, knit 1 (yo, knit 2 together) repeat between () until there are two stitches left, yo, knit 2. Eyelet row 4 (ws): Knit to center stitch, purl center stitch, knit to end. Eyelet row 5 (rs): Knit 2, yo. Knit to center stitch, yo, knit center stitch, yo, knit until there are 2 stitches left, yo, knit 2. Eyelet row 6 (ws): Knit to center stitch, purl center stitch, knit to end. You should now have 207 stitches on the needle - Two edge stitches, 101 pattern stitches, 1 center stitch, 101 pattern stitches, and two edge stitches.
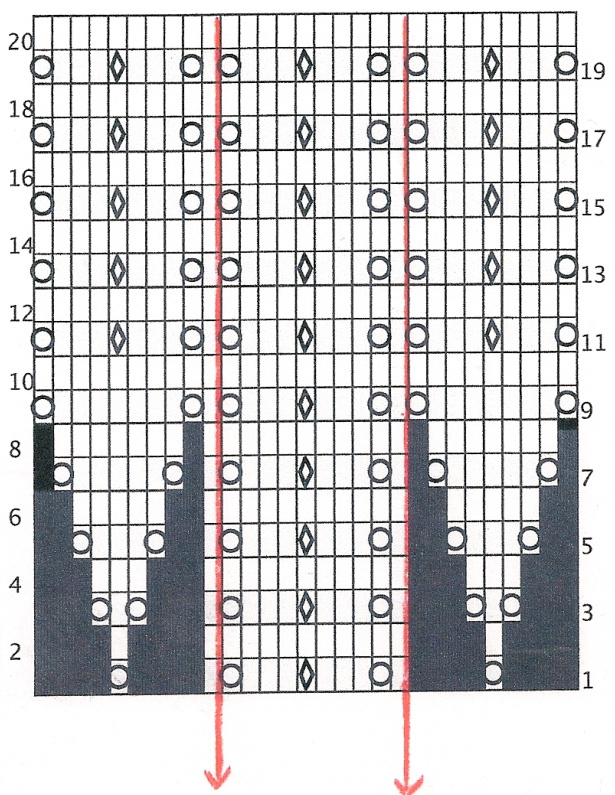
Chart B
Begin chart B at row 1. The 10 stitch repeat is inside the red lines. All wrong side rows are worked: Knit 2 edge stitches, purl until 2 stitches are left, knit 2 edge stitches. You can work the entire chart through row 20, or if you run out of yarn you can stop after completing any wrong side row. If you have extra yarn you can make your edging as deep as you'd like. After completing row 20, you may go back and repeat rows 19-20 as many times as you'd like to. Keep in mind that you will need a doubled length of yarn if you wish to do the Estonian bind-off that follows.
Estonian Bind-Off
Pick up another length of yarn and use two strands of yarn held together for the bind-off. Leaving a tail of the new strand to weave through later, begin bind-off: Slip one stitch knit-wise, knit one stitch, (slip these two stitches back to left needle and knit two together through the back loop. Knit one) Repeat between () until all stitches are bound off and you are left with one stitch. Cut the yarn leaving a tail and enlarge the last stitch until Only the tail is left.
Finishing
Weave in your tails but do not trim until after blocking. Soak your shawl in cold water and no rinse wool wash (I love Eucalan) for at least 30 minutes to allow the fibres to become completely saturated. Roll in a white towel or spin out excess water using the spin cycle of your washing machine. Using T pins and blocking wires block while wet. Stretch while blocking to open up the lace pattern. The edging can be pinned out into points where the yo, knit 1, yo naturally creates a point. Leave until completely dry or overnight. Remove the pins and blocking wires, trim the tail ends of yarn, and dance around the room with your newshawl. Copyright 2010 Judy Marples This pattern is provided free of charge for your personal use only. Please do not use it for any other purpose without the permission of the designer.
Chart A
Key p1. No Stitch s2,k1,p2ss0 yo k1
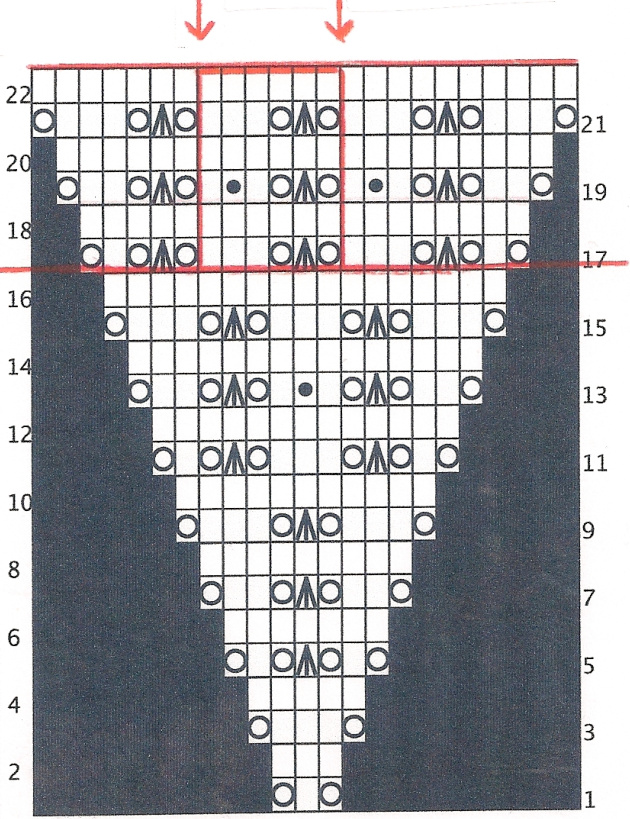
Chart B