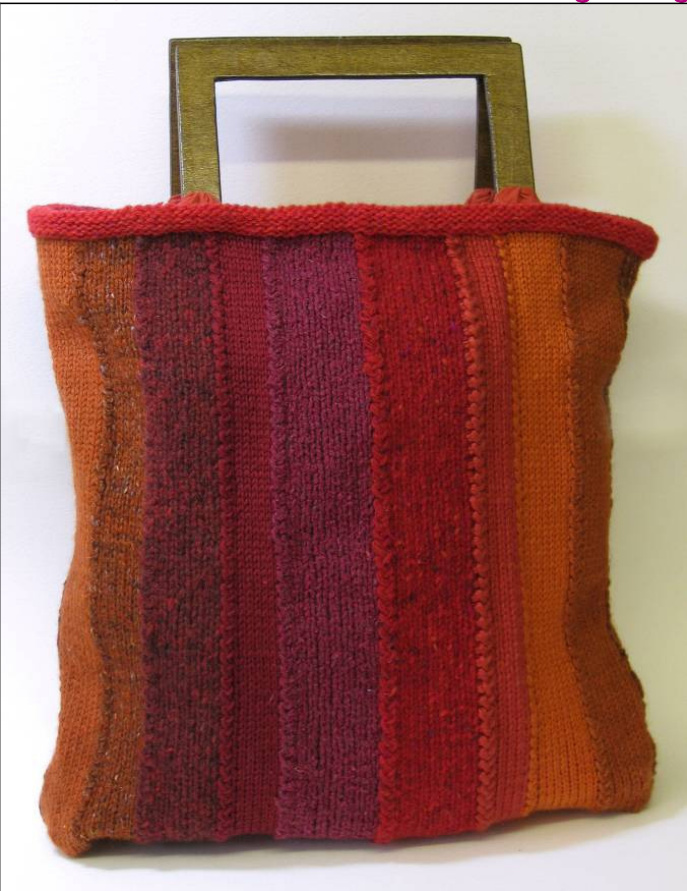
PANEL TOTE BAG米
worked in panels of stocking stitch which are joined as you work 米 this pattern can be worked in any DK yarn or a mix of DK and Aran-weight yarns Panel Tote Bag is worked in a mix of DK and aran weight yarns in wool and cotton. Finished Size: 36cm (14in) wide and 42cm (16%in) high (excluding handles)
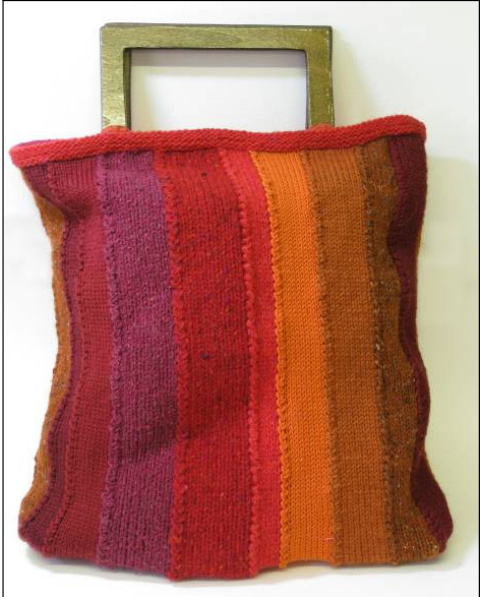
Back of Tote bag
| INFORMATloN-please read through the information and the pattern before starting toknit Yarn:DKyarnin9coloursoramixofDKandaran-weight OtherMaterials | |
| yarns.Approx30gofeachcoloursoprojectissuitablefor oddments,partballs,orstashyarns. SuggestedYarns and Colours:DK and aran-weightyarn, anyfibre.Usesolidcoloursortheprojectcanalsobe | LiningFabric:Onepiece offabric toline thebag-to measure at least 45 x 82cm (18in x 32in). Onepieceoffabrictocoverbagbase-tomeasure18x 39cm (7% x 151/2in) BagBase:7.5x36cm(3x14in) piece ofplastic canvas |
| worked in multi-coloured,handpainted,or variegated yarns.Choose apaletteofsimilar colours or useup all coloursinyourstash. | Apairofready-madehandles |
| Needles: a pair of 3.75mm (Uk9/US5) knitting needles. Tension: approx 24 sts and 30 rows to 10cm (4in) measured over stocking stitch (1 row k, 1 row p) using 3.75mmneedlesandDKyarn.Thistensionisaguideonly as the overall tension across several panels will vary with the weight (thickness) of yarn used. | Writteninstructions,photography,design and pattern layout ClaireCrompton2011 Nopartofthisleafletmaybereproducedorusedinany form without writtenpermission of ClaireCrompton.The design is copyrighted and must not beknitted for re-sale. Theleaflet is copyrighted and must not be reproduced for re-sale. |
Abbreviations
cm - centimetre, in - inch(es), k- knit, mm - millimetre, p - purl, RS - right side, st(s) - stitch(es), st st - stocking stitch (1 row k, 1 row p),wS -wrong side
START KNITTING HERE
Using 3.75mm needles and A, cast on 10 sts. Work in st st, starting with a k row, until strip measures 40 cm (16in) long, ending with a k row. Cast off purlwise.
PANEL 2
Using B, cast on 8 sts. Row 1 RS K7, slip last st knitwise, do not turn work. Join to Panel 1 by holding the right edge of Panel 1 in left hand with RS facing, insert right hand needle into thespacebetween thefirstand second stitches on row 1 ofPanel 1.
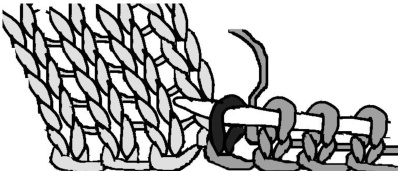
Wrap the yarn round the needle and pull a loop through. Pass the slipped stitch over this new stitch. Turn work.
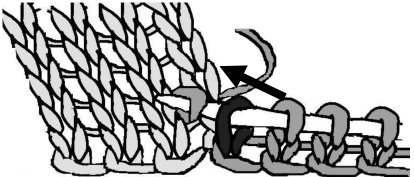
Row 2 P to end. Row 3 K7, slip last st knitwise, do not turn work. Miss 1 space above where you last picked up on Panel 1 then insert right hand needle into next space betweenfirst and second stitches.
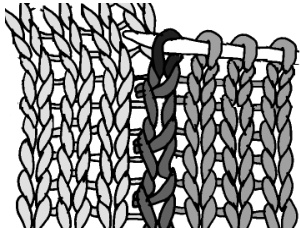
Wrap yarn around needle and pull a loop through. Pass the slipped stitch over this newstitch.Turn the work.
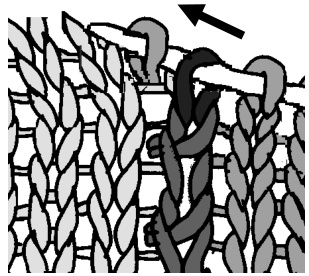
NOTE: to join the panels properly, it is important that you insert your needle into every alternate space (or row) between the first and second sts. Pull the join apart and you will be abletoseethespacethatyoulast worked into. Miss the space above it and work into the next one. Repeat rows 3 and 4 until Panel 2 measures same as Panel 1, and Panel 2 has been joined to the last row of Panel 1, ending with Row 3. Cast off purlwise.
PANEL3
Using C, cast on 8 sts and work as given for Panel 2, joining it to the right edge of Panel 2.
PANEL 4
Using D, cast on 8 sts and work as given for Panel 2, joining this panel to the right edge of Panel 3. Continue to add panels, joining in the same way, as follows: Panel 5-E, cast on 10 sts Panel 6 -F, cast on 10 sts Panel 7 - G, cast on 6 sts Panel 8 - H, cast on 10 sts Panel9-l,cast on10 sts Panel 10 - A, cast on 8 sts Panel 11 - B, cast on 6 sts Panel 12 - C, cast on 10 sts Panel13-D,cast on 10 sts Panel 14 -E,cast on 6 sts Panel 15 - F, cast on 10 sts Panel 16-G,cast on 10 sts Panel 17 - H, cast on 8 sts Panel 18 - l, cast on 8 sts The bag piece should measure approx 72cm (28in) wide. But panels can be added or omitted to achieve this measurement. With RS of work facing,using 3.75mm needles and A, pick up and knit 1 stitch for every cast off stitch across top edge of bag piece. Row 1 WS Knit. Row 2 Purl. Row 3 Knit. Row 4 Purl. Row 5 Knit. Row 6 Knit. Change to B. Row 7 Purl. Row 8 Knit. Row 9 Purl. Cast off loosely knitwise.
FINISHING
Sew in all ends neatly. Block and press bag piece.
TOPEDGING
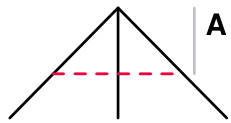
Measure width of bag piece from side edge to side edge. Measure length of bag piece from cast on edge to below Top Edging. Keep these measurements to make a lining. On knitted piece, join side seam and ends of Top Edging. Join base seam, starting at side seam. Fold top edging to ws and slip stitch into place. To make a flat base: turn the bag through so the RS is inside.At the lower corners place the side seam along the base seam and pin. Measure 4cm (1%in) down from the point (A). Place a pin as a marker. Sew horizontally across the corners at this marker.
LINING
Using the width and length measurements taken previously, add a total seam allowance of 3cm (1%4in) on to each of these measurements. Cut out a piece of lining fabric using these measurements. Fold in half with RS together and join the side and base seams using a 1.5cm (%in) seam allowance. Fold 1.5cm (%in) to ws along open top edge and press. Make a flat base in the same way as the knitted bag.
ATTACHING HANDLES
Measurethetopofthebagandplace a pin to mark the centre. Position one handle centred on this pin. Attach the handle to the knitted bag using strong sewing thread. How you do this will depend on the style of handle. It may have metal fittings or there may be a slot in the ends of the handles to sew through. Attach thesecond handle tothe other side to match.
FINISH LINING
Slip bag lining into knitted bag. Slipstitch into place along bottom edge of Top Edging.
REMOVABLE BASE
Usetheplasticcanvasasitis orcover it in lining fabric as follows: Cut a piece of lining fabric 18 x 39cm (7% x 1512in). Fold in half with right sides facing and sew the long seam and one short seam, using a seam allowance of 1.5cm (%in). Turn the cover through to the right side and press. Insert the plastic canvas. Fold the extra fabric at the open edge to the inside and slipstitch the edges closed. Insert base into bag.


