Pattern: Cabled handwarmers
hotoffthesheep.wordpress.com
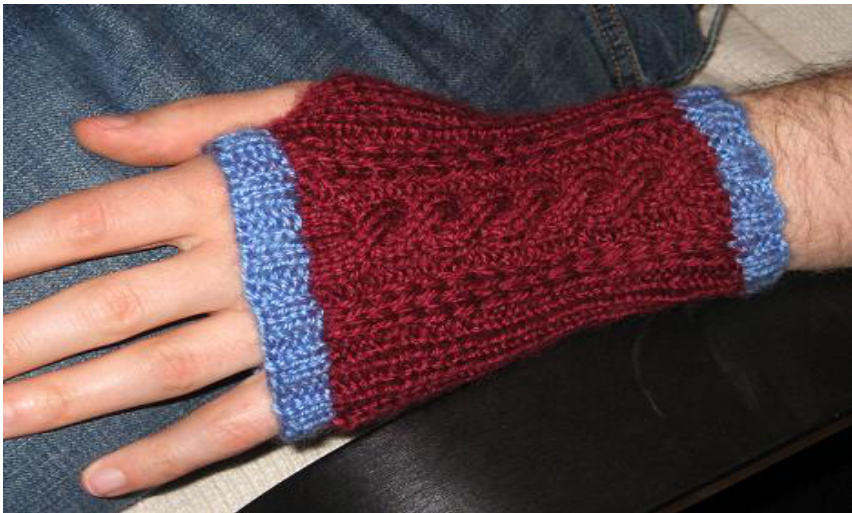
Needles: Double-pointed, size 3; 1 cable needle; 3 stitch markers . Yarn: Any worsted-weight yarn, two colors. I used Bernat Satin Sport acrylic yarn, in Wine (main color) and Clear Sky (contrast color); this used up about half the main color skein and less of the contrast color skein. Notes: The stitch “kdy' refers to knit with double yarn', meaning knit a stitch but wrap the yarn around the needle TWICE before pulling it through the stitch. ‘pdy’ will be the same but with purl. You may want to leave out the increases/decreases around the thumb, depending on the shape of the hand you're knitting for. If your hand is a lot wider under your thumb than at the wrist, then do the increases; if not, then you can leave them out. Both options are posted below. Finally, with all the increases and decreases, writing down every knit and purl would get too cluttered. Just remember that the two stitches just outside the panel should both be purl, and everything should line up in a [k1,p1] rib. 1 get repeated to form the cable and edging that goes up the back of the hand. (16 st. When working in the round: Row 1: pl, slip 2 purlwise wyib (letting the extra yarn loops drop), p2, k6, p2, slip 2 purlwise wyib (letting the extra yarn loops drop), p1 Row 2: pl, slip 2 purlwise wyib, p2, k6, p2, slip 2 purlwise wyib, pl Row 3: p1, kdy2, p2, k6, p2, kdy2, pl Row 4: Repeat row 1 Row 5: Repeat row 2 Row 6: pl, kdy2, p2, cable 3 front, p2, kdy2, p1 When working flat: Row 1: k1, slip 2 purlwise wyif (letting the extra yarn loops drop), k2, p6, k2, slip 2 purlwise wyif (letting the extra yarn loops drop), k1 Row 2: pl, slip 2 purlwise wyib, p2, k6, p2, slip 2 purlwise wyib, pl Row 3: k1, pdy2, k2, p6, k2, pdy2, k1 Row 4: pl, slip 2 purlwise wyib (letting the extra yarn loops drop), p2, k6, p2, slip 2 purlwise wyib (letting the extra yarn loops drop), p1 Row 5: kl, slip 2 purlwise wyif, k2, p6, k2, slip 2 purlwise wyif, k1 Row 6: pl, kdy2, p2, cable 3 front, p2, kdy2, pl The pattern, with increases around the thumb: hand: Cast on 44 stitches in the contrast color. Rounds 1-4: Repeat [k2,p2] (44 st. Round 5: Switch to main color. k21, place frst stitch marker. k1, kdy2, k10, kdy2, k1. Place second stitch marker. k7. Make 1 stitch in the yarn between the two stitches below. (45 st.) From now on, the panel pattern will be worked between the two stitch markers; the rest of the round will be done with a [kl,pl] rib. At the beginning of the next round, start with a purl stitch. When you reach the first stitch marker, you should have just done a purl stitch. Then work Row 1 of the panel pattern, then continue in the rib, starting with a purl. You should end the round with a knit, to then begin the next round with a purl. -20: Work in the regular pattern. (You'll get through 2 1/2 repeats of the cable pane. Now we'll start making the increases below the thumb. When you increase, you'll knit front and back in the first and last stitches of each round (regardless of whether the stitches was supposed to be a knit or a purl). In the following row, you'll know whether to knit or purl the new stitches, by just making them fit into the rib pattern. You may want to add in a stitch marker at the end of the round to show you where to increase. 21: Work regular pattern until last stitch; knit the last stitch front and back. (46 st. Rounds 22-26: Knit the first stitch front and back; then follow the regular pattern for the rest of the round; knit the last stitch front and back. (Make sure you don't mis-align the rib). (48, 50, 52, 54, 56 st.) Round 27: Knit first stitch front and back; then follow the regular pattern for the rest of the round. (57 st.) Rounds 28-35: Continue in the pattern. (57 st.) Now we'll work the rounds as fat rows, to leave a hole for the thumb. Round 36: Turn to knit the wrong side, rather than to continue in the round. Work the regular pattern (using the Flat version of the panel pattern). (57 st.) Round 37: Turn to knit the right side, rather than to continue in the round. Work the regular pattern. At the end of round, k2tog the last two stitches. (56 st.) Rounds 38-49: Continue as above, turning at the end of each round. On all wrong side rows, p2tog the last two stitches; on all right side rows, p2tog the last two stitches. (55, 54, 53, ... , 44 st.) Round 50: Do not turn the piece; continue knitting in the round from the previous row. Everything should be as before, except that you're missing one stitch, so the round will start and end with a knit stitch. At the end of the round, make 1 stitch in the yarn between the two stitches below; this will be the missing purl stitch. (45 st.) Rounds 51-52: Continue in the round in the regular pattern. Round 53: Switch to contrast yarn. K2tog, then knit the rest of the round. counds 54-57: Repeat [k2,p2]. Round 58: Cast off loosely, following the [k2,p2] patter Left hand: Same as right hand, but the panel will be in a diferent position. The only difference is where you put the stitch markers: Round 5: Switch to main color. k8, place first stitch marker. k1, kdy2, k10, kdy2, k1. Place second stitch marker. k20. Make 1 stitch in the yarn between the two stitches below. (45 st.) Note that the round will begin with a knit, instead of with a purl; this changes a few of the guidelines above. Just follow the rib and you'll be ok! Otherwise, the entire pattern is the same. The pattern, without increases around the thumb (simpler version): hand: Cast on 44 stitches in the contrast color. Rounds 1-4: Repeat [k2,p2] (44 st. Round 5: Switch to main color. k21, place frst stitch marker. k1, kdy2, k10, kdy2, k1. Place second stitch marker. k7. Make 1 stitch in the yarn between the two stitches below. (45 st.) From now on, the panel pattern will be worked between the two stitch markers; the rest of the round will be done with a [kl,pl] rib. At the beginning of the next round, start with a purl stitch. When you reach the first stitch marker, you should have just done a purl stitch. Then work Row 1 of the panel pattern, then continue in the rib, starting with a purl. You should end the round with a knit, to then begin the next round with a purl. : Work in the regular pattern (you'll get through 6 repeats of the cable panel). (45 s1 Now we'll work the rounds as fat rows, to leave a hole for the thumb. Round 36: Turn to knit the wrong side, rather than to continue in the round. Work the regular pattern (using the Flat version of the panel pattern) At the end of the round, p2tog the last two stitches. (44 st.) Round 37: Turn to knit the right side, rather than to continue in the round. Work the regular pattern. (44 St.) Rounds 38-49: Continue as above, turning at the end of each round. (44 st.) Round 50: Do not turn the piece; continue knitting in the round from the previous row. Everything should be as before, except that you're missing one stitch, so the round will start and end with a knit stitch. At the end of the round, make 1 stitch in the yarn between the two stitches below; this will be the missing purl stitch. (45 st.) Rounds 51-52: Continue in the round in the regular pattern. Round 53: Switch to contrast yarn. K2tog, then knit the rest of the round. counds 54-57: Repeat [k2,p2]. Round 58: Cast off loosely, following the [k2,p2] patter Left hand: Same as right hand, but the panel will be in a diferent position. The only difference is where you put the stitch markers: Round 5: Switch to main color. k8, place first stitch marker. k1, kdy2, k10, kdy2, k1. Place second stitch marker. k20. Make 1 stitch in the yarn between the two stitches below. (45 st.) Note that the round will begin with a knit, instead of with a purl; this changes a few of the guidelines above. Just follow the rib and you'll be ok! Otherwise, the entire pattern is the same.


