Purple Pansy Designs
By Denise Bein Kroll
Change it Up Il
This pattern builds on the concept of the Change it Up pattern. The difference is that instead of manipulating the stitches to create a visual "break" from the striping in self-striping yarns, this pattern celebrates the stripes by taking the fun to the next level. These also socks make great stashbusters if you don't mind weaving in a few extra ends.
Materials:
Yarn: About 50g each of 2 self-striping yarns (minimum) Pictured Yarns: (Argyles) - Kureyon Sock by Noro, Light Fingering / 3 ply, 70% Wool, 30% Nylon, 462 yards / 100 grams Size: Women's Medium; circumference 9" length 9.5" (Stripes) - Trekking XXL by Zitron, Fingering / 4 ply, 75% Wool, 25% Nylon, 459 yards / 100 grams Opal Smile by Zwerger Garn, Fingering / 4 ply, 75% Wool, 25% Nylon, 465 yards / 100 grams Opal Sweet & Spicy by Zwerger Garn, Fingering / 4 ply, 75% Wool, 25% Nylon 464 yards / Note: The sample socks only used around 30 grams of each striping yarn. Amount needed for contrasting ribbing and heels is about20g. The sample footies used about 20g of each striping yarn. Needles: US1 / 2.25 mm 32" circular or dpn needles Gauge: 32 St / 48 rows = 4" in stockinette Notions: Stitch markers (optional), row counter, darning needle
Pattern notes:
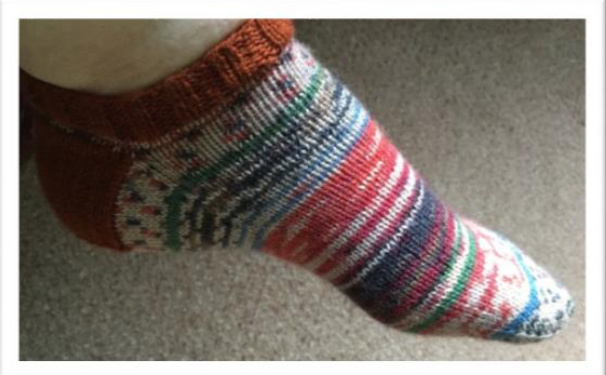
These patterns can be worked with just two colors of striping yarns, but a third color in solid or semi-solid makes a nice contrasting ribbing. heel and / or toe. The footie pattern features some extra short row shaping to give a deeper heel area which helps prevent the sock from slipping down inside a shoe. Pattern includes choice of optional heel instructions to add a personal touch to the sOcks. There will be extra ends to weave in, but the results are worth it! There are two pattern choices: Skinny stripe magic: combines 2 different self-striping yarns to create a new mix of colors and stripes. This is my go-to option for footies, so I have included the instructions for that option.
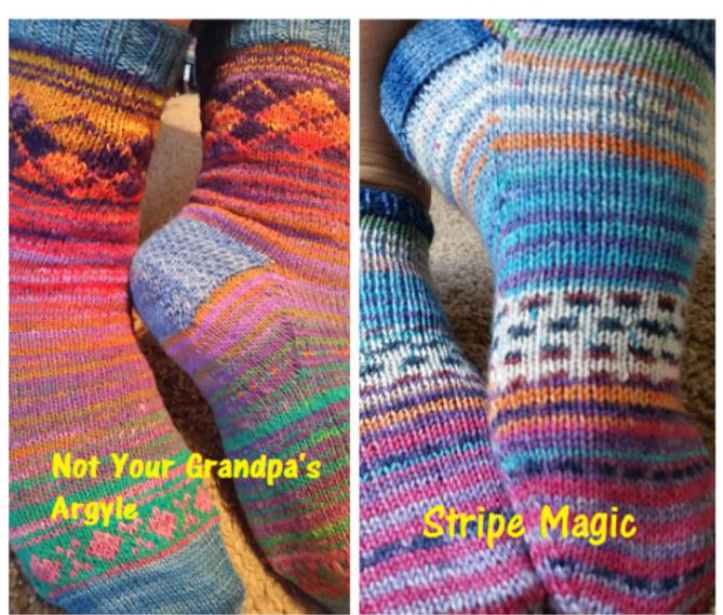
Not your grandpa's argyle:
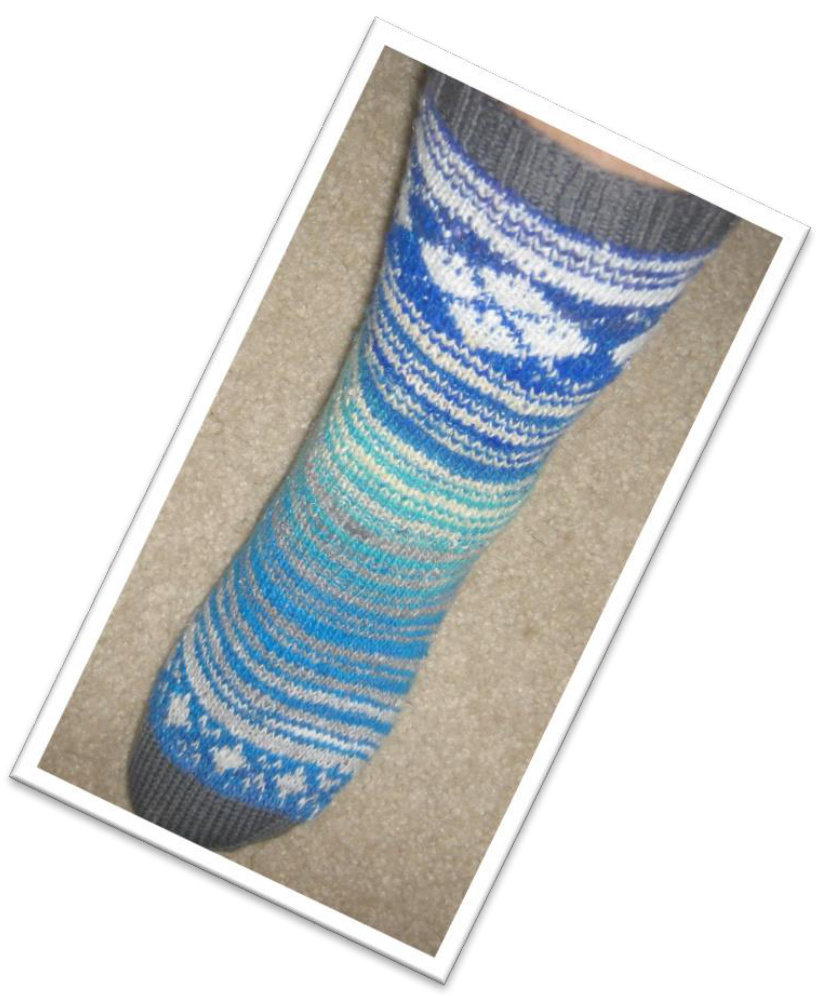
Combines a little striping with a little color work. This design works best with long color change yarn (like Noro Kuryeon sock, Knit-Picks Chroma or Zaurberball), but can also be used for semi-solid or monochromatic stripes. It will also knit up well in solid colors. On the socks pictured above, I opposed the MC/CC yarns for each sock. Effects may vary by yarn choice.
Abbreviations and Terms:
K - Knit S1 - Slip one stitch purl wise with yarn in back K2tog - Knit two stitches together P2tog - purl two stitches together SSK - s1, s1, knit two stitches together SK2P - slip 1, knit 2 together, pass slip stitch over the knit 2 together; 2 stitches have been decreased (Also called CDD central double decrease) ML - Magic Loop (knitting in the round using one long circular needle) MC - Main Color CC - Contrasting color / color two S1WYIF - Slip one stitch purl wise with yarn in front dpn - double point needle K1tbl - knit 1 stitch through the back loop W&T - slip stitch to right needle, insert yarn between slipped stitch and next stitch (back to front on knit row, front to back on purl row - this creates wrap), then return slipped stitch to left needle and turn work.
Sock Directions:
With MC or CC2, Cast on 60 (64) stitches using long tail cast-on, join to work in the round (being careful not to twist). Work K1, P1 ribbing for 12 rounds, then work charts for Cuff/Leg as specified for chosen sock design option.
Heel Flap Options:
Slipped Stitch:
Heel set up:
Row 1: S1, K1 to end The heel is worked flat on first 30 (32) stitches unless otherwise noted. Row 2: S1, P to end Repeat these 2 rows until 32 total rows have been worked If working a contrasting color heel, turn work or slip stitches across needle 1, join yarn from opposite side and purl across first 30(32) stitches with the new color to make a neater transition to the heel flap. Reverse Slip stitch:
Heel Flap:
Row 1: S1WYIF, K1 to end Row 2: S1, P1, to end Choose an option from the sidebar to give your sock a custom look. (Or substitute any heel of your liking... no rules!) Repeat these 2 rows until 32 total rows have been worked Once the flap is done, the "turn" is worked using short rows, this will create a right angle "bend" to the sock tube and make it more foot-shaped.
Eye of Partridge:
Turn heel:
Row 1: S1, K1 to end Row 1: Sl1, knit 17(18), SSK, K1; turn work Row 2: S1, P to end Row 2: Sll1, purl 7, P2tog, pl; turn work Row 3: S1, \*S1, K1, repeat from \* to last two stitches, k2 Row 3: Sll, knit to one stitch before gap formed by turn, SSK, K1, turn work Row 4: S1, P to end Row 4: S1l, purl to one stitch before gap formed by turn, P2tog, P1, turn work Repeat these 4 rows until 32 total rows have been worked Repeat last 2 rows until 18 stitches remain (for 30 st size, there will be no K1/P1 after the decrease on the last repeat) Knit across remaining heel stitches (unless contrasting color yarn was used).
Gusset:
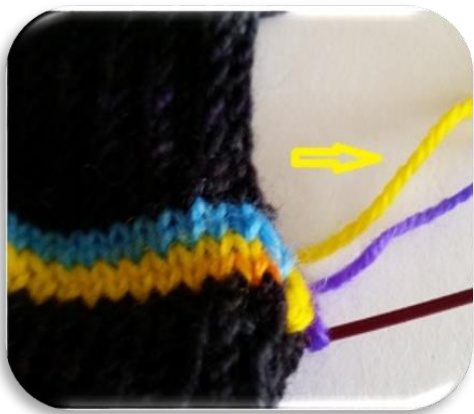
The gusset is created by picking up stitches to connect the heel flap to the rest of the sock and set up the stitches to return to knitting in the round. Stitches will be picked up on each side of the heel flap starting with the edge of the knitting where the yarn strands are idle. The extra stitches from the gusset will be decreased to fill in the angle created with the heel turn and finish the shaping of the foot. The gusset is complete when the current number of stitches is equal to the number of stitches used to knit the cuff/leg. (Tutorials for picking up stitches can be found on knittinghelp.com or YouTube, however, be sure to follow the specific instructions for this pattern) Set up: Cut heel yarn leaving enough tail to weave in later. With right side facing, using he strand of yarn\* attached between instep and heel, pick up 17(18) stitches on each side of heel flap, adjusting stitches on needles according to type needle used. (Cut yarn will be added in at beginning of next stripe).
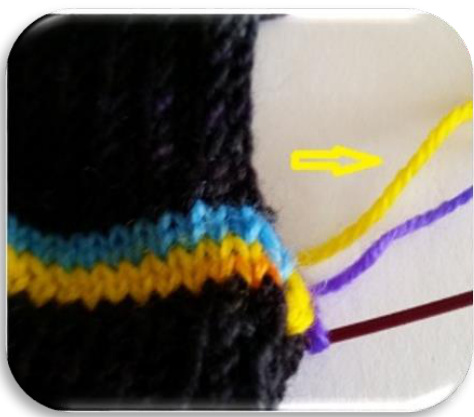
\* Note: If you used a contrasting color for heel, there will be 2 strands, pick up the strand of next color in stripe sequence. For circular: all gusset and heel stitches will be on first needle, all instep stitches will be on second needle. For dpns: Picked up stitches plus half the heel stitches on needle 1, half the heel stitches plus picked up stitches on needle 2 all instep stitches on needle 3. The round now begins where the gusset and instep stitches meet. f needle type, the gusset decreases will be worked as Round 1: K1, SSK, Knit to 3 stitches before beginning of instep, K2tog, K1, knit instep. Round 2: Knit all stitches Work these two rounds until 60 (64) stitches remain. Continue working on foot until you have sufficient length to reach base of big toe\* \* Note: Toe can be worked 3 ways: Stripe pattern can be continued into toe Use a single color of the striping yarns Discontinue striping and work toe in contrasting yarn
Toe shaping:
Round 1: K1, SSK, knit to 3 stitches before beginning of instep stitches, k2tog, k1, kl, ssk, knit to 3 stitches before end of instep stitches, k2tog, k1. Round 2: Knit all stitches Repeat rounds 1 & 2 until 32 stitches remain, then round 1 only until 20 stitches remain. Use Kitchener stitch to graft toe closed. Knit 2nd Sock and enjoy!
Footie Directions:
Choose a cuff option from sidebar
Note: for a more generous ankle, cast on 60 (64) stitches and omit increases Knit 4 rounds
Heel set up:
Knit 27 (29), W&T, P24 (26), W&T, Knit 27 (29), picking up wrapped stitch, S1, P29 (31), picking up wrapped stitch, you are now ready to work the heel on 30 (32) stitches.
Heel Flap
Select heel flap option of your choice from the sock pattern.
Turn heel:
Row 1: Sl1, knit 17(18), SSK, K1; turn work Row 2: Sll, purl 7, P2tog, p1; turn work Row 3: Sll, knit to one stitch before gap formed by turn, SSK, K1, turn Row 4: Sll, purl to one stitch before gap formed by turn, P2tog, P1, turn Repeat last 2 rows until 18 (20) stitches remain (for 60 st size, there will be no K1/P1 after the decrease on the last repeat)
Gusset:
Set up: Cut heel yarn leaving enough tail to weave
in later. with right side facing, using the next color of yarn in the stripe sequence\* (this strand will be
Cuff options
Lacy Cuff Cast on 60 (65) stitches using a long tail cast-on, join to work in the round (being careful not to twist) Round 1: \*P1, K3, P1, repeat from \* around Round 2: \*P1, YO, SK2P, YO, P1, repeat from \* around Repeat these two rounds a total of 3 times (6 rounds) work round 1 once, knit 1 round (decrease 1 stitch on last round to reduce stitches to 64 if making larger size)
Ribbing
Cast on 56 (60) stitches, using a long tail cast-on, join to work in the round (being careful not to twist) Work 8 rounds of any ribbing (K1, P1; K2, P2; K1tbl, P1, etc) Knit 1 round, increasing 4 stitches evenly spaced (60/64 st) (for ML, one stitch at beginning and end of each needle) attached between instep and heel), pick 17(18) stitches on each side of heel flap, adjusting stitches on needles according to type needle used: \* Note: there will be 2 strands waiting if a contrasting color was used for heel. Pick up the strand of next color in stripe sequence. Copyright 2016 Denise Bein Kroll. This pattern is intended for personal use only. Please do not make items to sell or for profitwithoutmypermission.Pleasedonot sharethispatternwithoutpropercredif. For circular: all gusset and heel stitches will be on first needle, all instep stitches will be on second needle. For dpns: Picked up stitches plus half the heel stitches on needle 1, half the heel stitches plus picked up stitches on needle 2 allinstep stitches on needle 3. The round now begins where the gusset and instep stitches meet. Regardless of needle type, the gusset decreases will be worked as follows: Round 1: K1, SSK, Knit to 3 stitches before beginning of instep, K2tog, K1, knit instep. Round 2: Knit all stitches. Work these two rounds until 60 (64) stitches remain.
Foot:
Continue working on foot in stripe pattern until you have sufficient length to reach base Of big toe\* \* Note: Toe can be worked 3 ways: Stripe pattern can be continued into toe Use a single color of the striping yarns Discontinue striping and work toe in contrasting yarn
Toe shaping:
Round 1: K1, SSK, knit to 3 stitches before beginning of instep stitches, k2tog, kl, k1, ssk, knit to 3 stitches before end of instep stitches, k2tog, k1. Round 2: Knit Round 3: Knit Repeat rounds 1 & 2 until 32 stitches remain, then round 1 only until 20 stitches remain. Use Kitchener stitch to graft toe closed. Knit 2nd Sock and enjoy!
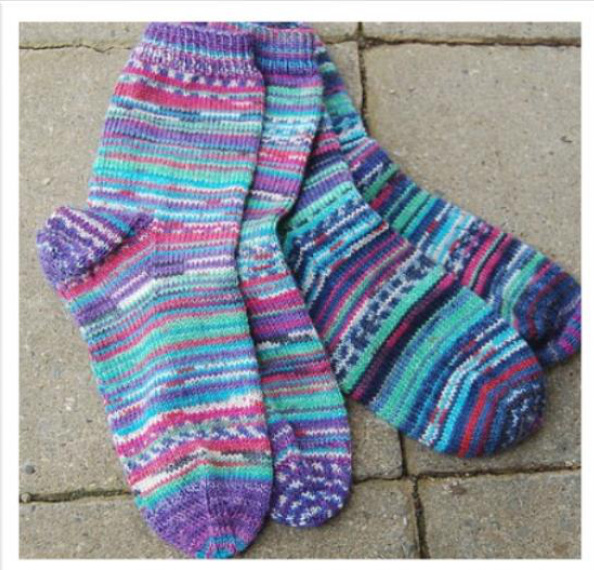
Stripe Magic
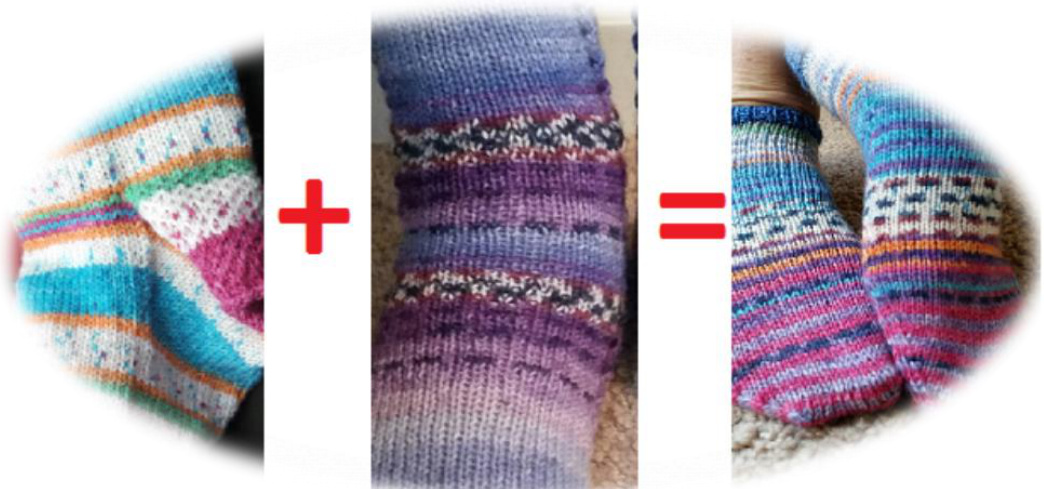
There are no charts for this pattern. The types of socks you can create are up to your imagination and your stash. This is also a super fun way to use up yarn leftover from other projects (as illustrated above). The 'magic' happens when two different self-striping yarns are combined to redefine the already patterned stripes. This can be achieved by using: 2 different brands of self-striping sock yarn 2 different colorways of the same yarn Or by knitting from opposite ends of the same yarn In the pictured socks, I used a contrasting solid for ribbing and heel. This is up to you. The fun of this pattern is to use what you have and play with color. The sock leg will be knit 4-6" (or to the desired length). Work the footies according to the footie pattern. Cast on for either the sock or footie pattern pick your stripes option and have fun!
-Photo by Chris Maclean
Stripe Magic Options
Option 1:
2x2. this works well with patterned yarns or yarns that create longer striping rounds. Alternate 2 rounds of each color.
Option 2:
Warning! Combining self-striping yarns is addictive. There are many other ways to achieve variety in stripes. These options could lead to your own experimentation! 1-2-3 stripe sequence Round 1 MC Round 2 & 3 CC Round 4-6 MC Round 7 CC Round 8&9 MC Round 10-12 CC
Option 3:
-Photo by Petra Preyer Spiral stripe. This also works well with variegated yarns. Set up round: Knit 1 or 2 rounds with MC. Next round: knit to halfway point of sock, drop MC, add CC, knit around until reaching the point the MC was dropped, continue knitting around in this manner, changing yarns when arriving at the point the previous yarn was dropped. Note: it is important to not twist the new and old working yarn, simply start working with the new color when arriving at the point it is hanging.
Not your Grandpa's Argyle
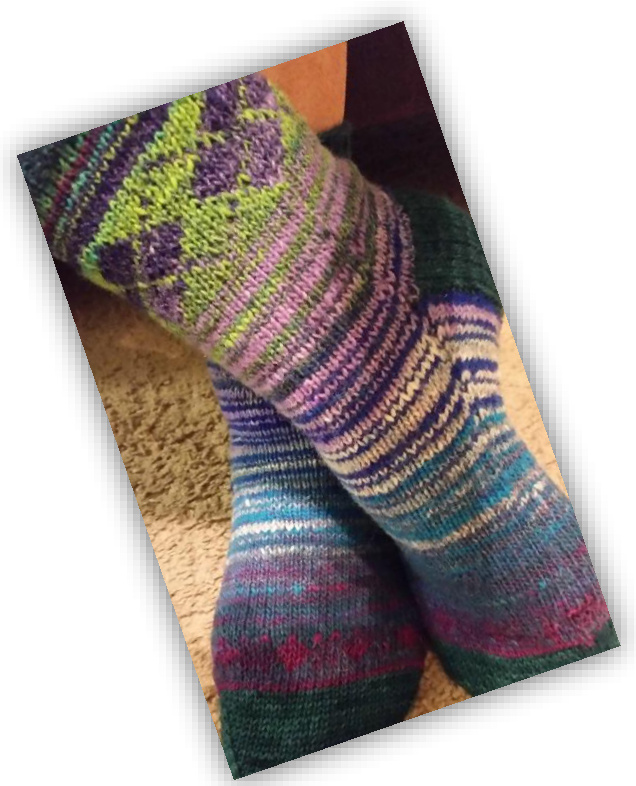
Pattern Note:
This pattern is worked on 64 stitches. It incorporates a random stripe pattern with a little bit of color work. Each section" of patterning is counted by rounds separately, so the count will start over as you move from one section to another. Use one size larger needle for color work section. Follow pattern instructions for ribbing. After working ribbing, change to stockinette, work stripes as follows for 1l rounds.
| Rounds | Count |
| Round 1&2:MC | 2 |
| Round3&4:CC | 2 |
| Round5:MC | 1 |
| Round 6:CC | 1 |
| Round 7:MC | 1 |
| Round 8-10:CC | 3 |
| Round 11:MC | 1 |
To keep floats loose, it may be helpful to knit the sock inside out for the color-work portions. A video of this technique is available here: Knitting socks inside out If a larger size is required, this pattern can be adapted for 72 stitches. If choosing to do a 72 stitch sock, heel will be worked on the first 36 stitches.
Change to larger needles.
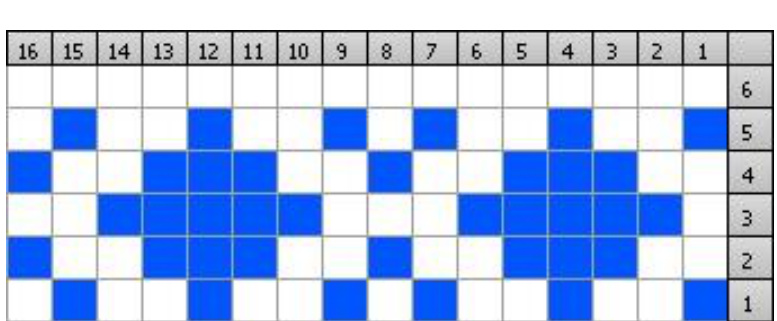
Begin leg chart, pattern repeat is bordered in red, work repeat 3 times around leg for 15 rounds (beginning and end of round are at center of repeat, there is one partial repeat on either side of the full repeats). After 15 rounds of chart are complete, resume working stripe sequence give below chart. Change to smaller needles. If making a shorter cuff, begin heel. Copyright 2016 Denise Bein Kroll. This pattern is intended for personal use only. Please do not make items to sell or for profit withoutmypermission.Please donot sharethispatternwithout proper credit.
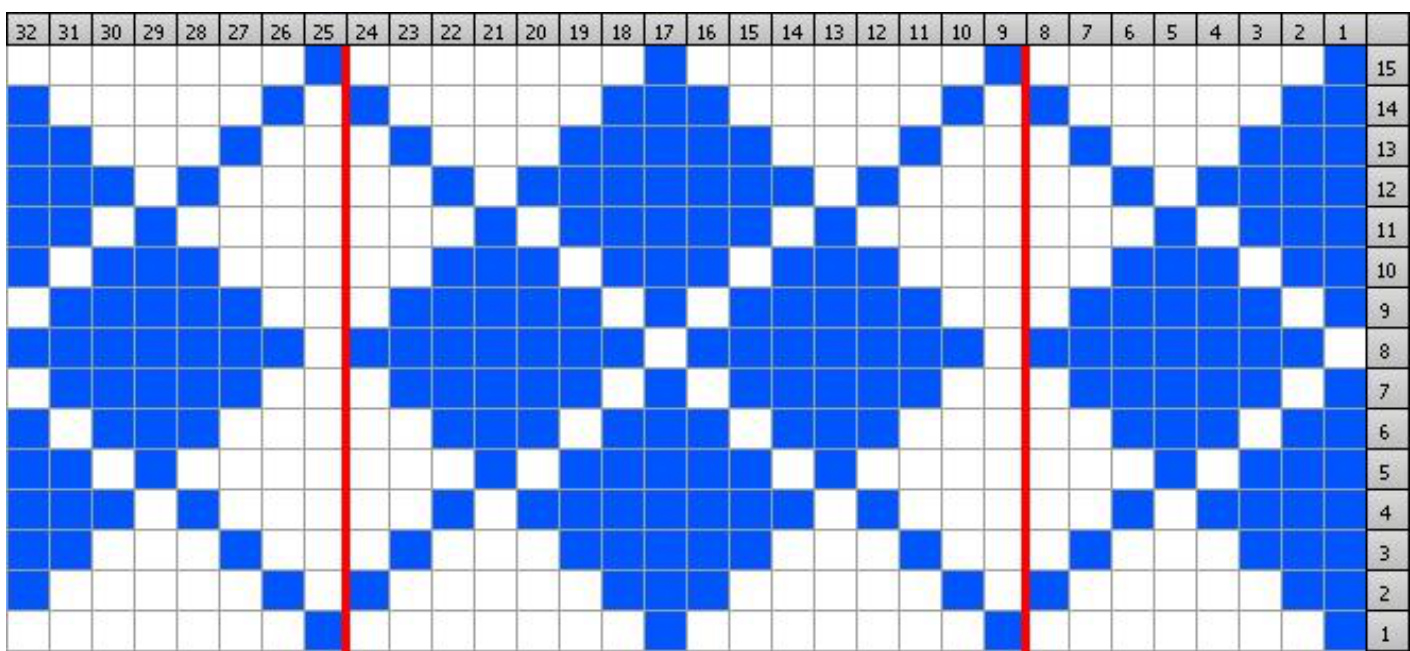
Leg Chart: (pattern repeat bordered in red)
Stripe sequence continued:
| Rounds | Count |
| Round 1:MC | 1 |
| Round 2: CC | 1 |
| Round 3:MC | 1 |
| Round4&5CC | 2 |
| Round 6&7 mC | 2 |
| Round 8:CC | 1 |
| Round9: MC | 1 |
| Round 10&11:CC | 2 |
| Round 12&13:MC | 2 |
| Round 14:CC | 1 |
| Round15:MC | 1 |
| Round 16:CC | 1 |
| Round 17-19MC | 3 |
| Round 20&21:CC | 2 |
| Round 22: MC | 1 |
| Round 23:CC | 1 |
| Round24&25:MC | 2 |
| Round26&27:CC | 2 |
| Round28:MC | 1 |
| Round29&30:CC | 2 |
Copyright 2016 Denise Bein Kroll. This pattern is intended for personal use only. Please do not make items to sell or for profit without my permission.Please do not share thispattern without proper credit.
Work heel
Foot: Continue in stripe sequence (working gusset shaping until returning to the original number of stitches cast on). The stripe sequence will be worked starting with the 11 rounds before chart 1 and continuing with rounds 1-30 above. Repeat stripe sequence from the beginning 11 rounds if additional length is needed. work until 2.5 inches from desired length ending with MC stripe. Knit toe chart work 1 round even, then work toe shaping.
Copyright 2016 Denise Bein Kroll. This pattern is intended for personal use only. Please do not make items to sell or for profit withoutmypermission.Please donot sharethispatternwithout proper credit. -Photo by Lynn Hensley


