The Bubble-Fly Sweater Designed by Nancy Barrett
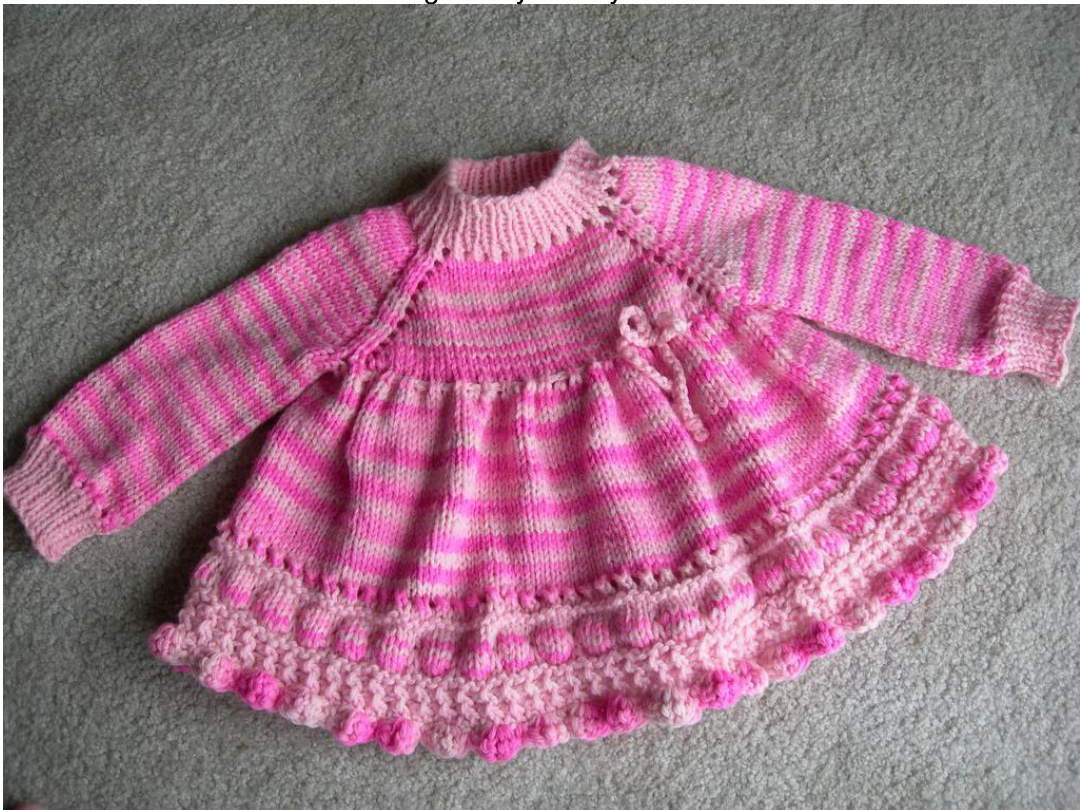
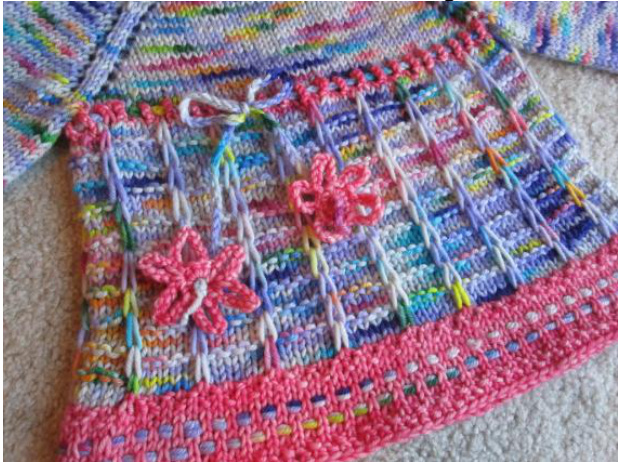
Sweater #1: Worsted weight yarn, colorway eyelet waistband with (K1, YO) increases, Bubbles hem.
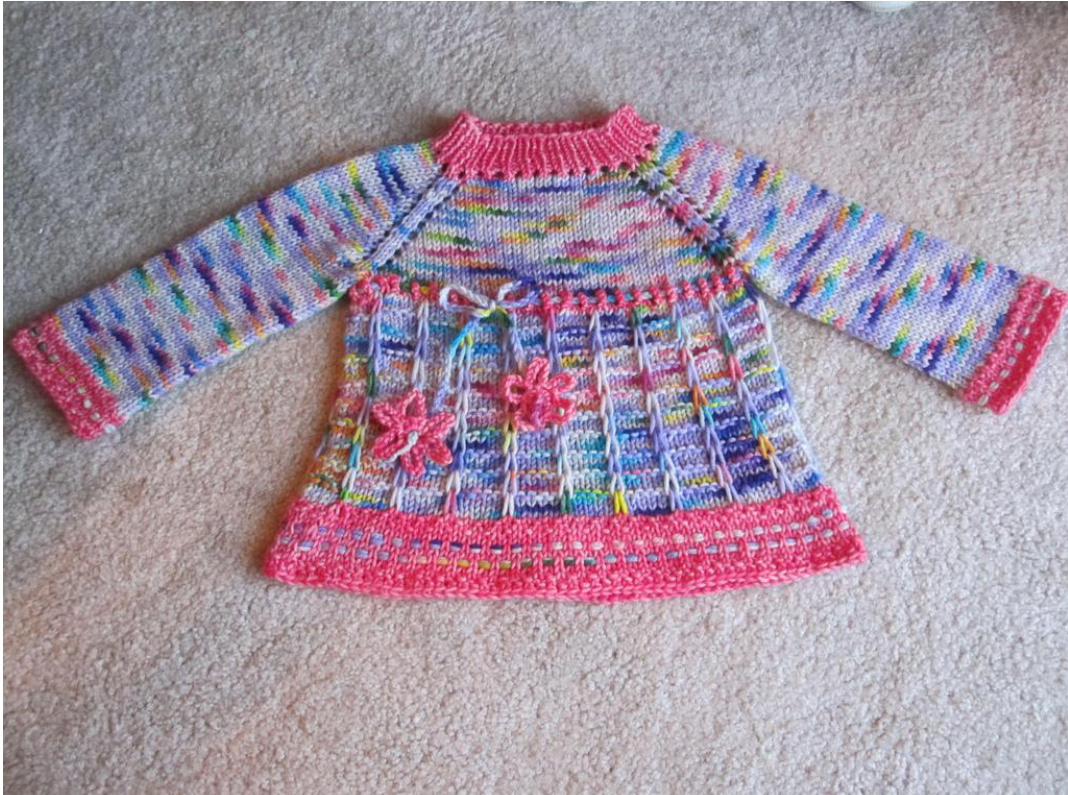
Sweater #2: DK weight yarn, Raisin Stitch waistband, skirt increases are (K2, KFB), slip stitch patterned skirt, Woven Swedish Dot hem. The Bubble-Fly sweater is a basic girl's sweaterpatternwhichisveryflexiblefor customizations and modifications. I have written this pattern in a somewhat modular way in order to allow you options for creating a one of a kind item for you child. Pick and choose among the elements or add your own to come up with something new! Since so many details can be customized, I willassumethatyouknowthe childyou are knitting for and can take a chest measurement.Take this measurementbelow the armpits. Use the chest measurement to determine which size you should knit. You can then customize the overall length and arm length to fit the child and design you have in mind. Take the arm measurement from the armpit to the wrist. Try to tickle the model AFTER you get your measurement, not before. As a rough guidance, size A is roughly equal to a size 18 months and the size C is roomy enough to fit my size 5T preschooler. Sized A, B, C. Length from back of neck to hem = 12", 14", 16” Arm length = 8", 9", 10 Chest circumference = 20", 21.25", 22"
Materials:
7-12 oz worsted or DK weight yarn Size 4, 16" circular needles Size 6, 16" and size 20+" circular needles for the fully-skirted sweater Size 6 DPNs or your preferred small circumference knitting method Stitch holders (2) or scrap yarn Yarn needle Crochet hook, size G (for casting off, creating a drawstring, and for the bubble edging. The size of hook is somewhat flexible, so use what you have!) Stitch markers (4)
Gauge:
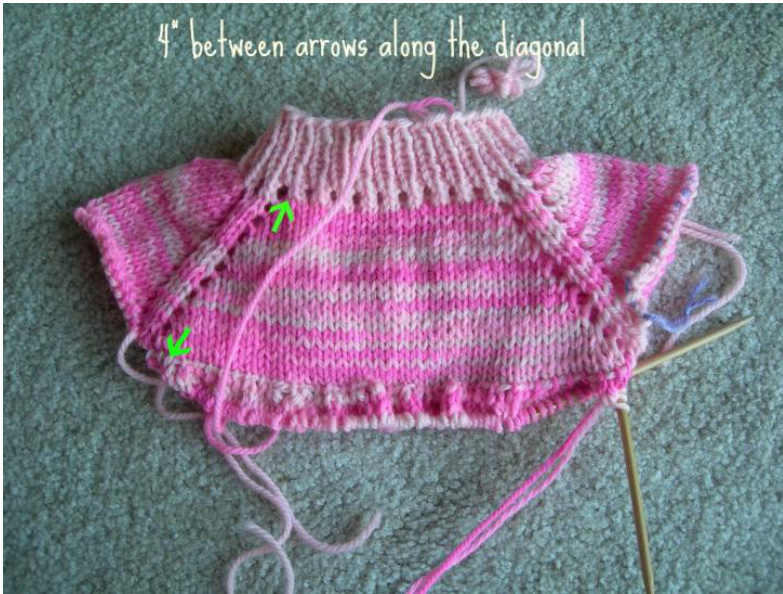
4.5 stitches per inch for both worsted and DK Body: Cast on 60 (68, 76) stitches with the long tail method in trim color, using the smaller needles. Join and knit K1P1 ribbing for 1". Create eyelet round: \*(YO, ssk) repeat from \* around to end. Switch to colorway and larger needles. R1: K20 (22, 24), place marker, K10 (12, 14), place marker, K20 (22, 24), place marker, K10 (12, 14), place marker. R2: all sizes \*(K1, YO, K to 1 stitch before marker, YO, K1, slip marker) repeat from \* four times, until you reach the end of the round. R3: all sizes K around Repeat R2, R3 until the piece measures 4", 4.5", or 5" when measured on the diagonal from the bottom of the ribbing along the increases leading to the armpit. End with a R3.
Place arm stitches on holders or scrap yarn:
K to first marker, place the stitches between the arm markerson a holder, cast on 4 stitches with the backward loop method, K across the body to next stitch marker, place next set of arm stitches on a holder, cast on 4 stitches, K across the body to end of round. You may choose to replace the round marker in a less noticeable location, such as the center of the underarm on one side. Since the sweater is the shaped the same on the front as it is the back, you could elect to leave the round marker where it is and designated that side as the back of the sweater if you do not want to move the marker.
Create Waistband and choose a skirt style:
All of the options below assume that you have an even number of stitches. You can simply add or subtract a stitch to create an even number if necessary. Here, also, is where you can choose whether you want the skirt to be full as shown in sweater #1 or slender as in sweater #2. 1 have included instructions for both skirt types in each option. Option A: A simple eyelet row with or without a ribbon or drawstring, as shown in sweater #1. Keeping with main color yarn, \*(YO, K1) repeat from \* around to round marker. This creates a very full skirt on the sweater with a dainty eyelet row at the division between body and skirt. If you would rather have a more slender skirt, replace the K1 above with K2. Option B: Banded eyelet waistband for a ribbon or drawstring, fluffy or slender skirt. switch to trim color. R1:P R2: Create an eyelet row with (YO, ssk) repeats R3:P Switch to main color. \*(K2, KFB) repeat from \* around to end for a slender skirt. For a fuller skirt \*(K1, YO) to end Option C: Simple ribbed waistband without any eyelets, this can be done in colorway or trim. Switch to trim color if desired. R1-4: K1, P1 to end. Switch to main color. \*(K2, KFB) repeat from \* around to end for a slender skirt. For a fuller skirt \*(K1, YO) to end. Option D: shown in sweater #2, raisin stitch eyelet and slender skirt. Switch to trim color R1: K R2: Raisin stitch from Barbara K Walker's Second Treasury of Knitting Stitches. This stitch is completed in the following manner: \*(K1, K1 YO, slip the original stitch over the YO, \*\*[YO slip the previous YO over the new YO,] repeat from \*\* twice morel) repeat from \* to end. This set of actions occupies TWO stitch places on your round.You are creating a shortchainofstitchesontopof thesecond stitch and then moving on to the next set of twostitches.Thefirstknit stitchof thenext settacksthechainofstitchesfromthe previous set down into the row and creates a small opening through which you can thread a ribbon or drawstring through.
R3:K
R4: switch to main color. \*(K2, KFB) repeat from \* around to end for a slender skirt. For a fuller skirt \*(K1, YO) to end. Option E: Switch to trim color or keep main color. R1: K R2: Purl Twist stitch as follows: \*(P2tog but leave the stitches on the left-hand needle. Purl the first stitch again and drop both stitches from the left needle.) repeat from \* to end. R3: K R4: switch to main color. \*(K2, KFB) repeat from \* around to end for a slender skirt. For a fuller skirt \*(K1, YO) to end. Really, you could put in any variation such as \*(K2, M1), \*(K3, KFB), \*(K4, KFB), etC, to customize how much flare you want in your skirt. You may need to add or subtract a stitch when you get to the round marker or short your last repeat by a stitch or two. This generally does not affect the final appearance as long as the difference is only a stitch or two. I offer up the first two because they are good options for a more dress-like appearance. If you choose to use a custom increase, you will need to do a bit of math or fly by the seat of your pants when you reach the hemline in order to adjust your stitch numbers to accommodate the hem you choose. This really isn't too hard to do as the hem stitches I chose are knitted on multiples of 2 or 4. DON'T FORGET! After completing your waistband, return to main color if you used trim color for the waistband.
Skirt:
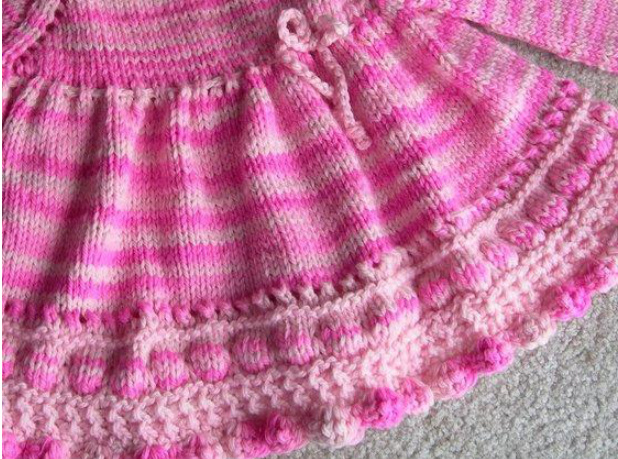
This is where you can add length to your sweater for a more dress-like option. Option A: stockinette stitch as shown in sweater #1. K in stockinette stitch until the piece is 1 %2" shorter than your final desired length. This option works no matter which set of increases you chose after the waistband and what size you are making. Option B: pattern as shown in sweater #2. For this option, you may need to adjust your total number of stitches in order to accommodate the slip stitch pattern. The precise location of these stitches is not critical as long as they are somewhat equally spaced and are worked into the stitch pattern. Try to use an increase that does not leave a hole in the work. You need a stitch count in a multiple of6. The slip stitch pattern is as follows: R1-3: \*(K5, slip one with yarn in back.) repeat from \* to end. R4: P5, K1 K in slip stitch pattern for both skirt types until piece measures 1.5" up from bottom hem as measured from neck down. This slip-stitch pattern tends to contract both laterally and vertically. You will need to decide if you will block it stretched out or allow it to contract and simply knit it a little bit longer to begin with. It does not compress enough to change the overall appearance but can make the piece seem up to %2" shorter if allowed to contract even overnight! Additional options for skirt: The skirt is a great place to play around with those stitch patterns that you love. Any stitch pattern is acceptable as long as it fits on the number of stitches you have on your skirt. You might try linen stitch, half linen, raindrop, butterfly, sand or dot stitch. You could work a two-color or three-color stitch pattern, mosaic patterns, or fair isle motifs. The skirt is straight sided so consider it your blank canvas and have fun. Anything goes! Additional stitches to try: Basket weave chevrons QuakerRidges ·King Charles Brocade ·Rose stitch Roman stitch Little Pyramids Seed stitch An all-over cable pattern (this will contract the piece, so add stitches!) Remember, if your stitch count is 1-2 stitches more or less than an even division, you can simply add or subtract the correct number of stitches to make the pattern work. Hem: Option A: Bubble hem as shown in Sweater #1. For the bubble hem, you will want a stitch count that is divisible by 4. When adding stitches, it is easiest to hide your increases if you work them as KFBs in R4. It may make more sense to subtract a stitch than to add three so think about what your end goal is. R1: \*(K2tog through back loop, YO) repeat from \* to end (creates an eyelet row) R2-3: Switch to trim color, K to end R4: P (trim color) R5-6: K (trim color) R7-10: K (main color) R11. K3 (main color), Drop 4th stitch off of needle and unravel TO the last row you knit in the trim color. Pick up this stitch on your right needle with the strands of the main color rows behind the work. Looking at your work, for the 4 most recently worked stitches on your right needle, you should see, looking left to right, 1 trim color stitch and 3 main color stitches. R13: K (trim color to the end of row 19) R14: P R15:K R16: Ringlets: \*(P2, holding yarn in front, slip previous two stitches back onto left needle, wrap yarn back around the right side of these two stitches to the back of the work, sleep these two stitches back onto the right needle and bring the yarn back to position to work the next stitch.) Repeat from \* to end. R17: K R18: Ringlets as in R16 R19: K
Crochet bubble edging:
You can cast off and begin the crochet edge in either trim color or main color. For sweater 1, I did all of the crochet work in main color. Cast off with single crochet cast-off. When you reach the end of your round, you will chain 2 and then turn your work so that you will go around in the OPPOSITE direction. You could consider this step optional, but the crocheted shells will have a less bubble-like outline if you do not turn the work. Bubble Crochet edge: Single crochet into second stitch out. Double crochet into second stitch out from the stitch you single crocheted into. Triple crochet twice into the same you already double crocheted into.. Double crochet again, into this same stitcl Repeat to end. Weave in ends.
Option B:Woven Swedish Dot as shown on Sweater #2. This option requires that your stitch count be divisible by 2. It is easy to add a single stitch at the beginning of the round to create an even number of stitches. There are two ways to accomplish this hem. You can either weave the colorway rows in as you are knitting or add them in later with a tapestry needle and excess yarn. This is how to do it if you choose to add the colorway rows while knitting. R1: Switch to trim color, breaking colorway here (you will weave this end in later.) R2-3: seed stitch R4-5: K to end (knit Row 5 loosely) R6: bringing colorway yarn back into play, you will weave the colorway yarn in behind the first stitch, in front of the second, behind the third, etc. to the end of the round. Be sure to leave a tail of 4" or so at the beginning of this round for weaving in later. R7: repeat R6, following the same pattern of in front, behind, in front, etc. You will now have two strands of yarn running around the hem, woven between the stitches. R8-9: K to end, knitting fairly loosely. (TRIM color) R10-11: repeat R 6-7, reversing your pattern so that the first stitch has the colorway yarn passed in front of it, the second behind, etc. You can break the yarn, leaving 4" or so for weaving in. R12-13: K to end with trim color R14-15: Seed stitch in trim color This is how you would accomplish the same look by adding the colorway rows afterwards with a tapestryneedle. R1:K R2: K1,P1 to end R3: P1, K1 to end R4: K R5: K - This row is where you will add a double stranded running stitch after the hem is cast off. You may choose to mark this row with a split ring marker. R6:K R7: K - This row is where you will add a double stranded running stitch after the hem is cast off. You may choose to mark this row with a split ring marker. R8: K R9: K1, P1 to end R10: P1, K1 to end Cast off with single crochet cast-off.You can cast off in your preferred method if you like here, but you may not achieve the same slight flare that the crochet cast-off will give.
Drawstring: The drawstring can be done in many ways, including: Ribbon I-cord Crocheted chain To crochet: With the crochet hook, create a chain long enough to tie around your child's waist. To create an I-cord drawstring: I normally knit my I-cord with size 2 DPNs but they can be done on the same size DPN as you used for the arms of the sweater. Cast on 3 stitches onto your DPN. R1: K R2: slide the cord from one side of the righthand DPN to the other, switch the right needle to you left hand and knit the same three stitches again. Repeat R1-2 until the cord reaches your length. Cut the yarn with a 7" tail. Thread the tail into a tapestry needle and run it through all three loops and remove them from the needles. You can hide your tails by simply running the needle up into the cord a few inches, pushing it out the side, tugging tight, and cutting the yarn. When the cord relaxes, the tail disappears inside. You can adorn the drawstring with crocheted flowers with the following instructions: Insert the hook through one loop in either the chrocheted chain or knitted I-cord. Slip stitch the yarn through this loop. Single crochet back into the first stitch. Double crochet into the ring 10 times. Chain 7. Slip stitch into the second stitch out. Continue to chain 7 and slip stitch into the second stitch out until you have 5 petals on your flower. Tie off.
Arms:
Place the stitches from one holder onto DPNs or your favorite small circumference knitting tool. Pick up the four stitches that were cast on at the armpit. Join your colorway yarn and knit around until the arm measures 1-1 1%4" from desired length. For short sleeves, knit only a few rounds of main color before switching to the cuff option you have chosen. The cuffs are fairly wide and will make up a lot of length on a short sleeve. Option A: shown in Sweater #1. R1: in colorway, \*(K2togbl, YO) repeat from \* to end R2-10: in trim color, \*(K1, P1) to end. Option B: shown in Sweater #2. Again, you may choosetoadd the colorway rowwith a tapestry needle after casting off. If you choose to do so, you will mark R4 as the row where you want to add your colorway later. Omit R 5-6 if you do this. R1: in trim color, K to end R2:in trim color, seed stitch to end R3-4: in trim color, K loosely to end. R5-6: picking up colorway, weave the yarn behind and in front of the stitches as in Hem Option B Row 6-7. R7: in trim color, K to end R8: in trim color, seed stitch to end R9: cast off in seed stitch pattern with needles.
Additional Info:
You may knit from this pattern for use in charities, swaps, barters, haggles, etc. However, please do me the honor of credit for the pattern. For now, the pattern is free and youmaysharecopieswithyourfriends and family. If you would like to offer a sweater from this pattern in your store, please contact me as a courtesy. Please feel free to contact me at narnobarrett@gmail.com if you require further info or have questions about the pattern. Glossary: K: knit P: purl K2togbl: knit two together through back loop Yo: yarn over CO: cast on St: stitch Sts: stitches KFB: knit front and back P2tog: purl two together Ssk: slip one knitwise, slip one knitwise, knit the two slipped stitches together through the back loop


