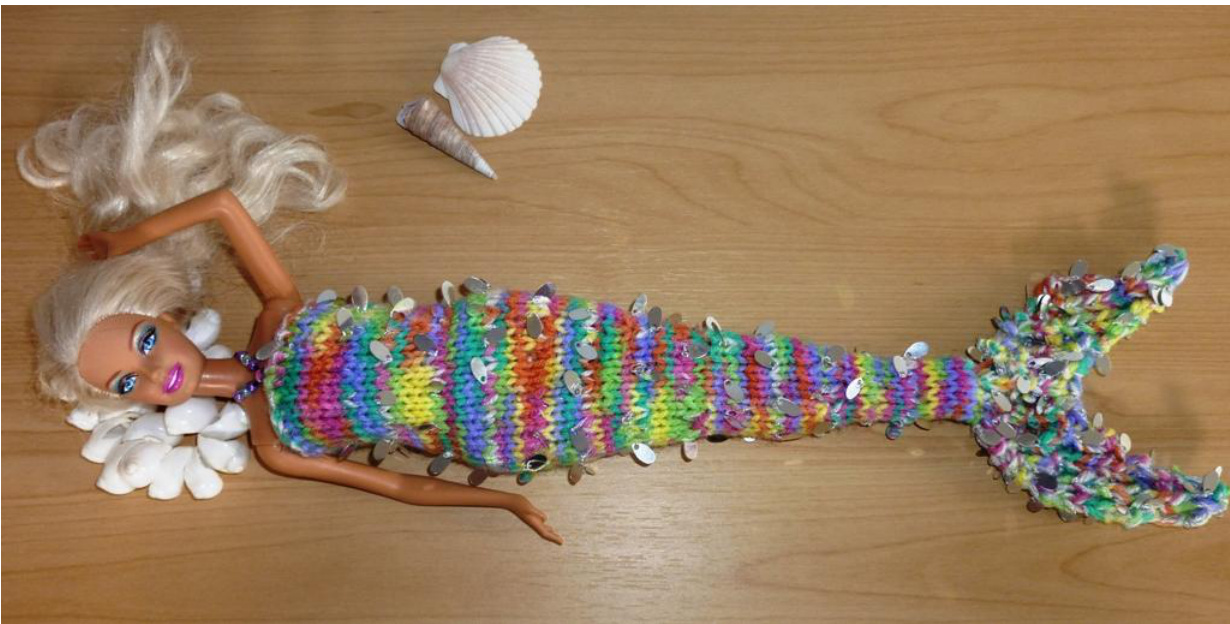
Merliah Mermaid Tail By Erica Riddle 2012
You will need:
· 3mm needles Some stash of 8ply yarn. It does not take much at all so just whatever you have. Some sparkly yarn for contrast- completely optional but it does look pretty. A 10cm length of elastic and 6 beads if you would like to make a necklace halter- optional as well. · A barbie type doll just to test on as the dolls can vary in size- this pattern is for a standard barbie (Bella's had a slightly dislocated leg from too much prancing around) but fits her nicely. · Needle to sew up, measuring tape and some scissors.
Abbreviations:
Kfb- Knit into front and back of stitch to increase Skpo-slip one stitch knitwise, knit next stitch, pass slipped stitch over PSSO-pass slipped stitch over K2tog- knit two stitches together S1- slip one stitch knitwise Tension: 21 stitches x 31 rows (approx) to 10cm x 10 cm
Body
Cast on 24 stitches holding main colour and contrast together. (At end of row either cut contrast with enough length for sewing in or carry up the side of work to knit in as you see fit throughout the body- I did this every four or so rows ensuring all sequins were pushed to the front but the end design is entirely up to you). Knit 16 rows (2 inches long) stocking stitch finishing with right side facing. Inc row K1, kfb, k6, kfb, k6, kfb, k6, kfb, K1. (28 stitches) Knit 8 rows (1 inch long) stocking stitch finishing with right side facing. Dec row K1, skpo, k6, skpo, k6, k2tog, k6, k2tog, k1 (24 stitches) Knit 8 rows (1 inch long) stocking stitch finishing with right side facing. Dec row K1, skpo, k4, skpo, k6, k2tog, k4, k2tog, k1 (20 stitches) Knit 8 rows (1 inch long) stocking stitch finishing with right side facing. Dec row K1, skpo, k3, skpo, k4, k2tog, k3, k2tog, k1 (16 stitches) Knit 15 rows (2 inches long) stocking stitch finishing with right side facing Dec row K1, skpo, k2, skpo, k2, k2tog, k2, k2tog, k1 (12 stitches) Knit 15 rows (2 inches long) stocking stitch finishing with right side facing Cast off 3 stitches at the beginning of the next two rows. (6 stitches)
Tail Fin
Join contrast yarn and hold the two strands (body and contrast) for remainder of project- if you choose not to use a contrast hold body colour double to get the weight in to the fin correct. With two strands joined and held together knit one row. Inc row Kfb, k1, p1, k1, p1, kfb (8 stitches) K1, p1 to end of row Inc row Kfb, p1, k1, p1, k1, p1, k1, kfb (10 stitches) P1, k1 to end of row Inc row Kfb, k1, p1, to last stitch, kfb (12 stitches) K1, P1 to end of row Inc row Kfb, p1, k1, to last stitch, kfb (14 stitches) P1, k1 to end of row Inc row kfb, K1, P1 to last stitch, kfb (16 stitches) K1, P1 to end of row Inc row Kfb, P1, K1 to last stitch, kfb (18 stitches) P1, K1 to end of row
Fin shaping
Work in rib for the next 9 stitches and turn (Continue to work on only these stitches. You can put the other 9 stitches on a holder if you like or just leave them on the needle). \*Dec row (should be on wrong side of work) K2tog, K1, P1 to end (8 stitches) P1, K1 to end Dec row K2tog, P1, K1 to end (7 stitches) P1, K1 to end Dec row K2tog, K1, P1 to end (6 stitches) P1, K1 to end of row Dec row k2tog, P1, k1, K2tog (4 stitches) K1, P1 to end for next 3 rows Dec row k2tog, k1, p1 (3 stitches) K1, P1, K1 Dec row S1, k2tog, psso. Bind off last stitch. Rejoin yarn to remaining 9 stitches and work pattern again from \*Dec row to end of section. Make sure all decreasing is worked on central edge- on the wrong side of work.
Making up
Stitch up back seam from bottom to the top. Attach base of tail (cast off stitches) to the tail to close it all up. Sew away ends. Optional halter necklace: Pop the tail onto your barbie first- Fold elastic in half and thread the bent end through a central stitch in cast on row as per picture, thread elastic tails through the made loop and pull tight. Thread 3 beads onto each elastic end and fasten a knot behind her head ensuring enough length and stretch to pass the elastic over the head and hair. When happy double granny knot the elastic and snip ends.


