NRLEEN
By Dona Knits Design

Arleen is a simple everyday pullover, with a light twist: a crocheted button-up slit that allows you to choose whatever size button you like! Knitted from the top in one piece and seamless, it's an easy and fast project. You may want to try on your sweater as you go for the best fitting result. It is also highly customizable: want 3/4 sleeves or tunic length? Just keep on knitting and there you go! This is my very first pattern; any comments are welcome to help me improve my pattern writing skills. For any questions or suggestions, please feel free to mail me at donaknits@ gmail.com. Hope you'll enjoy this simple knit! FINISHED BUST MEASUREMENTS: 34 (36, 38, 40, 42)'’ 86 (91, 96, 102, 107) cm (shown here in 36", no ease) GAUGE (blocked): 19 st and 29 rows = 4" (10cm) in Stockinette stitch in the round. YARN: 3 (3, 3, 4, 4, 4) skeins (220 yards each) Cascade 220 Wool (shown here in 9543 navy blue) NEEDLES: US 7 (4.5mm) 16', 24" and 32" (40, 60 and 80 cm) or size needed to get gauge. 4.5mm crochet hook or same hook size as needles giving you gauge. 5 buttons 0.5" (1,4 cm) (suggestion) Stitch markers Sewing needle http://donaknits.blogspot.com/
NOTES:
K: Knit P: Purl Kfb: Increase Ist by knitting into the front and the back of the next st. Kbf: Increase Ist by knitting into the back and the front of the next st. K2tog: Decrease 1st by knitting the next 2 sts together. SSK: Slip, Slip, Knit. Decrease 1 st by slipping 2 sts knitwise one at a time, inserting tip of left needle into both sts and knitting the 2 sts together. CO: Cast-on BO: Bind-off PM: Place marker M: Marker Garter Stitch in the round: \*K one round, P one round\* Repeat from \* to \*. /: Indicates the place of a marker or Slip marker. In green: Suggestions for a best fitting result.
YOKE:
CO 88 (92, 92, 96, 96). Do not join. You'll be working flat for the moment. Work 4 rows in Garter stitch. On the next row, P 34, (36, 38, 40, 40) [this is the front], PM, P 10 (10, 8, 8, 8) [this is the right sleeve], PM, P 34, (36, 38, 40, 40) [this is the back], PM, P 10 (10, 8, 8, 8) [this is the left sleeve].
Raglan increase rows:
R1: Kfb, \*K to 1 st before next M, Kbf/Kfb\* x [3 times], K to 1 st before end, Kbf. R2: P Repeat R1 & R2 for a total of 10 (10, 10, 12, 12) times. R1 once again. Do not turn. You should have 176 ( 180, 180, 200, 200) sts. http://donaknits.blogspot.com/ Arleen 2011 Copyright @ by Dona Knits Design. All rights reserved.
Joining the yoke in the round:
PM and join for working in the round. K one round. You'll continue with raglan increases but from now on in the round. The beginning of the row is at the front left raglan.
Raglan increase rounds:
R1: Kfb, \*K to 1 st before next M, Kbf/Kfb\* x [3 times], K to 1 st before end, Kbf. R2: K Repeat R1 & R2 for a total of 10 (12, 14, 14, 16) times. You should have 256 (276, 292, 312, 328) sts. At this point, I highly recommend trying on your sweater: the sleeves should almost meet at underarm. Each knitter's body being unique, you may want to increase the raglan shaping more or less before separating sleeves from body. Separating sleeves from body: Reminder: The front of the body is where the slit is Place left sleeve's stitches on scrap yarn, 52 (56, 58, 62, 66) and CO 2 (2, 4, 4, 6), PM (from now on, this marker indicates the beginning of the round), C0 2 (2, 4, 4, 6), K back st, 76 (82, 88, 94, 98). Place right sleeve's stitches on scrap yarn, 52 (56, 58, 62, 66) and CO 2 (2, 4, 4, 6), PM, CO 2 (2, 4, 4, 6), K front st, 76 (82,88, 94,98) If you haven't made any additional raglan increases, you should have 160 (172, 192, 204, 220) sts for the body and 264 (284, 308, 328, 352) sts total. BODY: If you do not want to add waist shaping to your sweater, please work even until approximately 16" (41cm) from underarm or preferred length before working the garter stitch trim. K body until approximately 7, 5” (19cm) Waist decreases: A: M, K1, SSK, K until 3 before M, K2tog, K1, M, K1, SSK, K until 3 before M, K2tog, K1. B: K 5 rounds. Work A & B for a total of 3 (3, 3, 4, 4) times or more if needed. K 5 rounds.
Waist increases:
A: M, K, Kfb, K until 2 st before M, Kfb, K1, M, K1, Kfb, K until 2 before M, Kfb, K1 B: K 5 rounds. Repeat A & B for a total of 3 (3, 3, 4, 4) times or more if needed. Finishing body: Knit 5 rounds in Garter Stitch. BO loosely. Sleeves: Pick up the live sleeve stitches from scrap yarn, pick up and knit the 4 (4, 8, 8, 12) previously cast-on stitches at underarm. If necessary, you may want to pick up and knit 2 more stitches at each side of the casted-on stitches to avoid anygap. PM, join and K 1 round. Work 5 rounds in Garter Stitch. BO loosely.
Crocheted button holes and finishing:
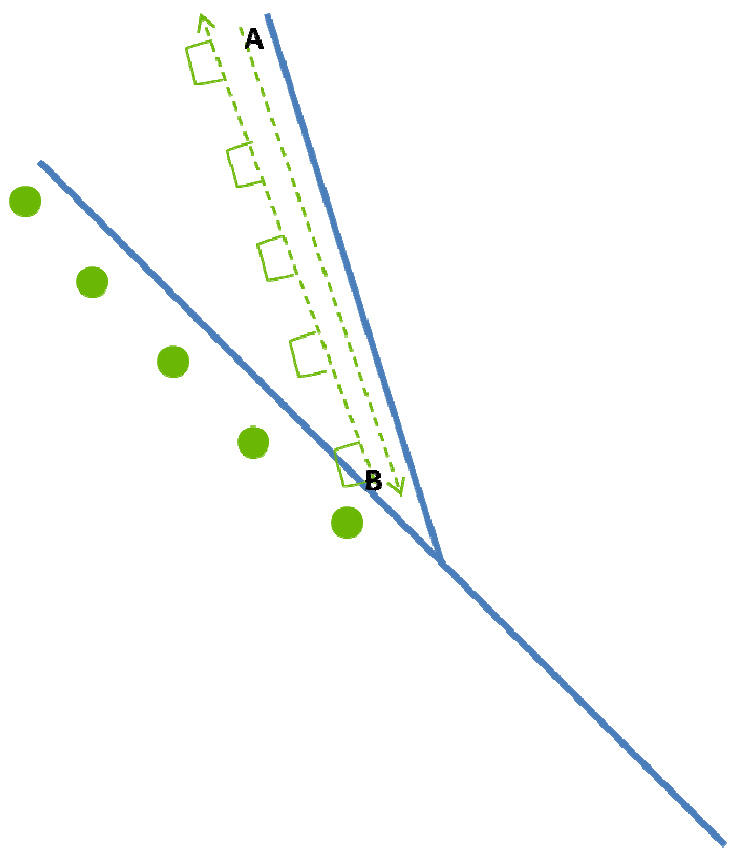
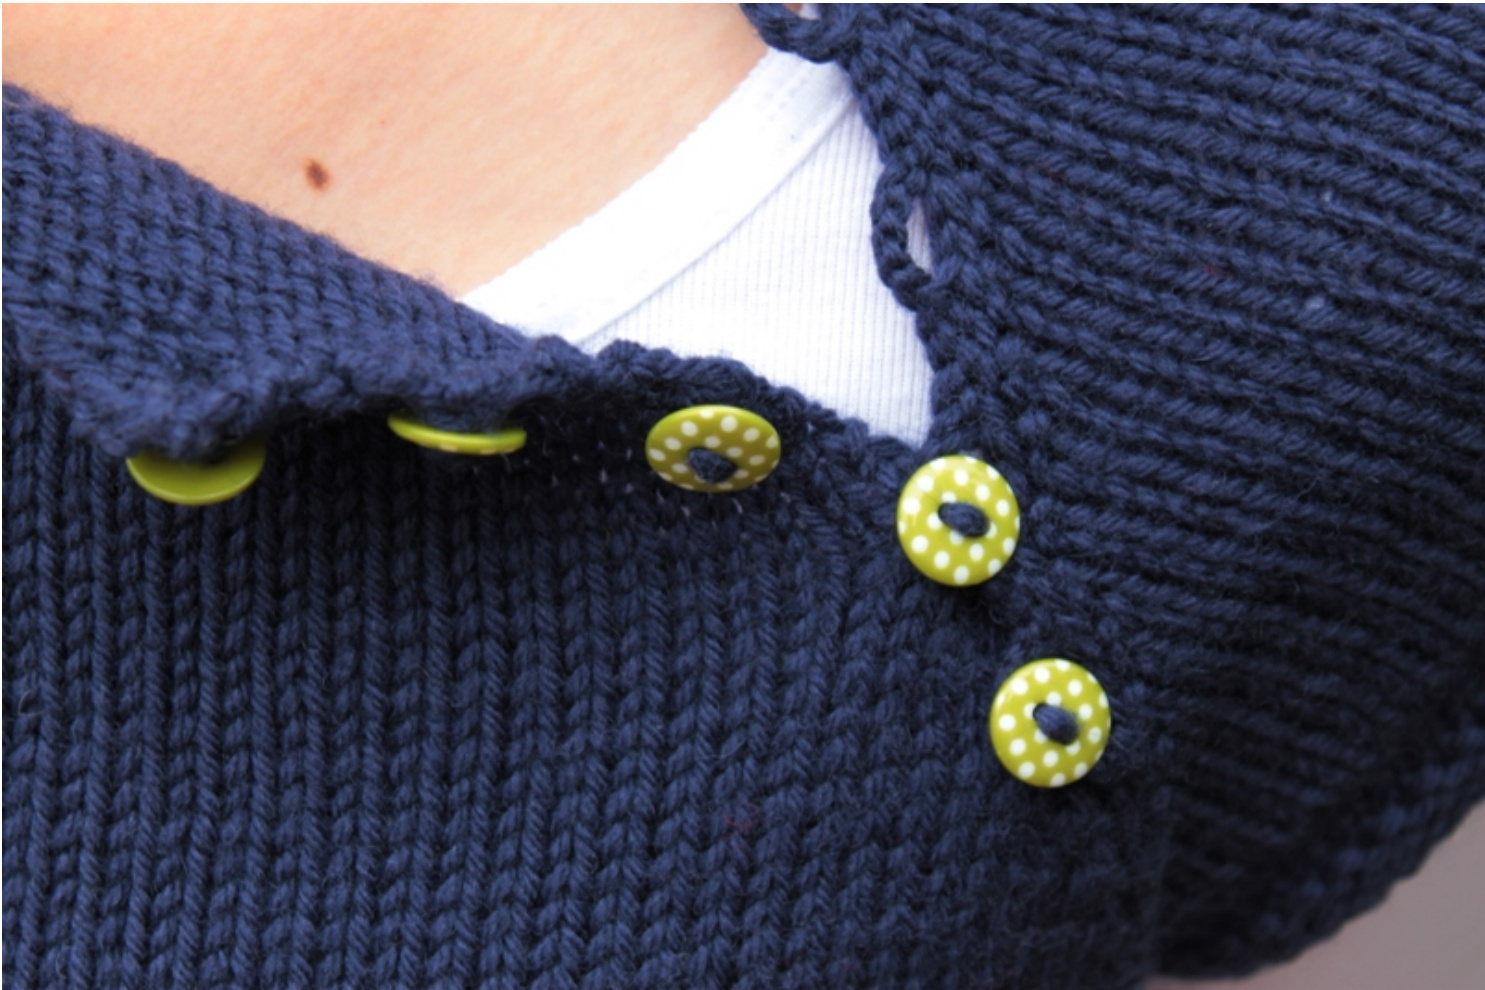
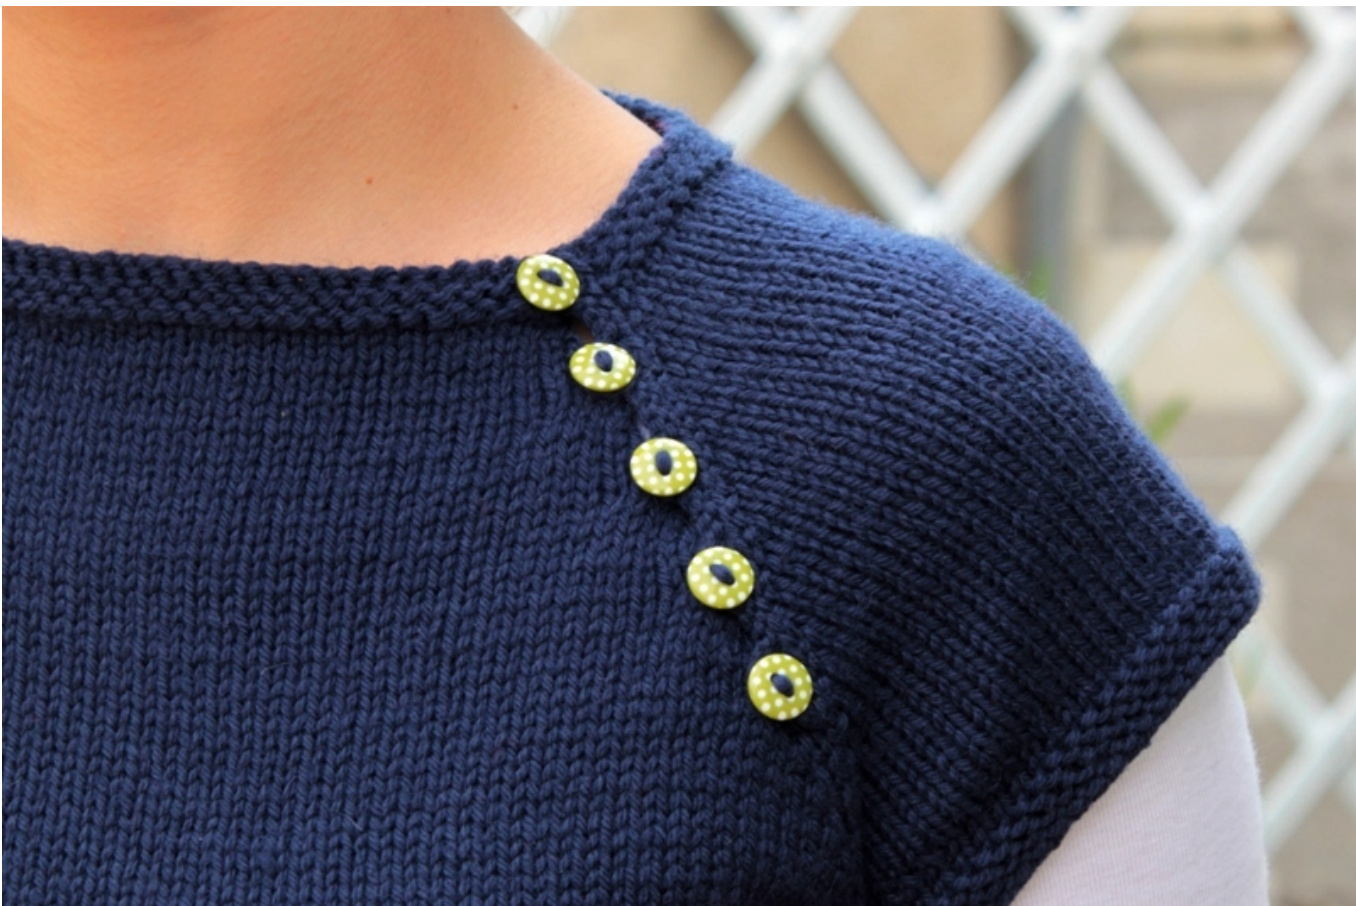
On Right Side: Sew the buttons on the lower side of the slit. With 4.5 mm crochet hook and new thread of yarn, on upper right corner of the slit, crochet one row (A) of slip stitches in every edge stitch. On the next row (B), slip stitches and chain tightly 4 or 5 stitches, (depending on your button's size) in front of the buttons. (I made a little diagram on the next page explaining the crocheting process. Hope that helps!) Weave in all ends. Enjoy! Diagram for the raglan detail: Buttons A: 1" crochet row (all slipped stitch) B: 2"d crochet row (slipped stitch and chain stitches)