Just like a Peasant Cap
By: Amber Daniels Yi-e. +ite up tu .!y -e e. .uyy", uujus Materials: Classic Elite Waterlily in brown, 5 balls used for my version. To use other yarns, about 450 yards needed as yarn is used double through brim and body. Needles: Size 10.5(Us) for body and brim, size 5(Us) for ribbed band. Gauge:Should be an 18st/4 inches in stockinette held single yarn. Gauge can be very variable since the sizing is so flexible. Garter Stitch Short Row Brim: With yarn held doubled, cast on 40 stitches on a size 10.5 needle. Note: All rows are knit Row 2: K to 4 stitches short of the end of row (36 sts) turn Row 3: K to 4 stitches short of row (32 sts)turn Row 4: K to 4 stitches short of last row (28 sts) turn continue in this fashion for 5 more rows, until there are 8 stitches left in the middle of the brim that are being actively knit.
Last Row (Row 10): Knit to end of row ALL stitches, turn and knit across in the other row, now all the stitches should be "live" again.
Without turning work, using backwards loop method, cast on 12 stitches.
Next row: knit across new stitches, across 40 stitches of brim, and using backwards loop method, cast on 12 stitches. Stitch count should now be at 64. Begin Body Pattern with yarn still doubled. Double Moss Stitch Row 1: Slip 1 stitch, P1 K1 to end of row. Row 2 (wS) Slip 1 stitch, K1 P1 to end of row. Row 3: Slip 1 stitch, K1 P1 to end of row. Row 3: Slip 1 stitch, P1 K1 to end of row.
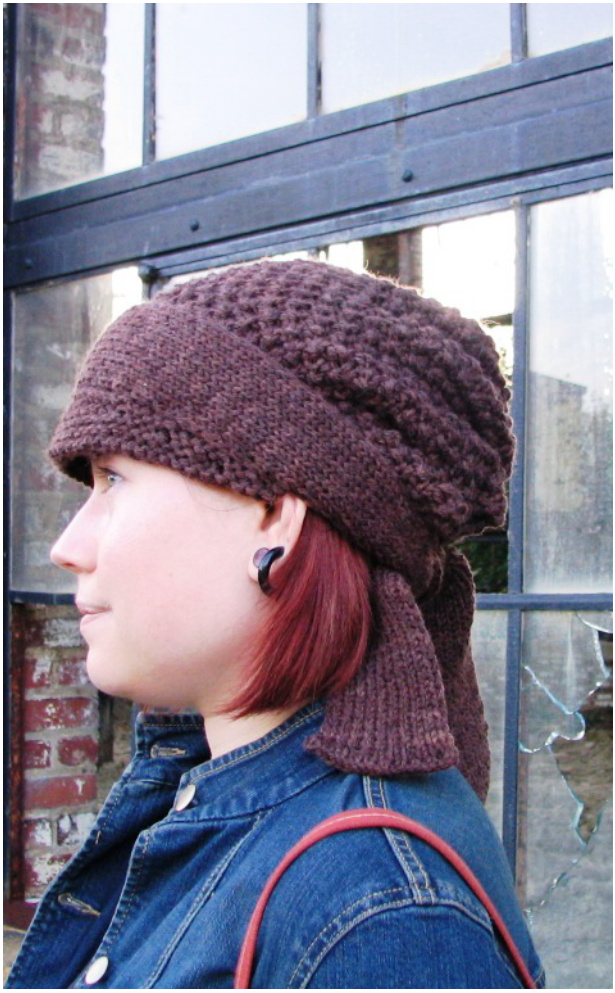
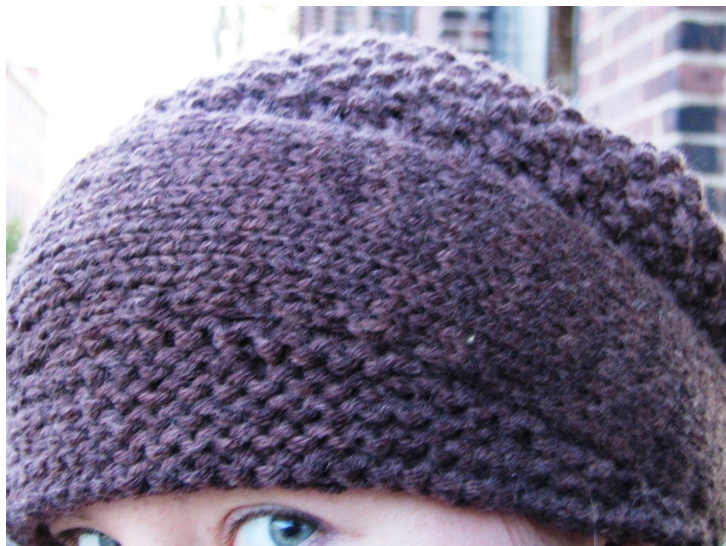
This creates the double moss stitch pattern where you have two rows of K1P1, then 2 rows of P1 K1. As below. --1-1-1- -1-1-1-1- 1-1-1-1-1 1-1-1-1-1 Continue in pattern for 10 inches. Then begin decreases rows: Row 1: K 30 sts in pattern, K2 tog, SSK, knit to end in pattern. Row 2: K in pattern as it appears. Continue with these two rows for 4 more rows of decreases. Cast Off all stitches. Fold the cast off edge in half and sew together from the bottom up to the peak (where decreases were being made) Pull the yarn you are using to seam through the point in the peak and pull the point to the inside of the piece and sew down to make a little dip in the back, this provides part of the gathered shaping shown in the product pictures. At this point it should, for lack of better words, look like a little wool "doo rag".
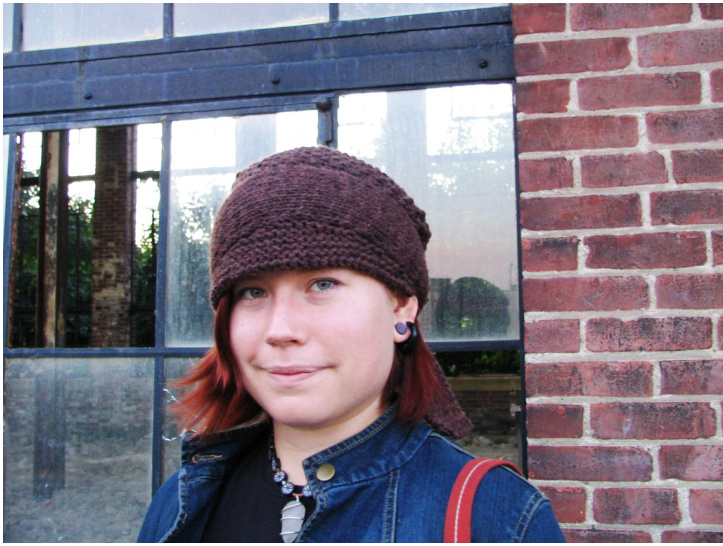
Ribbed Band:
Using a single strand of yarn and size 5 needles, cast on 20 stitches. Knit in K1 P1 rib for about 35 inches (my piece was 37 inches, I have a big head, I admit it) Cast off. Line up evenly with front of the hat so that the band has the same amount available to tie in the back. Sew onto upper edge of brim and cast on edges at sides of brim neatly (I sewed through one of the Purl lines of stitches to hide my sewing)
Wearing:
This is an odd little hat. I wear mine by laying the brim low across my forehead and tying the ties behind my head like a bandana. Then I adjust the loose gathered fabric in the back to my liking. I also like to wear it off to one side, as it's rather "jaunty". The ties stay tied without a double knot fairly easy as the wool catches on itself.