Cheerfu] Cutiea
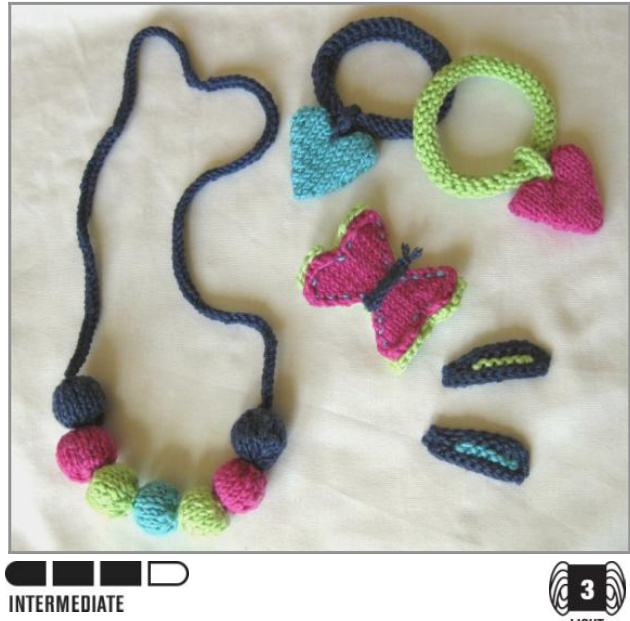
A set of vibrant colour-pop knitted jewellery pieces, all knitted flat, with a little seaming to assemble. I-cord is used in some of these pieces: see I-cord instructions. This set comprises 4 pieces: jumbo bead necklace, heart charm bracelet, butterfly brooch/clip and knitted hairclips. The pattern contains all the instructions for attaching pieces to clips.
Yarn
Sublime Baby Cashmere Merino Silk DK (75% Merino, 20% Silk, 5% Cashmere). 162 Pinkaboo (pink), 159 Pansy (blue), 195 Puzzle (green), 194 Seesaw (turquoise). Small amounts of each colour (up to 20g). Substitute with DK weights.
Other
Small amounts of polyester fibre toy filling (for necklace) 2 x hairclips, “snap clip" type, 5 cm length (for hairclips) Sewing thread in dark blue (for hairclips) Strong textile glue, such as Gutermann HT2 (for hairclips and brooch) 1 x brooch clip (for brooch) Small piece of felt fabric (for brooch)
Needles
4 mm (US 6) 3.25 mm (US 3) 3 mm double-pointed needles (two) Tapestry needle for sewing up
Yarn/notions
Gauge: 22 sts and 26 rows 0ver 10 x 10 cm (4 x 4 inches) in stockinette (stocking stitch) using 4 mm needles (or size needed to obtain gauge).
Abbreviations
k: knit p: purl k2tog: knit 2 together p2tog: purl 2 together kfb: knit into the front and back of the stitch (increase) MC: main colour CC: contrast colour Turn: turn the work around just as if you have reached the end of a row (you will not necessarily be at the end of a row when reaching "turn" instruction). st. st.: stocking/stockinette stitch = knit and purl alternate rows. CO: cast on Some pieces use I-cord. Instructions for I-cord are as follows: Cast on the number of stitches instructed, using double-pointed needles. Step 1: Knit all sts. Do not turn. Slide the sts to the other end of the needle (yarn will now be coming from the “wrong" edge of your knitting) Step 2: Knit all sts. Slide the sts to the other end of the needle Repeat steps 1 and 2 until required length is reached
Jumbo bead necklace
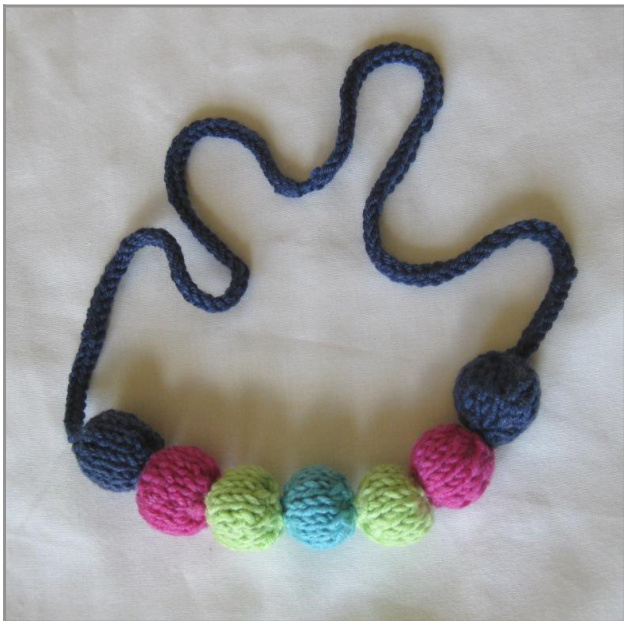
Knit Beads
(make 7 beads; 2 blue, 2 green, 2 pink and 1 turquoise)
Using 4 mm needles, cast on 4 sts Row 1: kfb in every st (8 sts) Row 2: kfb in every st (16 sts) Row 3: Purl Row 4: knit Row 5: purl Row 6: knit Row 7: p2tog to end Row 8: k2tog to end Take a small amount of polyester filling, roll it into a ball between your hands and stuff into the knitted piece (to make the bead approx 2cm wide). Stitch up the bead around the filling, pulling the longer edges of the work towards each other. Weave in ends. When you have the 7 beads assembled, using needle and blue yarn, string them closely together (with one blue bead at either end of the sequence) and knot the yarn at each end to keep them securely held together. Weave in the two ends of yarn after knotting. With 3 mm double pointed needles, pick up 1 st from the outer facing end of one of the blue beads, from the centre of the bead. Knit through the picked up stitch to form another stitch, then slip this stitch back onto the needle so you have 2 sts on the needle. Use these 2 sts to work I-cord for 26 cm and bind off. Do the same from the other blue bead on the other side.Stitch the two I-cords together to join the necklace chain. You can adjust the length of the chain to fit for children by working shorter lengths of I-cord on each side. Bind off all sts, leaving a tail for stitching
Heart charm bracelet
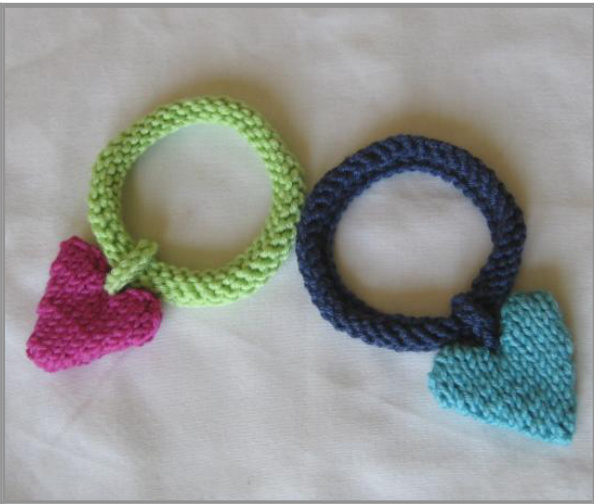
To make bangle:
Using your main bangle colour (blue or green are shown in photos) and with 4 mm needles, cast on 4o sts to fit adult wrist, to fit child's wrist 30 sts for small child, 35 for an older child. Knit 4 rows in st. st. Bind off all stitches. Let the knitted piece curl inwards (it will do this naturally) and sew the two row ends together.
To make heart charm:
Using 3.25 mm needles and your chosen heart colour (pink and turquoise are shown in photos), cast on 2 sts Row 1: kfb, twice (4 sts) Row 2: purl Row 3: kfb, k to last st, kfb (6 sts) Row 4: purl Repeat rows 3-4 until you have 14 sts on the needle, finishing with the purl row. Row 5: k2tog, k5, turn (7 sts will be left behind on the needle) Row 6: p2tog, p2, p2tog (4 sts) Bind off the 4 remaining stitches, fasten off and break off yarn. Reattach working yarn to the stitches left on the needle (at the inner of the heart) Row 7: k5, k2tog (6 sts) Row 8: p2tog, p2, p2tog (4 sts) Bind off Make another piece the same. Seam the heart pieces with right sides of the work facing together, leaving a small gap for turning inside out. Turn the work inside out so the right sides are now facing outwards and stitch up the little gap that is left.
To attach charm:
Using 3 mm double-pointed needles, cast on 2 sts in the same colour as the bangle. Work I-cord for 6 cm, bind off. Leave the tails at both ends for stitching. Sew one end of the I-cord into the groove of the heart, loop the other end of the icord over the bangle (over the join) and then sew the other end of the I-cord into the groove of the heart. Secure over the join in the bangle with a couple of stitches.
Knitted hairclips
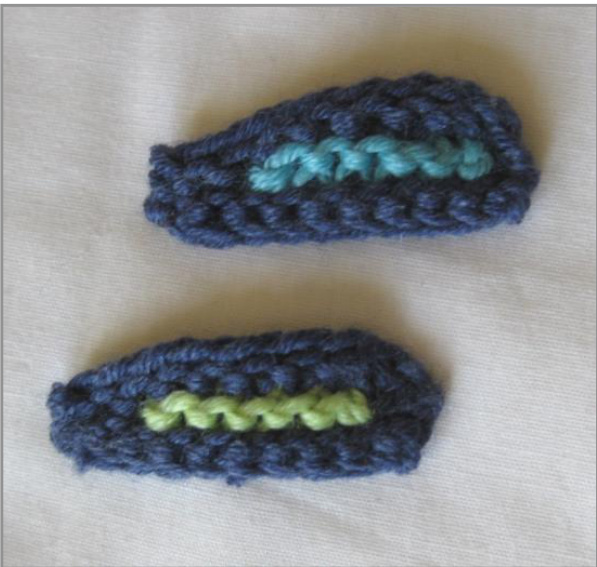
MC = Main colour (navy blue shown) CC = Contrast colour (green/ turquoise shown) Make clip cover: Using MC and 4 mm needles, CO 10 sts Row 1: knit Row 2: k8, turn. (2 sts left on needle) Put MC to back of work, join in CC Row 3: continuing in CC, k6, turn. Row 4: k6, turn Row 5: switching to and continuing with MC, k8 Row 6: k10 Bind off all sts, using k2tog bind off (k2tog, slip the stitch you just made back onto needle, k2tog, continue in this way until all sts are bound off) Cut all threads, weave in ends of CC Tie the cast on and bound off tail of MC together and weave in ends.
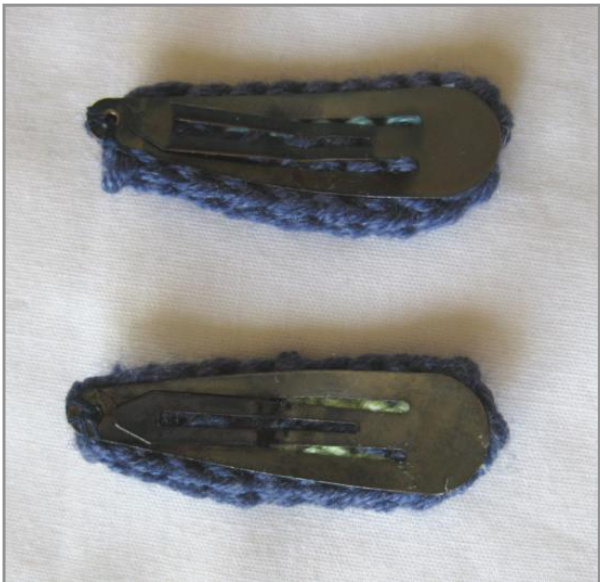
To attach to hairclip:
Making sure the hairclip is open and using sewing thread in same colour as MC, put a few stitches through one end of the knitting (the end where you knotted the two tails) and through the little hole at the end of the hairclip to attach it, knot sewing thread, weave in and cut. Put a few tiny dabs of textile glue onto the outer frame of the hairclip, taking care not to get any on the inner portion. Snap the clip shut and press the knitting down onto the glue to secure. Leave to dry for a few hours.
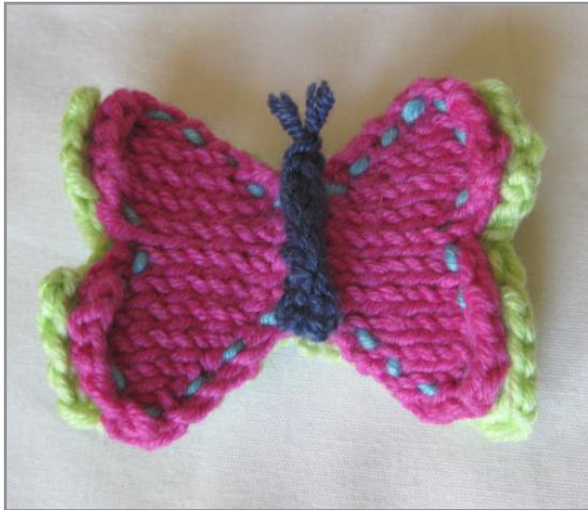
Butterfly Brooch
To make wings:
Using 4 mm needles and green, cast on 6 sts Row 1: kfb, k to last st, kfb (8) Row 2: purl Repeat rows 1-2 until you have 14 sts on the needle, finishing with the purl row. Row 3: k2tog, k5, turn (7 sts will be left behind on the needle) Row 4: p2tog, p2, p2tog Bind off the 4 remaining stitches, fasten off and break off yarn. Reattach your working yarn to the stitches left on the needle (at the inner edge) Row 7: k5, k2tog Row 8: p2tog, p2, p2tog (4 sts) Bind off Make another piece the same. Stitch the two pieces together to form the wings. They will curl inwards, do not worry about this as they will flatten when everything is finally assembled, no need to block. Using 3.25 mm needles and pink yarn, make two more pieces as above and sew them together in the same way. Stitch the smaller pink wing piece on top of the green larger wing piece, using turquoise. Sew through the two pieces with a visible running stitch for contrast.
To make body:
Using blue yarn and 3 mm double pointed needles, cast on 2 sts. Work a 6 cm icord using these 2 sts. Do not bind off yet. Cut a small 1cm snippet of the same yarn. Bind off the two stitches, but before tightening off the final loop, centre the snippet of yarn through the middle of the loop. Then tighten up. This little strand forms the feelers of the butterfly.
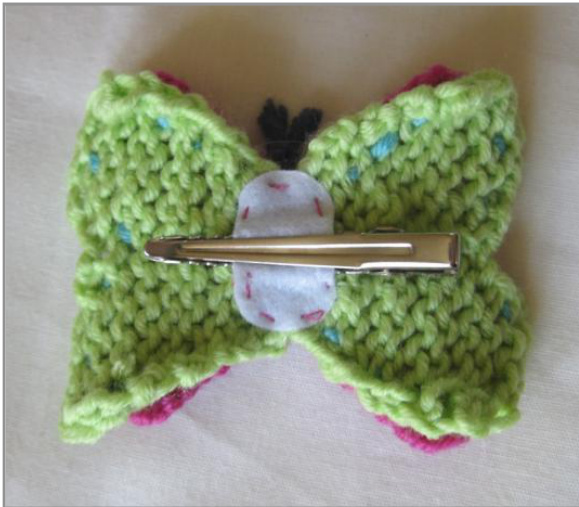
To attach to clip:
For a butterfly that can be worn either as a brooch or a hair clip, use a crocodiletype spring clip as pictured. Glue the finished brooch to the top of the clip using textile glue. It helps to cut a small strip of felt fabric and sandwich the top part of the clip between the fabric and the knitted piece. Leave to dry. When the glue is dry, secure with a few stitches using sewing thread, for a stronger join.