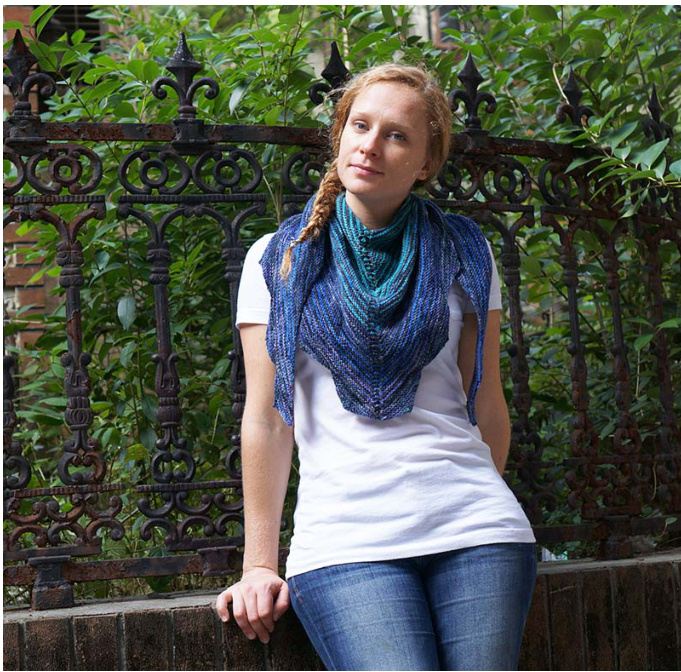
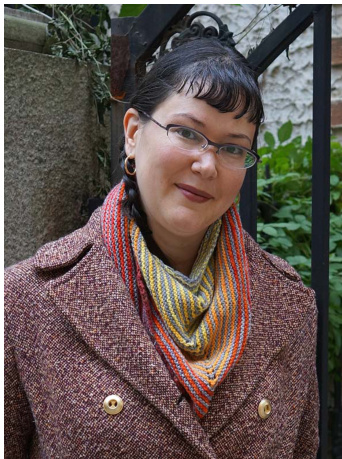
Carousel Il: Gradient Version
by Cate Carter-Evans Inspired by the fluted edge of an old Parisian carousel, this v-shaped scarf with a modern triangular edging detail is remarkably easy to wear. This is the scarf pattern I find myself returning to time and time again. Its vshape keeps it in place with a minimum of fuss, and it's just the right size to be cozy without being overly bulky. It's simple to knit, and the edging adds visual interest. Worked in alternating garter-stitch stripes with a central column of yarn-overs. Once you're past the first few rows, this scarf is easy to knit without the pattern - perfect for social knitting or travel.
About this Pattern
Skill Level: Beginner / Intermediate Skills Needed: Basic knitting skills, plus increases (yo, kfb) and decreases (sl & psso, k2tog). Finished Size: Wingspan: 70 inches / 180 cm Depth at center: 19 inches / 48 cm
Yarn:
MC: Infinite Twist Helix , 300 yds / 100 grams, (1 full skein + 1 half-skein). CC1 - CC6: Six (6) Infinite Twist Helix mini-skeins, each approx. 50 yds/ 20 grams. CC7: Infinite Twist Helix , 100 yds / 34 grams (1 half-skein)
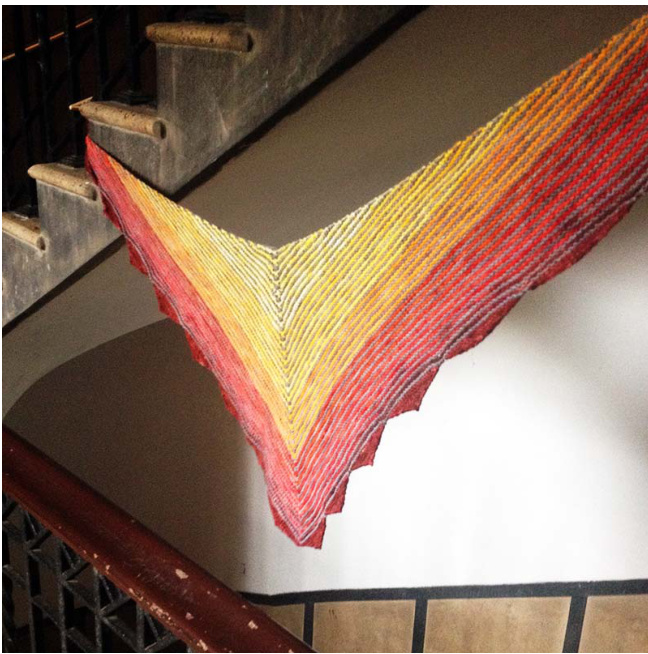
Blaze Colorway
MC Dovecote, CC1 Meringue, CC2 Sunflower, CC3 Marigold, CC4 Persimmon, CC5 Nancypants, CC6 Red Devil, CC7 Badlands.
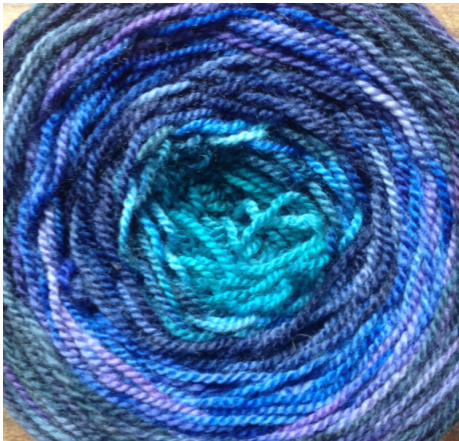
Blue Flame Colorway
MC Dovecote, CC1 Marina, CC2 Tibetan Turquoise, CC3 Clear Water, CC4 Japanese Denim, CC5 Larkspur, CC6 Japanese Denim, CC7 Storm Cloud.
Needles:
U.S. size 6 / 4.0 mm circular needle, at least 80 cm long, or any size yielding correct gauge. Gauge: 19 stitches / 44 rows over 4 inches / 10 cm in garter stitch. Notions: 11 stitch markers, yarn needle.
Abbreviations
CC - Contrast Color K - Knit Kfb - Knit front and back K2tog - Knit two together K3tog - Knit three together MC - Main color Pm - Place marker Psso - Pass slipped stitch over Rs - Right side SI - slip Sm - Slip marker St(s) - Stitch(es) Rem - remains Ws - Wrong side Wyif - with yarn in front Yo - Yarn over
Ytb - yarn to back. Move yarn to the back of the work in between the needles, being careful to avoid making an accidental yarn over.
Pattern Notes
\* when you change colors, bring the new working yarn (the yarn you are changing to) over the just-worked rows very loosely. Be sure to avoid tugging on the yarn, as this will make the top edge on one side of your shawl shorter than the other. + If you dislike weaving in ends, you may want to consider using the Russian Join or Magic Knot method to reduce the number of ends in your project.
Shawl Body
Using the Long Tail Cast On Method, cast on 7 stitches with MC. Row 1: Continuing with MC, kfb, k2, yo, pm, k1 (this stitch is the center of the pattern), pm, yo, k2, kfb. 4 sts increased. 11 sts. Row 2 (ws): Change to CC1. Kfb, k to 1st marker, sm, kl, sm, k until 1 st rem, kfb. 2 sts increased. Row 3 (Rs): Continuing with CC1, kfb, k to 1st marker, yo, sm, k1, sm, yo, k until 1 st rem, kfb. 4 sts increased. Row 4 (ws): Change to mC, work as row 2. 2 sts increased. Row 5 (Rs): Continuing with MC, work as row 3. 4 sts increased. Using CC1, work rows 2 - 5 7 more times, ending up with 8 stripes in CC1. 107 sts. Change to CC2, and work rows 2 - 5 6 times - 6 stripes in CC2. 179 sts. Change to CC3, and work rows 2 - 5 5 times - 5 stripes in CC3. 239 sts. Change to CC4, and work rows 2 - 5 4 times - 4 stripes in CC4. 287 sts. Change to CC5, and work rows 2 - 5 3 times - 3 stripes in CC5. 323 sts. Change to CC6, and work rows 2 - 5 2 times - 2 stripes in CC6. 347 sts. Change to CC7, and work rows 2 - 5 once - 1 stripe in CC7. 359 sts. dy row: Using CC7, work as row 2. 361 sts. Turn, do not break yari
Working the Border
Starting from the next stitch to be worked, pm every 20 stitches 9 times, skip the center stitch, and pm every 20 stitches 9 more times. If you have the correct number of stitches, skip ahead and work the first 9 segments as regular border segments. work the next segment with 21 sts (including the center stitch), and work the remaining 8 segments as regular border segments. If you discover that you don't have the correct number of stitches, don't worry - it's easily fixed. If you have too few stitches, you'll pm every 19 sts to create -1 border segments at the tips of the shawl. If you have too many stitches, you'll pm every 21 sts to create +1 border segments near the point. Too few stitches example: if you are missing 3 sts before the center stitch, pm every 19 sts three times, and then every 20 sts six times. If you are missing 2 sts after the center stitch, pm every 20 stitches seven times, and every 19 sts twice. Too many stitches example: If you have 2 extra sts before the center stitch, pm every 20 sts 7 times, and every 21 sts twice. If you have extra stitches after the center stitch, pm every 21 sts times as needed, and every 20 sts thereafter.
Regular Border Segment (20 sts)
Row 1: with CC7, k20 (to marker), turn. Row 2: s1wyif, ytb, kl, psso, k16, k2tog. 18 sts. Row 3: s1wyif, ytb, kl, psso, k14, k2tog. 16 sts. Row 4: s1wyif, ytb, kl, psso, k12, k2tog. 14 sts. Row 5: s1wyif, ytb, k1, psso, k10, k2tog. 12 sts. Row 6: slwyif, ytb, k1, psso, k8, k2tog. 10 sts. Row 7: s1wyif, ytb, k1, psso, k6, k2tog. 8 sts. Row 8: slwyif, ytb, kl, psso, k4, k2tog. 6 sts. Row 9: s1wyif, ytb, kl, psso, k2, k2tog. 4 sts. Row 10: slwyif, ytb, kl, psso, k2tog. 2 sts. Row 11: k2tog. Break yarn and weave in end. Re-join yarn and work from row 1. Work 7 more times to complete 8 border triangles.
+1 st Border Segment (21 sts)
There should now be 20 stitches before the center stitch (remove markers b and after center stitch) Row 1: K21 (including the center stitch), turn. Row 2: s1wyif, ytb, kl, psso, k17, k2tog. 19 sts. Row 3: slwyif, ytb, kl, psso, k15, k2tog. 17 sts. Row 4: s1wyif, ytb, kl, psso, kl3, k2tog. 15 sts. Row 5: s1wyif, ytb, kl, psso, kl1, k2tog. 13 sts. Row 6: slwyif, ytb, kl, psso, k9, k2tog. 11 sts. Row 7: slwyif, ytb, kl, psso, k7, k2tog. 9 sts. Row 8: slwyif, ytb, kl, psso, k5, k2tog. 7 sts. Row 9: slwyif, ytb, kl, psso, k3, k2tog. 5 sts. Row 6: s1wyif, ytb, k1, psso, k2tog. 3 sts. Row 7: sll wyif, ytb, k2tog, psso. Break yarn and weave in end.
-1 Border Segment (19 sts)
Row 1: With MC, k9, kfb, k9 (to marker), turn. Rows 2 - 11: work as regular border segment. Weave in remaining ends. Wet block by soaking in warm water and mild detergent or wool wash for five minutes. Remove excess water with a salad spinner, or roll shawl up in a towel and walk on the towel. Prepare to dry flat by stretching out the top edge of the shawl to desired dimensions. Gently pull and pin the tips of the border pattern triangles so they are pointy. Enjoy your new shawl!


