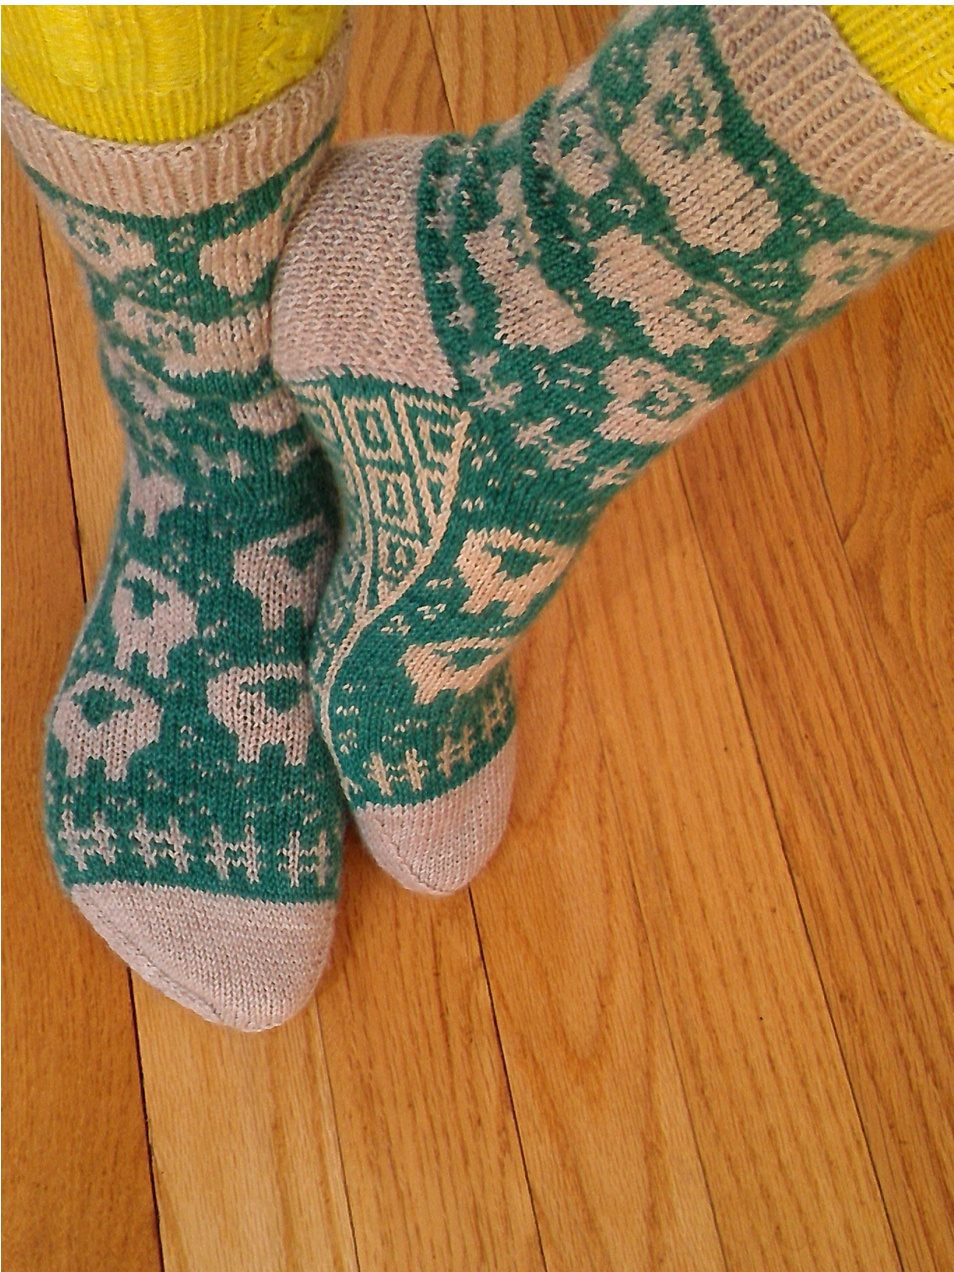
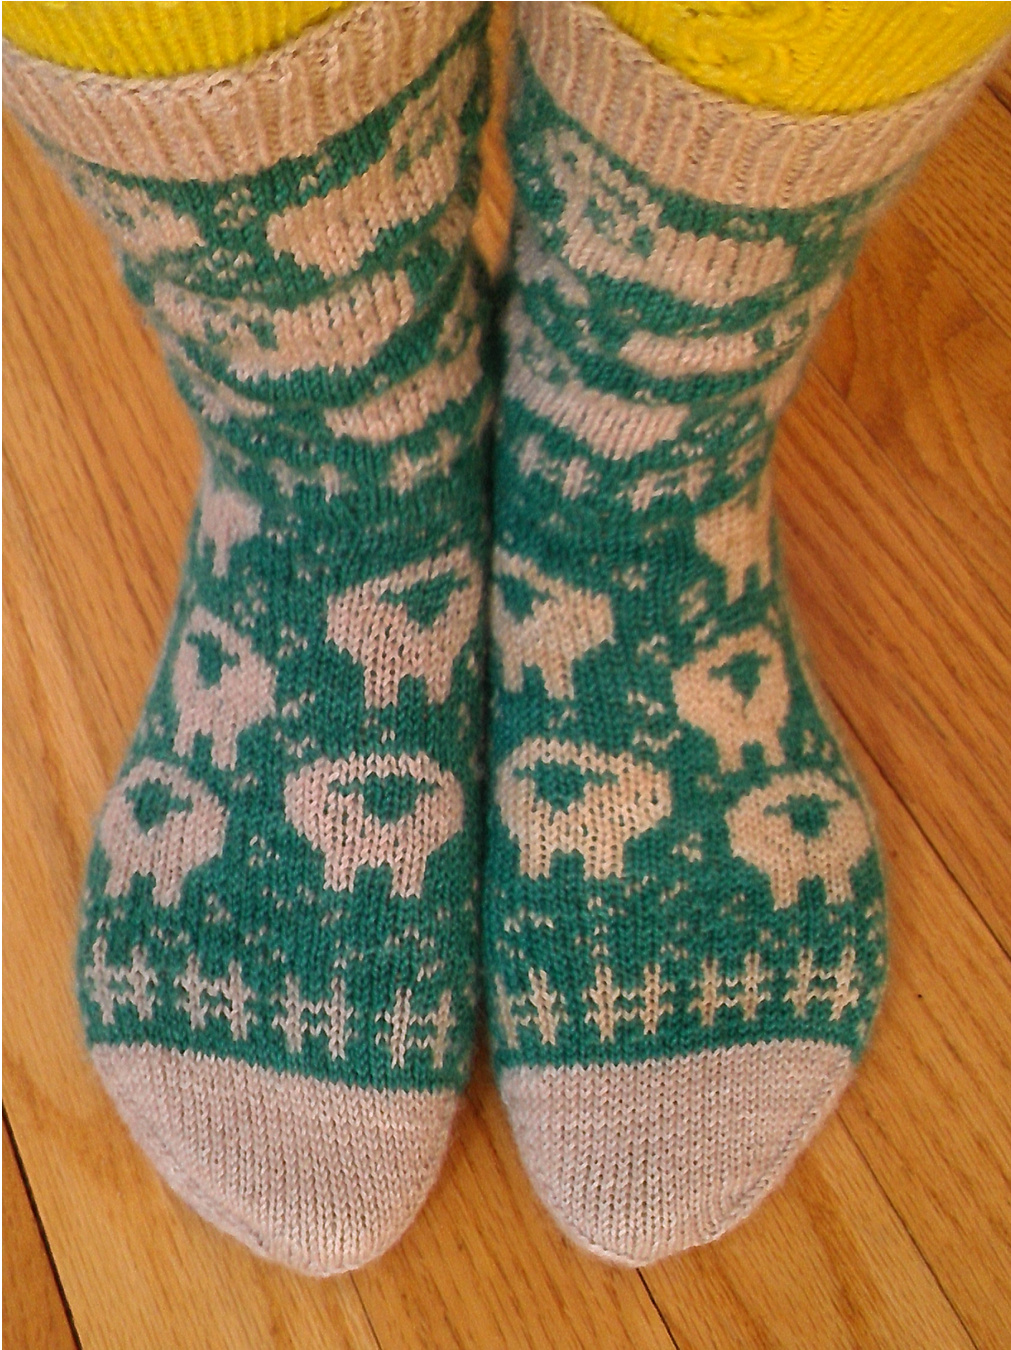
A Flock For Your Feet
sheep and sole charts by revi.
Size: Ladies medium: ≈ 8.25" (21 cm) foot and 9" (23 cm) leg Yarn: Fingering weight yarn: 100 grams MC and 50 grams CC. My socks were made with Invictus Yarns Unconquerable Sole (80% BFL/20% nylon, 400 yards/100 grams) in Oatmeal (MC) and Beth (CC). Needles: 2.25mm or size needed to obtain gauge. 2mm needle or size smaller than needle used to get gauge for cuffs, heels, and toes. Pattern can be worked on dpn's, 2 circulars, magic loop, or one short circular needle. Notions: Stitch markers, tapestry needle Gauge: 32 sts x 44 rounds = 4" (10 cm) in stranded pattern
Abbreviations:
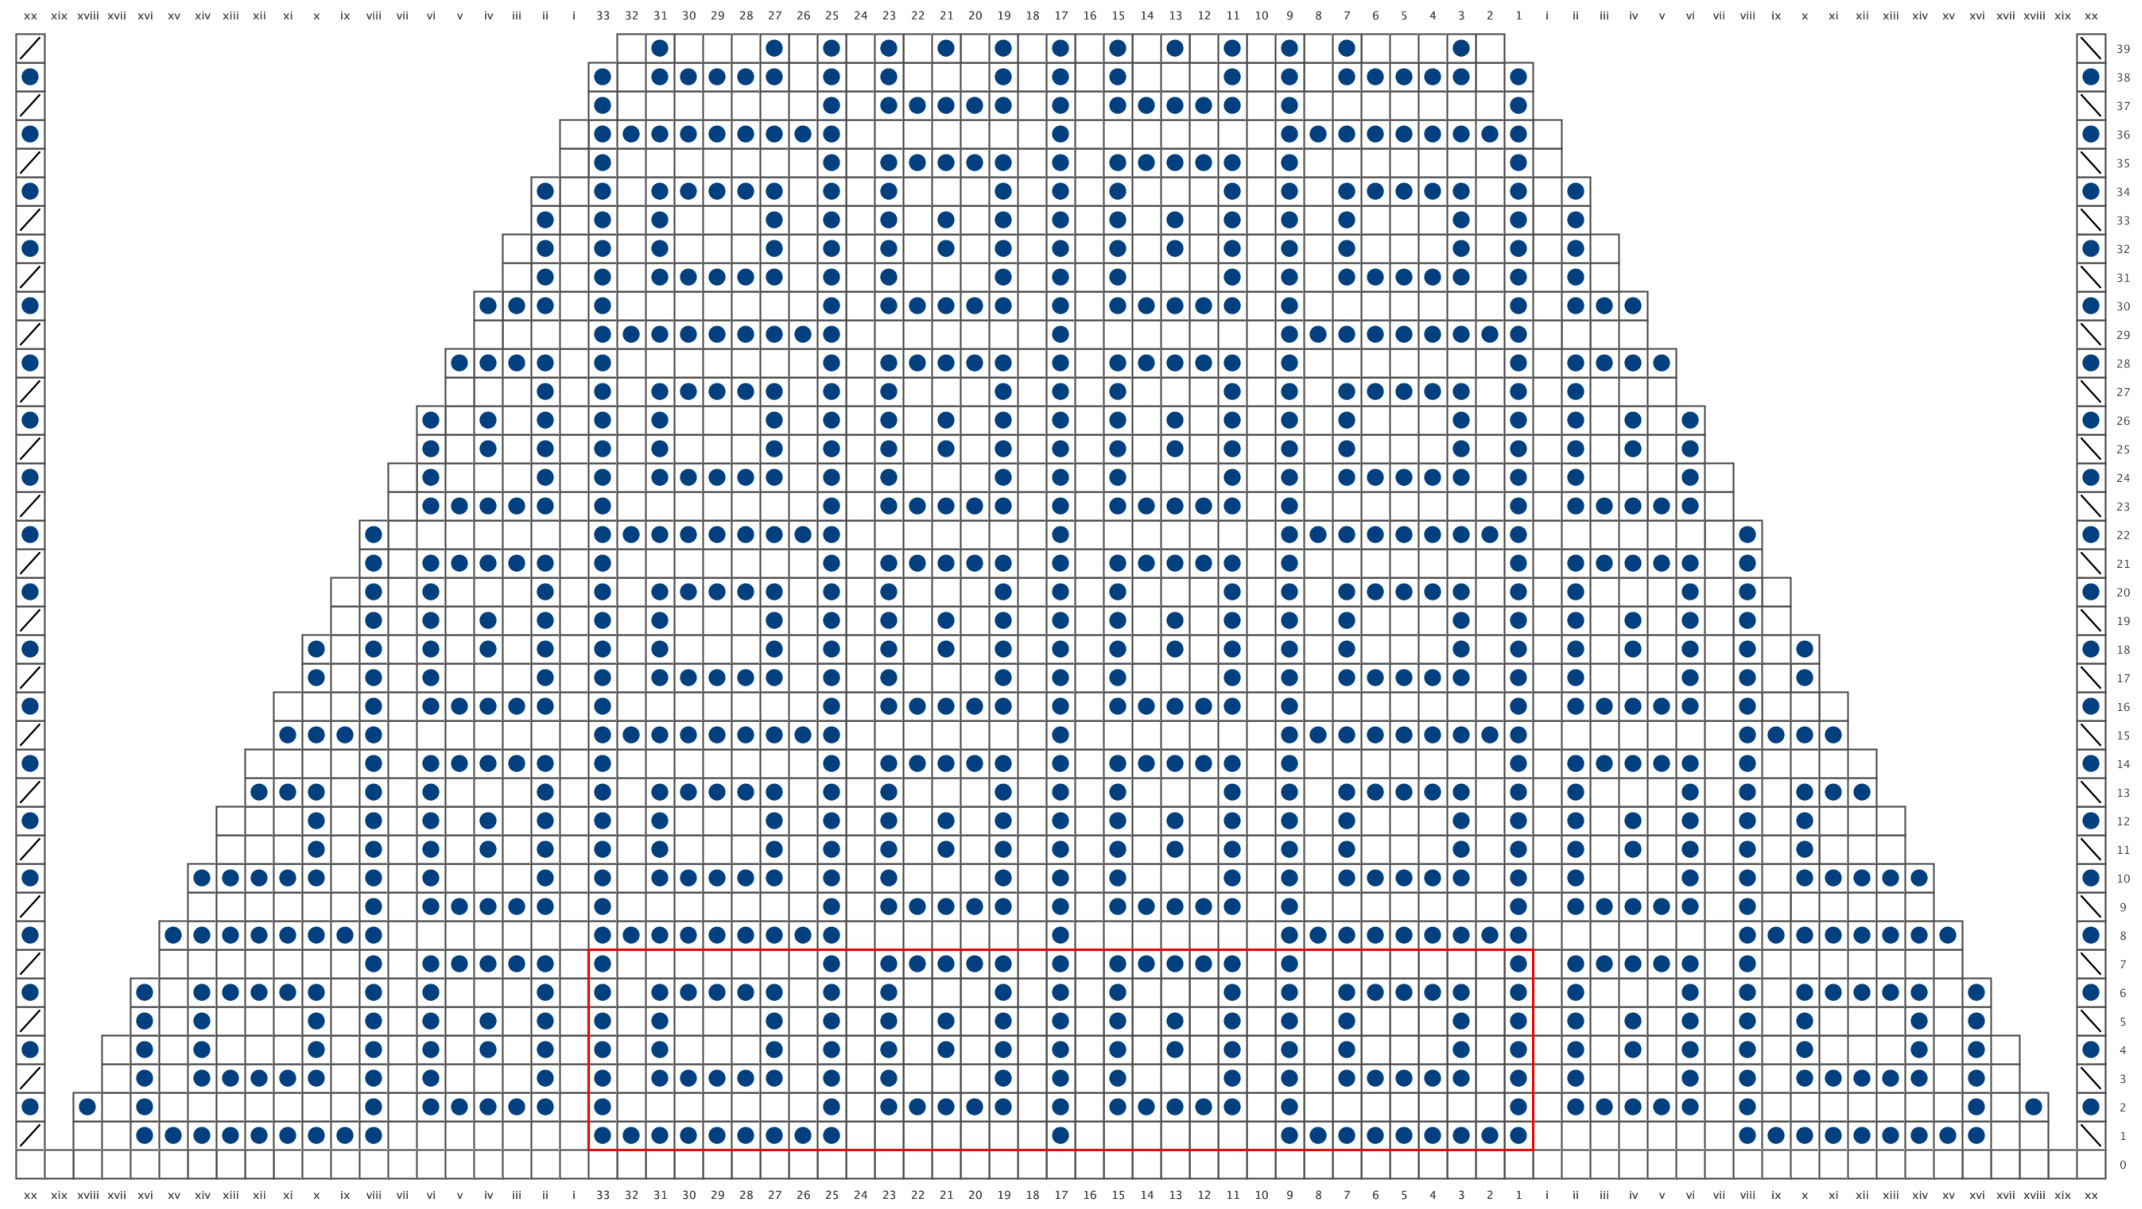
CC: Contrasting Colour (colour of the grass) dec: decrease k: knit k2tog: knit two stitches together ktbl: knit through the back loop M1: make 1 stitch MC: Main Colour (colour of the sheep) p: purl sl st: slip stitch ssk: slip next 2 sts knitwise one at a time, insert left needle into front of boths sts, and knit them together through the back loop sts: stitches This pattern assumes you are somewhat familiar with top-down sock construction and stranded knitting. It contains some longer than average floats, which will need to be tacked down. For a tutorial on stranded knitting which explains how to do that, click here. Cuff and Leg: Follow the instructions from the Sheep May Safely Graze pattern, up to and including this point: In CC work 1 round while decreasing 11 sts evenly spaced by ssk. now you have 66 sts. knit another round in CC. then break CC. change to smaller needles and with MC knit 16 sts. put next 33 sts on hold (they will be worked later for instep). heel is worked over the 33 sts you have still on the needles. turn your work. Heel flap: Heel flap will be worked back and forth using the MC, in Eye of the Partridge (EoP) stitch. Row 1 (WS): SI 1, p32. Turn. Row 2 (RS): [Sl1, k1] to last st, k1. Turn. Row 3: Sl 1, p32. Turn. Row 4: Sl1, [sl1, k1] across. Turn. Repeat rows 1-4 until heel flap measures desired length, typically the distance from the floor to your anklebone. Because this is a stranded sock, you may want to make the heel flap about 1/4" (6mm) longer than you normally do. Take note of how many rows you worked, so that both socks are the same. End heel flap after working a row 4, ready for a WS row. Heel turn: The EoP will continue through the heel turn for extra reinforcementunderfoot. Row 1: (WS) Sl 1, p18, p2tog, p1, turn. Row 2: (RS) [Sl 1, k1] 3 times, k1, ssk, k1, turn. Row 3: Sl 1, p to 1 st before the gap created on the previous row, p2tog to close the gap (1 st from each side of gap), p1, turn. Row 4: [Sl 1, k1] to 2 sts before the gap, k1, ssk to close the gap (1 st from each side of gap), k1, turn. Repeat rows 3 and 4 until 1 st remains on each side of gap. Next row: (WS) Sl 1, p to 1 st before the gap, p2tog to close the gap, turn. Next row: (RS) Sl 1, [sl 1, k1] to 1 st before the gap, ssk to close the gap - 19 sts remain. You are now ready to pick up sts along the heel flap for the gusset. Sole and gusset: The sole pattern repeat is enclosed in the red box, and consists of rows 1-7 and stitches 1-33. The left side of the gusset (right side of chart) is a repeat of stitches 1-16, and the right side of the gusset (left side of chart) is a repeat of sts 18-33. Set up the gusset: After finishing the heel turn, break yarn and set remaining heel sts aside. Rejoin CC at the beginning of the gusset (left side of instep). Make 1 stitch between the instep and the heel flap to close up the gap, then pick up and ktbl one stitch in each sl st along the heel flap. Knit across the held stitches from the heel turn, then pick up and ktbl the remaining stitches along the other side of the heel flap, ending with a M1 between the heel flap and the instep. While you are picking up stitches, place markers around the centre 33 stitches (19 sts from heel turn, plus 7 on each side) to mark off the sole. Be sure youhave thesamenumberofgussetstitchesoneachsideof thesolemarkers. After you have picked up all the stitches for the gusset, you are at the beginning (right side) of the instep. Place marker to indicate start of round, join MC, and work row 1 of the instep chart followed by row 1 of the gusset/sole chart. Decreases will be worked in MC every other round, on the first and last 2 sts of the gusset, beginning with row 1. You will decrease until all of the 'extra' stitches have been eliminated, leaving just columns 1-33 of the chart. How to read the gusset chart: The gusset chart is designed for a maximum of 20 sts between the sole marker and the instep (this would happen with a heel flap that is 52 rows long; most knitters will not have quite so many). The Roman numerals represent the gusset stitches, which are counted from the edge of the sole marker out towards the instep. The areas that are blank represent no-stitch areas, i.e. from stitches that have been decreased away. Column xx represents the first and last sts of the gusset, and will be worked the same way for all stitch counts. Count how many gusset stitches you have, and subtract two - this is how many stitches will be worked in pattern in the first row of your gusset. On each subsequent decrease row you will eliminate a column, until only the sole stitches (columns 1-33) remain. To illustrate: In my socks there were 16 gusset stitches, so on rows 1 and 2 i worked 14 stitches in pattern (columns i - xiv) on each side of the sole markers. On the next decrease round and the round that followed, i worked columns i - xili; on rounds 5 and 6 i worked columns i - xii, and so on. My last gusset decreases were on round 31. If you are starting with fewer than 20 gusset stitches, you may find it helpful to either highlight the stitches you will be working, or black out the ones you will not beworking. Instep: The instep charts are mirrored copies of each other - work one on each sock. Foot: Once the gusset decreases have been completed, continue working in pattern (sheep chart across the instep, and sole chart across the sole) until sock measures ≥2" (5 cm) less than desired length. If you need more length in the instep, add plain (solid) rounds before beginning the toe. If you need to shorten the instep, eliminate rows 51-57 of the sheep chart. If that is still too long, eliminate some of the plain knit rounds within the first 10 rounds of the toe (this will make the toe itself shorter, rather than shortening just the instep). Toe: The toe is worked entirely in stockinette stitch, using the MC, and measures about 2" (5 cm) long. Break CC and switch to smaller needles if desired. To shape the toe: work the decrease round (described below) on rounds 4, 7, 10, 12, 14, 16, 18, 19, 20, 21, 22, 23; for all other rounds, knit around. After working round 23 there should be 18 sts remaining. Use Kitchener stitch to graft the toe shut (tutorial here, if you need it.) decrease round: instep: k1, ssk, k to 3 sts before left side of instep, k2tog, k1; sole: k1, ssk, k to 3 sts before end of round, k2tog, k1. Finishing: Weave in all yarn ends, and admire your work. Now knit the other sock and enjoy your beautiful new pair! A good soak and block before wearing is highly recommended, as this will help the colourwork even out and settle into place. Happy knitting!
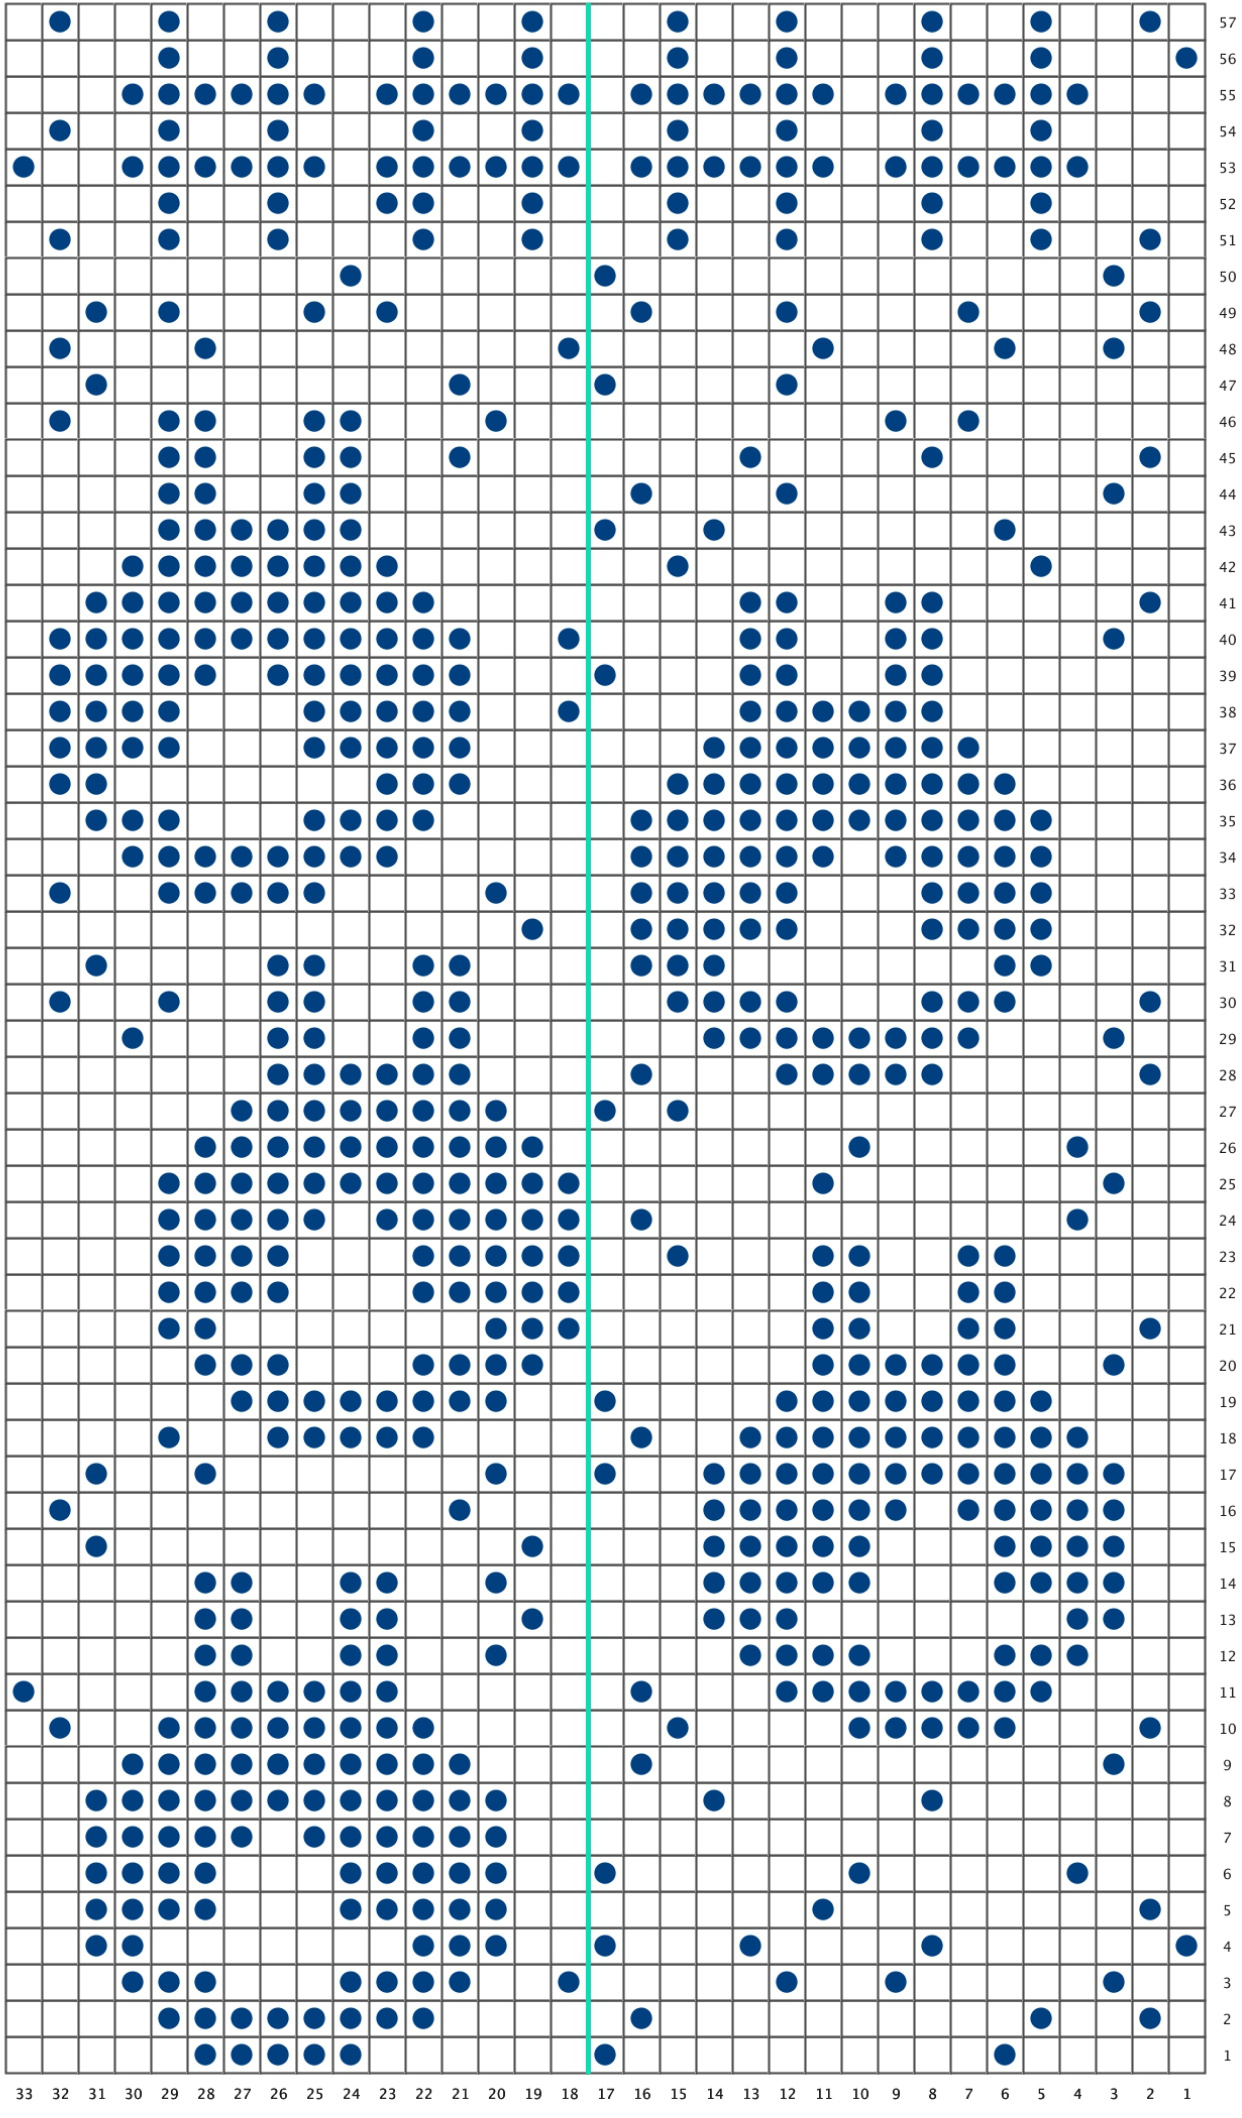
Instep Chart 1
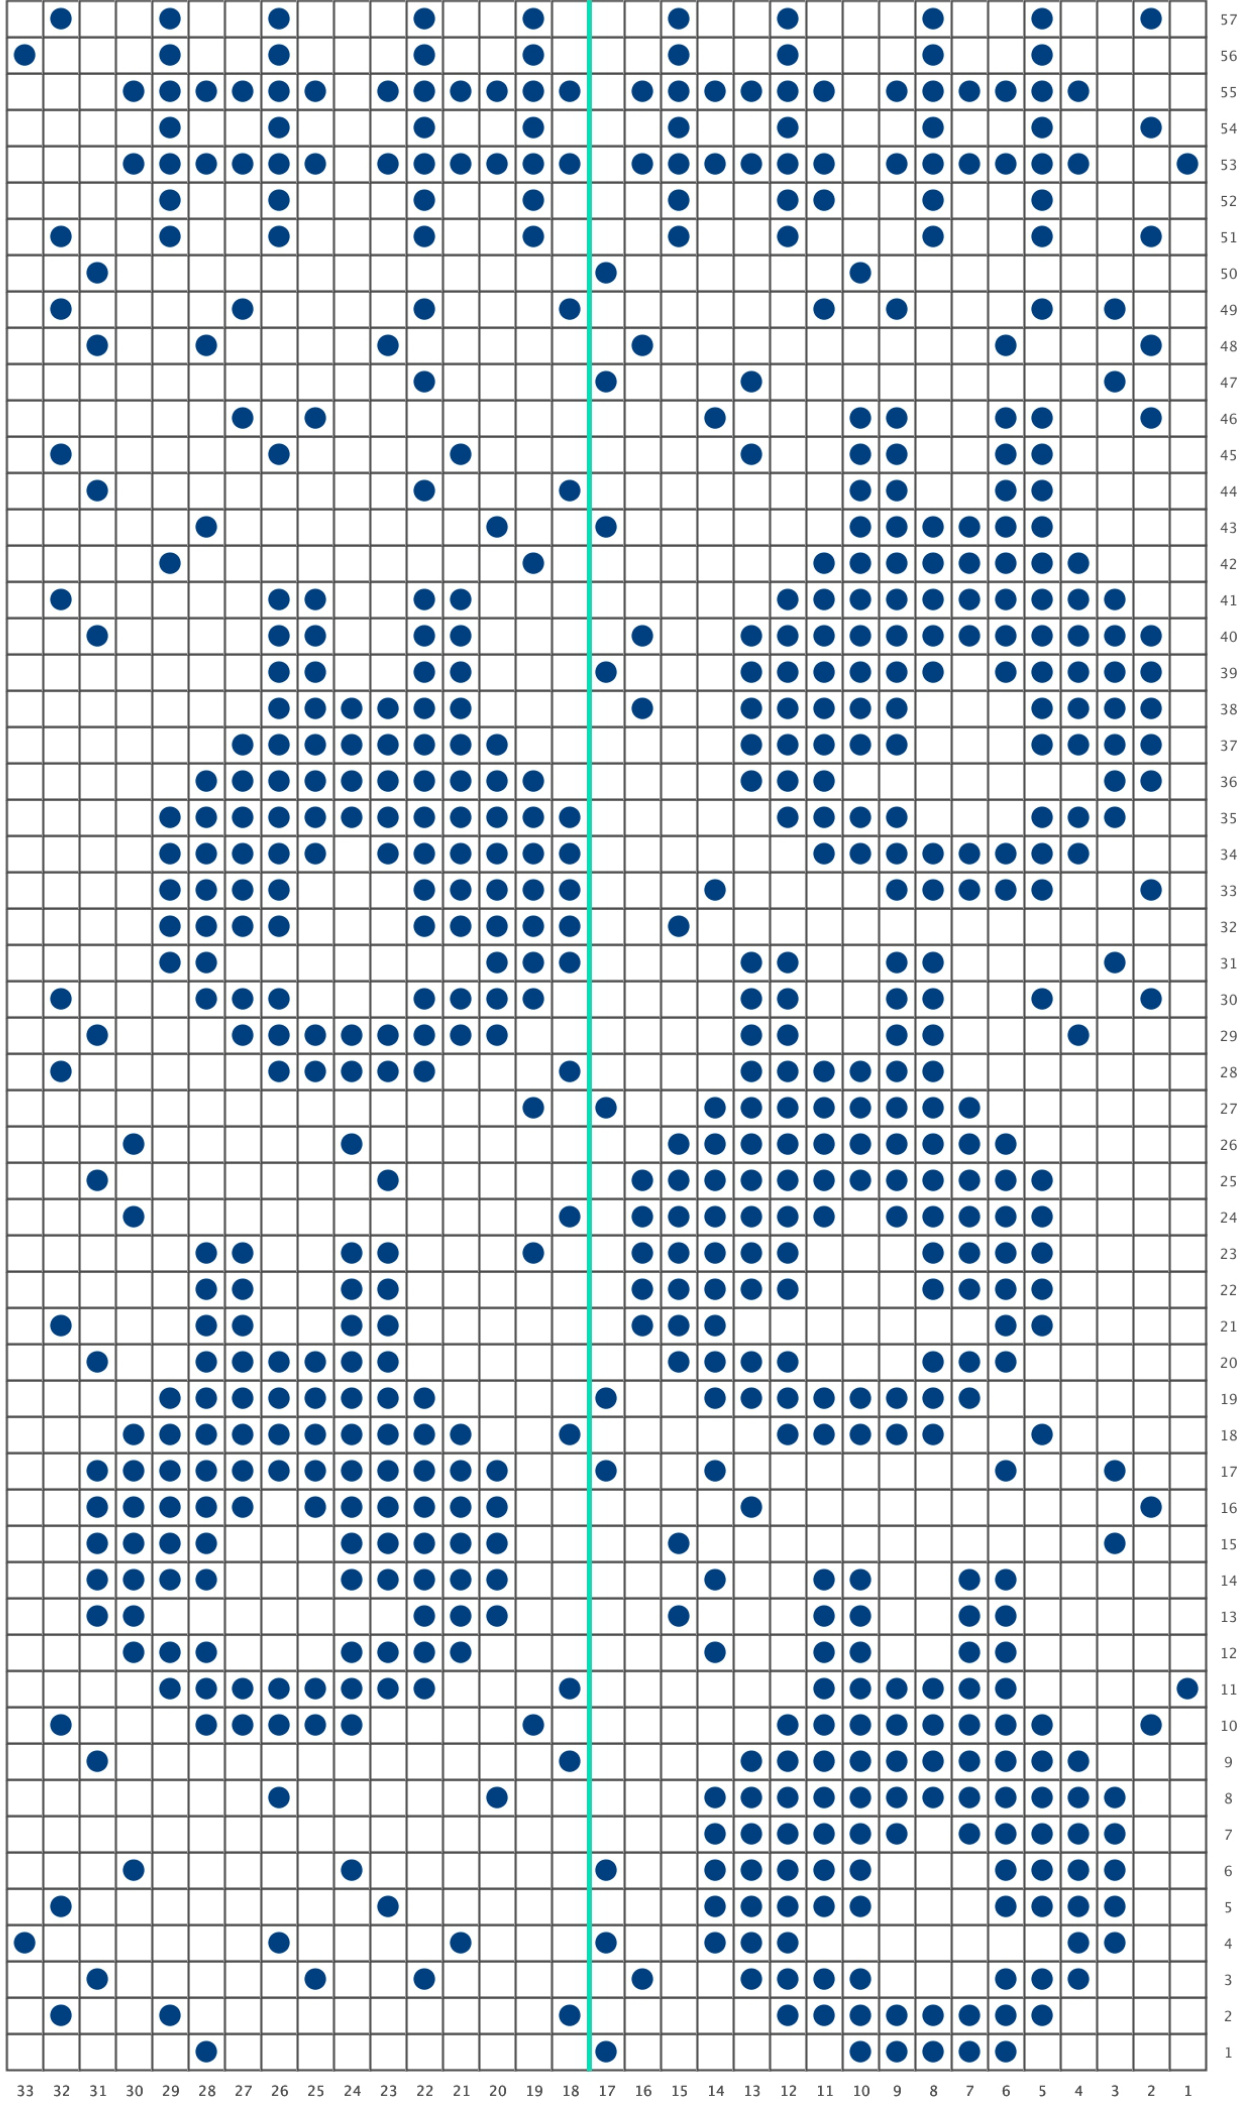
Instep Chart 2