FiBERSPRCE
Modular Felted Bag P-55
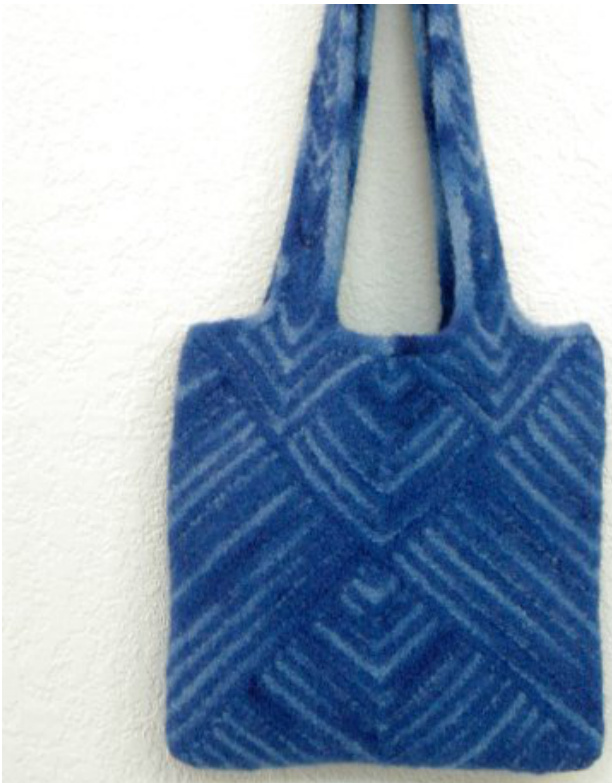
The Modular Felted Bag assembles itself. There's hardly any finishing to do - just weave in the tails. The bag is roomy and easy on the shoulder. Dimensions before felting: 16" x 16", after felting: 1112" x 111/2".
Materials
2 (100g/160y) skeins each Brown Sheep Co Lanaloft Worsted (100% wool) in Big Sur Blue (MC), Raindrop (CC) Size 11 US circular, 24", and double pointed needles, smaller spare 24" circular for picking up stitches Small stitch holders (2), locking stitch marker Gauge: approx 3 sts/inch in st st before fe
Techniques
dbl dec - double decrease: Worked over center 3 sts. Slip the first 2 sts as if to knit, k the next st and pass the slip sts over it. Place marker in center st, if desired. Pick Up and Knit: With RS facing, insert needle under st on outside edge. Wrap yarn knitwise around needle. Draw stitch through and leave on needle. For best results, pick up the bar between the garter st ridges. When picking up sts where the colors are carried, be sure to insert the needle under the stitch and the carry. m1 - make one: Make a stitch by picking up the loop lying between the stitch just worked and the next stitch. Knit into the back of this stitch. ssk - slip, slip, knit: Slip the next two sts knitwise, one at a time. Insert the left needle from left to right through the slipped sts and knit. w&t - Wrap & turn. Slip next st as if to purl, bring yarn forward between needles, slip slipped st back onto left needle, return yarn to back of work, turn work, and begin to knit. W&t can produce small holes at the turn. Avoid this problem by picking up the wraps, and working them with the corresponding stitch when they are encountered. 3 NBO - 3 Needle Bind Off: With stitches on two needles, hold needles parallel to one another, \*k2tog (one st from front needle, one st from back needle)\*. Repeat \*\* once. Bind off first st over second st. Continue to k2tog, one front st and one back st, while binding off. Applied I-Cord Trim: (3 st version) After casting on sts to dpn, \*pick up the first handle st on the left. Slide the 4 sts to the opposite end of the dpn. Pull the yarn across the back, k2, k2tog tbl (through the back loop)\*. Repeat\* until all sts around handle have been worked. If desired, pick up handle sts with spare circular before working the trim.
Square #1
NOTE: When changing from MC to CC, always bring the next color to be knit under the previous color. If unsure about where dbl dec happens, use this formula: take total # of sts minus 3. Divide that result by 2. For example: total sts = 47 - 3 = 44 ÷ 2 = 22. Next row is k22, dbl dec, k22. With circular needle and MC, CO 65 sts. Place m in center st, if desired, and carry m up as work progresses. Row 1: (WS) Knit. Row 2: With CC, k31, dbl dec, k31 (or, k to center 3 sts, dbl dec, k to end of row). Row3Knit. Row 4: With MC, k30, dbl dec, k30. Row 5: Knit. Repeat Rows 2-5, working one less st on either side of the center st, (k29, k28, k27, etc) until 5 sts rem. If not using a marker, refer to Note above for placement of dbl dec. Next Row: K1, dbl dec, k1. (3 sts) Next Row: K3tog. Do not break MC and CC. One st rem on needle. Begin next square.
Square #2
With rem st on needle, RS facing and MC, pick up and knit 32 sts along left top edge of square and 32 sts along cast on edge of square. (65 sts) Row 1: (WS) Knit. Work Rows 2-5 as for Square #1, alternating MC and CC until 5 sts rem. Work final 2 rows as for Square #1. Break MC and CC.
Square #3
Outer Trim
Pick up for Square #3 begins in the center of the CO edge of Square #1. With RS facing and MC, pick up and knit 32 sts along cast on edge and 33 sts along top right edge of Square #1. (65 sts) Row 1: (WS) Knit. Work Rows 2-5 as for Square #2, alternating MC and CC until 5 sts rem. Work final 2 rows as for Square #2. The following steps complete the center section of the bag and two of the four handle sections.
Bag Center
With RS facing and MC, begin pick up 16 sts down from top point of right hand square. Pick up 16 sts to top of Square #1, 1 st at intersection of squares, and 16 sts along side of opposite square. (33 sts) Row 1: (WS) Knit. Work Rows 2-5 as for Square #1, until 5 sts rem. Row 2 begins k15, dbl dec, k15. Work final 2 rows as for Square #1. Do not break yarn. Make one set of handles as described below.
Handle & Trim
Each side of the bag has one handle that is picked up starting from the top of Bag Center and one that is picked up starting from the top of either Square 2 or Square 3. Handle Left of Bag Center Handle begins with last st of Bag Center rem on needle. With RS facing and MC, pick up 15 sts along edge, 1 st at intersection of squares, and 16 sts along edge of Square #2/3. (33 sts) Row 1: (WS) Knit. Row 2: With CC, k2tog, k13, dbl dec, k13, ssk. Row 3: Knit. Repeat Rows 2 & 3, alternating MC & CC and working 2 less sts on either side of dbl dec (i.e., k11, k9, k7, k5) until 13 sts rem and Row 3 is complete. Decreases to Handle Row 1: K5, dbl dec, k5. (11 sts) Rows 2 & 4: Knit. Row 3: K4, dbl dec, k4. (9 sts) Handle Row 1: K1, m1, k2, dbl dec, k2, m1, k1. Row 2: Knit. Repeat Rows 1 & 2 for 19"(approx 35 ridges). Next Row: K3, dbl dec, k1, w&t, k3, w&t, k to end. Next Row: Knit. (7 sts) Place sts on holder. Break yarn, leaving short tail. Handle Right of Bag Center Handle begins at top of Square #2/3. With RS facing and MC, pick up 16 sts along edge of square, 1 st at intersection of squares, and 16 sts along edge of Bag Center. (33 sts) Repeat handle as for Left side, leaving final 7 sts on needle. Transfer Left Handle sts from holder to dpn. With WS of both handles facing and CC, work 3 NBO over rem sts, leaving last st on needle. Do not break CC. Work Applied I-Cord around edge of strap and bag, picking up sts as above. Use spare circular to pick up sts, if desired. Otherwise, pick up sts as cord is worked around. With rem st on needle and CC, cast on 2 sts to left hand needle. Work I-Cord as follows; \*work 2 sts Applied ICord and one rnd of 3 st I-Cord alone\*, rep \*\*. Two sts of the trim are attached, one is not. When cord reaches beg point, k1, k2tog, pass fist st over last. Break yarn and bring tail through last st. Repeat Bag Center and Handle & Trim for opposite side ofbag.
Inner Trim
Work Applied I-Cord around unfinished edge of handles and bag. With CC, cast on 3 sts. With RS facing, begin at top center of handle as for Trim above, working 2 sts in Applied I-Cord and one rnd I-Cord alone. Work around until all sts on inner edge have been trimmed. Work in all tails.
Felting
Set washer for heavy-duty cycle, low water level and hot water. Add a few drops of liquid laundry soap to the water. Place bag in a zippered pillowcase and drop in the washer. Agitate. Check on bag after 5 minutes of agitation, then, every 3-5 minutes until it is the desired size. Reset the agitation cycle as often as needed to accomplish this. Continue with either method listed below to finish the felting process. "Faint of Heart Method": Remove bag from washer. Squeeze out excess water - do not wring. Place in tub or bowl of cool water and rinse by hand. Squeeze out excess water, shape and let dry. "Living Dangerously in the Spin Cycle Method": (Disclaimer: Do not attempt this method while talking on the phone, polishing your nails or disciplining children. Your undivided attention is an absolute necessity!) Let washer proceed to rinse cycle. Agitate bag for 10-20 seconds. Stop washer. Reset washer to pump out water and spin. Once spinning begins, spin for about 20 seconds. Stop washer. Position bag in tub so that it is flat against the tub wall. Spin for another 20-30 seconds. Most of the water will be spun out and there should be no unsightly creases. Shape and let dry.


