Verdure
Designed By Jenny Richens

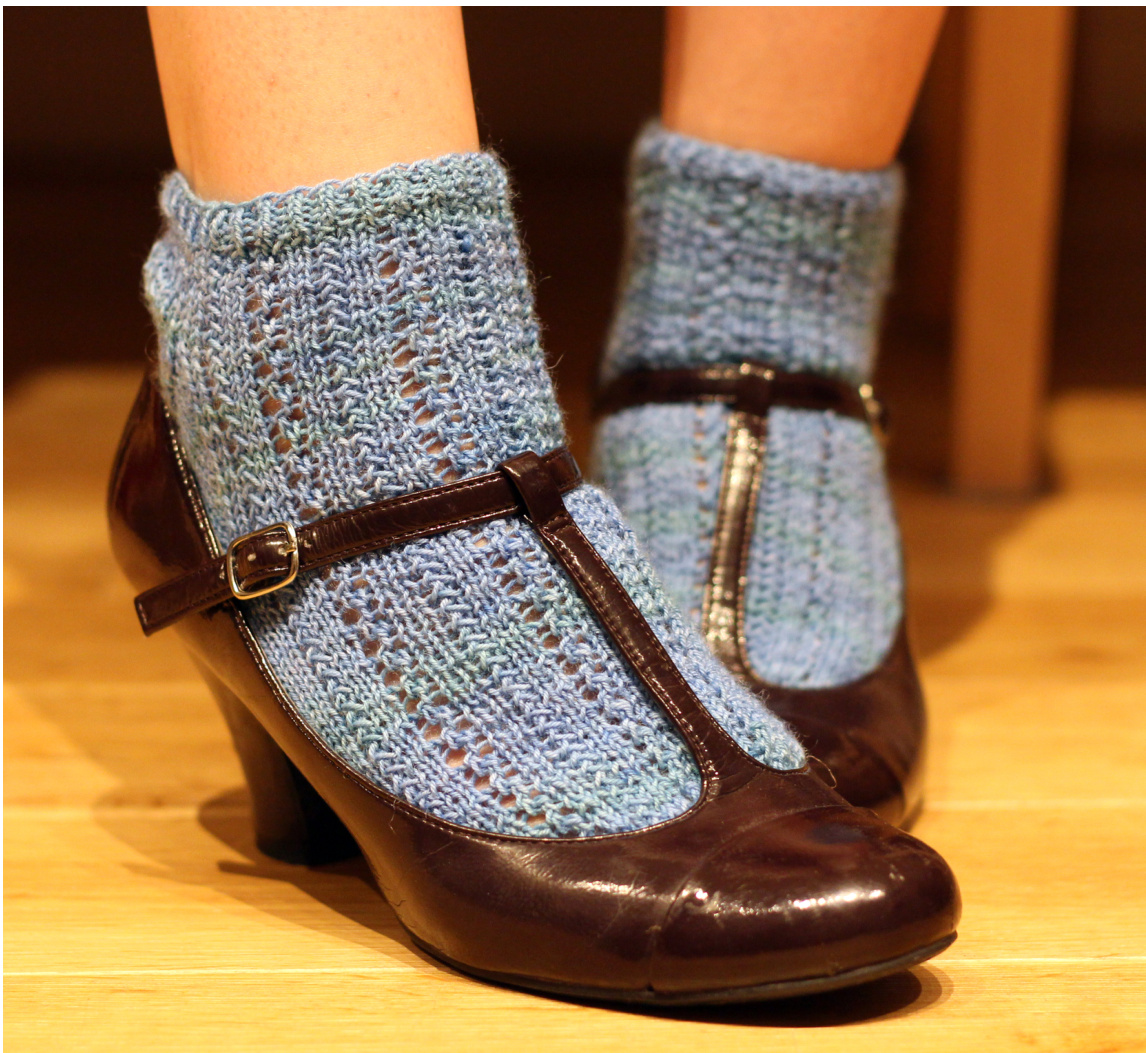
These socks are a simple knit with enough pattern to keep up interest while knitting them. They are knit top-down and I have included instructions for both short "trainer socks" and normal full-length socks (trainer sock instructions in parentheses). These socks suit a fairly solid coloured base, to allow the lace and slipped stitch patterns to show up to best effect.
Gauge
(Il used 2.25 mm double-pointed needles) 32 sts/ 4 inches in st st 34 sts / 4 inches in pattern (but it's stretchy)
Yarns used
For trainer socks - The Thylacine Wellington Sock Yarn, colourway Fairy-Wren, 400m/ 437yds per 100g skein. (48 g of yarn used per pair for European size 39) For full-length s0cks - Regia 4-ply (4-fadig), colourway 01078, 210m/230yds per 50g ball (68 g yarn used per pair for European size 39)
Abbreviations used
K1 - Knit one stitch K1 tbl - Knit one stitch through back loop P1 - Purl one stitch SSK - Slip two stitches (as if to knit), insert the left needle into the fronts of these two stitches, knit slipped stitches together K2Tog - Knit two stitches together Grass stitch - Slip one stitch purlwise (with yarn in back), Knit one stitch, Yarn around the needle, Pass slipped stitch over knit stitch and yarn over. @ Jenny Richens 2013 theknittingtotoro.blogspot.co.uk
Cuff and Leg
Cast on 64 stitches using a long-tail cast on. Join in the round, being careful not to twist. Work twisted rib for 10 (5) rows (K1 tbl, P1). Begin pattern on row 1 of chart and do 13 (3) (or however many you want) repeats before beginning the heel flap. The chart represents the minimal unit of the pattern and each row of the chart will be repeated 8 times to make a full row of the sock cuff. Writteninstructions Row 1 - [K1, Grass Stitch, K2, YO, SSK, K1] to end. Row 2 - K all stitches. Row 3 - [K1, Grass Stitch, K2, K2Tog, YO, K1] to end. Row 4 - K all stitches.
| 4 3 | ||||||||
| o | ||||||||
| 入 | o | C | V | 2 1 |
Heel Flap
Once the leg is complete put 32 stitches on hold for the top of the foot, and begin the heel flap with the other 32 stitches. I like a slipped stitch heel for extra durability, and the “eye of partridge" heel is particularly pretty (see below). You can also work a plain heel, but slip the first stitch of every row (this makes picking up stitches for the gusset much easier). Plain heel Row 1 (RS) -SI 1, K31. Row 2 (WS) - SI 1, P31 EyeofPartridge Row 1 (RS) - Sl 1, [SI 1, K1] 15 times, K1. Row 2 (WS) -SI 1, P31. Row 3 (RS) - Sl 1, [K1, SI 1] 14 times, K2. Row 4 (WS) - SI 1, P31.
| 4 | V | ||||
| V | V | ||||
| 2 | V | ||||
| V | V |
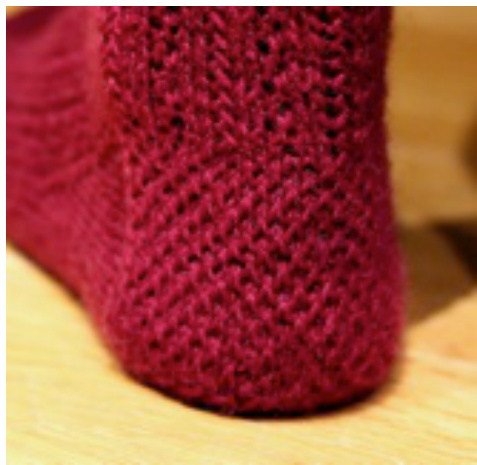
Work the heel flap for 4.5 cm, if you have a large instep then you may wish to work a longer heel flap, and pick up more stitches for the gusset. End on a WS row.
Turn Heel
Row 1(RS) - K18, SSK, K1, turn. Row 2 (WS) - SI 1, P7, P2Tog, P1, turn. Row 3 (RS) - Sl1, K8 (until one stitch before the gap), SSK (across the gap), K1, turn. Row 4 (WS) - Sl1, P9 (until one stitch before the gap), P2Tog (across the gap), P1, turn. Continue working in this manner, slipping the first stitch of each row, then knitting (or purling on the WS) to one stitch before the gap, SSK across the gap (or P2Tog on WS), K1 (P1 WS) and turning. Do this until you have reached the edges of the heel flap and you have a turned heel. You should have 20 stitches remaining. K10 to reach the centre of the heel, and proceed to gusset.
Gusset
You are now at the centre of the heel, and the beginning of the round. If working on dpns then arrange your stitches so that you begin the round on a new needle. If working on circular needles, just place a marker here, so that you know it is the beginning of the round. Knit the remaining 10 stitches of the heel, then pick up and knit stitches along the edge of the heel flap, one stitch per slipped stitch from the heel flap, and pick up an extra stitch between the top of the heel flap and the held instep stitches. Knit across the instep stitches (row 1 of the lace pattern), and then pick up one stitch between the instep and heel flap, then one stitch in each slipped stitch from the heel flap. Knit the remaining 10 stitches of the row. On the next round K10, then for all stitches picked up in the previous round K tbl, K across instep stitches (row 2 of lace chart), K tbl for picked up stitches, K10. (Knitting through the back loop of the picked up stitches tightens them up and makes for a neater appearance). Begin working the following two rounds, until you have decreased back to 64 stitches. Row 1 - K to 3 stitches before instep, SSK, K1, work lace pattern over instep stitches, K1, K2Tog, K to end. Row 2 - K all stitches. Once you have decreased to 64 stitches, work even along the length of the foot, until 4.5 cm from the end, working lace pattern on the top of the foot and stocking stitch for the underside.
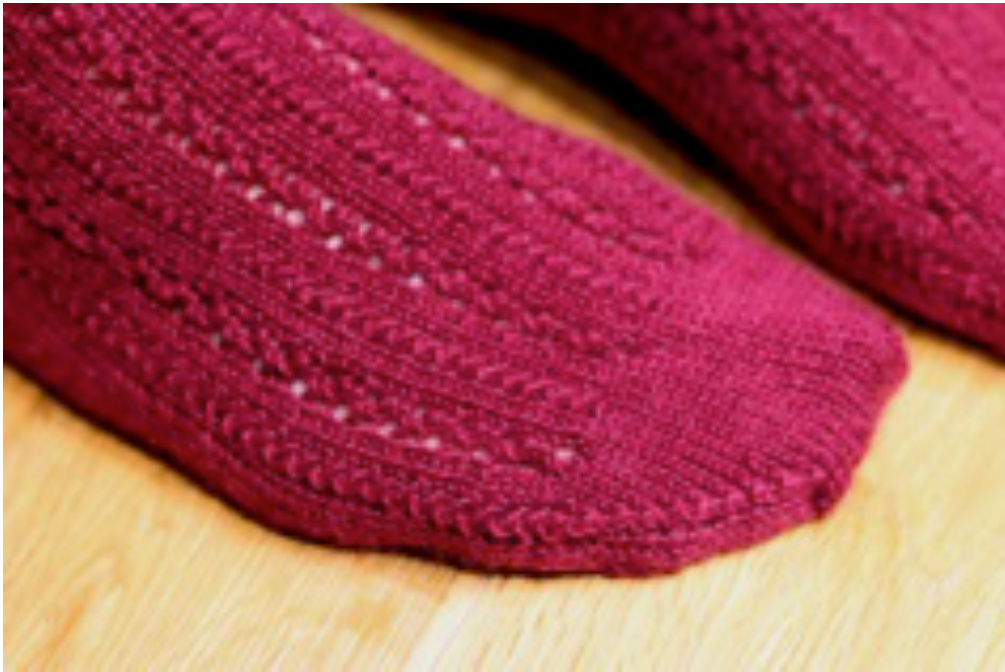
Toe Organise your stitches so that you begin the row at the beginning of the lace pattern. Row 1 - K1, SSK, K to 3 st before end of top of foot, K2Tog, K2, SSK, K to 3 st before end of round, K2Tog, K1. Row 2 - K all stitches repeat these two rows until you have 24 stitches remaining, 12 for the top of the foot, and 12 for the underside. Arrange the 12 stitches for the top of the foot onto one needle, and the 12 for the bottom onto another, and using kitchener stitch graft the toe of the sock closed. Weave in ends, and block if desired (blocking can help to open up the lace pattern more effectively). Enjoy your new socks!
Copyright Notice: This pattern is the property of Jenny Richens. This pattern is for personal and non-profit use only. No portion of this pattern, may be copied, translated, resold or otherwise used for profit without permission from the designer. Items may be made from the pattern for yourself, as a gift or for charity. If you wish to sell items made from this pattern please contact the designer.


