Soft Glow of Candlelight Shawl
By Pam Chamberlain
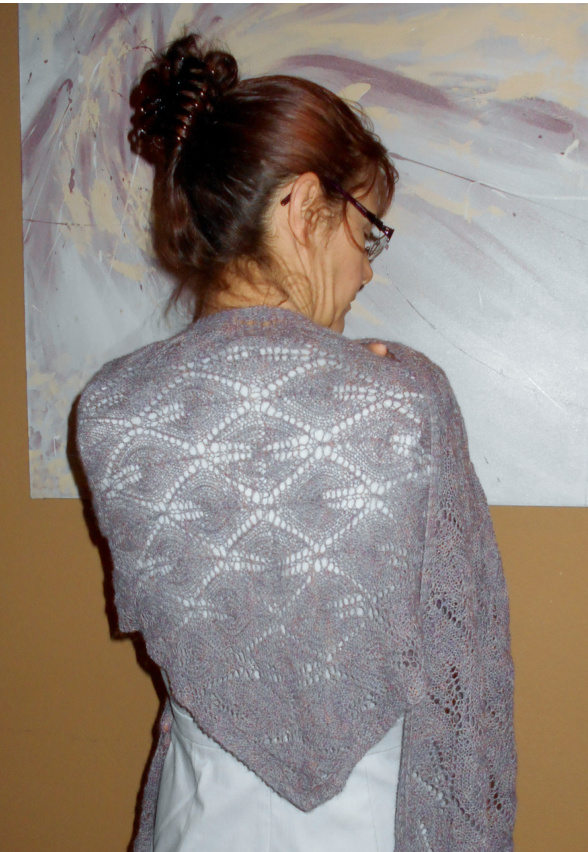
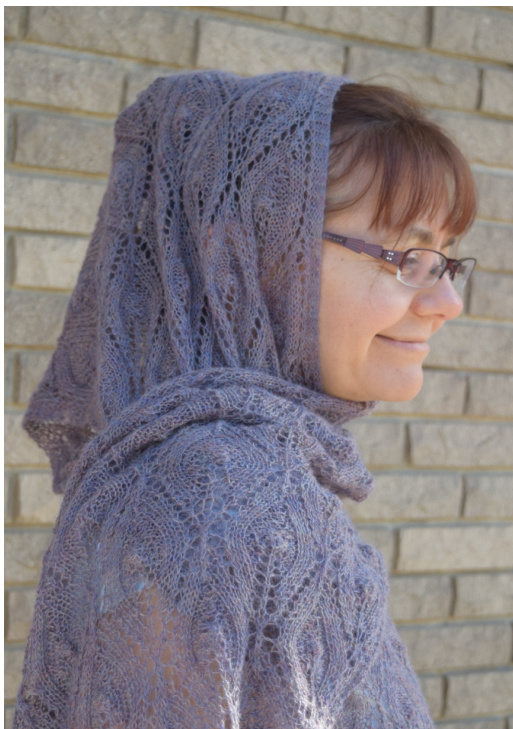
This "candlelight" lace motif has been restructured from its original rectangular shape into a biased fabric. One of this pattern's features is the beauty of its reverse side, where the embossed "candlelight" motif appears in knit stitches against a background of purled stitches. This shawl has many interesting qualities. This lace is reversible and can be worn on either side. The two sides are knit separately, the motif and shaping are mirrored. Then, they are grafted together in the center to form a "v" shaped shawl that can be worn many different ways. This shawl is edged with a simple garter stitch border. The candlelight lace pattern is written, not charted. This shawl is for the adventurous knitter. This pattern uses six different decreases: k2tog, k3tog, ssk, sssk, CDD and P-CDD (a purl side version of the CDD - directions for doing this decrease are under Techniques). It also uses Grafting in Pattern to join the two sections together.
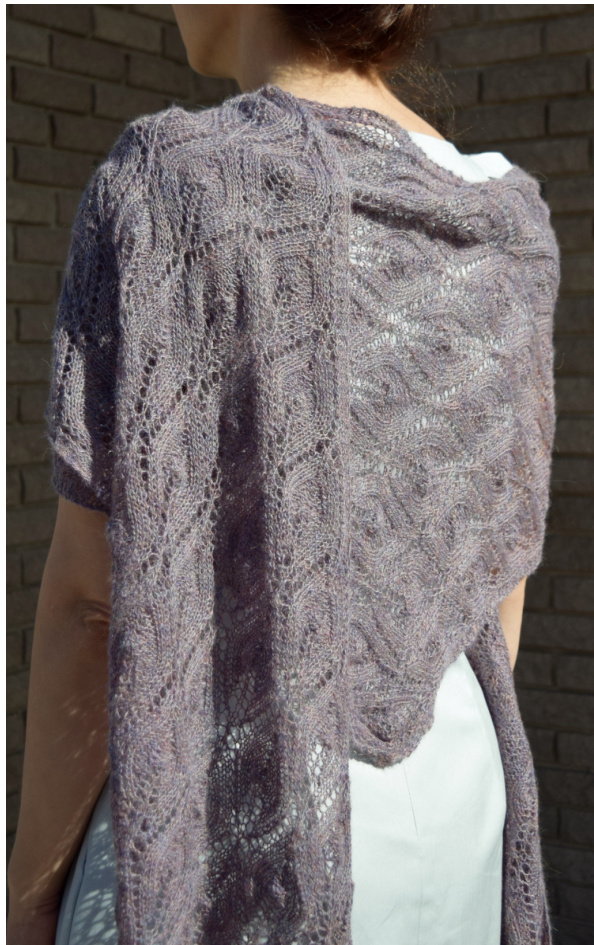
Difficulty: Advanced Size: One size fits most Finished measurements: 13"x 116" (the outside edge of the "V") gently blocked Yarn: 1320 yards of lace weight yarn The sample shawl was knit using 3 skeins of Knit Picks Alpaca Cloud, 100% Baby Alpaca in Iris Heather, 440 yds/50 grams. Needles: US size 2/2.75 mm - 24/29 inch circular needles Crochet hook size E/4/3.5 mm Or size needed to obtain gauge Notions: 2 stitch markers Stitch holder Spare needle Yarn needle Lace blocking wires and pins Gauge: 27 sts/16 rows per 4"(10 cm) over lace pattern (gently blocked) To save time, take time to check the gauge. While gauge is not important is the fit is not crucial, changes in gauge will result in size differences and the amount of yarn needed to complete the project.
Techniques:
CDD - Centered Double Decrease - sl2, k1, p2sso: Insert the tip of the RH needle from left to right (knitwise) into the front loops of the next two stitches on the LH needle (as if to k2tog) and slip them to the RH needle. Knit the next stitch on the LH needle. With the tip of the LH needle lift the two slipped stitches and pull them over the stitch you just knit and off the needle. Crochet or Chain Cast On: Using your main yarn and a crochet hook two sizes larger than your knitting needle, make a slipknot on the crochet hook in your right hand. Hold the needle and yarn in your left hand with the yarn under the needle. Wrap the yarn around the needle from back to front and using the crochet hook, pull the yarn through the slipknot. \*Bring the yarn to the back under the needle and wrap the yarn around the needle from the back to the front and using the crochet hook, pull the yarn through the loop on the hook.\* Repeat from \* to \* until you have cast on the desired number of stitches minus one. Then bring the yarn to the back and slip the loop from the crochet hook to the needle. Designer Note: I like to use the Crochet Cast On as it exactly matches the knit bind off. Using a crochet hook two sizes larger than your knitting needle allows for stretching when blocking. Grafting in Pattern: Grafting is a technique for invisibly weaving together live stitches, including stockinette and mixed knit and purl stitches. It is also called Kitchener Stitch when grafting stockinette stitches to stockinette stitches. When you graft two pieces together, you create a new row of stitches between the upper and lower fabrics. Grafting "in pattern" combines the techniques of grafting knit and purl stitches. Each stitch is evaluated independently. Instead of being dependent on how the stitches appear on the needles, it is based on the type of stitch that will result when the stitches are grafted (which may or may not be the same as the stitches on the needles). Remember what type of stitch needs to be grafted and adjust the steps accordingly. Place each set of stitches on a separate needle. Lay the fabric flat on a table top with right sides facing up with the needles parallel and the tips of the needles facing to the right. Each needle must have the same number of stitches and the stitches to be worked first on each needle should be spaced to match the stitches on the other needle. On the back needle, cut the working yarn four times the width of the fabric and thread this end through a yarn needle. To work the following instructions, "first pass" means the first time the yarn is pulled through a stitch, and "second pass" is the second time the yarn is pulled through that same stitch. Start with the first pass on the front needle. If a knit stitch on the front needle: 1. First pass, insert the yarn needle purlwise. 2. Second pass, insert the yarn needle knitwise. If a knit stitch is on the back needle: 1. First pass, insert the yarn needle knitwise. 2. Second pass, insert the yarn needle purlwise. If a purl stitch on the front needle: 1. First pass, insert the yarn needle knitwise. 2. Second pass, insert the yarn needle purlwise. If a purl stitch on the back needle: 1. First pass, insert the yarn needle purlwise. 2. Second pass, insert the yarn needle knitwise. Moving the yarn needle between the two fabrics creates one side of a stitch. Moving the yarn needle horizontally between two stitches of the same fabric creates a running thread. Never drop a stitch from a knitting needle until it has two strands of yarn in it. Every two or three stitches examine the fabric. Tighten or loosen the stitches using the end of the yarn needle to tug at each loop, working from the beginning of the join towards the last stitches worked. When the last stitch is worked, pull the yarn end through the center of the stitch and pull gently to close. Weave in the remaining yarn end on the wrong side. k2tog - knit two together: Insert the tip of the RH needle from left to right (knitwise) into the front loops of the next two stitches on the LH needle. Knit these two stitches together.
k3tog - knit three together:
Insert the tip of the RH needle from left to right (knitwise) into the front loops of the next three stitches on the LH needle. Knit these three stitches together (hint: gently pull down on the stitches to elongate them slightly before you insert the RH needle). Knit bind off: Knit two stitches, one at a time. \*Insert the tip of the LH needle into the first stitch on the RH needle, lift and pull this stitch over the second stitch and off the needle. Knit one stitch.\* Repeat from \* to \* until one stitch remains on the RH needle. Cut yarn and gently pull it through the last remaining stitch. Weave in the remaining yarn end on the wrong side.
P-CDD - Purl Centered Double
Decrease: With yarn in front, slip the next two stitches on the LH needle knitwise to the RH needle one at a time (as if to ssk). Insert the tip of the LH needle into the front loops of both slipped stitches from right to left and move the stitches back to the LH needle, keeping them twisted. Insert the tip of the RH needle from right to left (purlwise) into the front loops of the slipped stitches and the next stitch and purl these three stitches together (hint: gently pull down on the stitches to elongate them slightly before you insert the RH needle). This decrease is worked on the purl stitches so that on the knit side it looks like a CDD. Designer Note: A p3tog can be substituted for the P-CDD, but it will not have the centered knit stitch . p3tog - purl three together: With yarn in front, insert the tip of the RH needle from right to left (purlwise) into the front loops of the next three stitches on the LH needle. Purl these three stitches together (hint: gently pull down on the stitches to elongate them slightly before you insert the RH needle). ssk - slip, slip, knit: Slip the next two stitches on the LH needle knitwise to the RH needle one at a time. Insert the tip of the LH needle through the front loop of both slipped stitches from left to right. Knit these two stitches together. sssk - slip, slip, slip knit: Slip the next three stitches on the LH needle knitwise to the RH needle one at a time. Insert the tip of the LH needle through the front loop of all three slipped stitches from left to right. Knit these three stitches together (hint: gently pull down on the stitches to elongate them slightly before you insert the LH needle). Three needle bind off: This method binds off two pieces of knitting at the same time, joining them in a visible, neat seam. Each needle must have to have the same number of stitches. Hold the two pieces of knitting together with right sides facing each other if you want the seam on the inside or wrong sides facing each other if you want the seam on the outside and the tips of the needles facing to the right. Insert the tip of the third needle into the first stitch on each of the RH needles knitwise, starting with the front needle. Knit these two stitches together and then slip the first stitch off of each of the needles. Repeat from this motion: \*Insert the tip of the third needle into the first stitch on each of the RH needles knitwise, starting with the front needle. Knit these two stitches together and then slip the first stitch off of each of the needles. Insert the tip of the LH needle into the first stitch on the RH needle and lift and pull this stitch over the second stitch and off the needle (as you would in a traditional knit bind off)\*. Repeat from \* to \* until one stitch remains on the RH needle. Cut yarn and gently pull it through the last remaining stitch. Weave in the remaining yarn end on the wrong side. Stitch Pattern:
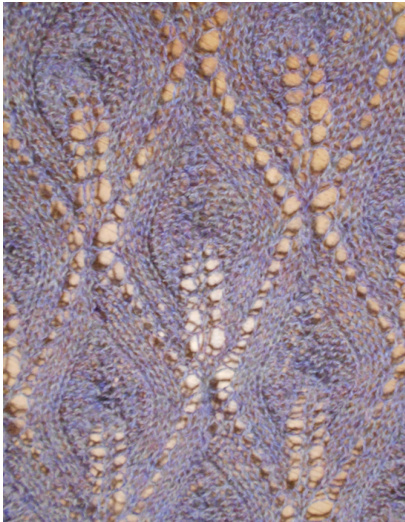
Candlelight - Left Slant
Multiples of 20 + 3, except Rows 1 and 2 have Multiples of 20 + 4 Row 1 (RS): K1, \*CDD, yo, k3, p11, k3, yo: end k1, yo, k1. Row 2 and all WS rows: Knit the k's and purl the p's and yo's. Row 3: SSSK, \*yo, k3, p4, P-CDD, p4, k3, yo, k3; end yo, k1. Row 5: SSK,\*yo, k3, p3, P-CDD, p3, k3, yo, k2tog, yo, k1, yo, ssk; end yo, k1. Row 7: SSK, \*yo, k3, p2, P-CDD, p2, k3, yo, k2tog, (k1, yo) 2x, k1, ssk; end yo, k1. Row 9: SSK,\*yo, k3, p1, P-CDD, p1, k3, yo, k2tog, k2, yo, k1, yo, k2, ssk; end yo, k1. Row 11: SSK, \*yo, k3, P-CDD, k3,yo, k2tog, k2, p1, yo, kl, yo, p1, k2, ssk; end yo, k1. Row 13: SSK, \*yo, k2, CDD, k2, yo, k2tog, k2, p2, yo, k1, yo, p2, k2, ssk; end yo, k1. Row 15: SSK \*yo, k1, CDD, k1,yo, k2tog, k2, p3, yo, k1, yo, p3, k2, ssk; end yo, k1. Row 17: SSK, \*yo, CDD, yo, k2tog, k2, p4, yo, k1, yo, p4, k2, ssk; end yo, k1. Repeat Rows 1- 18 for the pattern. Pay special attention to the beginnings of Row 1 and 3. When you have completed this side, put these stitches on a stitch holder. You will transfer them to the spare needle later. Candlelight - Right Slant Multiples of 20 + 3, except Rows 1 and 2 have Multiples of 20 + 4 Row 1 (RS): K1, yo, k1 \*yo, k3, p11, k3, yo, CDD; end k1. Row 2 and all WS rows: Knit the k's and purl the p's and yo's. Row 3: K1, \*yo, k3, yo, k3, p4, P CDD, p4, k3; end yo, k3tog. Row 5: K1, \*yo, k2tog, yo, k1, yo, ssk, yo, k3, p3, P-CDD, p3, k3; end yo, k2tog. Row 7: K1, \*yo, k2tog, (k1, yo) 2x, k1, ssk, yo, k3, p2, P-CDD, p2, k3; end yo, k2tog. Row 9: K1, \*yo, k2tog, k2, yo, k1, yo, k2, ssk, yo, k3, p1, P-cDD, p1, k3; end yo, k2tog. Row 11: K1, \*yo, k2tog, k2, p1, yo, k1, yo, p1, k2, ssk, yo, k3, P-cdD, k3; end yo, k2tog. Row 13: K1, \*yo, k2tog, k2, p2,yo, k1, yo, p2, k2, ssk, yo, k2, Cdd, k2; end yo, k2tog. Row 15: K1, \*yo, k2tog, k2, p3,yo, k1, yo, p3, k2, ssk, yo, k1, CDD, k1; end yo, k2tog. Row 17: K1, \*yo, k2tog, k2, p4, yo, k1, yo, p4, k2, ssk, yo, Cdd; end yo, k2tog. Repeat Rows 1- 18 for the pattern. Pay special attention to the end of Rows 1 and 3.
Directions:
Cast on 113 sts. Designer Note: I like to use the Crochet Cast On because it has the clean finished look of a crocheted chain. Work in garter stitch (knit every row) for 10 rows (5 ridges). Pattern set up: 5 sts garter stitch border, pm, k103 sts for the Candlelight lace pattern, pm, 5 sts garter stitch border. Knit the Candlelight lace pattern while knitting the first and last 5 stitches of each row to create the border. Designer Note: I like to make a copy of the pattern and tape it to an index card. I also use a sticky arrow or sticky tape to mark the row I'm working on. Make 1 Left Slant and 1 Right Slant. Make each side the same length. Technical Note: Here is how to calculate the maximum number of pattern repeats for each side if you're using 3 skeins of yarn. One skein of yarn (440 yds) gave me 14 pattern repeats. So I was able to get 20 pattern repeats for each side. To figure out your number of repeats: take the number of full repeats from the first skein and multiply it by .5 () and round down to a full number. (Example: if you get 13 full repeats: 13 x .5 = 6.5. Round down to 6. 13 + 6 = 19 repeats.) Designer Note: It would also be an interesting design with one side longer than the other for over the shoulder styling. Graft the two sides together. On one side measure off approximately 3 yards of yarn for grafting. With right sides facing up, graft the two sides together to form a "v" shape. If you are able to work Grafting in Pattern, please do so. If you are unable to graft in pattern, you may do a stockinette stitch graft (Kitchener Stitch) or as a last resort, loosely do a 3-needle bind off (note however, that this will leave a definite line). Weave in ends. Wet block, stretching to open up the lace. Designer Note: Row 13 will pop out slightly. When wet blocking. gently pat into place.

Pam learned to knit (backwards) at her Grandmother's knees as a small child. Pam is a TKGA Certified Master Knitter. Her first love is texture, especially lace. She loves to knit shawls, but hasn't learned how to wear them yet! For pattern support contact: PamChamberlainKnits@gmail.com PamChamberlain on Ravelry @ Copyright 2015, Pam Chamberlain Knits. All rights Reserved.


