eecarlli Rock pera Gloves
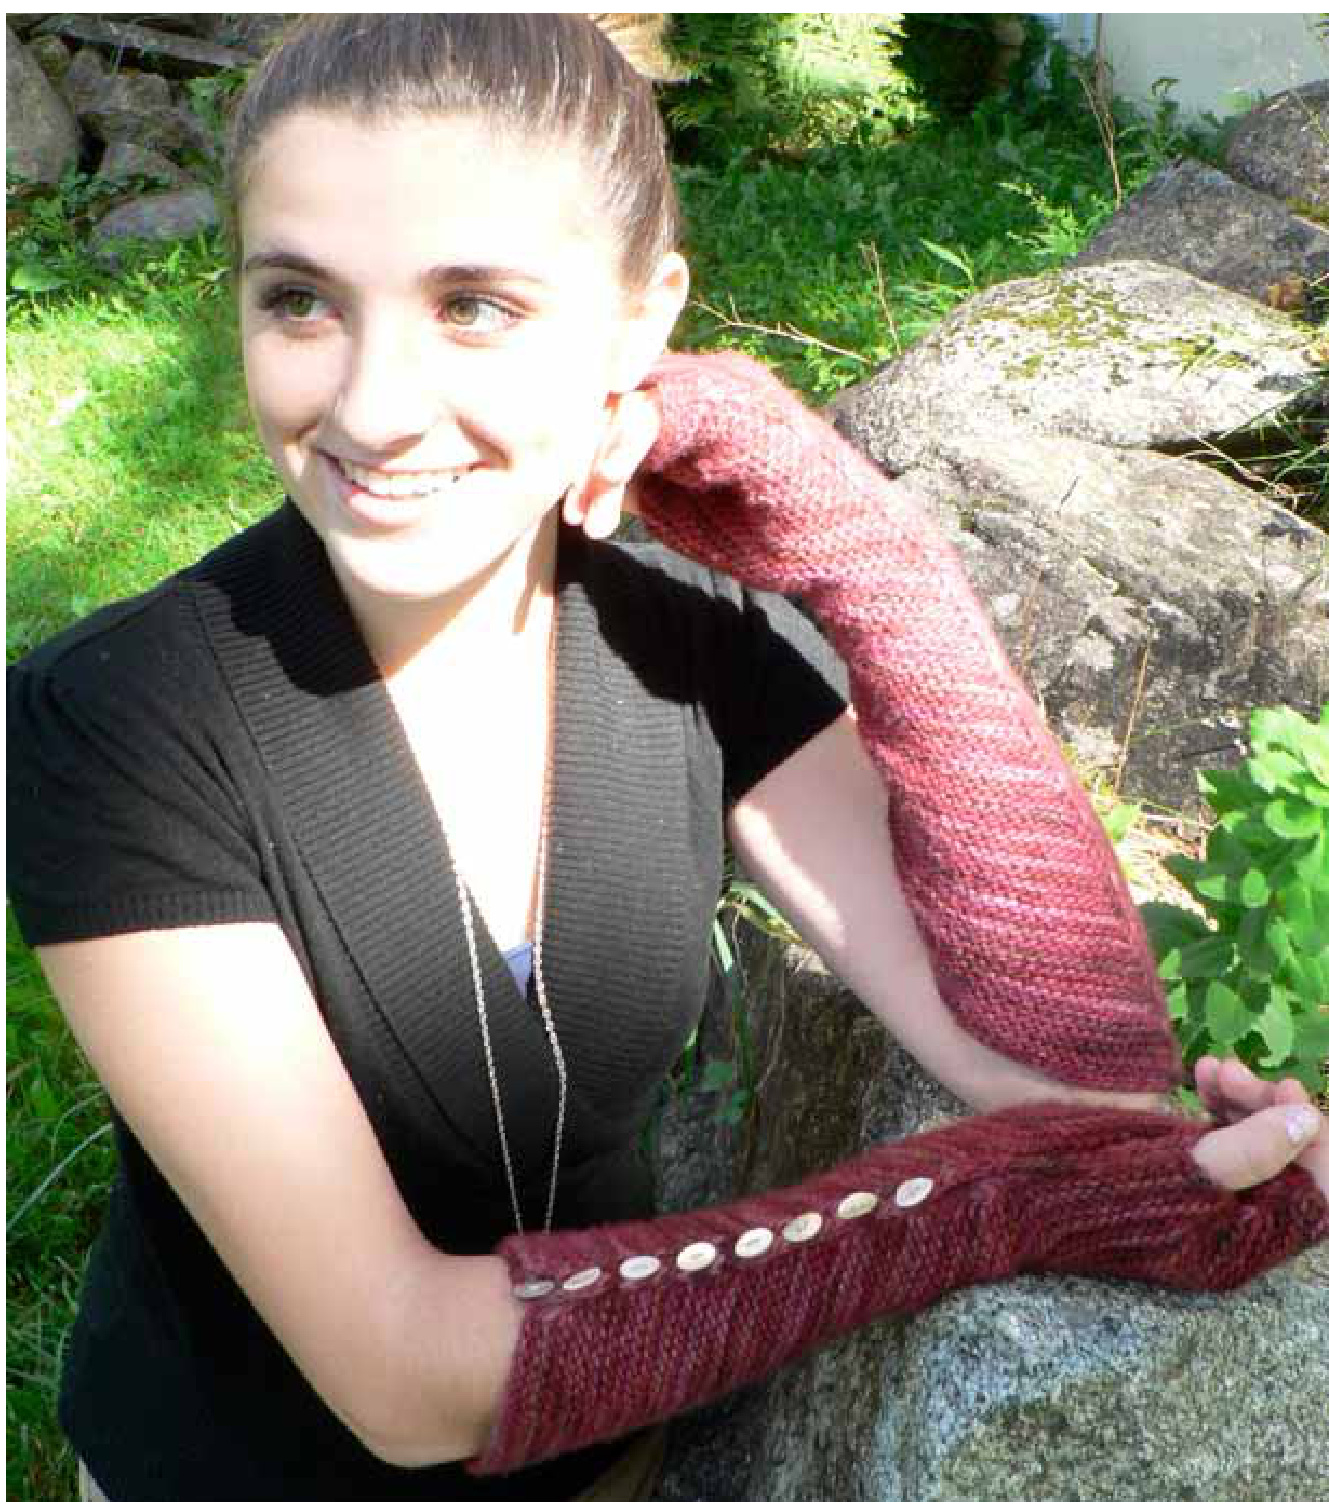
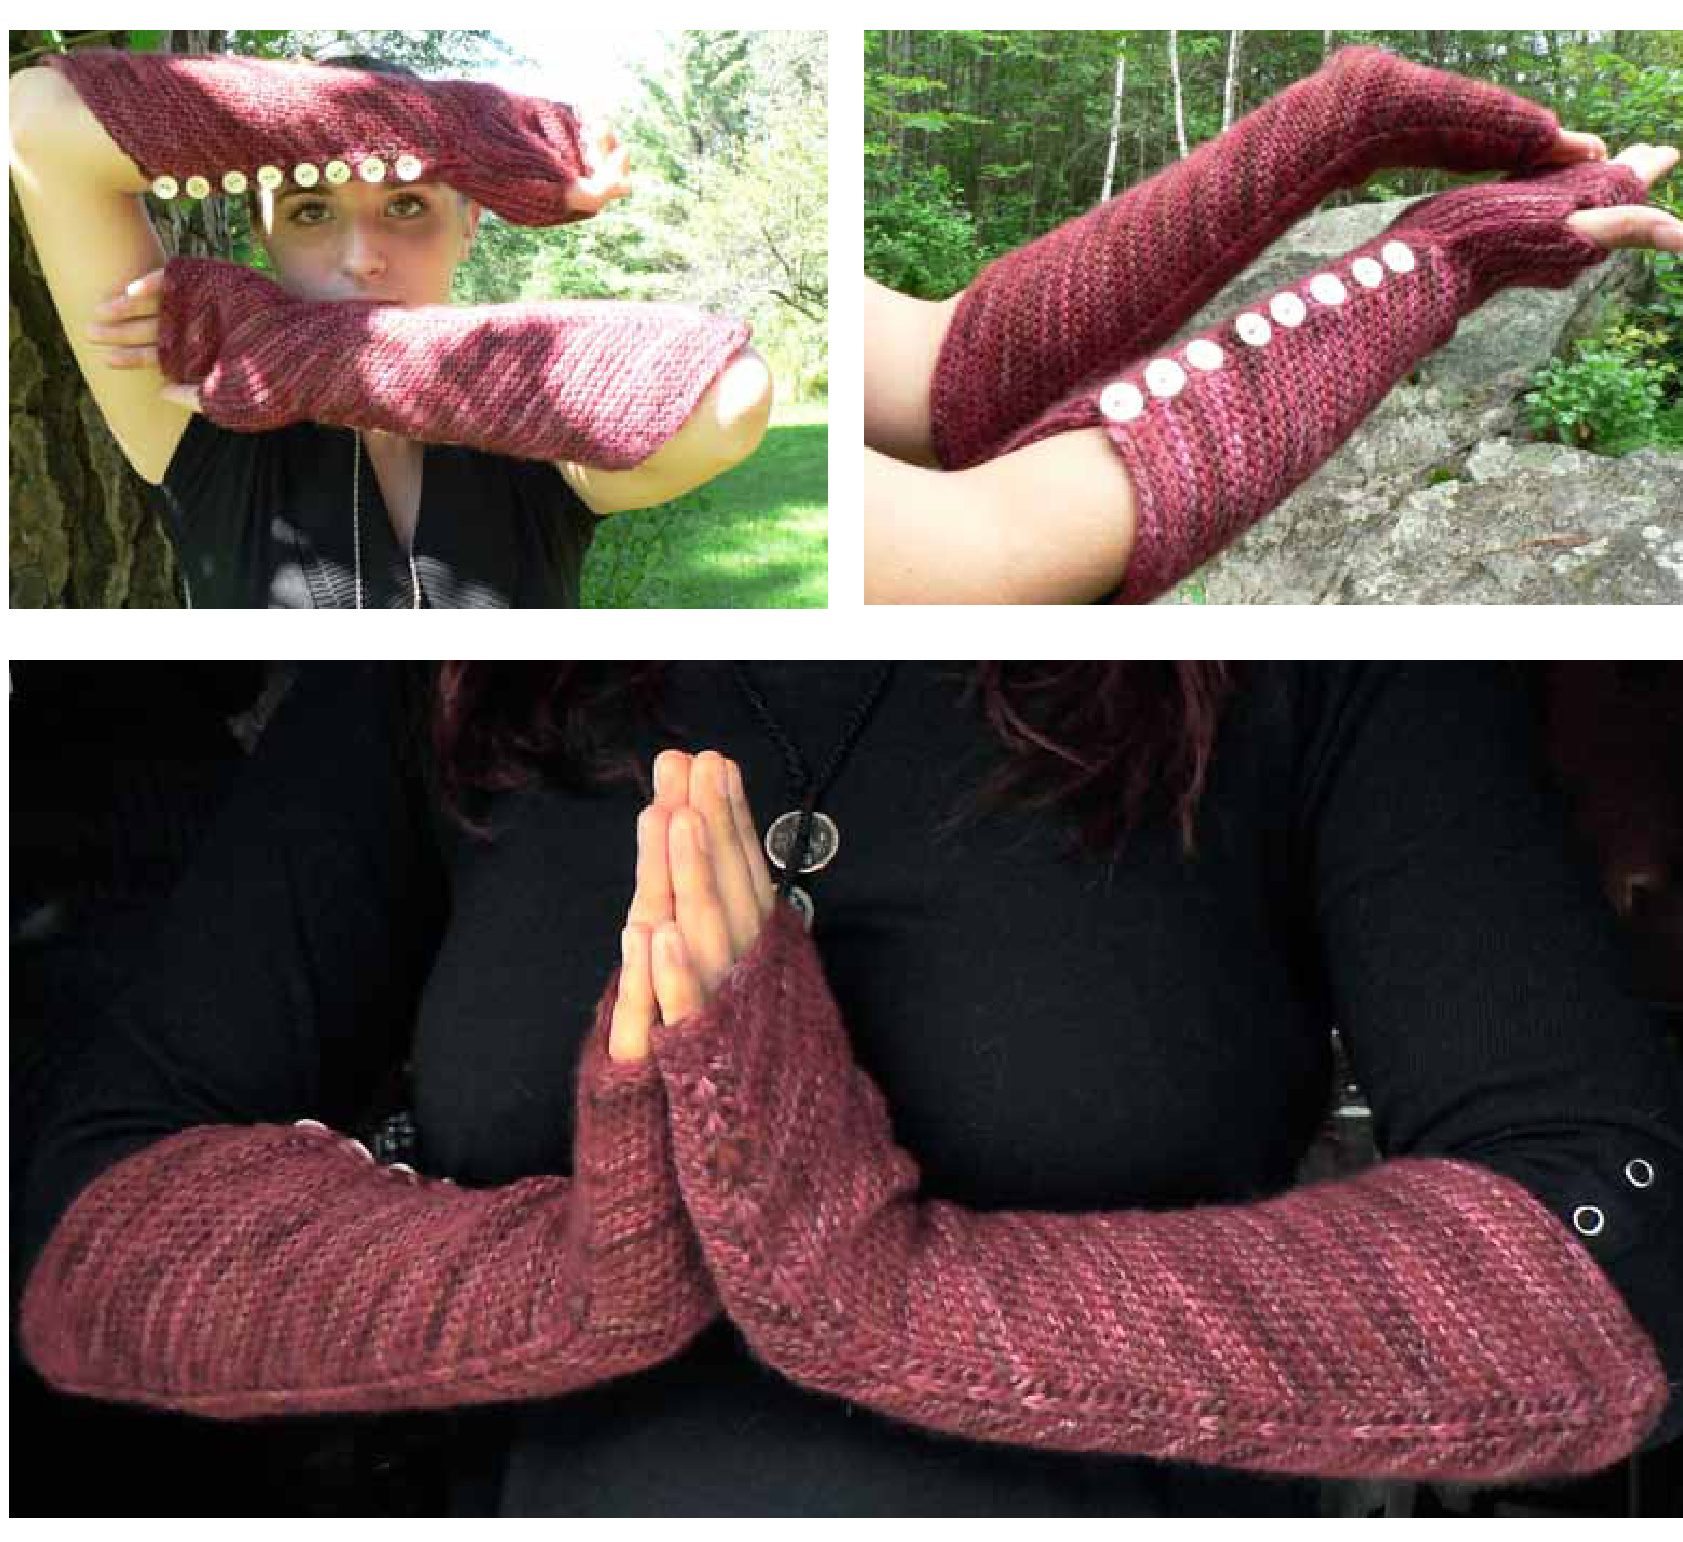
The Rock Opera Gloves are knit flat by working biased garter-stitch panels that are separated and edged with double-knit seam lines, making a reversible fabric. There are button holes on both sides of the cuff selvedges, which can be closed using cufflink like buttons so the buttons may be changed with your mood. Knitted from the base of the pinkie finger to the elbow, these finger-less gloves feature a dramatic point at the elbow.
knitwear designs
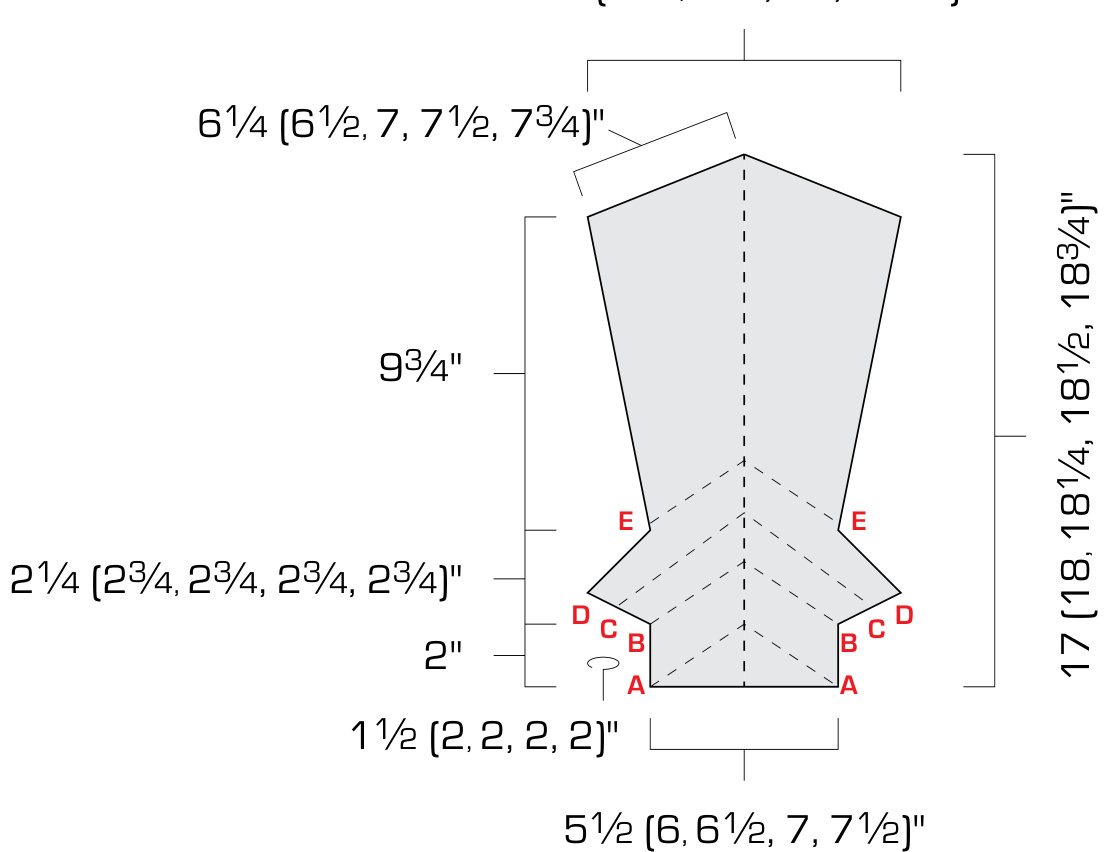
Finished Measurements Glove Hand Circumference: 51/2 [6, 612, 7, 71e]". Sample shown in 7" size. To Fit Hand Measuring: 61/2 [7, 71/2, 8, 812]
Yarn
Malabrigo Rastita [100% merino wool, 310 yds or 285m/skein]: 1 skein for all sizes. Shown in Jupiter.
Needles
One pair size US 4 [3.5 mm], or size needed to obtain gauge.
Notions
13 locking stitch markers Smooth waste yarn for lifelines tapestry needle Sixteen V2" two-hole buttons OR thirty-two 12" two-hole buttons for cuff links
Pattern Notes
As an overview of what is being done for this pattern, please read the notes below, and refer to them when instructed in the pattern. 1. Work in sets of two rows. The rows are always worked in sets of two: a primary row, and a return row. The two rows give us a row to make the garter-stitch ridge on each side of the fabric and opportunity to work the double-knit seam lines on each side of the fabric. It's important to keep track of which row you're on —I recommend using two different colors of locking markers to on the edges of the projects. In the pattern there are specific instruction on placing selvedge markers.
Gauge
20 stitches and 40 rows = 4" in garter stitch. Take time to save time, check your gauge.
Pattern Stitches
Knitted Cast On: Begin with a slip st on the left needle, \*insert right needle knitwise into first st of left needle, wrap the yarn around the needle and pull through as to make a knit st, leave the first st on left needle and slip st just made to left needle [1 st CO]; rep from \* to required number of sts. Garter Stitch: Knit on both the primary and return rows. 2. Seam Stitches [smst: K1, sm, sl1 pwise wyifj: Double-knit seam stitches divide the garter-stitch panels of the glove down the middle and form the selvedges.These seam stitches can be thought of as a two-stitch i-cord, with one stitch atop the other, their stockinette-stitchfaces to the outside of the fabric in either direction. Even though there are two stitches in the seam, it only takes the width of a single stitch in the fabric. On the primary row, the first of the two stitches will be knit, the second slipped purlwise with the working yarn held in front. On The return row, you encounter the stitches in the opposite order, and the stitch previously slipped will be knit, the stitch previously knit will be slipped with the
Abbreviations
BO: bind off CO: cast on dec-smst: Decrease seam stitch k2tog, sm, sl 1 st pwise wyif. See pattern note 3 for more detail. I-Cord-BO: k1, sm, [sl 1 st wyif] 2 times, turn, k2tog, sm, sl 1 st wyif, turn. You will still be at the beginning of the row. k: knit m: marker pm: place marker pwise: purlwise rep: repeat sl: slip sm: slip marker Smst[s]: Seam stitch[s] k1, sm, Sl 1 pwise wyif. See pattern note 2 for more detail. Smst-BO: Seam Stitch Bind off k1, sm, [sl 1 st wyif] 3 times rem oving marker, turn, k3tog, sm, sl 1 st wyif, turn. st[s]: stitch[es] tbl: through the back loop wyif: with yarn in front yo: yarn over yarn held in front. It does not matter if the seam is at the beginning of the row, in the middle of the row, or at the end of the row, they are always worked in this order. Regular st markers are used between the seam stitches to easily indicate where they are. Take care to form both the knit stitches in the seam stitches carefully, working the knit stitch completely, and sliding it onto the right needle before slipping the following stitch, so that the stitches will not be tight.
knitwear designs
Pattern Notes continued
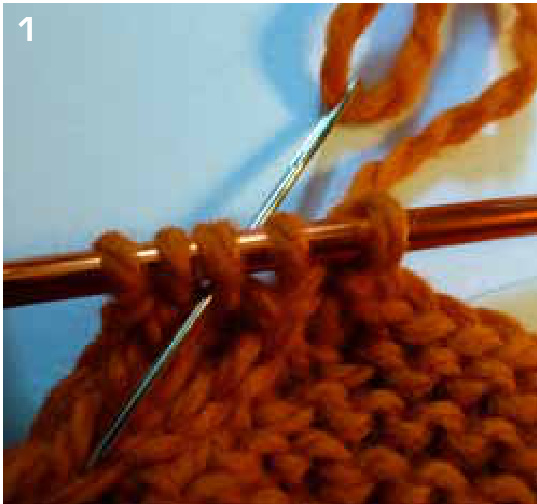
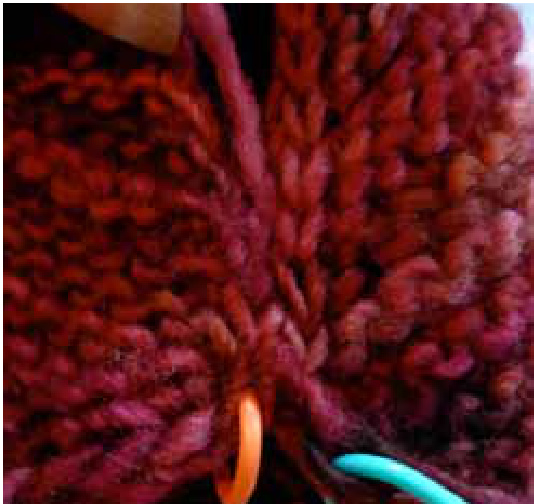
3. Increases and decreases. The shape of the glove and the bias in the fabric are made with the strategic use of increases and decreases. These always occur at the seam stitches, never in the middle of the garter-stitch panels. Increases [yo]: Increases are made with a simple yo, as you would for lace knitting. They're always next to a seam stitch. They're ALWAYS made on the primary row, never on the return row. On the return row, the yo increase beside the selvedges are knit through the back loop to twist the stitches, closing the eyelet; yo increases beside the center welt are knit through the front loop so the eyelet remains open for decorative detail. Decreases [Dec-smst]: Decreases are always done at the end of a garterstitch panel, knitting the last stitch in the panel with the first stitch of the seam stitch. Decreasing will occur on either the primary row or the return row. There will never be a decrease nextto thecenter welt. 4. Placing selvedge markers: Locking stitch markers are placed in the selvedge seam stitches throughout this pattern. They serve three functions: 1. By color-coding them, they serve as makers for which row [primary or return] you're on. 2. They mark the legs to pick up when you split a seam line into two seam lines [for button bands]. 3. They provide guides for sewing when you finish the glove. The edge of the fabric will look like a chain of stitches, but it's made with the outside leg from each stitch in the seam. When instructed, place the locking stitch markers through both of these outside legs in the stitches below the live stitches on the needle [see photo]. Take care to make sure that an inside leg on each side of the fabric isn't caught up in the marker.
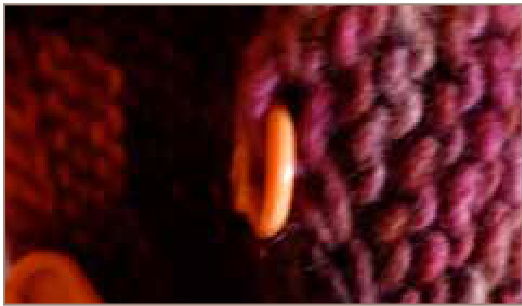
5. Life lines: Lifelines are periodically placed by threading a length of waste yarn through the live stitches that are on the needle. It is suggested to place them as indicated in case an error occurs and the stitch count on your glove does not match the pattern. If that is the case, you can remove your needle from the live stitches and frog back to the lifeline. The stitches on the lifeline will be oriented in the correct position for the needle to be inserted and to continue knitting from that place in the pattern. As you place a new lifeline, previous lifelines may be removed if desired. 6. Button holes: The pattern calls for button holes on both selvedge edges of the glove. This allows you to use two buttons sewn together [like cufflinks] so that you can change the buttons for style, or to use one button hole as an indicator for where to sew the button on. If you prefer, you can make the buttonholes on just one edge.
INSTRUCTIONS
Cast-on and Set-up Use the knitted method to CO 2 sts. Primary Set-up Row 1: [K1, yo, k1] in the first st, sl 1 pwise wyif, place a locking stitch marker into the front leg of the slipped st. Turn the work. 4 sts. Return Set-up Row 1: K1,move marker to the front of the work between the needles, sl 1 wyif, yo, sl 1 wyif, place the marked st onto the left needle and knit into that st, sl 1 wyif. Remove marker. 6 sts. Primary Set-up Row 2: [K1, pm, sl 1 wyif] 3 times. [Note: Use a different colored marker the first time to indicate the beginning of the primary row.] Return Set-up Row 2: [Smst] 3 times. Primary Set-up Row 3: Smst, y0, smst, yo, smst. 2 sts increased. Return Set-up Row 3: Smst, k1 tbl, smst, k1 tbl, smst. Stitch count: 3 sts between markers, + 2 edge sts Total stitches: 8 sts all sizes
knitwear designs
Work to Width of Palm
Work the following set of primary/ return rows a total of 8 [9, 10, 11, 12] times: Primary Row: Smst, yo, knit to 1 st before welt marker, yo, smst, yo, knit to 1 st before selvedge marker, yo, smst. 4 sts increased. Return Row: Smst, k1tbl, knit to 1 st before welt marker, smst, knit to 2 sts before selvedge marker, k1tbl, smst. Stitch count: 19 [21,23, 25, 27] sts between markers, + 2 edge sts Total stitches: 40 [44, 48, 52, 56] sts After checking that stitch counts are accurate, place locking stitch markers at the selvedges [see pattern note 4 and schematic marker A] and run a life line through all stitches [see pattern note 5].
Palm to Thumb Gusset
Work the following set of primary/ return rows a total of 6 times for all sizes: Primary row: Smst, knit to 1 st before welt marker, yo, smst, yo, knit to 2 sts before selvedge marker, dec-smst. 1 st increased Return row: Smst, knit to 1 st before welt marker, smst, knit to 2 sts before selvedge marker, dec-smst. 1 st decreased Stitch count: 19 [21,23, 25, 27] sts between markers, + 2 edge sts Total stitches: 40 [44, 48, 52, 56] sts Work the following set of primary/ return rows at total of 1 time for all sizes: Primary row: [I-Cord-BO] 2 times, smst, knit to 1 st before welt marker, yo, smst, yo, knit to 2 sts before selvedge marker, dec-smst. 1 st decreased. Return row: [-Cord-BO] 2 times, Smst, knit to 1 st before welt marker, smst, work to 2 sts before selvedge marker, dec-smst. 3 sts decreased. Stitch count: 17 [19, 21,23, 25] sts between markers, + 2 edge sts Total stitches: 36 [40, 44, 48, 52] sts After checking that stitch counts are accurate, place locking stitch markers at the selvedges [see schematic marker B] and run a life line through all stitches.
Thumb
Inside of thumb:
Work the following set of primary/ return rows at total of 4 [5, 5, 5, 5] times: Primary row: Smst, yo, knit to 1 st before welt marker, yo, smst, yo, knit to 1 st before selvedge marker, yo, smst. 4 sts increased. Return row: Smst, k1tbl, knit to 1 st before welt marker, smst, knit to 2 sts before selvedge marker, k1tbl, smst. Stitch count: 25 [29, 31, 33, 35] sts between markers, + 2 edge sts Total stitches: 52 [60, 64, 68, 72] sts After checking that stitch counts are accurate, place locking stitch markers at the selvedges [see schematic marker C] and run a life line through all stitches.
Top of thumb:
Work the following set of primary/ return rows 4 [5, 5, 5, 5] times: Primary row: Smst, knit to 1 st before welt marker, yo, smst, yo, knit to 1 st before selvedge marker, smst. 2 sts increased. Return row: Smst, knit to 1 st before welt marker, smst, knit to 1 st before selvedge marker, smst. Stitch count: 29 [34, 36,38, 40] sts between markers, + 2 edge sts Total stitches: 60 [70, 74, 78, 82] sts After checking that stitch counts are accurate, place locking stitch markers at the selvedges [see schematic marker Dj.
Bind off thumb gusset:
Work the following set of primary/ return rows at total of 1 time for all sizes: Primary row: [I-Cord-BO] 11 [14, 14, 14, 14] times, smst, knit to 1 st before welt marker, yo, smst, yo, knit to 2 sts before selvedge marker, dec-smst. 10 [13, 13, 13, 13] sts decreased. Return row: [l-Cord-BO] 11 [14, 14, 14, 14] times, smst, knit to 1 st before welt marker, smst, knit to 2 sts before selvedge marker, dec-smst. 12 [15, 15, 15, 15] sts decreased. Stitch count: 18 [20,22,24, 26] sts between markers, + 2 edge sts Total stitches: 38 [42, 46, 50, 54] sts After checking that stitch counts are accurate run a life line through all stitches.
knitwear designs
Cuff Work the following set of primary/ return rows at total of 1 time for all sizes: Primary row: Smst, knit to 1 st before welt marker, yo, smst, yo, knit to 1 st before selvedge marker, smst. 2 sts increased. Return row: Smst, knit to 1 st before welt marker, smst, knit to 1 st before selvedge marker, smst. Stitch count: 19 [21, 23, 25, 27] sts between markers, + 2 edge sts Total stitches: 40 [44, 48, 52, 56] sts After checking that stitch counts are accurate, place locking stitch markers at the selvedges [see schematic marker E] and run a life line through all stitches. [NOTE: The selvedge markers here are needed for the next step, don't skip them; see pattern note 4 on Placing Selvedge Markers.]
Split selvedge seam stitches for button band:
Work the following set of primary/ return rows at total of 1 time for all sizes: [Note: When picking up the marked sevledge sts, pick up only the front leg of the stitch-the leg that is facing you as you work-not the other side of the work.] Primary row: With right needle, pick up marked selvedge st [in the row below] and place it on the left needle without twisting it, then knit into it, pm, smst, knit to 1 st before welt marker, yo, smst, yo, knit to 2 sts before selvedge marker, dec-smst, pick up and knit the front leg of the marked seam stitch in the row below. 3 sts increased. Return row: Pick up and knit the other leg of the marked selvedge stitch, pm, sl 1 wyif, smst, knit to 1 st before welt marker, smst, knit to 2 sts before selvedge marker, dec-smst, pick up and knit the other leg of the marked seam and knit into it, sm, sl 1 wyif. 1 st increased. You have established a new seam line at each edge of the work and should have two sets of seam stitches next to each other without any garter stitches between them. Stitch Count: 19 [21, 23, 25, 27] sts between inner markers, 2 sts each buttonband, 2 edge sts Total stitches: 44 [48, 52, 56, 60] sts Work the following 2 sets of primary/ return rows at total of 1 time for all sizes: Primary row: [Smst] 2 times, knit to 1 st before welt marker, yo, smst, yo, knit to 2 sts before selvedge marker, decsmst, smst. 1 st increased. Return row: [Smst] 2 times, knit to 1 st before welt marker, smst, knit to 2 sts before selvedge marker, dec-smst, smst. 1 st decreased. Primary row: Smst, yo, smst, knit to 1 st before welt marker, yo, smst, yo, knit to 2 sts before selvedge marker, decsmst, yo, smst. 3 sts increased. Return row: Smst, k1tbl, smst, knit to 1 st before welt, smst, knit to 2 sts before selvedge marker, dec-smst, k1tbl, smst. 1st decreased. Stitch Count: 19 [21, 23, 25, 27] sts between inner markers, 3 sts each buttonband, 2 edge sts Total stitches: 46 [50, 54,58,62] sts After checking that stitch counts are accurate run a life line through all stitches if desired. Establish cuff and buttonhole rows: Work the following set of primary/ return cuff rows 1time,then the set of primary/ return buttonhole rows 1 time: Primary Cuff row: Smst, k1, smst, knit to 1 st before welt marker, yo, smst, yo, knit to 2 sts before selvedge marker, dec-smst, k1, smst. 1 st increased. Return Cuff row: Smst, k1, smst, knit to 1 st before welt marker, smst, knit to 2 before seam, dec-smst, k1, smst. 1 st decreased. Primary Buttonhole row: Smst, yo, dec-smst, knit to 1 st before welt marker, yo, smst, yo, knit to 1 st before selvedge marker, smst, yo, dec-smst. 2 sts increased. Return Buttonhole row: Smst, k1 [knit open, do not ktbl, to make the button hole], knit to 1 st before welt marker, smst, knit to 1 st before selvedge marker, smst, k1 [knit open], smst. Stitch Count: 20 [22, 24, 26, 28] stS between inner markers, 3 sts each buttonband, 2 edge sts Total stitches: 48 [52, 56, 60, 64] sts After checking that stitch counts are accurate run a life line through all stitches if desired.
knitwear designs
Continue cuff and buttonhole rows: Work 3 sets of primary/return cuff rows followed by 1 set of primary/ return buttonhole rows 7 [or until welt measures just above your elbow] times, there will be 8 buttonholes. Work one additional set of primary/ return cuff rows. Stitch Count: 27 [29, 31,33,35] sts between inner markers, 3 sts each buttonband, 2 edge sts Total stitches: 62 [66, 70, 74, 78] stS
Final Bind-off:
BO 1 st with I-Cord-BO, BO 1 st with the smst-BO, BO with the I-Cord BO until 3 stsremain on theleftneedle [2 from the last I-Cord BO, and 1 unworked st] before the welt marker, BO 1 st with the smst-BO, BO with the I-Cord-BO until 3 sts rem before selvedge marker [2 sts from last I-Cord BO and 1 unworked st], BO 1 st with the smst-BO. 5 sts remain. Do not turn.
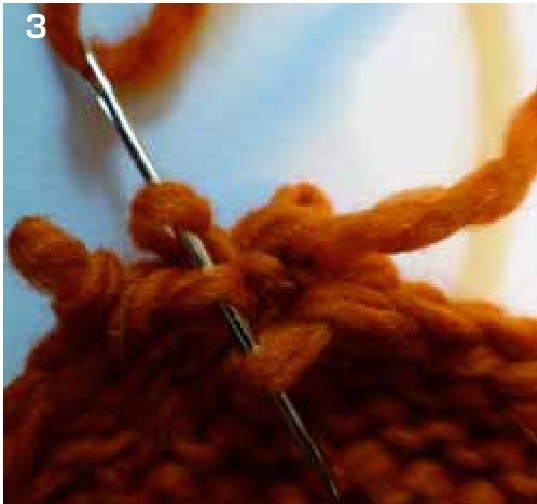
Graft remaining sts together:
Break the yarn leaving approx 6" tail, and thread tail onto tapestry needle. Thread tail through the sts following the photo-tutorial below. Make a second glove, the same as the first.
Insert tapestry needle from back to front through the center stitch.
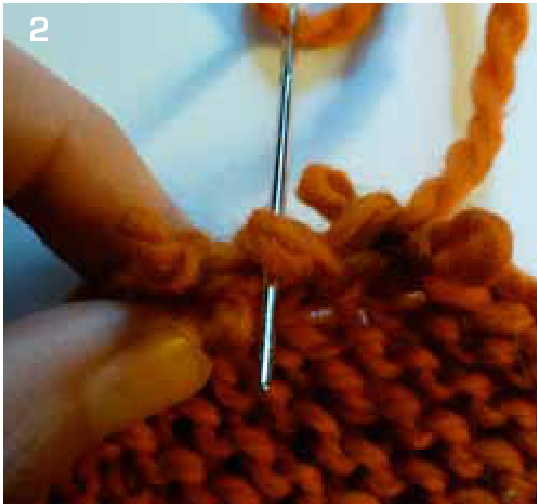
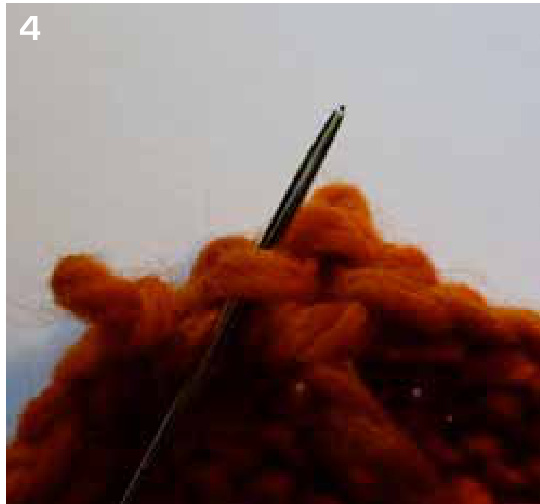
Remove all stitches from knitting needle.
Place the stitch to the left of the center st onto the tapestry needle, then place the stitch all the way to the right onto the tapestry needle and pull the yarn through.
Insert tapestry needle from front to back through the center stitch and turn the work around.
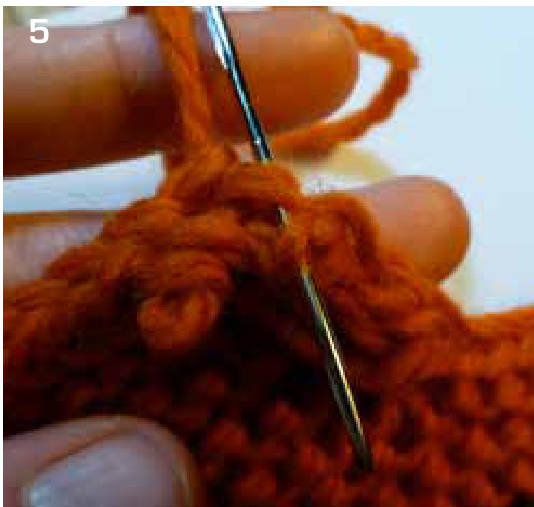
Place the stitch to the right onto the tip of the tapestry needle.
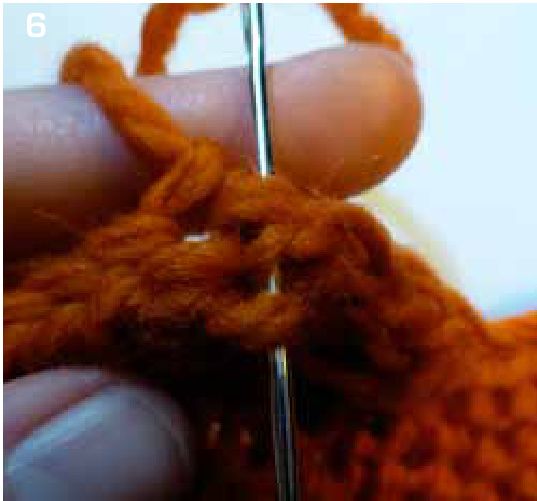
Place the stitch to the left onto the tapestry needle and pull the yarn through. Adjust tension of these sts and weave in end.
Rebecca Zicarelli Rock pera Gloves
Finishing
Remove life lines, but leave the locking selvedge stitch markers in place. Weave in ends. Wash and block to measurements.
Sew Seams:
To sew the palm of the glove together, you'll need to make two seams. There should be five locking stitch markers on each selvedge edge of the glove, placed as shown on schematic, A-E. The first seam will start at the marker A and extend to marker C, make sure marker B on one edge of the mitt is lined up properly with the other edge. The second seam will start at marker D and extend to marker E. To sew the seam so the gloves are reversible, butt the 2 selvedge edges together. Working from one edge to the next, sew the selvedges together by picking up the threads running between the seam stitch on each side of the fabric [see photos]. Up to this point, these gloves are completely reversible. To maintain reversibility, make cuff links out of two buttons instead of sewing buttons directly to the glove. To make cuff links, sew two buttons together with their back sides together, front sides facing out, orsewbuttonswhereeachthebuttonholes are on one side of each glove, taking care to overlap the right and left gloves in opposite directions.

Insert tapestry needle between the 2 selvedge seam-stitch edges.
After seaming, there will be 2 knit-looking stitches at the seam. It should look the same on the RS and WS, making the mittsreversible.
Rebecca knitwear designs Rock Opera Gloves
Special thanks to: yarn support: Thank you Malabrigo for supplying yarn support for this project. test knitting: Thank you Cheryl Gammon, Niki Steckler and Anne Murray. modeling: Thank you Hayley, Julie, Nicole and Amy. technical editing and graphic design: Thank you Kristen TenDyke.


