Ingvold Aran KAL
Designed by Helen Burros Summer, 2010 Introduction This is the summer KAL project for the Ravelry Starmores From the Top group, while we wait for the reprint of Alice Starmore's Aran Knitting book this late summer/fall. I'm calling the sweater Ingvold, a personal family name, and mine will be a cardigan. At this point I'm planning to use Black Water Abbey worsted weight yarn, since I'm creating the design and can choose the gauge I want to knit at to get the fabric I prefer. I've looked at projects on Ravelry using this yarn and needles used range from size 4 to size 9. I'm going to try 6 and 8 and see how I like the fabric. We'll be starting with a gauge swatch, which for me will actually be a swatch cap, since I don't like having old swatches around to tempt moths. Oh, yes, a bit of info. Black Water Abbey makes a worsted, sport, and fingering weight version of their yarns, so you have three choices if you're interested. Since I really want to get the sweater done before we start the fall KAL, I'm planning to use the worsted weight so it knits up faster. Others may prefer to use sport or fingering weight for a lighter garment for warmer weather use. And a small surprise - I'm planning to create a shaped shoulder cap on the sleeves and a shaped armhole on the body, which may take a bit of trial and error to get right. I'm guessing that a lot of folks have already made or are currently making a FLAK by Janet Szabo, so I want to explore new areas with this sweater, while still keeping it manageable for newer Aran knitters. Since my sweater will be custom to fit me, and I'll be explaining how to custom fit your sweaters, there won't be the usual size range to pick from. A good thing to do right away is to find a sweater that fits you well and measure it carefully. Length, shoulder width, sleeve length, sleeve cuff, upper sleeve, chest, neck. Another thing to check is front neck to hem length versus back neck to hem length. Many folks have curves in their spines which need more fabric to achieve the same hem length all the way around. There will usually be a few inches difference between the two, because of the front drop at the neck, but more than about 4 inches will need to be noted and accounted for when you start your sweater body. I'm planning my sweater to fall to my hips, as I really hate to sit down and have my lower back exposed to chill air. Each knitter will need to decide how long they want their sweater to be, based on their idea of fit and comfort. Do keep in mind that the larger the yarn chosen, the bulkier the sweater and the less it will cling to curves. So the October Frost that I am currently knitting with Rowan British Breeds Blue Faced Leicester yarn is going to be sized a bit larger than the Black Water Abbey yarn because the Aran yarn is thicker. If you choose a sport weight yarn, you can figure in less ease because the yarn will 'cuddle' you closer. I'm working on coming up with a schematic for folks to use in measuring themselves for their sweaters. I would suggest that folks print it out, copy it, and put the original away before writing on it. That way, you can make other copies for yourself later, for others you knit for, or to share it with knitting friends. I would ask that all the instructions, diagrams, and charts I post be passed on with the copyright info intact, as. designing a sweater and leading a KAL is something I want to do for my next career and I'd really like folks to be able to know who designed this interesting sweater, lol! I hope folks start looking for yarns at their local yarn shop, if they are lucky to have one, or a close by one, to support local merchants. There are always the vendors here on Ravelry, who help support Ravelry when you follow a link to their shops, as well. I hope everyone enjoys the KAL and we have some really lovely sweaters to share at the end of it! We will start with the charts for the cables I plan to use in the design. I suggest that folks knit these into a swatch cap, ala Elizabeth Zimmermann, and measure them before and after washing and blocking to see how the chosen yarn behaves. If you prefer, you can knit them into a flat swatch to put into your knitting notebook for later reference. When I design a pattern, I set up a folder for it and keep my notes, charts, plans, schematics, and a list of the references I used for the design in it. Later, if I have a question or someone needs to know how I did something, I can refer back to my folder to answer the question.
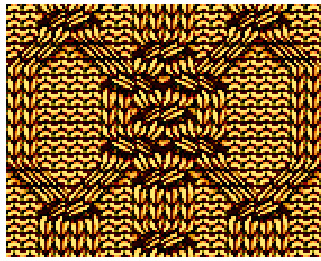
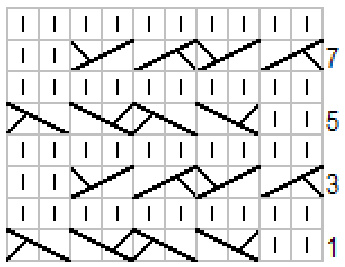
Ingvold Back Braid Designed by Helen Burros 20 stitches $\textbf{x}16$ rows
Stitch Key
Stockinet Stitch: Knit 1 (k) on right side rows, purl 1 (p) on wrong side rows. Reverse Stockinet Stitch: Purl 1 on right side rows, knit 1 on wrong side rows. xstbeldkftt knit the stitches on the cable needle. < c4f: Slip next 2 stitches onto cable needle, hold at front of work. Knit 2, knit the stitches on the cable needle. t4b: Slip next 2 stitches onto cable needle, hold at back of work. Knit 2, purl the stitches on the cable needle. f: lp next stithes onto cable nede hld at front ofwork url , knit the stith the cable needle.
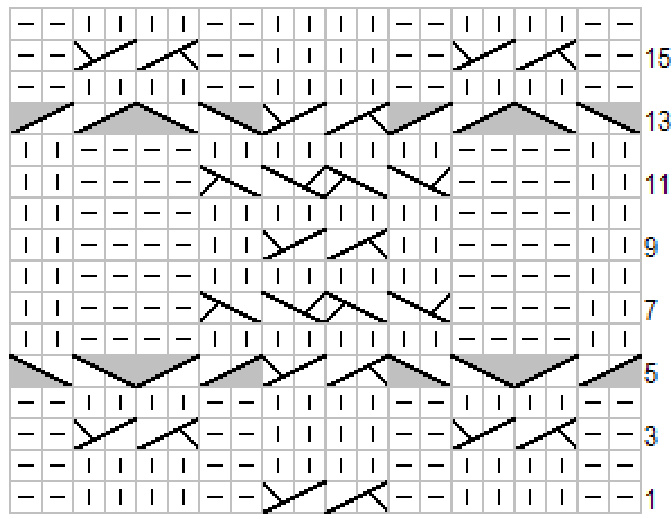
Untitled, rows 1 - 16 Row 1 (Right Side): p2, k4, p2, c4b, p2, k4, p2. Row 2 (Wrong Side): k2, [p4, k2] 3 times. Row 3: p2, c4b, p2, k4, p2, c4b, p2. Row 4: k2, [p4, k2] 3 times. Row 5: t4b, t4f, c4b, t4b, t4f. Row 6: p2, k4, p8, k4, p2. Row 7: k2, p4, c4f 2 times, p4, k2. Row 8: p2, k4, p8, k4, p2. Row 9: k2, p4, k2, c4b, k2, p4, k2. Row 10: p2, k4, p8, k4, p2. Row 11: k2, p4, c4f2 times, p4, k2. Row 12: p2, k4, p8, k4, p2. Row 13: t4f, t4b, c4b, t4f, t4b. Row 14: k2, [p4, k2] 3 times. Row 15: p2, c4b, p2, k4, p2, c4b, p2 Row 16: k2, [p4, k2] 3 times. Copyright Helen Burros, 2010. All rights reserved.
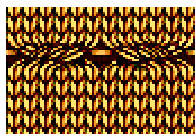
Seeded Double Cable Designed by Helen Burros
12 stitches $\textbf{x8}$ rows
On my sweater I will be putting in purl stitches on every odd (right side) row for extra interest. I will be purlingthe $2^{\mathrm{nd}},5^{\mathrm{th}},8^{\mathrm{th}},$ and $11^{\mathrm{th}}$ stitch.
Stitch Key
Stockinet Stitch: Knit 1 (k) on right side rows, purl 1 (p) on wrong side rows. Reverse Stockinet Stitch: $\mathrm{Purl}\ 1$ on right side rows, knit 1 on wrong side rows. cb: Slip next 3 stches oto cable neede, hold at back of work Knit , knithe stitches on the cable needle. : Slp nxt sthsont able ne hdat fnt ofwrkit kt stitches on the cable needle.
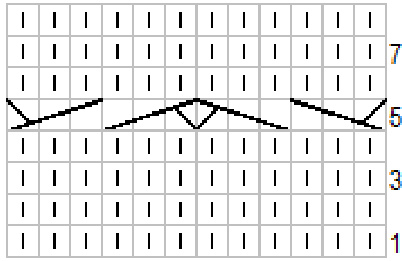
Seeded Double Cable, rows 1 - 8 Row 1 (Right Side): k12. Row 2 (Wrong Side): p12. Row 3: k12. Row 4: p12. Row 5: c6f, c6b. Row 6: p12. Row 7: k12. Row 8: p12.
Five Strand Braid for Shoulders Designed by Helen Burros
10 stitches $\textbf{x8}$ rows This is my favorite stitch for shoulder straps. The multiple strands crossing each other every other row give this cable a lot of strength to handle the weight of the garment hanging from it. The weight will flatten the cable a bit, but not as much as other cables, so the design is still very visible.
Stitch Key
Stockinet Stitch: Knit 1 (k) on right side rows, purl 1 (p) on wrong side rows. 一Reverse Stockinet Stitch: Purl 1 on right side rows, knit 1 on wrong side rows. c4b: Slip next 2 stches onto cable neede, hold at back of work Knit the next 2 sttchs, knit the stitches on the cable needle. c4f: Slip next 2 stithes onto cable neede hold at front ofwork Knit 2 knithe stith n the cable needle. Row 1 (Right Side): k2, c4f 2 times. Row 2 (Wrong Side): p10. Row 3: c4b 2 times, k2. Row 4: p10. Row 5: k2, c4f 2 times. Row 6: p10. Row 7: c4b 2 times, k2. Row 8: p10.
Copyright Helen Burros, 2010. All rights reserved.
Railroad Tracks Designed by Helen Burros
12 stitches x 24 rows The railroad figures in a lot of my childhood memories, so I created this pattern to resemble railroad tracks.
Stitch Key
Stockinet Stitch: Knit 1 (k) on right side rows, purl 1 (p) on wrong side rows. Reverse Stockinet Stitch: Purl 1 on right side rows, knit 1 on wrong side rows. 1. Kb: Knit the next stitch through the back loop.
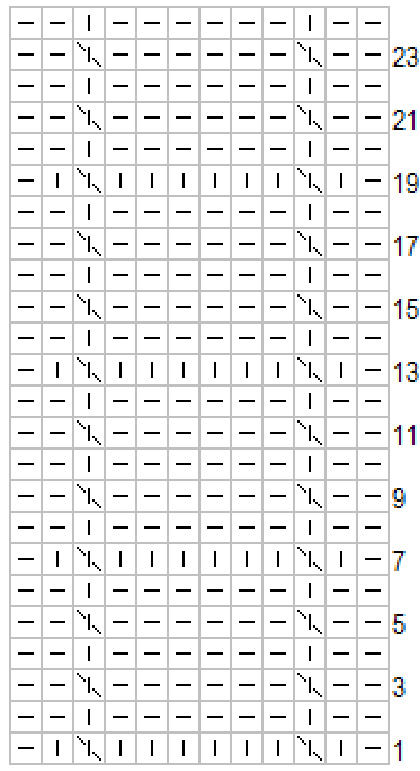
Railroad Tracks, rows 1 - 24 Row 1 (Right Side): p1, k1, kb, k6, kb, k1, p1. Row 2 (Wrong Side): k2, p1, k6, p1, k2. Row 3: p2, kb, p6, kb, p2. Row 4: k2, p1, k6, p1, k2. Row 5: p2, kb, p6, kb, p2. Row 6: k2, p1, k6, p1, k2. Row 7: pl, k1, kb, k6, kb, kl, p1. Row 8: k2, pl, k6, p1, k2. Row 9: p2, kb, p6, kb, p2. Row 10: k2, pl, k6, p1, k2. Row 11: p2, kb, p6, kb, p2. Row 12: k2, p1, k6, p1, k2. Row 13: p1, k1, kb, k6, kb, kl, p1 Row 14: k2, p1, k6, p1, k2. Row 15: p2, kb, p6, kb, p2. Row 16: k2, pl, k6, p1, k2. Row 17: p2, kb, p6, kb, p2. Row 18: k2, p1, k6, p1, k2. Row 19: p1, k1, kb, k6, kb, k1, p1 Row 20: k2, p1, k6, p1, k2. Row 21: p2, kb, p6, kb, p2. Row 22: k2, p1, k6, p1, k2. Row 23: p2, kb, p6, kb, p2. Row 24: k2, p1, k6, p1, k2. Copyright Helen Burros, 2010. All rights reserved.
Little Waving Cables Designed by Helen Burros
5 stitches x 4 rows This cable reminds me of the foam on the waves at the Oregon beach, where I have wonderful memories of my childhood digging razor clams.
Stitch Key
Stockinet Stitch: Knit 1 (k) on right side rows, purl 1 (p) on wrong side rows. Reverse Stockinet Stitch: Purl 1 on right side rows, knit I on wrong side rows. :i exsth ableede hlda ak forit th xtstih, th ch from the cable needle. C: lip ext ttocabe de holdat fontofworKt I, kite sthon t a needle. Row 1 (Right Side): c2b, k1, c2f. Row 2 (Wrong Side): p5. Row 3: c2f, k1, c2b. Row 4: p5.
Flat Rope Cable Designed by Helen Burros
14 stitches x 6 rows
Stitch Key
Stockinet Stitch: Knit 1 (k) on right side rows, purl 1 (p) on wrong side rows. 一Reverse Stockinet Stitch: Purl 1 on right side rows, knit on wrong side rows. c4b: Slip next 2 tches onto cable neede,hold at back of work. Knit the next 2 stches, knit the stitches on the cable needle. c4f: Slip next 2 stitches onto cable needle, hold at front of work. Knit 2, knit the stitches on the cable needle.
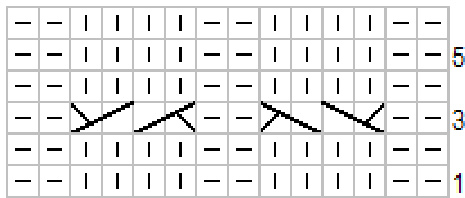
Flat Rope Cable, rows 1 - 6 Row 1 (Right Side): p2, [k4, p2] 2 times. Row 2 (Wrong Side): k2, [p4, k2] 2 times. Row 3: p2, c4f, p2, c4b, p2. Row 4: k2, [p4, k2] 2 times. Row 5: p2, [k4, p2] 2 times. Row 6: k2, [p4, k2] 2 times.


