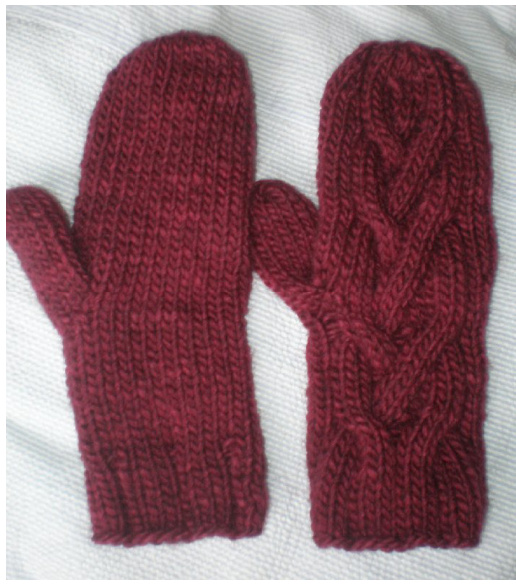
Cabley Mitties Allison Clayton

I was making these mitties for someone else, but I liked them so much (and they match a coat I just bought) that I decided to keep them for me and write out the pattern (I make a lot of things for which the pattern isn't worth writing out). There's no chart for this pattern because of the extra purl stitch in each cable that I couldn't figure out how to chart. Someday there might be a chart! I used Tahki Bunny yarn (in maroon) and needed not quite 2 balls (\~160-170 yds). You can use any yarn you want, but for high-traffic mitties, I like something with a smidgeon of nylon in it, for wear and give. Also, the Tahki Bunny has some very slight color changes that add interest but don't detract from the cables. These mitties may look or seem too small as you're knitting them, but because of the extra purl stitches in the middle of the cables, they stretch nicely and look nice, too! These are sized for an adult female, but all hands are different, so I have discussed below how to accommodate larger hands. As for length, my fingers are slightly longer than average (7.5in from base of palm to tip of middle finger), and these fit perfectly. My best advice for accommodating generally smaller hands is to make your gauge smaller than mine. For shorter hands/fingers, you can move the thumb hole up by 2 (to row 19 from row 17) and with it the increases on the palms, too (to rows 17 & 21 from 15 & 19).
Gauge:
8 stitches/11 rows $=$ 2inches (in stockinette)
You will need:
Definitions:
CE (end cables): C4B, K3, CX, CY, P1, C3F1B, K3, CX, CY CM (middle cable): K3, P1, C4B, K3, CX, CY, P1, K3 C4B: Move the next four stitches to a cable needle and hold to back C3F1B: Move the next 3 stitches to a cable needle and hold to front; move the following purl stitch to a cable needle and hold to back. CX: Move the purl stitch offits (back) cable needle onto the original needle and purl it. CY: Move the rest of the (3) stitches off of their cable needle onto the original needle and knit them. Selvage5: Use scrap yarn to knit these 5 stitches. Move the knit scrap yarn loops back to the left needle and knit them again with the original yarn. You've created a "hole" that we will use for the thumb.
Combine4:
This is a technique to lay two side-by-side cables flat on top of each other. You are basically laying the two cables on top of each other and knitting their first 2 stitches together, their second 2 stitches together, and so on. It makes for a nice-looking decrease. Here: Move the first 4 stitches to a cable needle (includes the purl), hold to back. Move the next 3 stitches to another cable needle, hold to front. Move the first available (purl) stitch from the back needle back onto the original needle. Move the first available stitch from the front cable needle back to the original needle. Move the next available stitch from the back needle to the original needle, and so on, alternating cable needles. Now the cables should be interlaced, and you should K2tog 3 times and then P2tog once. Pattern: CO 32 and split evenly between 4 dpns orCO $32+{\mathrm{a}}$ multiple of 4 if your gauge is off or to make a larger size.
Wrist Ribbing, 10 rounds: K3,P1, $^{*}\mathrm{K}3.\mathrm{P}1^{*}$ to end
Body: For the body of the mittie, you will work the palm in the first 15 stitches and the top in the next 17 of a round. If you cast on more than 32 stitches at the beginning, your palm will be 19 stitches (or $15+$ whatever multiple of 4 you used). In this case, the thumb round (round 17) will have a larger selvage (selvage of one extra stitch for every 4 stitches you added), and the remaining palm stitches will be ${\bf K}12+$ remaining extras. Rounds 1 & 2, each: K15, P1, K3, P1, $^{*}\mathrm{K}3$ , $\mathrm{P}1^{*}$ to end Round 3, end cables: K15, P1, CE, P1 Rounds 4-8: Work stitches as they appear Round 9, middle cable: K15, P1, CM, P1 Rounds 10-14: Work stitches as they appear Round 15, end cables and increase: M1, K15, M1, CE, P1
Rounds 16,18,20: Work stitches as they appear Round 17 (for Left glove): K12, Selvage5, P1, K3, P1, $^{*}\mathrm{K}3$ , $\mathbf{P}1^{*}$ to end Round 17 (for Right glove): Selvage5, K12, P1, K3, P1, $^{*}\mathrm{K}3$ $\mathbf{P}1^{*}$ to end Round 19, increase round: M1, K17, M1, P1, K3, P1, $^{*}\mathrm{K}3$ , $\mathbf{P}1^{*}$ to end Round 21, middle cable: K19, P1, CM, P1 Rounds 22-26: Work stitches as they appear Round 27, end cables: K19, P1, CE, P1 Rounds 28-32: Work stitches as they appear Round 33, middle cable: K19, P1, CM, P1 Rounds 34-38: Work stitches as they appear Round 39, end cables: K19, P1, CE, P1 Rounds 40-43: Work stitches as they appear (If you need a little extra length for longer fingers, here is where to add 1-2 more rows of the same). Start Decreases: Round 44: K2tog, K15, SSK, P1, K3, P1, Combine4, K3, P1 Round 45: Work stitches as they appear (30 remain) Round 46: K2tog, K13, SSK, P1, K2, K3tog, K1, K3tog, K2, P1 Round 47: Work stitches as they appear (24 remain) Round 48: K2tog, K11, SSK, P1, K2tog, K3tog, K2tog, P1 Round 49: Knit this round even (knit the purls, too) (18 remain) Finishing: Divide stitches evenly on 2 needles, one for top, one for palm, turn mittie inside out and weave stitches together, alternating one stitch from each needle. Pull tight and weave in ends tightly (maybe making a knot to hold it). Thumb: Remove selvage stitching. There will be 5 live stitches on the bottom and 4 on the top. Find a 5th on the top to the right of the 4th and pull it down. Pick up 2 stitches on each side of the thumb-hole. (14 stitches total). Knit 17 rounds. Turn thumb inside out and close off the same way as at the top of the mittie. Weave in ends.


