Cabled iPad Case
Add some personality
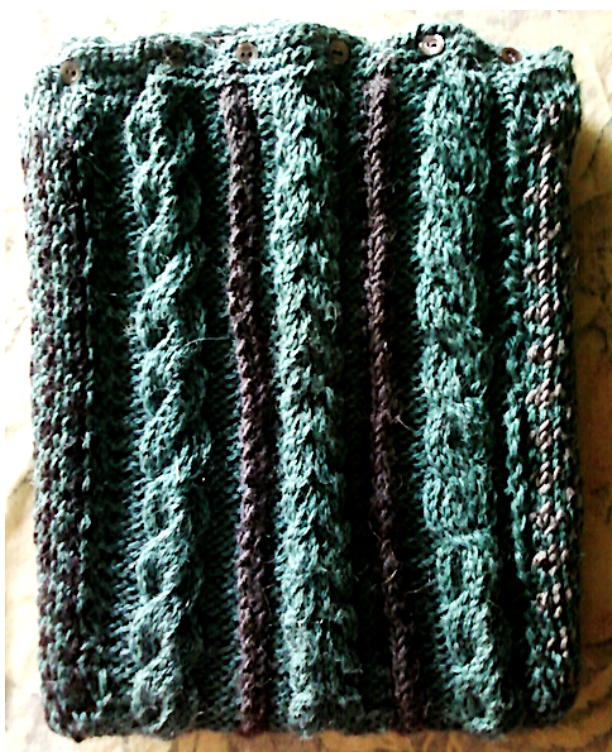
This case incorporates cables and color-work to make a very individual case for your iPad (or other tablet).
Abbreviations
K: Knit P: Purl CF: Cable front CB: Cable back This pattern is made in 3 pieces: one continuous piece for front & back, and two separate side panels.
Inspiration
When I first got an iPad a few years ago, I wanted to give it a personalized case. 1 also wanted to experiment more with incorporating cables into my designs, hence the cables on the front and back of the case. Simple intarsia is used to add two vertical stripes between the cables. Patternworks Bretton, in Stargazer (l skein) (MC -main color) Yarn Two colors sportweight, such as I also always love incorporating colorwork details in my designs, so I chose a simple fair-isle pattern for the sides of the case.
Materials
Needles Size 6 straight needles Jo Sharp Silk Georgette, in Pebble (l skein) (AC - alternate color) Notions Cable needle Yarn needle Scissors Other If desired, a zipper or buttons to close the top I used a series of6 small buttons to close the top - the buttons are small enough that I didn't need to knit in buttonholes, as the buttons fit in the spaces between stitches. You could also add a zipper, or make buttonholes and use larger buttons, or even just leave it open. I didn't add a lining to my case, but it would be a simple addition. To fit other tablets, adjust the length by continuing to the length of your tablet (instead of the specified 1l in.), and adjust the width by adjusting the width of the side panels.
Instructions
Front and Back:
Cast on 48 stitches with main color (MC) yarn Knit 5 rows of garter stitch Row 1 (RS): With MC, P4, CF8, P3. With AC, K2. With MC, P3, CF4, CB4, P3.With AC,K2.With MC,P3,CB8, P4. Row 2 (WS) and ALL EVEN Rows: With MC, K4, P8, K3. With AC, P2. With MC, K3, P8, K3. With AC, P2. With MC, K3, P8, K4. Row 3:With MC,P4,K8,P3.With AC, K2. With MC, P3, K8, P3. With AC, K2.With MC, P3, K8, P4. Row 5:With MC,P4,K8,P3.With AC, K2. With MC, P3, CF4, CB4, P3. With AC, K2. With MC, P3, K8, P4. Row 7: With MC, P4, CF8, P3. With AC, K2. With MC, P3, K8, P3. With AC,K2.With MC,P3,CB8,P4. Continue in this manner, such that the two side cables are repeated every sixth row, while the middle cables are repeated every fourth row. Continue until the piece measures 11 inches, ending with a WS row. Work 6 rows in the pattern established (without the cables), such as follows: Row 1 (RS): With MC, P4, K8, P3. With AC, K2. With MC, P3, K8, P3. With AC, K2. With MC, P3, K8, P4. Row 2 (WS): With MC, K4, P8, K3. With AC, P2. With MC, K3, P8, K3. With AC, P2. With MC,K3, P8, K4. End with a WS row. This way you have a small portion with cables so the piece can fold. Now resume working in the cable pattern used before. Work until both sides match in length of cables. Knit 5 rows of garter stitch in MC only (if you are planning on adding buttonholes, make sure to do so here!). Bind off.
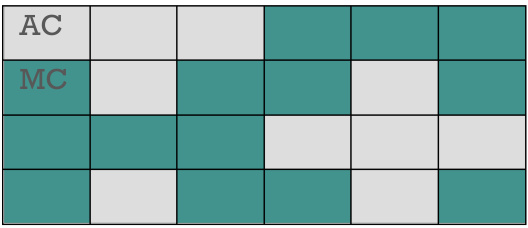
Sides (make 2):
Cast on 12 stitches with main color (MC) yarn. Work in stockinette stitch, alternating colors following the chart below. The chart shows 6 stitches, so you repeat it twice per row. The pattern is a 4-row repeat.
Work until the side is the same length as the front or back (approx. 1l inches). Bind off.
Finishing:
Take one side and the front/back piece. Match the long edge of one side to the long edge of the front. With right sides facing, sew together. Then, with right sides still facing, match the bottom edge of the side to the cable-less part of the front/back piece, and sew together. With right sides still facing, sew the remaining long edge of the side piece to the edge of the back. Repeat for the other side piece. Even though all the pieces are rectangular, you may find when sewing them together that they have to curve a little to fit - don't worry, that's exactly right! It fits my tablet better that way, and hopefully it does the same for yours. Sew in any loose ends. Optionally, you can create a lining. or add buttons, zipper, or other closure to the top. Design by Victoria Regina. For more, visit http://ravelry.com/people/Loralie or http://cniotail.tumblr.com


