Lined Mittens Feb. 2009 Designed by String Theory 2.0 http://stringtheory2.blogspot.com
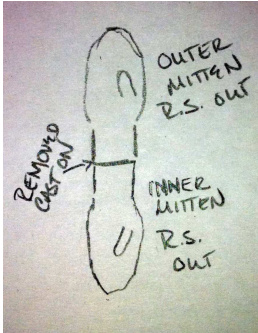
Two layers of knitting plus the airspace in between makes these very nice, toasty mittens and worth basically having to knit them twice! These can be decorated or plain as you like. Stripes of color on the outer mitten add interest without bulky. You could embellish with beads, or embroider or Swiss darn little flowers on the back of the hands for some people or you can just leave them plain on the outside and use spaced dyed yarn for the inner mitten so they appear staid and boring actually have a wild side when you get to know them better. The basic logic to these mittens is this: you knit the inner mitten from a scrap orprovisionalcaston,thentakeoutthatcastonandpickupthecuff(withthe right side facing you) and knit the opposite mitten (so when you push the liner mitten into the outer, the thumbs willine up), slightly larger this time. When both are done, you'll have a single, lined mitten. Keep in mind that your end-weaving should be done before you complete the mitten as once you finish the outer mitten, you'll have no access to the “wrong side" of your work and weaving in ends from the right side of your work can be awkward.
Size: Women's small [medium] [large} Materials: Size 2 and 3 double pointed needles (or circular if you do these the magic needle way) 1 yarn needle Crochethook Yarn A lining yarn: 20o [220] {2403 yards of fingering weight silk or cotton yarn (or blend it just needs to be soft) - Knitpicks ComfyFingering works perfectly. Yarn B: 200 [220] {240} yards fingering weight wool yarn Knitpicks Palette yarn or Bartlett Yarns Shetland Sport work nicely (use Bartlett and the mittens will outlive you).
Gauge:
Directions- Left Mittens
Inner Mittens With crochet hook and scrap yarn, do a provisional cast on of 50 [55] {60} stitches. I just cast on the desired number of stitches with scrap yarn and cut them out later, but there's a good explanation of provisional cast on here (http:// bellaknitting.typepad.com/bella_knitting/20o7/10/provisional-cas.html). rn A pick up/knit these stitches, dividing them evenly amongst 3 or 4 needles and join with. Work 2 inches in straight stitch (Stockinette stitch, knit every round). Next Row: Increase 4 [5] [6} stitches evenly spaced (54 [60] [66}3 sts total) and distribute stitches amongst needles thusly: distribute stitches as follows on 4 needles: 28, 14, 14 [30, 15, 15] {33, 17, 16}; on 5 needles: 14, 14, 14, 14 [15, 15, 15, 15] {17, 16, 17, 16} Work another 1.75 [2] [2.25} inches. Work another 3.5 [3.75] {4} inches. Next round, begin decrease for top of mit 4 needles: 1st needle SSK, knit to within 2 stitches of the end of needle, k2tog 2nd needle SSK, knit to end 3rd needle knit to within 2 stitches of the end of needle, k2tog OR 5 needles: 1st needle SSK, knit to end 2nd needle knit to within 2 stitches of the end of needle, k2tog 3rd needleSSK,knittoend 4th needle knit to within 2 stitches of the end of needle, k2tog Work this round until 10 stitches total remain. Close the top of the mitten using Kitchner Stitch (see end of pattern for directions). Thumb: Using smaller needles, slip a needle into the 10 stitches on the top of the waste yarn you've knit in for the thumb hole AND the bottom of the waste yarn you've knit in for the thumb hole (you'll have two needles each holding 10 stitches). Carefully remove the waste yarn-I use a crochet hook, rather than scissors. Next 3 rows: Knit 2 together all the way around (you'll probably have 1 extra stitch, just knit it). Knit one round. Knit 2 together all the way around (you'll probably have 1 extra stitch, just knit it). Break off yarns and thread through the remaining stitches. Pull firmly (not tightly) to close off top of thumb. Turn this mitten inside out and weave in all ends. Turn right side out again and begin the...
Lined Mittens Feb. 2009 Designed by String Theory 2.0 http://stringtheory2.blogspot.com
Next 3 rows: Knit 2 together all the way around (you'll probably have 1 extra stitch, just knit it). Knit one round. Knit 2 together all the way around (you'll probably have 1 extra stitch, just knit it). Break off yarns and thread through the remaining stitches. Pull firmly (not tightly) to close off top of thumb. Turn this mitten inside out and weave in allends. Turn right side out again and begin the... Outer Mittens With right side of the work facing you and using larger needles, remove your scrap or provisional cast on and pick up the 50 [55] {60} stitches of the first row of your mitten. Divide them evenly amongst 3 or 4 needles, then join Yarn B and purl one round (this will make a fold between the inner and outer mitten. Work 2 inches plus 2 rows (this will provide the ease needed to ensure the inner mitten fits inside the outer mitten) in straight stitch (Stockinette stitch, knit every round). Next Row: Increase 4 [5] {6} stitches evenly spaced (54 [60] {66} sts total) and distribute stitches amongst needles thusly: distribute stitches as follows on 4 needles: 28, 14, 14 [30, 15, 15] {33, 17, 16}; on 5 needles: 14, 14, 14, 14 [15, 15, 15, 15] {17, 16, 17, 16} Work another 1.75 [2] {2.25} inches plus 2 rows (again, ensure the inner mitten fits inside the outer mitten). \*\* Next round, work entire round until there are only 12 sts.remaining.Knit next 10 sts. in scrap yarn for the thumb, move these 10 stitches back to the left hand needle and complete the last 2 sts. of the round. Next round, begin decrease for top of mitten as follows (HINT--if you want to embellish these mittens with embroidery, do it now before you close the top of the mitten, but this is optional): 4 needles: 1st needle SSK, knit to within 2 stitches of the end of needle, k2tog 2nd needle SSK, knit to end 3rd needle knit to within 2 stitches of the end of needle, k2tog OR Thumb: Using larger needles, slip a needle into the 10 stitches on the top of the waste yarn you've knit in for the thumb hole AND the bottom of the waste yarn you've knit in for the thumb hole (you'll have two needles each holding 10 stitches). Join Yarn B and work 2.5 inches plus one row in straight stitch (Stockinette stitch, knit every round). Be sure to pull the tail of YarnB to the outside of the work so you can weave it in later. Next 3 rows: Knit 2 together all the way around (you'll probably have 1 extra stitch, just knit it). Knit one round. Knit 2 together all the way around (you'll probably have 1 extra stitch, just knit it). Break off yarns and thread through the remaining stitches. Pull firmly (not tightly) to close off top of thumb.
Directions-- Right Mitten:
Directions for the left hand mitten are identical except for thumb placement, indicated by \*\* for inner mitten and \* for outer mitten. Here are the changes to make right hand mittens:
Inner mitten:
\*\*Next round,towithin1 stitchesof theendof theround,nit in scrapyarnfor thethumbover thenext 9 stitche,moe these 9 stitches back to the left hand needle and finish round.
Outer mitten?
\*Next round, 2, knit in scrap yarn for the thumb over the next 10 stitches, move these 10 stitches back to the left hand needle and continue round.
Finishing:
Weave in all ends, block (choose your method, http://knitty.com/ISSUEwinterO2/FEATdiyknitter.html). I like to gently submerge mine in warm water with baby shampoo, rinse twice, roll up in a towel and press to get out most of the water, then shape gently to even out all the stitches and place in a warm place to dry. To assemble, gently push the inner mitten into the outer mitten. Kitchner Stitch: for a full explanation with pictures,see http://www.knitty.com/ISSUEsummer04/FEATtheresasum04.html Step1 Insert the yarn needle into the first stitch on the front needle as if to knit, while slipping it off the end of the needle. Step 2:Insert the yarn needle into the next stitch on the front needle as if topurl, but this time,leave it on the needle. Gently pull the yarn through. Step3: Insert the yarn needle into the first stitch on the back needle as if to purl, and slip it off the end of the needle. Step4 Insert the yarm needle intothe next stitch on the back needle as if to knit, and leave it on the needle.Pull the yarn through. Keep repeating steps 1-4, pausing to tighten up the stitches now and then until all the stitches are worked. The last two stitches remaining on the needle will require you to perform step I then go directly to step 3.


