Parson Brown (a Snowman Ornament)
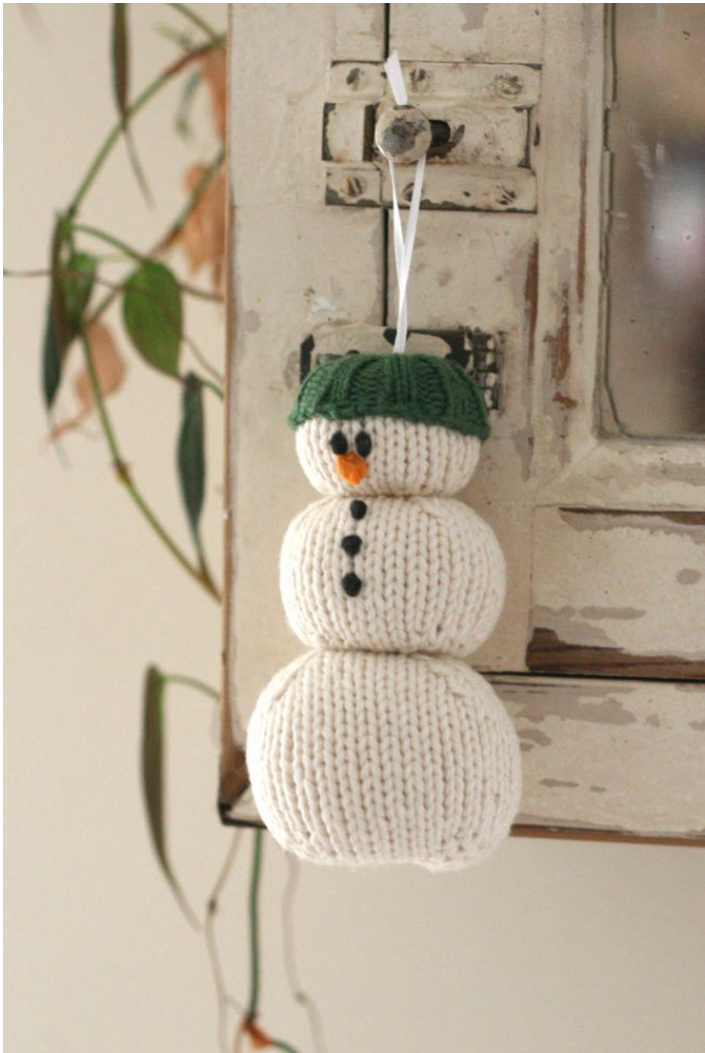
Example shown in: KnitPicks Simply Cotton, Marshmallow Unidentified Green Fingering KnitPicks Simply Cotton, Bittersweet Blue Sky Alpacas Dyed Worsted, Pumpkin

Materials
-Four US 3, 3.25mm double pointed needles OR SIZE TO OBTAIN GAUGE -Four US 1, 2.25mm double pointed needles -48 yards worsted weight in Body color -5 yards fingering (sock) weight yarn in Hat color -yarn needle and (optional) removable marker -Scraps of yarn for eyes, nose and buttons. -Stuffing -24" length of 1/8" ribbon (the really skinny kind) for assembly and hanger. Yarn will also work.
Abbreviations
MiR- lift the strand between the stitches from back to front with the LH needle and knit MiL- lift the strand between the stitches from front to back with the LH needle and knit through theback loop All other abbreviations are standard.
Notes
-All increases are the kind where you lift the strand between the stitches. M1L and MiR are explained in the Abbreviations. -Links to tutorials for unfamiliar techniques, including French knots, can be found at http://yarnmiracle.com/techniques -Stitch counts for dividing stitches on DPNs are given as “2-3-2". That is, 2 sts on needle #1, 3 on needle #2 and 2 on needle #3. -Stitch counts for critical rows or rounds will appear in parentheses: (17 sts) -It's always a good idea to look through a pattern before starting.
Gauge
5 sts to an inch with worsted weight yarn yields a 4.5" (or so) snowman.
Bottom Snowball (make 1 in Body)
Cast on 6 leaving a 4" tail. Divide stitches evenly on three double pointed needles (2-2-2) and join to work in the round. Snowballs are worked from bottom to top, rounds end and begin at theback. Round 1: Knit Round 2: \*K1, M1R repeat from \* to end of round (12sts) Round 3: Knit Round 4: \*K1, M1R, K2, M1L, K1 repeat from \* to end of round Round 5: Knit Round 6: \*K1, M1R, K4, M1L, K1 repeat from \* to end of round Round 7: Knit Round 8: \*K1, M1R, K6, M1L, K1 repeat from \* to end of round Round 9: Knit Round 10: \*K1, M1R, K8, M1L, K1 repeat from \* to end of round (36 sts) Rounds 11-22: Knit (12 rounds) Use the yarn tail to close up the hole made by the cast on, hiding the end inside. Mark t beginning of the round if needed. Round 23: \*SSK, K8, K2TOG repeat from \* to end of round Round 24: Knit Round 25: \*SSK, K6, K2TOG repeat from \* to end of round Round 26: Knit Round 27: \*SSK, K4, K2TOG repeat from \* to end of round Round 28: Knit Round 29: \*SSK, K2, K2TOG repeat from \* to end of round Round 3o: Knit Stuff the snowball (otherwise the hole might be too small for your finger)! Round 31: \*SSK, K2TOG repeat from \* to end of round (6 sts) Break yarn leaving a 4" tail. With a yarn needle, draw the tail
through the live stitches and pull tight to close the opening. Hide the remaining tail inside the snowball. Remove marker.
Middle Snowball (make 1 in Body)
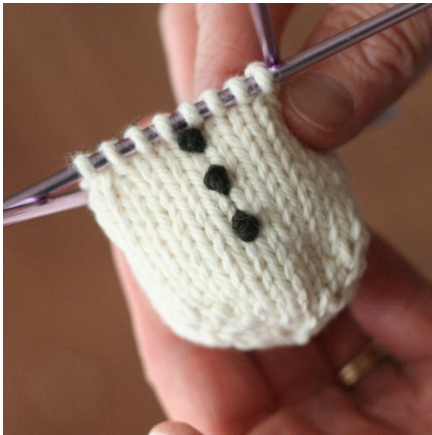
Cast on 6 leaving a 4" tail. Divide stitches evenly on three double pointed needles (2-2-2) and join to work in the round. Snowballs are worked from bottom to top, rounds end and begin at the back. Round 1: Knit Round 2: \*K1, M1R repeat from \* to end of round (12sts) Round 3: Knit Round 4: \*K1, M1R, K2, M1L, K1 repeat from \* to end of round Round 5: Knit Round 6: \*K1, M1R, K4, M1L, K1 repeat from \* to end of round Round 7: Knit Round 8: \*K1, M1R, K6, M1L, K1 repeat from \* to end of round (30 sts) Rounds 9-18: Knit (10 rounds) Use the yarn tail to close up the hole made by the cast on, hiding the end inside. Mark the beginning of the round if needed. Round 19: \*SSK, K6, K2TOG repeat from \* to end of round Round 20: Knit uttons' (French knots, embroidered lines, duplicate stitch, actual buttons, ettc to the front of this snowball. I center on Needle #2 and place the first one on Round 19 and the other two evenly underneath. Round 21: \*SSK, K4, K2TOG repeat from \* to end of round Round 22: Knit Round 23: \*SSK, K2, K2TOG repeat from \* to end of round Round 24: Knit Stuff the snowball (otherwise the hole might be too small for your finger)! Round 25: \*SSK, K2TOG repeat from \* to end of round (6 sts) Break yarn leaving a 4" tail. With a yarn needle, draw the tail through the live stitches and pull tight to close the opening. Hide the remaining tail inside the snowball. Remove marker.
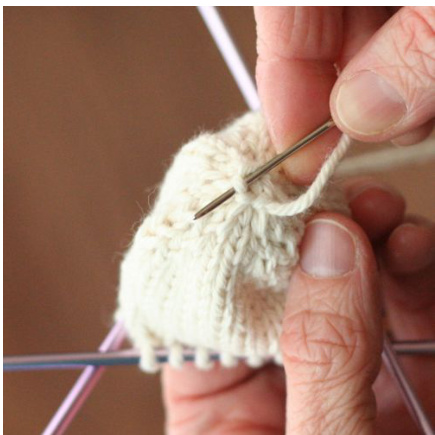
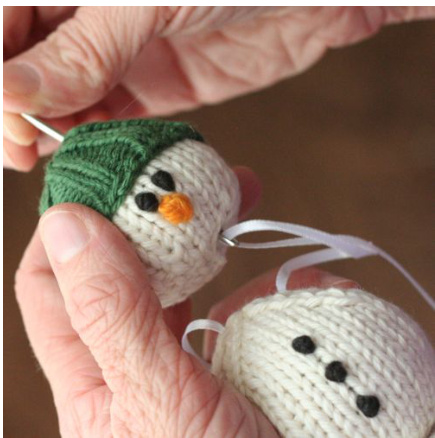
Top Snowball (make 1 in Body) Cast on 6 leaving a 4" tail. Divide stitches evenly on three double pointed needles (2-2-2) and join to work in the round. Snowballs are worked from bottom to top, rounds end and begin at theback. Round 1: Knit Round 2: \*K1, M1R repeat from \* to end of round (12sts) Round 3: Knit Round 4: \*K1, M1R, K2, M1L, K1 repeat from \* to end of round Round 5: Knit Round 6: \*K1, M1R, K4, M1L, K1 repeat from \* to end of round (24 sts) Rounds 7-14: Knit (8 rounds) Use the yarn tail to close up the hole made by the cast on, hiding the end inside. Mark the beginning of the round if needed. Round 15: \*SSK, K4, K2TOG repeat from \* to end of round Round 16: Knit Add his little face (French knots, embroidered lines, duplicate stitch, whatever) to the front of this snowball. I center the eyes on Needle #2 and place them on round 11 - in the stockinette part and low enough that his hat won't cover them up. (See the picture on page 1 for details.) Round 17: \*SSK, K2, K2TOG repeat from \* to end of round Round 18: Knit Stuff the snowball (otherwise the hole might be too small for your finger)! Round 19: \*SSK, K2TOG repeat from \* to end of round (6 sts) Break yarn leaving a 4" tail. With a yarn needle, draw the tail through the live stitches and pull tight to close the opening. Hide the remaining tail inside the snowball. Remove marker. Hat (make one in Hat) With smaller needles, cast on 36 stitches. Divide stitches evenly on three double pointed needles (12-12-12) and join to work in the round. Rounds 1-12: \*K2, P2 repeat from \* to end of round. Round 13: \*K2, P2TOG repeat from \* to end of round. Round 14: \*K2TOG, P1 repeat from \* to end of round. Round 15: \*K2TOG repeat from \* to end of round. (8 sts) Break yarn leaving a 4 inch tail. With a yarn needle, draw the tail through the remaining stitches, remove from needles and pull tight. Secure yarn tail on the inside of the hat. Weave in the cast on end.
Assembly and Finishing
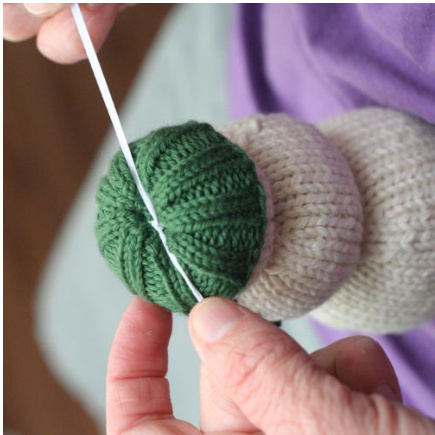
'ack his hat to his head using a bit of Hat color yarn. This will keep it in place. To assemble your snowman and make a loop for his hanger, you're going to thread all of his Snowballs onto a length of ribbon, knot it securely at the top to keep them together and then use an overhand knot to create a loop out of the remaining ribbon tails. Accomplish this as follows: Thread a yarn needle with the length of ribbon (or yarn). Center and push the needle through the base of the Bottom Snowball and pull it out through the top. Only pull half of the ribbon out the top! Re-thread the needle with the other half of the yarn (the half that is still hanging out the base of the snowman) and push it from the base of the Bottom Snowball a few stitches away from the first entrance point and pull it out through the top. The Bottom Snowball now has two ribbon ends sticking out the top.
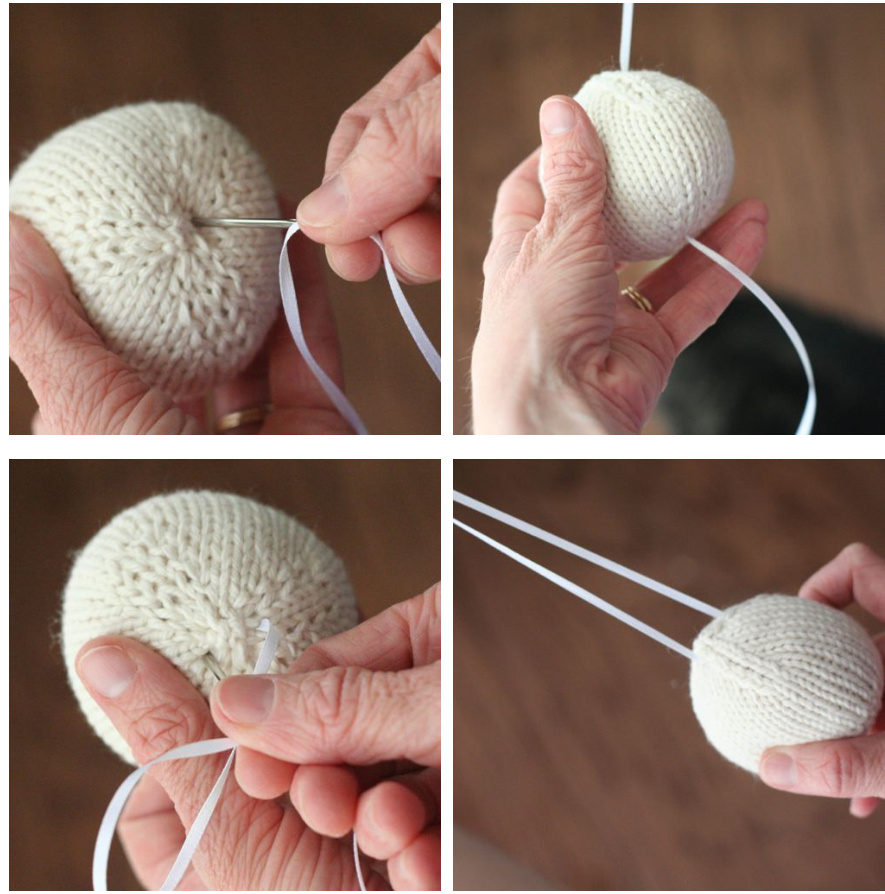
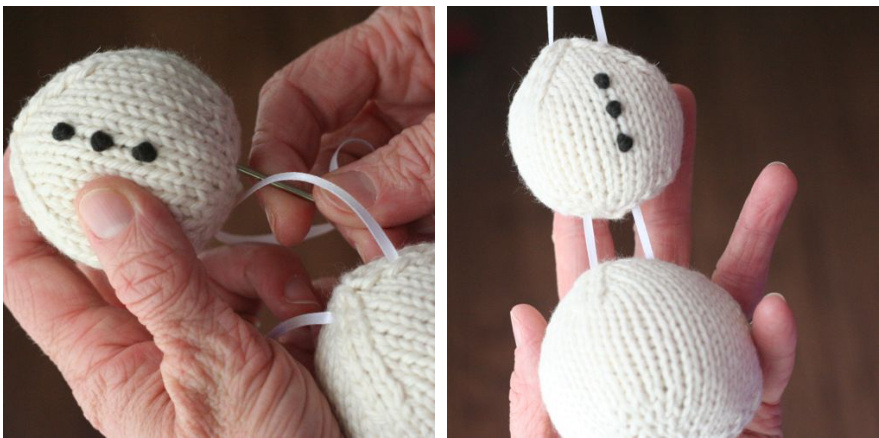
Keep the needle threaded with one of the ribbon ends. Center and push the needle through the Middle Snowball and pull it out the top. Re-thread and do the same thing with the other ribbon end. Now the Bottom Snowball and the Middle Snowball are joined together, and there are two ribbon ends sticking out the top of the Middle Snowball. Keep the needle threaded with one of the ribbon ends. Line up the Top Snowball so that his buttons and his face are facing the same direction! Center and push the needle through the Top Snowball and pull it out through the top of his hat. Rethread the needle and do the same thing with the other ribbon end.
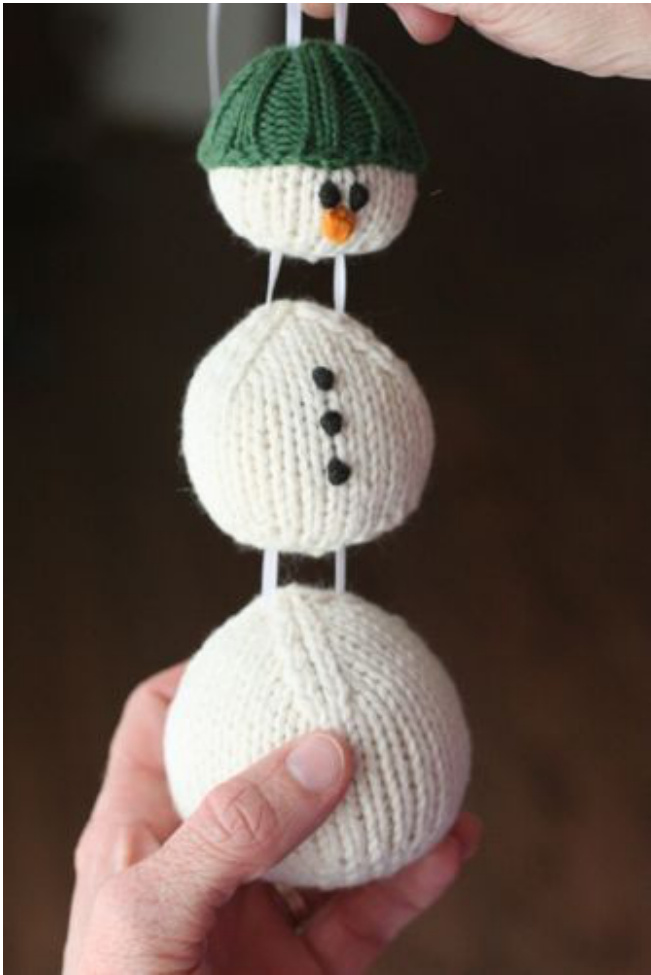
<--He is now stacked Bottom, Middle, Top and has two ribbon ends sticking out the top of his hat.
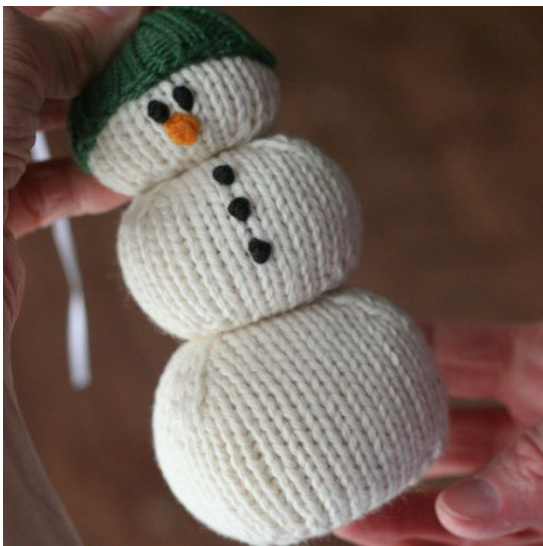
Slide the Snowballs down the ribbon so that they are flush with each other (even snuggly pressed together if you like a squatty snowman). <-- Knot the two ribbon ends tightly against the top of his hat.
Use an over hand knot to tie the two ribbon ends together and create a loop for hanging. Trim the ends and find the perfect spot to display your little Winter Wonder! Copyright 2012, Emily Ivey, emily@yarnmiracle.com, http://yarnmiracle.com Share this free pattern, but do not sellit in any form or remove the copyright. If you choose to sell the Snowmen that you knit, please link to yarnmiracle.com and consider a donation to the HSuS.


