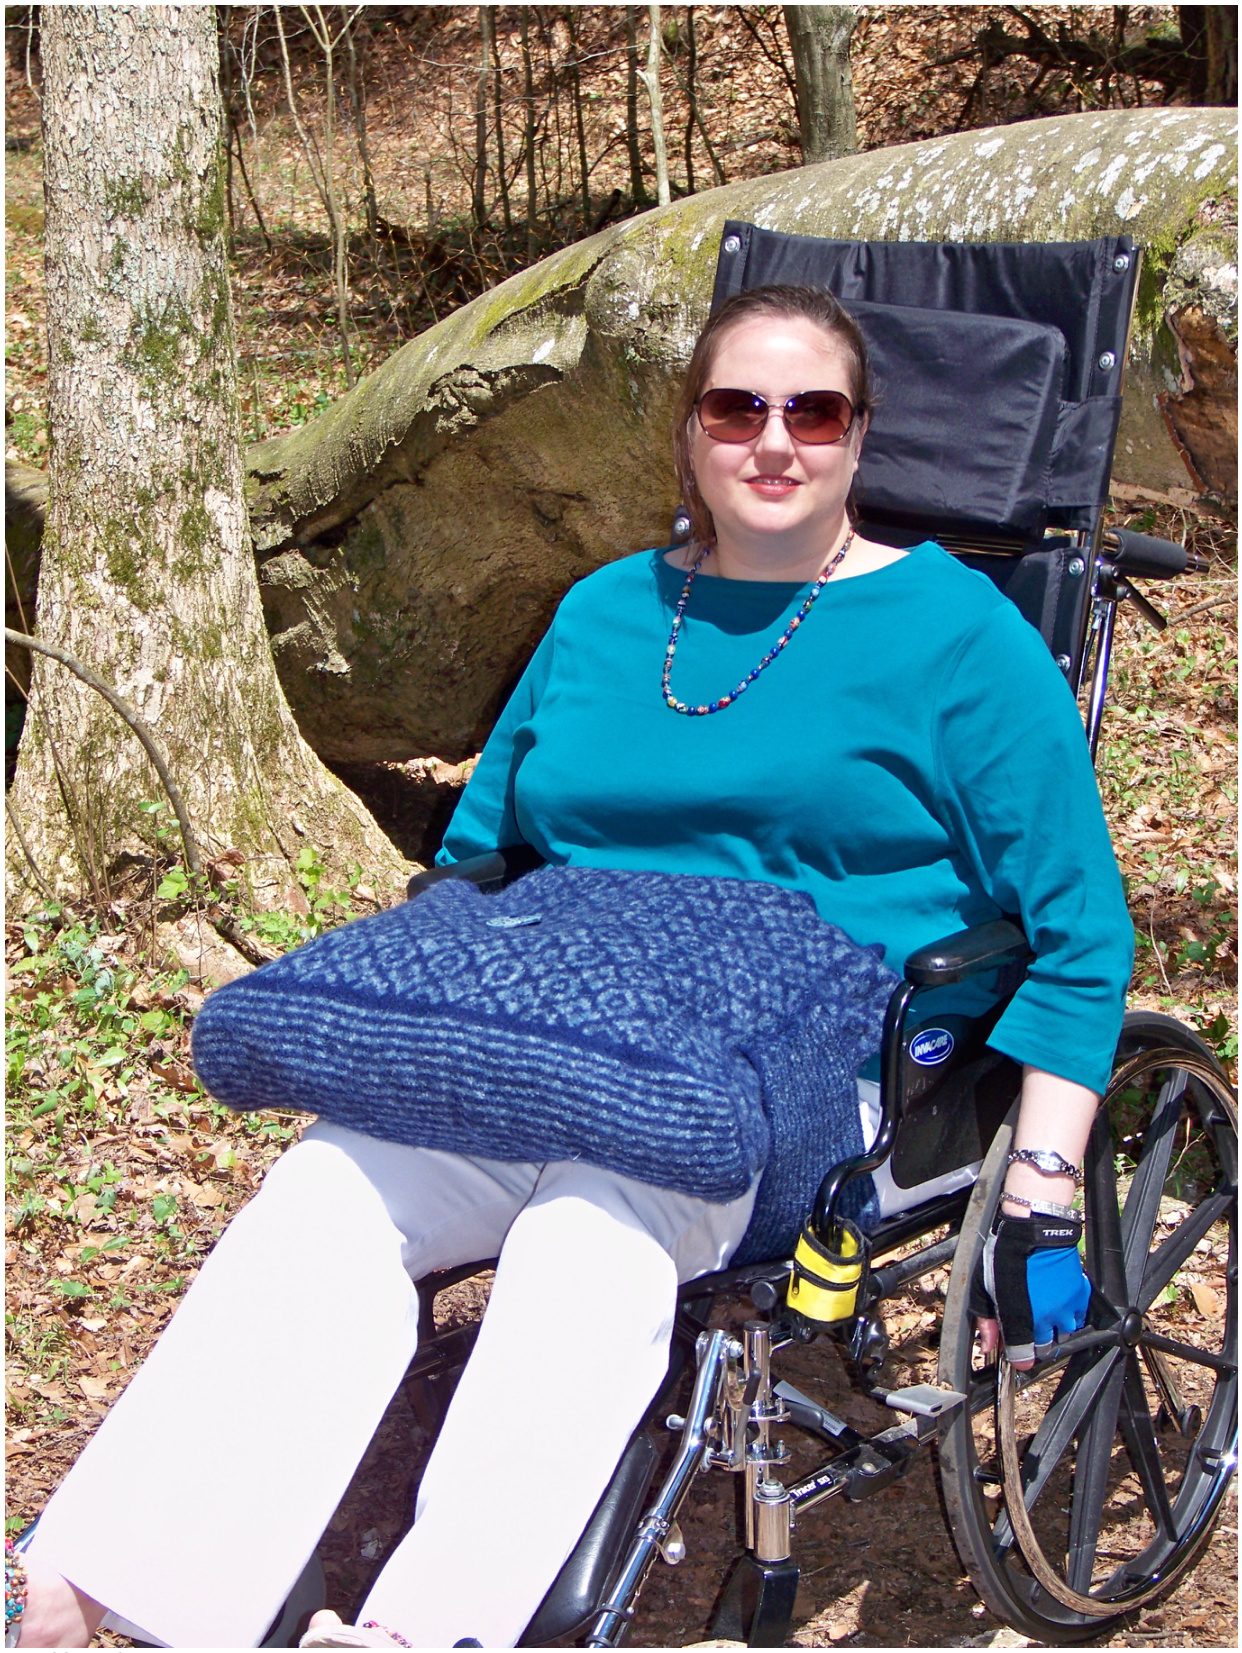
Ramp by Jodie Gordon Lucas Jodiemom@verizon.net Difficulty [Piquant] This design was the product of youth, stupidity, an embarrassing crash and a damaged sweater. I'm a young(ish) woman with POTS who must use a wheelchair outside my home. When the wheelchair became a part of my life, 1 entered my second toddlerhood. My motto is “I'll do it myself."-Well, at least until I can't. One of my favorite things about my wheels is zipping down a long ramp. Once I get up some speed it is the closest I can come to the experience of running. At this point, I think you can see where the stupidity and the crash enter the story. I took off down a wonderful ramp and the bag holding my knitting flew off my lap. At that point my instincts were to save the knitting and forget about things like steering and braking, which are what my hands should have been doing at the time. I crashed into a wall and skidded about 2o feet with my right arm wedged against a guardrail. I wasn't hurt and, the chair wasn't damaged, but my just-off-the-needles sweater had an interesting new design element on the sleeve. This was unacceptable! I should not have to choose between works in progress and finished objects! So, Ramp was born-a beautiful trio of totes with handy (pun intended) hands-free panels for those of us who explore life on wheels. To use in hands-free mode, lay the bag on your lap, unbutton the panels and tuck the ends of the panels under your legs. Before making Ramp, I strongly advise that you find a copy of Fair Isle Sweaters Simplified, by Ann and Eugene Bourgeois, or visit the Philosopher's Wool website and learn their Fair Isle technique. It's an amazingly satisfying process and produces a fabric that is almost as lovely on the inside as it is on the outside. The Fair Isle charts come from 1ooo Knitting Motifs by Luise Roberts. Finally the ceramic buttons are original designs of SummersStudioEtc and were custom made for these bags. While Ramp was designed for wheelchair use, the hands-free panels make it ideal for other situations: knitting while sitting in bleachers, knitting while sailing, knitting on a rollercoaster, knitting on a ski-lift, knitting on a motorcycle, knitting--well, your imagination is the limit. Ramp is a great laptop carrier, too-- if you can bear to put aside your knitting. Photo credit [Jodie Lucas/Jodie Lucas, Mark Lucas] SIZE Small, Medium and Large
FINISHED MEASUREMENTS
Before felting
Bag: 12[18.5, 25.5] inches wide by 13[17.5, 22] inches high by 2[4.5, 5.5] inches deep. Hands-free panel: 4.5[6, 7] inches wide by 9.5[15, 22] inches long.
After Felting and Blocking
Bag: 8.75[13.5, 20] inches wide by 8[11, 14] inches high by 1.75[3.5, 4] inches deep. Hands-free panel: varies- according to blocking severity. Degree of felting varies by yarn. Your measurements may vary.
MATERIALS
Notes on yarn selection: All bags were made with worsted weight predominantly wool yarn suitable for felting. All MC yarns provide a sharp contrast to the multicolored CC yarns. A good way to use up wool remnants from previous projects would be to work random stripes in place of the CC against a dark MC. Small [MC] Brown Sheep Company, Inc., Nature Spun [100% wool; 245 yd / 224m per 100g skein]; color 205 Regal Purple; 1 skein [CC] Wisdom Yarns, Poems [100% wool; 109 yd /100 m per 50g skein]; color 583; 2 skeins Bag pictured used 82g MC and 66g CC. Medium [MC] Brown Sheep Company, Inc., Lamb's Pride Worsted $[85\%$ wool, $15\%$ mohair; 190 yd / 173 m per 113 g skein]; color M-05 Onyx; 3 skeins [CC] Plymouth Yarn Company, Outback wool $[100\%$ virgin w0ol; 370 yd/ 338m per 200g skein]; color 954; 1 skeins Bag pictured used 33g MC and 14g CC. Large [MC] Brown Sheep Company, Inc., Nature Spun $[100\%$ w0ol; 245 yd/224 m per 100g skein]; color: 147 True Blue Navy; 4 skeins [CC] Plymouth Yarn Company, Outback wool [100% virgin wool; 370 yd/ 338m per 200g skein]; color 901; 2 skeins Bag pictured used 396g MC and 390g CC. 1 set US #9/5.5mm double-point needles (optional)\* 1 set US #9/5.5mm straight needles (optional)\* 1 or 2, 32-inch or longer U $\mathrm{JS\\#9}/5.5\mathrm{mm}$ circular needles \* \*the entire tote can be made with one circular needle using the magic loop method of circular knitting. If you prefer knitting in the round with double pointed needles, or two circular needles, or if you prefer knitting back and forth on straight needles, plan accordingly. Peaches and Cream (or equivalent) worsted weight cotton used extensively as wasteyarn size I crochet hook safety pins stitch markers 2 stitch holders zippered pillow case washing machine 1, 1.5[2, 2] inch button (SummersStudioEtc created the buttons pictured) tapestry needle T blocking pins sharp utility knife or scissors sewing needle (large enough eye for yarn but with sharp point). If you wish to line your bag you will also need: :33[.625,1.25] yds 60 inch wide or .5[.75, 1.625] yds 45 inch wide sturdy fabric (such as denim or twill) for lining 0[0.5, 1.25] yds 20 inch wide heavy interfacing sewing thread to coordinate with lining sewing machine 1, 14[22, 22] inch zipper
GAUGE
15 sts/15 r0ws $=4$ inches / 10 cm in garter stitch 20sts/20 rows $=4$ inches / 1o cm in Fair Isle stockinette stitch Note: While gauge for a felted bag isn't critical, you will run out of yarn for the large tote if you knit too loosely. Your options are to reduce the number of repeats of the Fair Isle chart or to use a smaller needle to more closely approximate gauge.
PATTERN NOTES
The large size is not suitable for hands-free use for children or petite adults. The small size is not suitable for hands-free use for large adults The provisional cast on used for this project involves picking up stitches in the back of a crochet chain and is described here. As the hands-free panels have a definite right side and yarn changes all occur at one end, you must begin picking up stitches for the provisional cast on at the beginning of the chain. The final stitch picked up will be closest to the free end of the chain. This will assure that your work is oriented correctly and that you can follow the directions as written when you remove your chain to work the second half of the panel. Garter Stitch Striping, used on the base of the bag and the hands-free panels, produces clearly defined stripes when viewed from the right side of your work. Several things happen at once with this method. First, unless noted, the first stitch of each row after the first row (with the exception of immediately after a wrapped stitch) is slipped. Second, yarn colors are alternated every other row. The unused yarn is dropped and will remain attached to the piece as it will be used for the next stripe. Each stripe of color represents two rows of knitting or purling. For simplicity's sake, this pattern will frequently count number of stripes. Wrapped stitches are used when working partial rows of the hands-free panels for shaping purposes (short row shaping). To wrap a stitch: 1) bring yarn forward; 2) slip stitch to be wrapped, purlwise, from the left needle to the right needle; 3) take yarn to the back of your work; 4)return the stitch to the left needle; 5) turn your work. Stitch (now on right needle) will have a loop wrapped around its base. When picking up stitches along the edges of garter stitch stripes, be sure to. pick up the stitches from the right side of the fabric and in the last bump of the stripe (which is quite easy to see if you've remembered to slip the first stitch of every row). In the final step of the hands-free panel edging this is a bit tricky as you are working in purl and have the wrong side towards you. When the first round of the base of the bag is worked, 1 stitch is added in each corner using the backwards loop method of casting on. These stitches are purled with the MC throughout the body of the bag. They do not take the place of a stitch in the Fair Isle chart. ·Fair Isle charts are not interchangeable. If you want to use a different chart you must adjust the number of stitches cast on and the number of stripes so that the total number per section (excluding corner purls) is divisible by the number of stitches in the Fair Isle chart of your choice. When the handle is worked there are four times when yarn will be broken. Be sure to leave at least 6 inches of yarn and take care that the stitches at the ends are not too loose or dropped.
PATTERN
You will need two hands-free panels for each bag. Each hands-free panel is worked in two sections that are mirror images along opposite sides of a provisional cast on. SectionOne Using MC and provisional cast on (see pattern notes), CO 32[54, 8o] stitches using either straight or circular needles. Row 1[RS]: Do not sl the first stitch. K all stitches. Row 2[WS]: Sl first stitch. Drop MC. Using CC k to end. Row 3: Sl first stitch. Using CC, k to end. Continue working in Garter Stitch Stripes (see pattern notes) until 4[6, 8] stripes have been worked ending with CC. Row 1: Sl first stitch. K until only 5[8, 1o] stitches remain on the left needle. Wrap the next stitch. Row 2: K all remaining stitches. Row 3: Sl first stitch. K until 3[4, 5] stitches remain on the left needle before the previous wrap stitch. Wrap the next stitch. Row 4: K all remaining stitches. Repeat rows 3 and 4, 2[4, 5] times. The last stitch wrapped will be stitch 19[27, 41] as counted from the beginning a RS row. The final row will be worked in CC. Cut CC yarn and secure. Neatly coil 2[3,4] yards of MC yarn and secure to work with a safety pin. Thread tapestry needle with 2[3,4] feet of waste yarn. Thread 32[54, 8o] stitches from section one onto waste yarn and remove knitting needle. Tie ends of waste yarn to secure.
Section Two
In this section you will continue the Garter Stitch Striping established in the first half of the hands-free panel. This requires the stitches to have been cast on correctly in section one (see pattern notes). All rows will be purled in this section. Make sure there is no obvious break between sections in texture or color. Color changes will continue to be made on the wider end of the panel. Beginning at the narrow end of the panel, remove provisional cast on and slip 32[54, 8o] stitches onto a needle. Mark this row with a safety pin to denote beginning of this section. Row 1 [WS]: Do not sl the first stitch. Beginning at the wide end of the panel and with WS facing, use CC and p all stitches. Row 2 [RS]: Sl the first stitch purlwise. P to the end of the row. Continuing in Garter Stitch Striping, work until this section of the panel has a total of 3[5, 7] stripes, ending with a CC stripe. Work short row shaping as in section 1 being sure to purl rows to maintain Garter Stitch Striping. Break CC yarn a few inches from the work and secure end. Drop MC.
Hands-Free Panel edging
Cut waste yarn holding the 32[54, 8o] stitches on the edge of the first section of the Hands-Free panel. Slip these stitches onto a circular needle. With right side facing and using the MC yarn reserved at the end of the first section of the panel, k32[54, 8o] stitches along the edge of section one. M1 using a backward loop. Pick up one stitch at the end of each stripe along the narrow end of the panel, 7[11, 15] stitches total. M1. K the 32[54, 8o] stitches along the edge of the second section; 73[121, 177] stitches. Break the reserved MC used to work these stitches and secure. Switch to the MC yarn dropped at the end of the second section of the panel. BO 73[121, 177] stitches leaving final loop on the needle. With wrong side facing and continuing in MC, pick up 16[24, 32] stitches purlwise along the right side of the wide end of the panel (see pattern notes). There will be one stitch picked up at the end of each stripe. Including the loop left from the bind off there will be 17[25, 33] stitches on the needle representing the same number of stripes on the panel (including the edging). P 1 row. Move all stitches to a stitch holder. Break MC yarn 2 yards from the end of the work. Coil remaining yarn neatly. This reserved yarn will be used later to graft the panel to thebag. Using either straight or circular needles and MC, CO 52[88, 130] stitches using a provisional cast on. Begin Garter Stitch Striping (k 2 rows in MC and then 2 rows in CC). Continue in garter stitch striping until there are 8[22, 26] stripes on the right side 0r a total of 16[44, 52] rows. If using straight needles for the base, switch to circular needles. In MC knit one row, pm. M1 with a backwards loop. Pick up and k 8[22, 26] stitches along narrow edge of the base (one stitch for each stripe). Pm. M1. Remove provisional cast on and k these 52[88, 130] stitches. Pm. M1. Pick up. 8[22, 26] stitches along the narrow edge. Pm-this marker denotes the end of the row. M1.124[224, 316] stitches.
Body
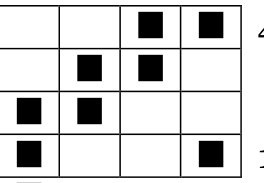
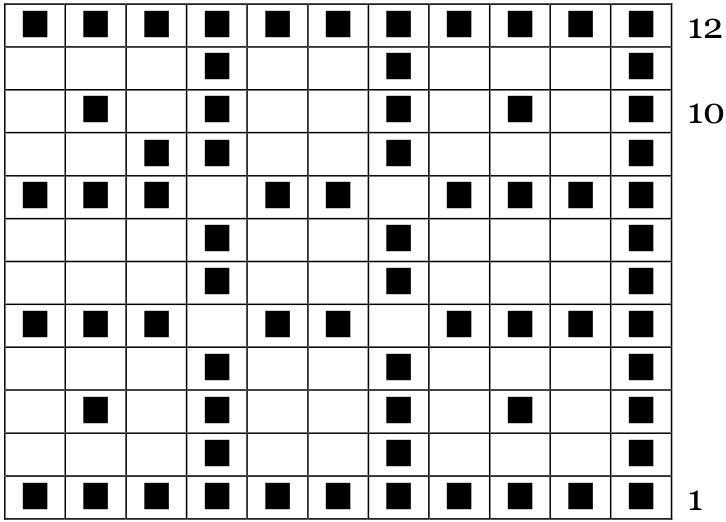
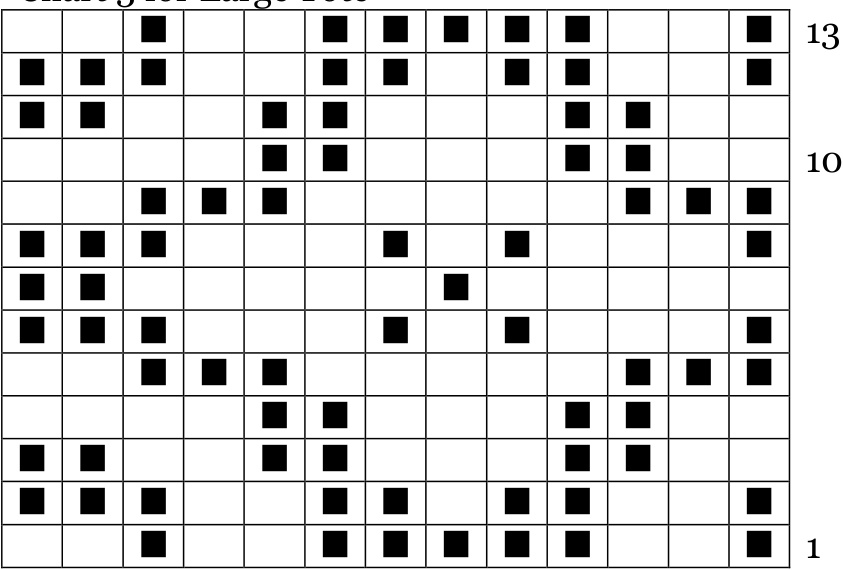
The body is worked in the round. Row 1: The first stitch of row one is the final corner M1 described in the previous step. Continuing in MC, p the remainder of the row. Row 2: Using MC, p124[224, 316] stitches. The Fair Isle design begins in row 3. Refer to Fair Isle Sweaters Simplified for a detailed description of the method used in this project. Essentially, one color is held in each hand. For every second stitch a color is used a slight modification is made to the stitch so that there are no strands running behind the work. Row 3: P1 with MC (and use MC for all further purls on corners). K52[88, 130] stitches in Fair Isle pattern in chart 1[2,3]. Sl marker, P1. Work 8[22, 26] stitches in pattern, sl marker. P1, k52[88, 130] stitches in pattern. Sl marker. P1, k8[22, 26] stitches in pattern. Sl marker. For the remainder of the bag body, work in stockinette, following chart and purling the first stitch after each corner marker (see pattern notes). Bags pictured were worked for 13[6, $7.5^{*}]$ repeats of the pattern for a total of 52[72, 98] rows of Fair Isle. \*The large bag would be fine worked for 7 repeats and 91 rows if you are running low on yarn). Chart 1 for Small Tote I MC, 4 stitches by 4 rows Chart 2 for Medium Tote IMC, 11 stitches by 12 rows Chart 3 for Large Tote 1 MC, 13 stitches by 13 rows
Handle
The handle begins as a continuation of the body of the bag. Row 1: K using MC, purling in corners. Row 2: In MC p1, k16[30, 46] stitches. Using waste yarn k20[28, 38] stitches. Break waste yarn (see pattern notes). Using MC k to marker 16[30, 46] stitches). Sl marker, p1, k8[22, 26] stitches to marker. Sl marker, p1. K16[30,46] stitches (42[84, 120] stitches worked from end of waste yarn). Break yarn. Using waste yarn k20[28, 38] stitches. Break yarn. Using MC k to marker (16[30, 46] stitches). Sl marker, p1. K8[22, 26] stitches to marker. Rows 3-6: Repeat row 1. Row 7: Purl all stitches. BO in purl. Handle hole shaping (work twice): Working from the Rs of the bag, carefully remove waste yarn transferring 2o[28, 38] live stitches each from the rows above and below the waste yarn to either double points or a circular needle. Handle shaping is worked in the round. Row 1: Using MC p20[28, 38] stitches, pick up and p 2 stitches along the side of the handle hole. P2o[28, 38] stitches. Pick up and p 2 stitches along the second side of the handle hole; 44[6o, 8o] stitches. Row 2: Purl all stitches. BO in purl.
FINISHING
Attaching Hands-Free Panels
On the front of the bag, measure 8.5[11, 13.5] inches from top and place a blocking pin in the first and last stitches of the row marked. The stitches marked will be adjacent to the corner purls. Be sure pins are placed on the same row of stitches. You will be picking up 17[25, 33] stitches along this column of stitches beginning at the pin and working towards the top of the bag. To pick up stitches use the tip of your needle and lift the cross bar of the stitch onto the needle. The book Fair Isle Sweaters Simplified has an excellent description of this technique. Once 17[25, 33] cross bars have been lifted onto the needle, use MC and knit one row of 17[25, 33] stitches onto the bag. Slip the stitches at the end of the handsfree panel onto a needle and use the reserved yarn to graft the 17[25, 33] stitches of the panel to the 17[25, 33] stitches picked up on the bag. Repeat process for the other panel. Weave in all ends.
Felting
Using cotton waste yarn and large stitches, loosely baste the opening of the bag closed. Place bag in a pillowcase with a zippered closure. Felt in a washing machine using hot water and a small amount of detergent. Be sure to throw a couple of towels or pairs of jeans in the washer while felting. Check felting. progress frequently. When desired degree of felting has been achieved, spin out hot water and run bag through a cold water rinse and spin in the machine.
Blocking
Remove waste yarn from opening of the bag. Fill bag with stacks of folded towels until bag is full and square. If desired, re-stitch bag closed with waste yarn. Lay one hands-free panel across the front of the bag. Using blocking pins, secure panel at the middle top and bottom (push into towels filing bag). Pull end of panel so that it angles to the lower corner of the bag. The end of the panel will remain parallel to the side of the bag (see diagram). Secure with blocking pins. Repeat with other panel, pinning through the first panel. Hang bag over a door knob and allow to air dry.
Button and Button Holes
Before removing the blocking pins mark the desired location of the button on each hands-free panel and on the bag front with a blocking pin (see diagram). On each hands-free panel, measure one-half inch from the mark towards the free, narrow end--place pin to mark. From the button's desired location measure 1[1.5, 1.5] inches toward the wide, secured end—-place pin to mark. Use a utility knife or sharp scissors to carefully cut a 1.5[2, 2] inch line connecting the three marked points parallel to the top of the bag (note-this line will not follow the panel rows). Use MC and a sharp sewing needle to whip stitch around the buttonhole opening to reinforce the buttonhole. Using MC loosely sew the button onto the body of the bag with enough slack to allow both hands-free panels to slip over the button.
Lining
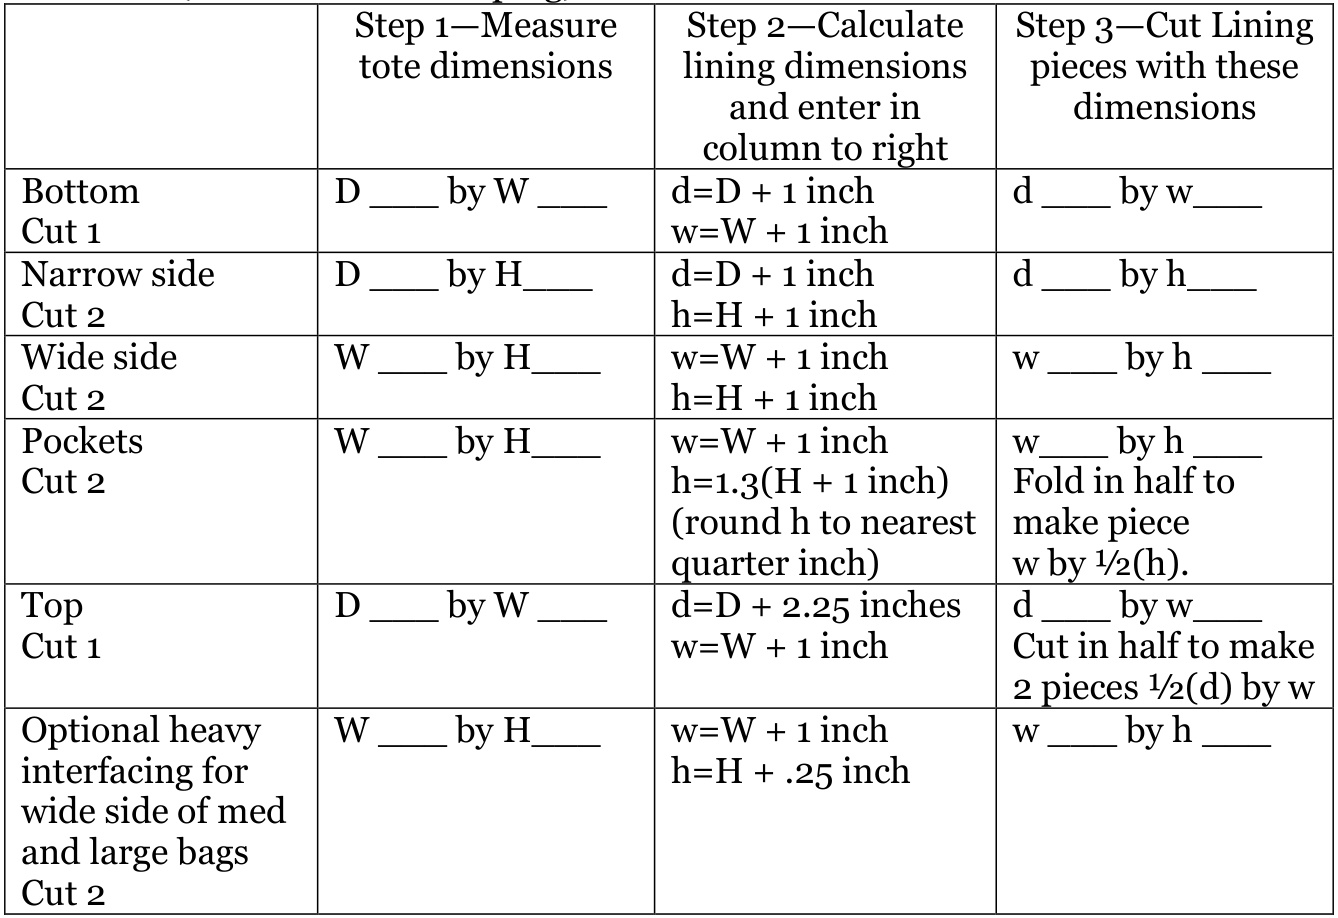
Measure the dimensions of the bag and enter into the first column of the table provided. As you bag will most likely not be completely square record the average of three different measurements. Bag depth (D) measure the narrow side between purl columns. Bag width (W) measure the wide side between purl columns. Bag height (H) measure the Fair Isle rows only on either the narrow or wide side (exclude handle shaping).
I) +ieoo uu picuuo. vuw .-o men mum iuiucu tuse yi puunet pieceo. 2) Place pocket onto wide side piece (RS of wide piece up) aligning sides and bottoms. Baste pocket to side. If desired, sew pocket into sections by stitching from pocket fold to the bottom edge. 3) If using heavy interfacing baste wide side/pocket piece to the interfacing. Interfacing should be flush with bottom and sides. Note: interfacing is .75 inches shorter than the side piece. 4) Using five-eighths inch seam allowance and beginning and ending your seam .75 inches away from each end, sew bottom to wide sides with RSs together. Be sure pockets are oriented correctly. Two seams. 5) With RSs together, sew narrow sides to wide sides beginning and ending your seams .75 inches away from the ends. Four seams. 6) Pin narrow side to bottom and sew beginning and ending .75 inches from the ends. Two seams. 7) Sew zipper into the top pieces following directions on the package. Be sure to have the pull on the RS of the fabric. If the zipper is too short, center on top piece and sew opening closed between the end of the zipper and the end of the top piece. If the zipper is too long, slowly and carefully machine baste ends of top panel .5 inch from edge after installing the zipper and then trim zipper flush to end of top piece. 8) With the WS of the top pinned to the RS of the sides, slowly and carefully sew top to each wide side of the lining. Repeat with narrow sides. 9) Inspect all seams. Hand-stitch any gaps in corners. Trim side and bottom seams to .25 inch. Clip corners. 10) Place unzipped lining in bag. Align the seams joining the lining top and sides with the MC at the beginning of the handle shaping of the bag. Be sure seam allowances are hidden in the bag and lining is centered. Pin lining into place. 11) Using back stitching and stitching from the inside of the bag along the seam between the sides and top, hand stitch lining into the bag. Be careful not to let stitches show on the exterior of the bag.
ABOUT THE DESIGNER
Jodie doesn't do moderation or self-pity. In her many hours of "“leisure" a day (thank you POTS) she reads, knits, crochets, plays piano, sews, watches Britcoms and homeschools her kiddos. She is married to the most wonderful man in the world who coincidentally enables her many obsessions. Jodie's heroine is the character “Queenie" in Black Adder Season 2. In that spirit, she has attempted to convince her children she is the Queen of the Universe. Being smart young men they humor her on a regular basis. Jodie's Ravelry identity is jodiemom.


