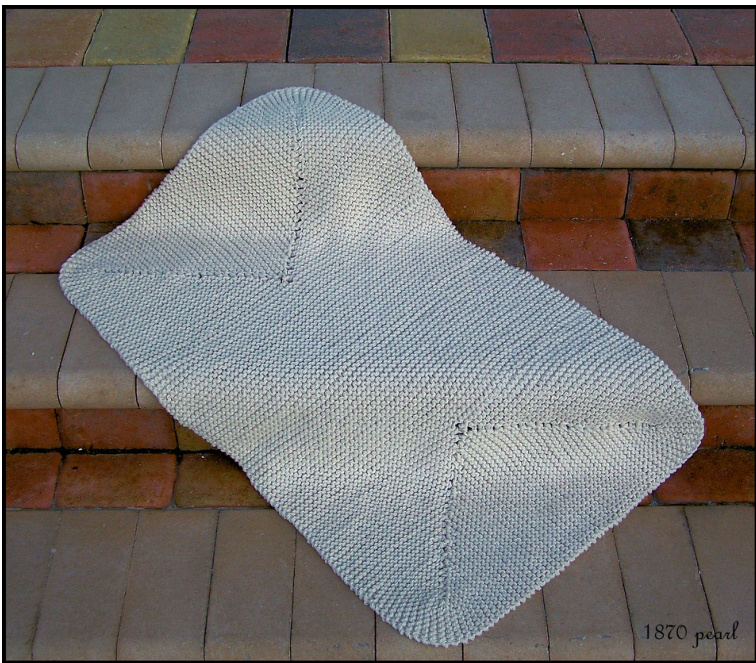
Garter Stitch Bath Mat
Designed by 1870 pearl http://1870pearl.typepad.com/ One day while I was knitting a 4 Corners dishcloth I wondered if I could knit a bathmat using the same principles of the dishcloth that I was knitting. As you can see, my little idea worked. Knit with double stranded yarn it makes for a cushy mat that is 100% natural, absorbent, washable and very durable. BoththeProvisionalCrochetCastOnandthe Garter Stitch graft are two critical techniques that will produce a seamless appearance in the mat. Therefore it would it would be extremely beneficial for you to knit a 4 Corners Dishcloth before starting this project, unless of course you are a seasoned knitter. You can find both the 4 Corners Dishcloth pattern and my grafting tutorial at my blog. While knitting this project it kept my lap rather warm and if I had chosen a different yarn it would have made a nice Lap Robe. Feel free to adapt the pattern to suit your own needs. Finish size: 21 x 34 inches Tension: 10 stitches x 20 rows in Garter Stitch = 3 inch square.
Materials
2 one pound cones (453 grams each) of Peaches & Creme Dishcloth cotton, in Ecru. Size 10 US circular needle, 29 inches in length One piece of non-skid rubber matting. Place this under the finished mat to prevent slipping and/or injuries.
Abbreviations:
K - Knit \* - Repeat
Please read through the entire pattern before you begin to knit.
The entire piece it knitted with two strands held together. Remember to treat each pair of stitches as one, being careful not to drop a strand. Check your work often to avoid having to rip back to correct the error. Using only one strand for the Provisional Crochet Cast On method, cast on 68 stitches. With two stands of yarn held together begin knitting across all 68 stitches for 2 inches, then start the 1st corner, which is worked over half of the stitches. You may place the remaining 34 stitches on waste yarn if you so desire. I choose not to. Instead I ignored them, while they rested on the needle until it was time to graft them to the 2"d corner. K 34 to center and turn. \*K 34 to outside edge and turn. K 33 to center and turn. K 33 to outside edge and turn. K 32 to center and turn. K 32 to outer edge and turn. Continue working one stitch less every other row until you are 8 stitches from the Outside edge. Then knit an additional row as follows: K 8 to the outside edge and turn K 8 to the center of mat and turn. K 8 to the outside edge and turn. K 9 to the center and turn. K 9 to the outside edge and turn. Continue to knit one more stitch every other row until all 34 stitches have been worked. Repeat this process one more time starting at the first corner row 2 \*. The last row should end at the center of the mat. Graft the 34 stitches to the stitches that were in held in abeyance. Neatly weave in tails. Carefully remove the waste yarn from the Provisional Crochet cast on and place them on your needle. It is vital that you resume knitting on the correct side of the work, with the purl bump resting close against the needle. Should there be a little groove or valley between the stitch that is on the needle and the row below, you need to turn the knitting over to the other side and begin there. K all 68 stitches until the piece measures 24 inches from the edge. Knit another pair of corners following the directions above, including the graft. Weave in all tails.
Wash and care instructions.
Machine wash and dry according to the manufacturer's instructions. When the mat is almost dry place it on the floor and pat into shape to finish drying.
Lap Robe pattern
The pattern is narrow and less bulky than a standard blanket and I think it would perfect width for a person who utilizes a wheelchair or for use in a vehicle. Should you choose to use this pattern to make a Lap Robe, I would recommend the following changes: Select a semi solid or solid color in a worsted weight super wash yarn, thus making the item easy care for the intended recipient. To widen the pattern simply add an even number of stitches to the cast on. This will make the corners deeper. Be sure to take that into account when you modify the original pattern. Naturally, you would need to extend the length of the blanket. Only you can determine how long or wide it should be. Or simply knit the pattern as is with worsted weight wool and just add a more rows to the center portion. Happy Knitting!
Copyright 1870 pearl December 2007.
http://1870pearl.typepad.com/ Ifyouencounter anyproblemspleaseemail me at a1870pearl@yahoo.com Subject line: Garter Stitch Bath Mat


