Part Three: The Big Finale

The Border
The book finale is full of excitement and surprises, including the desperate race across the Atlantic Ocean burning their own ship for fuel, Fogg's wrongful detention in jail, the magical realization that they have gained a day travelling with the sun, and Fogg's dramatic last second appearance in the Reform Club, to claim his win. However, the 20,o00 pound wager is not Fogg's biggest win in this journey, but meeting Aouda, who becomes his wife and brings him joy and happiness. The grand finale to our shawl matches the excitement and fun of the book ending, with plenty of romance, and a chance to make it as flamboyant and ornate as your heart desires. After many months of hard work and dedication, you will have a true showstopper of a shawl. "Truly, would you not for less than that make the tour around the world?' \~ Jules Verne.
Technical Notes
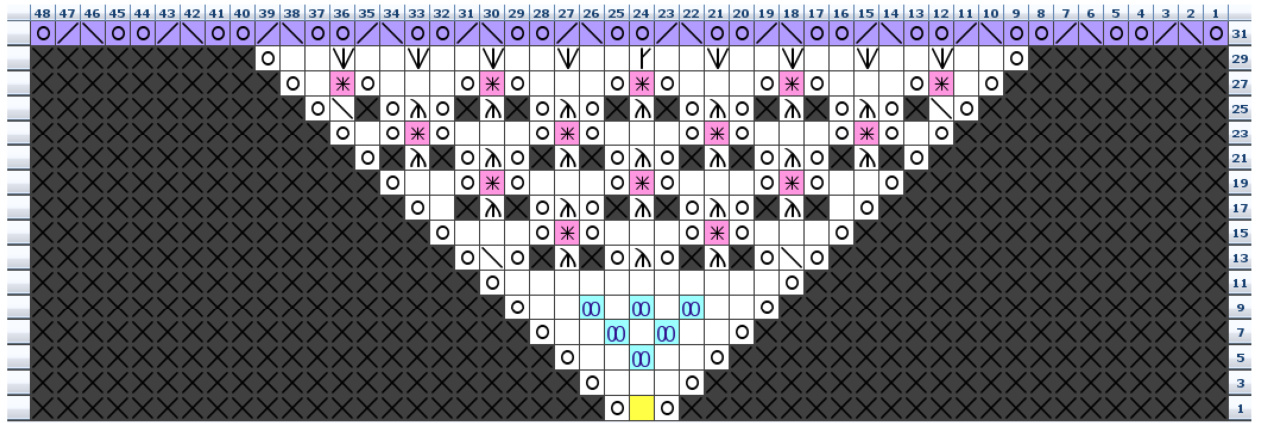
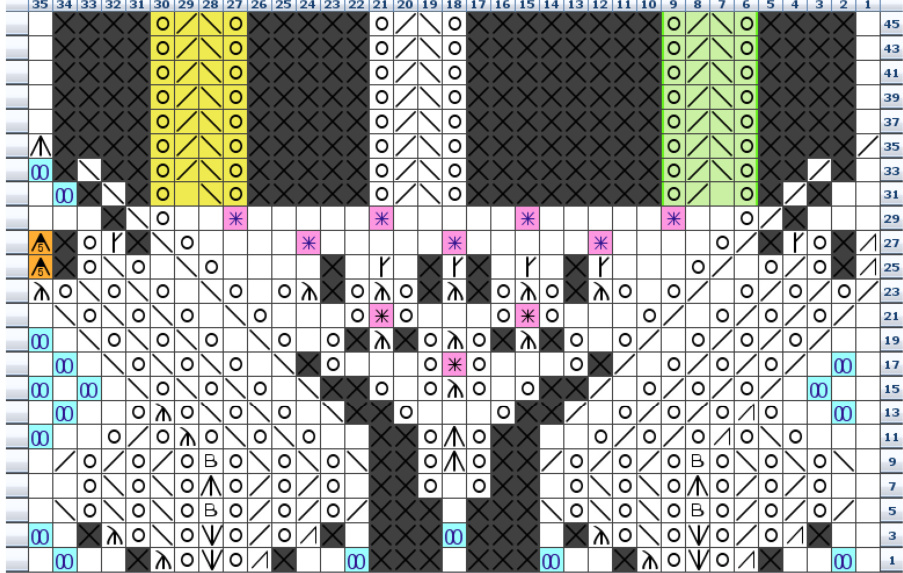
Border Construction
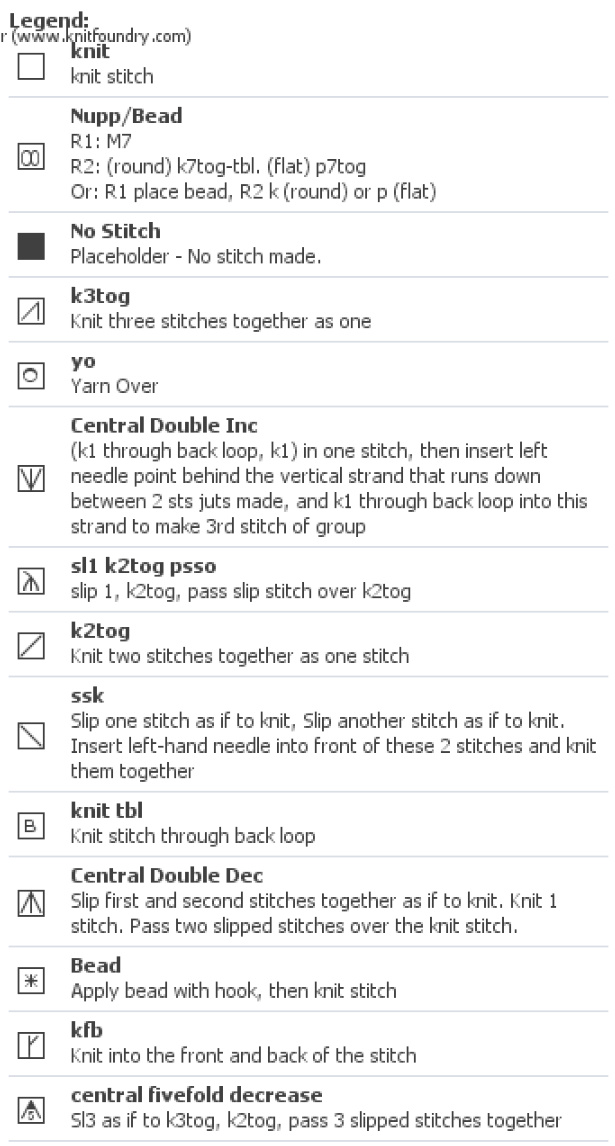
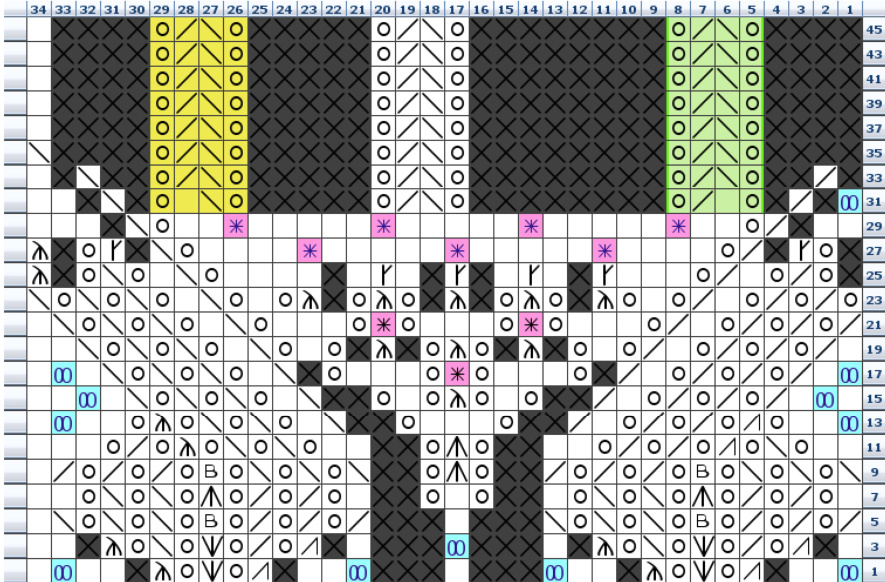
The border is integral to the shawl, the lace pattern flowing from the previous patterns. The increases at the edges now give room to a separate motif that forms the corner. The corner has a separate chart. The yellow stitch on R1 marks correspond to the "rib stitch" we have carried all through the main body of the shawl. The sides each have three charts: the Right, Center and Left charts. The Right and Left charts are almost identical to the Center chart, but for minor details in the first 2 and last column respectively, to and they flank the corner charts. The Center chart forms the main lace pattern. The stitch count varies from row to row quite widely, though the pattern alignment is easy to follow once it is established. Markers will be moved whenever a multiple decrease is next to them. You may continue to use the larger size needles you were using for UsA2.
Stitch Glossary
Double decreases have been discussed previously. Please note that all three types of double decreases (k3tog, sl1 k2tog psso, and cdd) are used here and they are not interchangeable. If you need a quick refresher, check http://community.knitpicks.com/notes/Decrease - Double Decreases Single increase: marked as a "y" shaped symbol, I recommend that you work this as a kf&b but you can of course use a different method. Central double increase: K into the back of the stitch, then into the front. Lift the stranc that runs between the two stitches and knit into it. A good video demo of this stitch can be found at: http://www.youtube.com/watch?v=l1qYe81lAT8 I personally find this method awkward, so I have used an alternate: First, lift the back loop of the stitch below, knit into it, and drop it then kf&b in the stitch on the needle. The results are mostly the same. Central fivefold decrease: to give this a "central decrease" appearance, work this as follows: slip the first three stitches as if to k3tog, k2tog, pass the three slipped stitches over together. Think of this as a CDD, but with more stitches.
Embellishments
You have two options for embellishments: Nupps (marked in the charts as blue “infinity" symbols), worked in the usual manner. They can be substituted for beads, or worked as plain knit stitches Beads. Besides the option to substitute nupps for beads, there are some optional beads that are marked in the chart with pink asterisk symbols. They cannot be worked as nupps. If you do not want to add beads there, work these as k-tbl instead. There are many combinations and permutations of these options, from working all the embellishments as charted ("baroque" option), to working all as beads ("superbead" option), work the nupps only, the beads only, or none at all, and again combine these with options in the corner chart, to produce a simple lace edge or indulge your taste for glam.
Sguare Shawi
The charts show only odd rounds (patterned). Odd Rounds: \*Knit Right Chart x1, Center Chart x5 (add an extra repeat per each additional repeat of USA2 if you did any), Left Chart x1, Corner Chart x1\* Repeat \* to \* for each section. Even Rounds: K all, remembering to k7tog-tbl in the nupp motifs if you are working a nupp version. In rounds 32 to 46, work k1, p1 into the double yarn overs.
Triangle Shawl
The charts show only odd rows (RS). On R1, decrease one stitch at each side by k2tog the garter selvedge stitches, so only one selvedge stitch remains at each side. RS rows: k1, \* Knit Right Chart x1, Center Chart x5 (add an extra repeat per each additional repeat of USA2 if you did any), Left Chart x1\*, Corner Chart x1, Repeat \* to \* once more, k1. WS rows: Purl all, remembering to p7tog in the nupp motifs if you are working a nupp version. In rows 32 to 46, work p1, k1 into the double yarn overs. Rows 31-46: Repeat colored stitches green x4 white x1 yellow x3
Created in KnitVisualizer (www.knitfoundry .com)
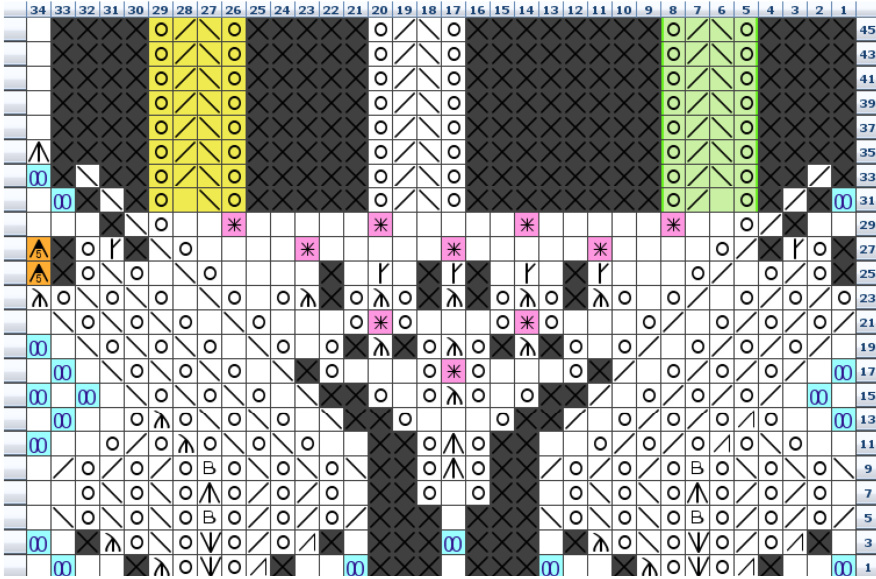
Created in KnitVisualizer (www.knitfoundry .com)
Cast Off
To finish the shawl and allow the edge to open up without pulling, we will be using a crochet cast off. In this technique, several stitches are crocheted together with a single crochet (sC) , then a small row of chain stitches (C) is crocheted, then again several knit stitches are taken onto the crochet hook into a single crochet stitch and so forth. The resulting chain stitch segments will form litle decorative loops. This is a great technique that allows for a very elastic, decorative cast off, and even if you have never used crochet, it is really simple to do. Check out this "crochet for absolute beginners" video, which covers chain and single crochet stitches: http://www.youtube.com/watch?v=eqca0oLdmAc&feature=related You should use a hook size comparable to your needle size, although you may prefer to use a larger or smaller size depending on how tight you like your chains. Here is a conversion table between needle and crochet hook sizes: http://www.knittersaddiction.com/ blog/The Crochet Chain/post/How To Convert Knitting Needle SizesTo Crochet Hook Sizes/
General technique for crochet cast off
To start the cast off, you make a few chain stitches using the first one or two stitches on your needles, then pass the next four stitches on the needle to the crochet hook, take a loop of working yarn with the hook and pass it through the four stitches, getting them off the hook. You will have now two loops on your hook: one with the chain stitch, and another one the one you just passed through the four stitches. Take another loop of yarn and pass it through the two loops (in effect, making a single crochet). Make another short chain and repeat, until all stitches are cast off. Here is a tutorial: http://baxterknits.blogspot.com/2007/06/how-to-work-crochet-chain-bind-off.html
Bind-off sequence for this shawl
We will cast off the stitches that form the spray flowers in groups of four, with 8 chain stitches separating each group. A shorter chain (4 stitches) will be at the beginning and end of each spray flower, binding the single stitch that separates each motif. When blocking the shawl, this will allow each flower to create a beautiful scalloped form. Start: (note: "right side chart", "center chart" etc. corresponds to the sections mapped on the "2011 border-right" chart,"2011 border-center" chart and s0 on) For triangle: pass crochet hook through first 3 loops, sc1, ch4 then continue as for "BO through Right Side Chart" instructions, starting at the second line (marked with "\*"). For square: pass crochet hook through first 2 loops, sc1, ch4 then continue as for "BO through Right Side Chart" instructions, starting at the second line (marked with "\*").
BO through Right Side Chart:
SC 1 through 1 loop, ch4 \*Sc1 through 4 loops, \*ch8, sc 1 through 4 loops\* x7, ch4, sc through 1 loop once, ch4
BO through Center Chart:
Sc1 through 4 loops, \*ch8, sc 1 through 4 loops\* x7, ch4, sc through 1 loop once, ch4; Repeat for every Center Chart repeat
BO through Left Side Chart:
Sc1 through 4 loops, \*ch8, sc 1 through 4 loops\* x7, ch4, sc through 1 loop once, ch4 BO through Corner Chart: Sc1 through 4 loops, \*ch8, sc 1 through 4 loops\* x11, ch4 For Triangle: \*Right Chart x1, Center Chart x 7 or more if additional repeats were done, Left Chart x1\*, Corner Chart, then repeat from \* to \* once more, casting off the last 3 stitches together. For Square: \*Right Chart x1, Center Chart x 7 or more if additional repeats were done, Left Chart x1, Corner Chart\*, repeat \*to\* four times total, then make one final sc through the first 2 stitchescastoffagain
Finishing:
Break off Yarn Weave in loose ends Wet-block carefully, pinning each loop of crochet to form a little point Wow everybody!


