Turkish-Norwegian Shawl
designed by Priscilla Hollingsworth :he adventurous knitter, using fair isle (stranded) technique, steeks, and Magic Balls Many thanks to Ann Myhre ("Pinneguri ", or the "Needle Lady"), whose ideas for shawl construction I follow in this design. Thanks also to Heather Desserud, whose design for her Ruba'iyat Mittens provided inspiration for the stitch patterns I used. The work of Christel Seyfarth has been influential also. And where can a knitter see all these things together, but on Ravelry?
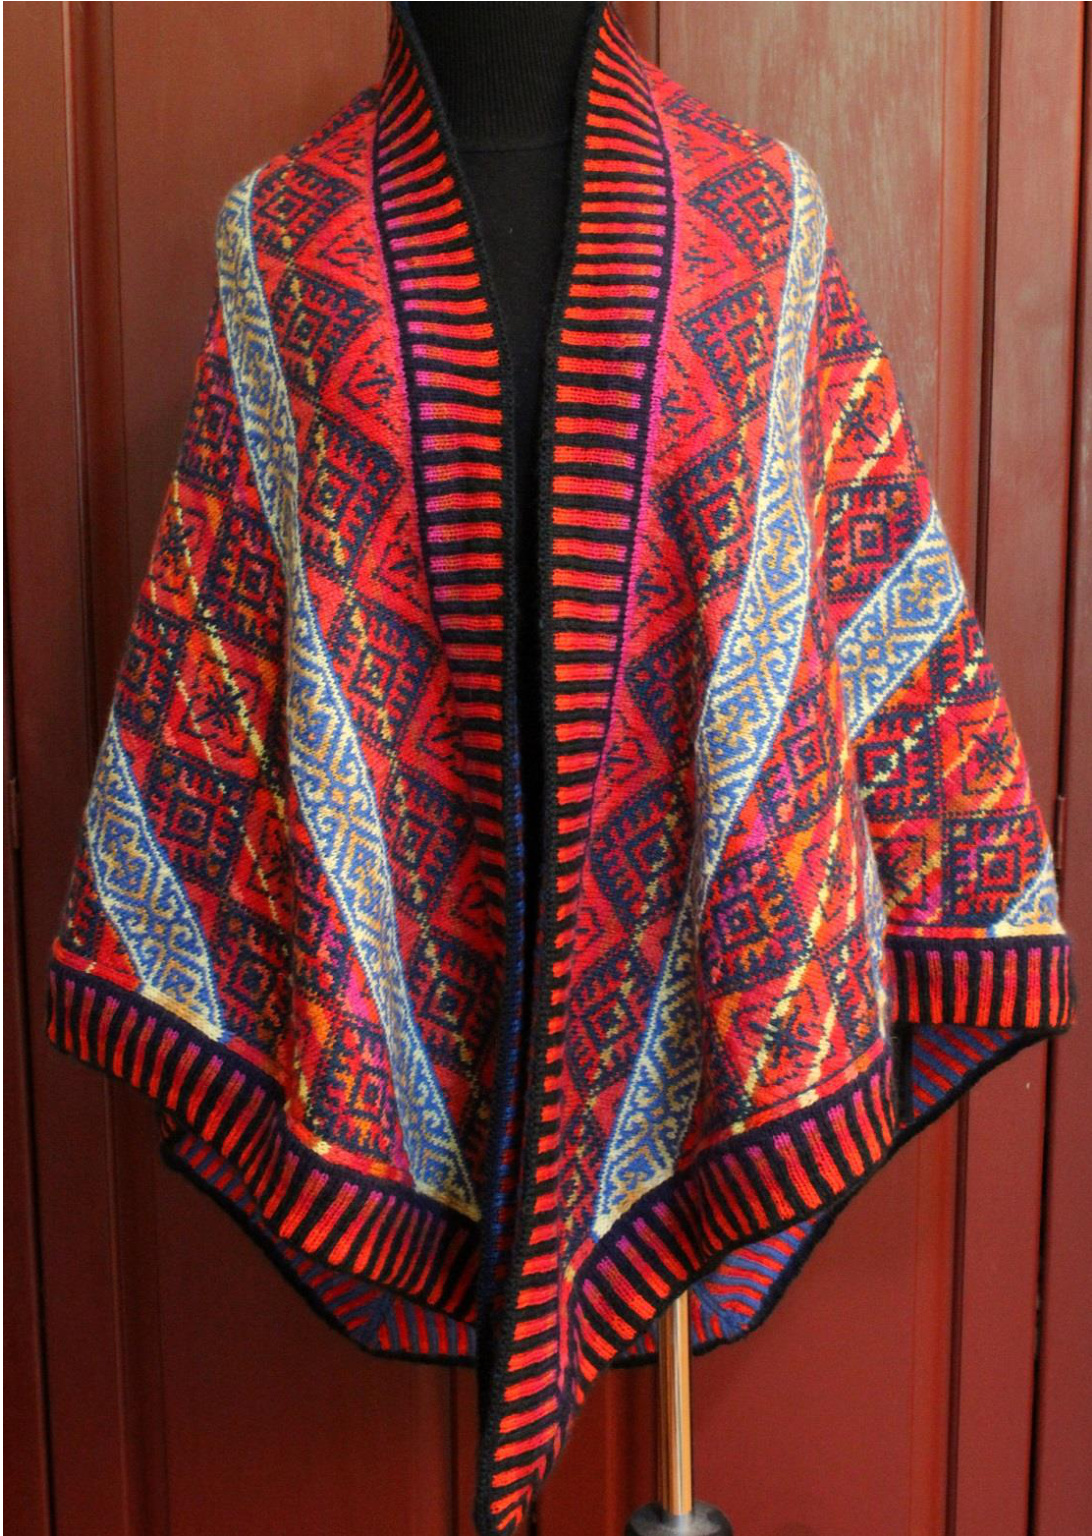
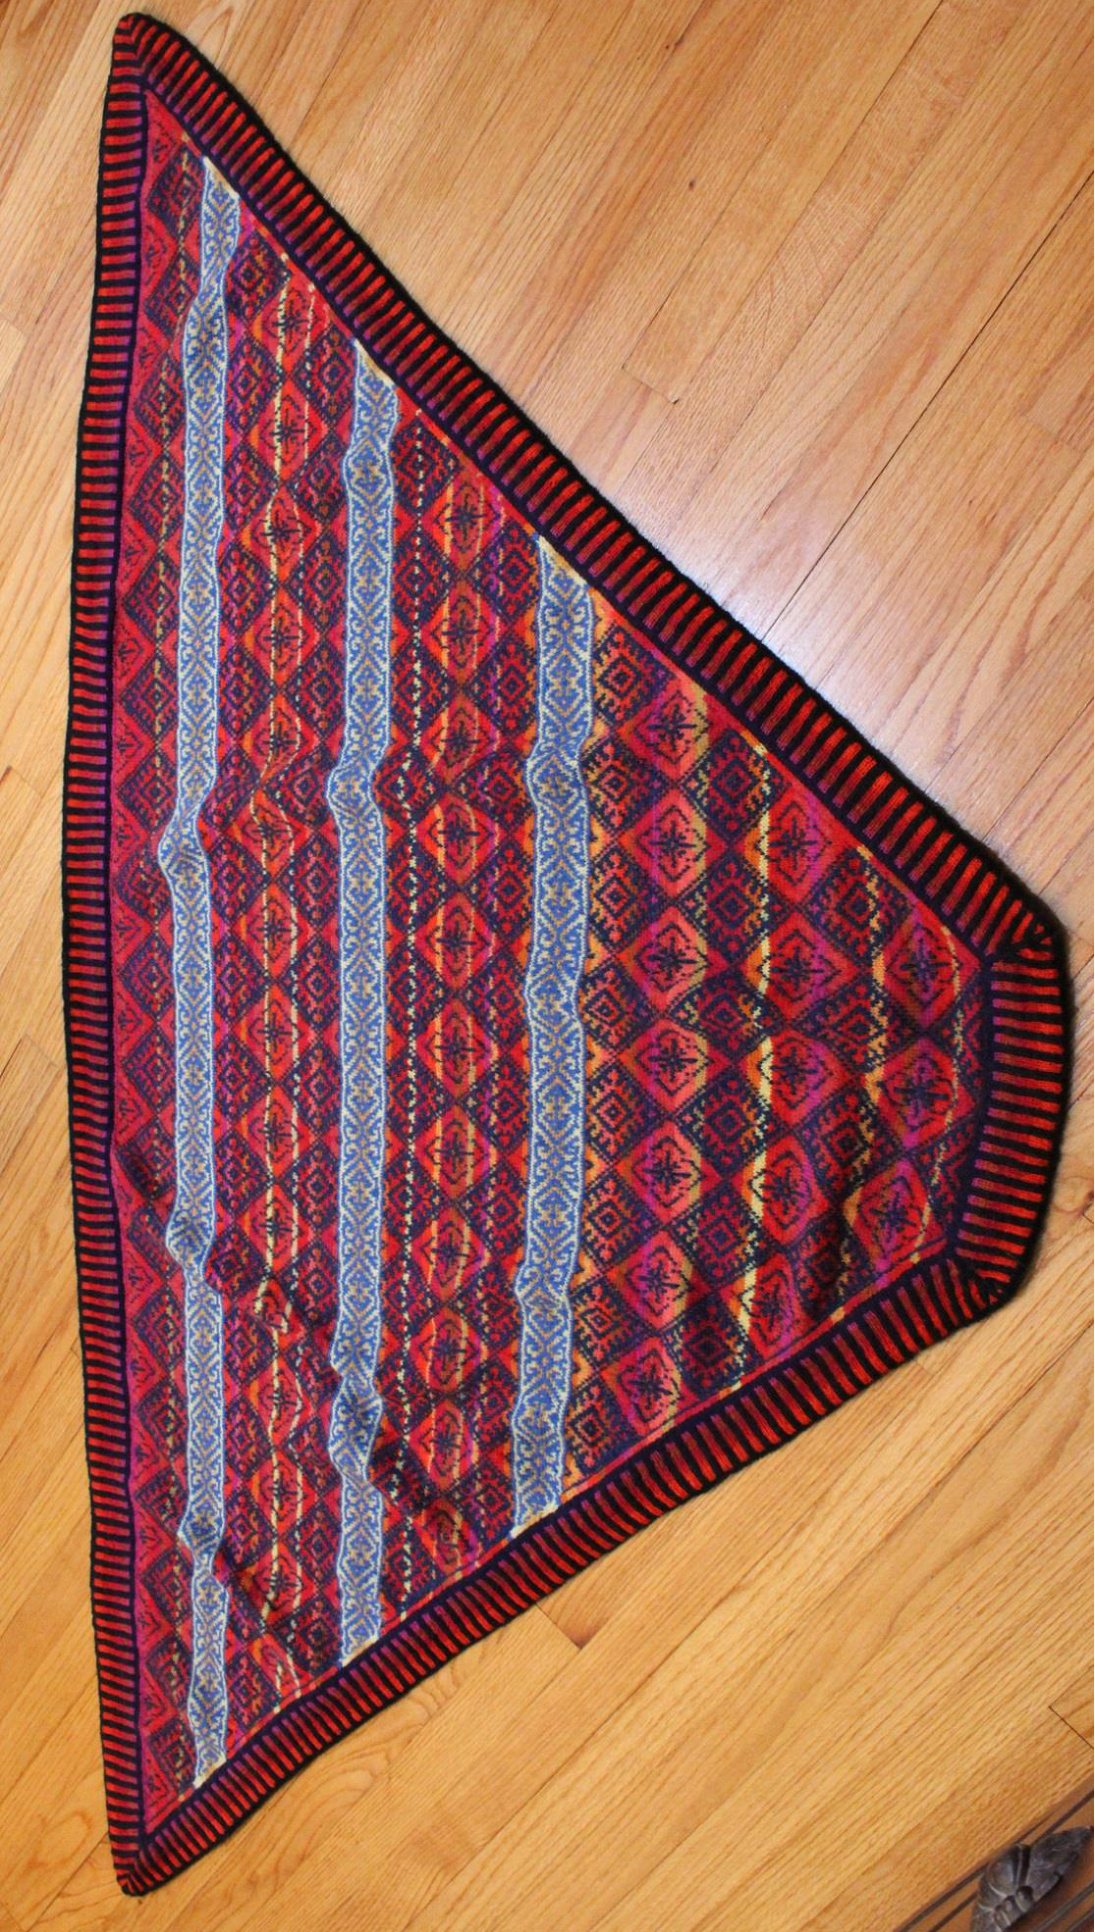
The basic plan here: This is a shawl knitted using the stranding (fair isle) technique, worked in the round using steeks. Only two colors are used per row. The background reds in the body of the shawl are wound into Magic Balls. The shawl is worked from the bottom up, allowing you to knit it to the size you prefer. When you get to the top of the shawl, you continue on with the upper striped border. Then the long steek is cut open, and you pick up stitches along the lower sides and bottom. These stitches are joined in a steek to knit the remainder of the border. When the short border steek is cut, you sew the border seams at the upper two corners . The border is folded in half to the inside and hemmed, enclosing the long steek edges and rendering them invisible. Yarn: Knitpicks Palette (fingering weight wool, 231 yards or 211 meters per 50g skein), in a range of colors. It takes approximately 650g of Palette to knit a shawl of this size. You theoretically could knit the shawl with exactly 13 balls, but to make it in the way shown, you will need more colors. Here's how itworks: Body of shawl, main blue: Marine Heather, 5 balls. Body of shawl, reds & yellows, 1 ball each: bright reds: Lipstick\*, Pimento\*, Serrano\*, Tomato\* contrast reddish colors: Fuchsia, Salsa Heather, Masala, Kumquat Heather, Raspberry Heather Contrast stripe pattern in the body of the shawl: Blue, 2 balls 1 ball each of Custard, Cornmeal, Turmeric Additional colors for the striped borders, 1 ball each: Navy, Midnight Heather\* \*Colors marked with asterisk were used up almost completely; to be on the safe side, or if you are making a larger shawl, consider acquiring an extra ball. For stitching down the borders: a small amount of black kidsilk mohair, such as Knitpicks Aloft. 20 yards wouldbesufficient. Two packages of bias binding, any style as long as it's cotton, any color. Needles: Size 2 (2.75mm), circulars in a variety of sizes. 47" (120 cm) length is invaluable for the late stages of the shawl. Shorter sizes will be useful for the earlier stages. I also used 24" (61 cm) and 32" (81 cm), changing to longer needles when the stitches crowded the needle. For the beginning, use the circular method of your choice, perhaps double-pointed needles or the Magic Loop method with a circular needle. Gauge: 32 stitches per 4 inches (10 cm), 32 rows per 4 in (10 cm). But, you will only need to match this gauge if you wish to get the exact size of shawl that I made. It is also very effective to find a needle size and gauge that work well for you and for your yarn, start knitting the shawl, and measure it as you go along. You can knit the shawl larger or smaller by continuing the knitting or stopping sooner. Size: 75 inches (190.5 cm) wide by 38 inches (96.5 cm) long. This is more or less a "medium" size, reaching to approximately the wrists of an average-height, average-proportioned woman. You might want one larger or smaller. If you don't already know the size of shawl that you prefer, you might try on a tablecloth or piece of uncut fabric yardage. Your fit question would be, how far do you want the shawl to come down on your arms? Then, when you have that number, how long would the back be? The back length is the only one that is easy to measure while you are knitting. Here is the calculation you need: desired back length minus 5 inches (12.7 cm) for the upper and lower border minus 4 inches (10 cm, subtracted because the shawl does not end in a point at the bottom) will be the length of shawl you will knit before you start the upper border. Making magic balls: The red background of the body of the shawl is worked with Magic Balls. A good tuturial is on knitty.com (try Googling "make your own magic ball knitty"). I suggest alternating your bright red yarns with the contrast reddish colors. Throw in a shorter length of one of the yellows occasionally, just to surprise the eye a little. I suggest you just wind one small ball first (3 inches in diameter, or 7 to 8 cm) to knit the first portion, where the rounds are short. The great thing about a Magic Ball is that you get color change and variety without digging through a whole bag of yarn colors while you are knitting. The second and later magic balls you wind can be larger, and should have longer runs of yarn colors because the rounds increase in size as you move up the shawl.
Turkish-Norwegian Shawl
Body of the shawl:
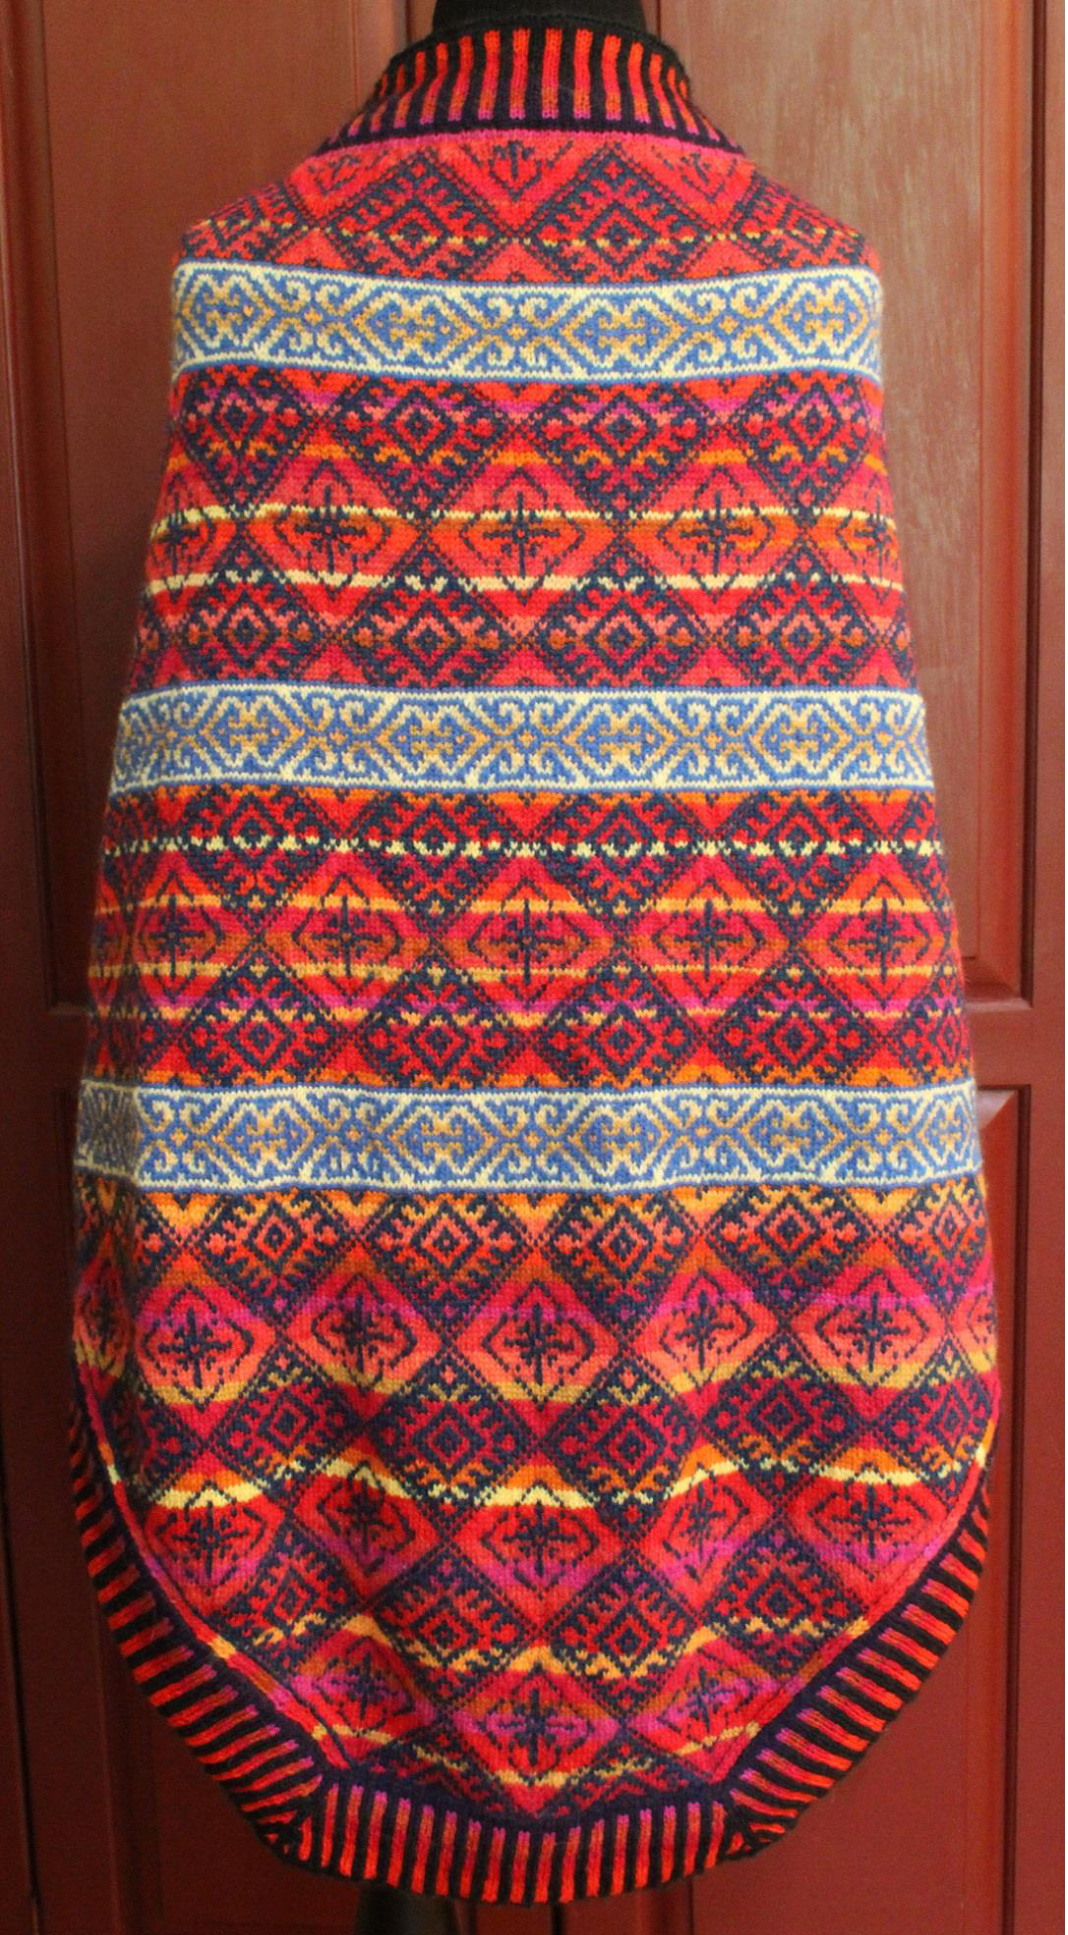
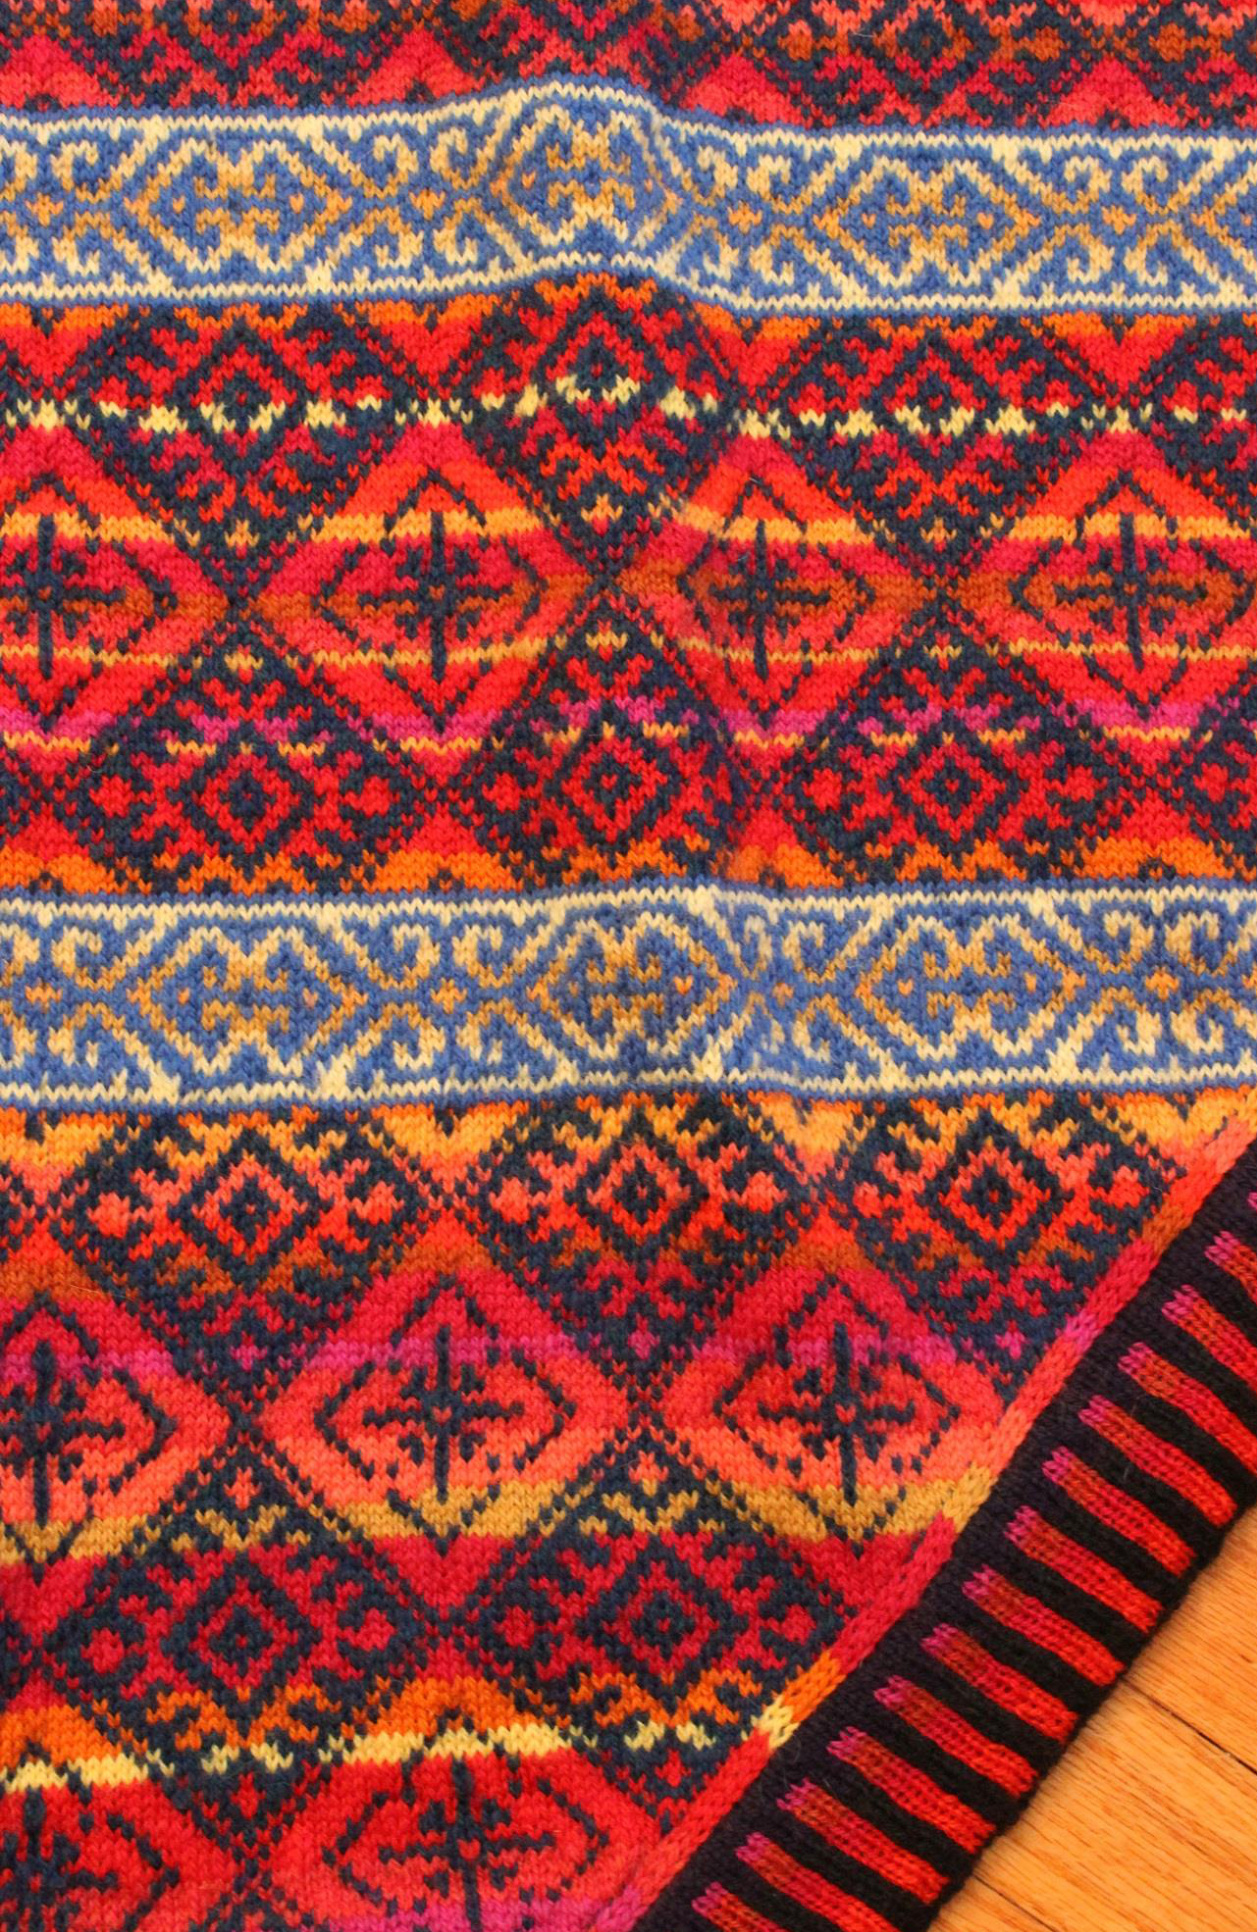
This is the hardest part - once you get the pattern established, it is much easier. To make the shawl as I did, cast on 77 stitches with your red Magic Ball. Knitting back and forth, knit one row, then purl one row. Row 3: begin to work in fair isle, using Marine Blue for the darker squares in Chart 1 and your red magic ball for the white ones. Here is how your stitches divide up: 4 steek stitches (alternating blue and red), 2 red border stitches, 65 pattern stitches, 2 red border stitches, 4 steek stitches (alternating blue and red). Add all those up and you get 77. So, to begin with on Row (round) 3, knit 1 red, knit 1 blue, knit 1 red, knit 1 blue, knit 2 red, begin in the lower right corner of Chart 1 to work the next 65 stitches, knit 2 red, knit 1 blue, knit 1 red, knit 1 blue, knit 1 red. On the 4th row (round), join in the round, increasing one stitch in the middle of the steek so that from now on, the steek has 9 stitches rather than 8. This steek will continue up the shawl on every round, with a 1 x 1 stitch checkerboard pattern (although you can use 1 x 1 stitch stripes if you prefer. All the way up the sides of the shawl, 2 stitches will remain in red on either side of the steek. At the same time, you will increase one stitch between the 2 red border stitches and the body of the shawl, on every round, on both sides of the steek/red border stitch area. A "make 1" increase works well for this. You will notice that the increases are always happening right above the blue stitch at the edge of a big diamond in the pattern, which will help you remember to always make the 2 increase stitches every round. Continue the knitting up the body of the shawl. Refer to the photo of the back of the shawl to determine when to work the contrasting pattern in blue and yellows. Or, if you are planning to knit a larger or smaller shawl, you should take a gauge measurement from your knitting and calculate whether you want to begin the contrast pattern bands earlier or later. Important note: take care to work the steek and increase area loosely enough. As you knit up the back of the shawl, you are making a kind of cone shape. The steek side of the cone should be the same length as the center back side of the cone. (It's okay to pull the steek side gently to see if it can be blocked to the same length.) At the appropriate point, work the first contrast pattern band, following Chart 2. Break off Marine Blue and the red magic ball in the center stitch of the steek. The pattern band colors are as follows: "Blue" (a bright blue) is used for the blue squares in all rows. The yellow colors are changed in the center of the steek in standard fair isle fashion. Next round: solid Blue Colors used for the white squares of the contrast pattern band - First solid row of white squares: Custard (a light yellow) Next 2 rounds: Custard Next 2 rounds: Cornmeal (darker) Next 2 rounds: Turmeric (darker still) Center round: Kumquat Heather (a yellow with orange in it) Next 2 rounds: Turmeric Next 2 rounds: Cornmeal Next 2 rounds: Custard Nextsolid round:Custard Next solid round: Blue. At the end of the round, in the center stitch of the steek, break off Blue and Custard and join on Marine Blue and your red magic ball. Continue in the main body pattern. Follow Chart 3 for when to switch from the main body pattern to the contrast pattern band again. My shawl has 3 repeats of the contrast pattern band. Take a look at the back view photo of the completed shawl to see where to end the main pattern at the top of the shawl. You may or may not decide to end at exactly that point, depending on the size of shawl you want to make. But I feel that the most striking effect will happen if the last contrast pattern band appears pretty close to the top of the shawl - that way, it will frame the front of the shawl nicely as the shawl drapes over your shoulders. One of my favorite things about this kind of shawl is the way that a horizontal pattern as seen from the back of the shawl becomes a vertical pattern as it drapes over the shoulders. Examine Chart 3 to see how much of the body pattern to work in between bands of the contrast pattern. When I reached the top of the shawl, before beginning the border, my cone of knitting measured 35 inches long (90 cm). After final finishing and blocking, the back length of my shawl measures 33 inches (84 cm), because of how the shawl stretches in wear. This is one of those situations in which knitting stretches horizontally more than vertically because of how it is used. The last two rounds at the top of the shawl are worked in red magic ball only, so break off the Marine Blue. Don't forget the increase stitches on every row. Upper Border: Knit two rounds in Navy Blue. On the first of these rows, decrease your stitch count by 25% (a good way is to work \*knit 2, knit 2 together\* all across the round - just don't decrease in the steek area or the two stitches to either side of it). But still, work the two increase stitches at both ends of every round up to the turning row of the border. Beginning with the third row of the border, work in color stripes 2 stitches wide, alternating Navy and one of the reds. Work 18 rounds in stripes. The first two stitches on either side of the steek should be worked in Navy. For the first 6 rounds, use "Navy" as the blue color, then switch to Midnight Heather for the next 12 rounds. Choose 4 of the brighter reds and work each one in 4 to 5 rounds. I used Fuchsia, Pimento, Serrano, Tomato. Work out your stitches so that immediately before and after the steek you have a 2-stitch stripe of Navy (to do this, starting counting stitches several inches before the end of the first round, and increase a stitch or two to make the stripe pattern come out perfectly). And of course, don't forget the two increase stitches at both ends of every round. The increase stitches should be worked in the stripe pattern - increased stitches should now be worked right at the edge of the steek stitches rather than 2 stitches away as in the body of the shawl. After 18 rounds of stripes, work 2 rounds plain in Midnight Heather. Don't forget to increase a stitch at each end of the round. The next row is the turning round. Still using Midnight Heather, work this one row in all purl stitches. Don't increase any stitches on this round. Now for the inner border. The inner border must decrease to mirror the increases of the outer border. Knit one round in Navy, decreasing one stitch at each end of the round (I used k2tog at the beginning of the round and SSK at the end of the round). For each round of the inner border, decrease one stitch at the beginning and one stitch at the end of the round. Knit the next round in Marine Heather. Now, begin the stripe pattern, alternating 2 blue stitches and 2 red stitches. For blue, use "Blue" color. For red, use the reds you used on the outer border, in a similar pattern - or vary them slightly, either way will look good. On each round, decrease in the stripe pattern, right next to the steek on either side. Knit 17 rounds of stripe pattern. Break off the red yarn. Knit one round solid with Blue. Knit one round solid with Marine Heather. Of course, don't forget to decrease one stitch before and after the steek on each round. Bind off all stitches, beginning in the center of the steek. Yes, the inner border is 1 row shorter than the outer border, but the bindoff row seems to make up for it.
Cut the Steek
Now it's time to cut the steek, carefully down the center stitch. Normally I would sew a steek first on a sewing machine, on either side of the center stitch of the steek. But for this kind of shawl, I leave myself more options if I cut first. If you are using wool yarn meant for fair isle work, you should be able to handle the cut edges gently without unraveling stitches. Once the steek is cut, lay your shawl out on a flat surface to evaluate it. If the side edges of the shawl are drawing in a bit, you can block them out longer with a steam iron on the "wool" setting. Once you have the edges the way you want them, secure the edges of the steek by sewing on a sewing machine. It is especially easy to control the cut edges if you back them with bias tape while you are sewing. Buy two packages of bias tape (or cut some bias strips out of lightweight cotton cloth). Iron the tape open and flat. Pin it to each side of the cut steek so the steek is the length you want it to be. Sew it to the outer edges of the steek with a zigzag stitch. Check to make sure that all the stitches are secure. Then cut off the excess bias tape along the length of the seams - you will end with less than % inch (maybe 1 cm) of fabric width. It does not matter what color the fabric is - it will never be seen because the side borders will be hemmed down with the steek inside. Or, you might prefer to skip using the bias tape, just sewing through the steek with no backing, and sewing before you cut. It's up to you. I wouldn't bother using the crochet method to secure the steek -- all that work, and who will ever see it? It's pretty exciting at this point to see how beautiful your shawl is going to be. You'll probably want to g0 ahead and hem down part of the upper border. Use the black kidsilk mohair and sew through every bound-off stitch into the back of the shawl. Don't go all the way to the corners yet - leave yourself some working room at the ends until you have the rest of the border knitted.
The Side and Lower Borders
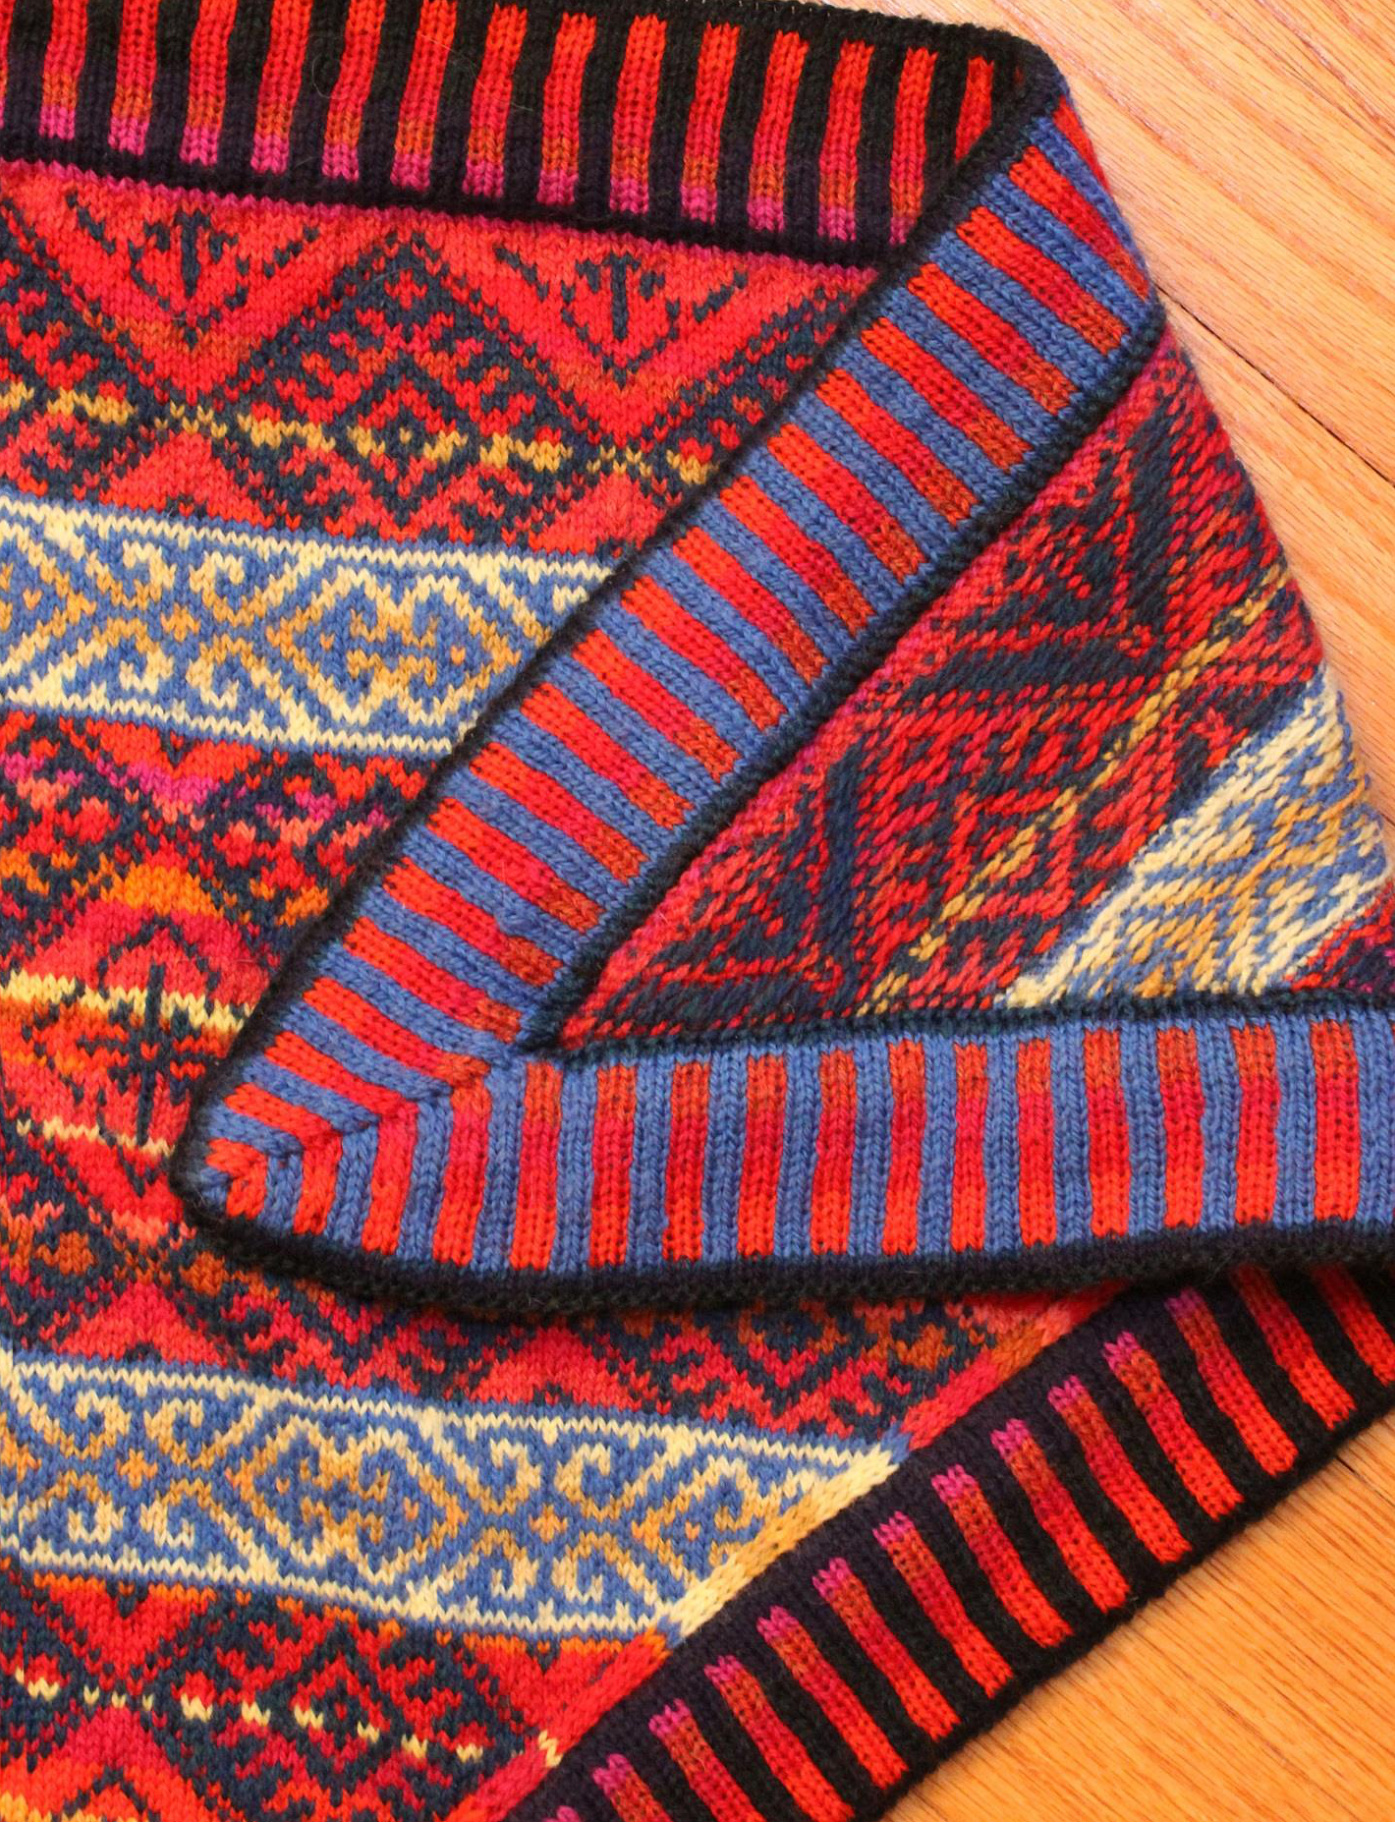
Using Navy, with the right side of the shawl facing you and starting right at the corner, pick up and knit one stitch for every stitch of the side edges of the shawl. Pick up between the long line of two red stitches and the steek - check the photos to see how it should happen. Pick up an extra stitch in each of the lower corners. On the bottom edge (the cut-off tip of the triangle), pick up approximately 9 out of every 10 stitches. On the bottom edge, you are picking up right where the fair isle pattern begins. At the end of the round, cast on a steek -I suggest 7 stitches will be sufficient. (On this particular steek, I found a 1 x 1 stripe pattern easier to keep up with than a 1 x 1 check pattern.) Knit one more round in Navy, increasing one stitch at the beginning and end of the round, right next to thesteek. On the next round, begin the 2 x 2 stripe pattern of the border. Begin with two stitches of Navy (and don't forget to increase 1 at the beginning of the round). When you get to the end of the first side, make sure the following pattern occurs on the first lower corner: knit 2 in blue, increase 1 in red, knit 2 in blue right on the corner, increase 1 in red, knit 2 in blue and then on with the stripe pattern. The second lower corner must happen the same way, so count the stitches between the two corners and increase or decrease a little bit to make it happen. )f 18 2x2 stripe rounds, as you did for the upper border, in the same or similar colo
Important:
On all these border rounds up until the purl turning row, you must increase in the following way: Increase 1 stitch immediately after the steek (in stripe pattern) on every round, increase one stitch before and after the 2-stitch blue stripe in the center of each corner on every other round (in stripe pattern, increase 1 stitch immediately before the steek at the end of every round. After the purled turning row, the decreases are worked at the same rate as the increases were. Otherwise, work the side and lower borders as you did on the upper border. When you have bound off all the stitches, sew with a machine and cut the little steek. Note: It is good to remember to work the borders slightly on the loose side. Check to make sure the borders are not drawing in too tightly as you work.
Finishing
Sew the upper corners together by hand using mattress stitch and kidsilk mohair, so you can match the stripes exactly. Hem down the seam allowances inside the border (on the wrong side) to reduce bulk. Hem the bound-off edge of the long border to the inside of the shawl, using kidsilk mohair. If you take one stitch through every bound-off stitch, the finished effect will be pretty. It will look fine to use black mohair yarn to sew on a blue edge. Enclose the long steeks edges within the border as you hem. Lightly block the finished shawl with a steam iron. You will want to stretch the edges out a bit and flatten the upper corners. The shawl naturally remains slightly curved in on all sides, and this is flattering on the body and useful for keeping it curving around you.
Turkish-Norwegian Shawl
Turkish-Norwegian Shawl
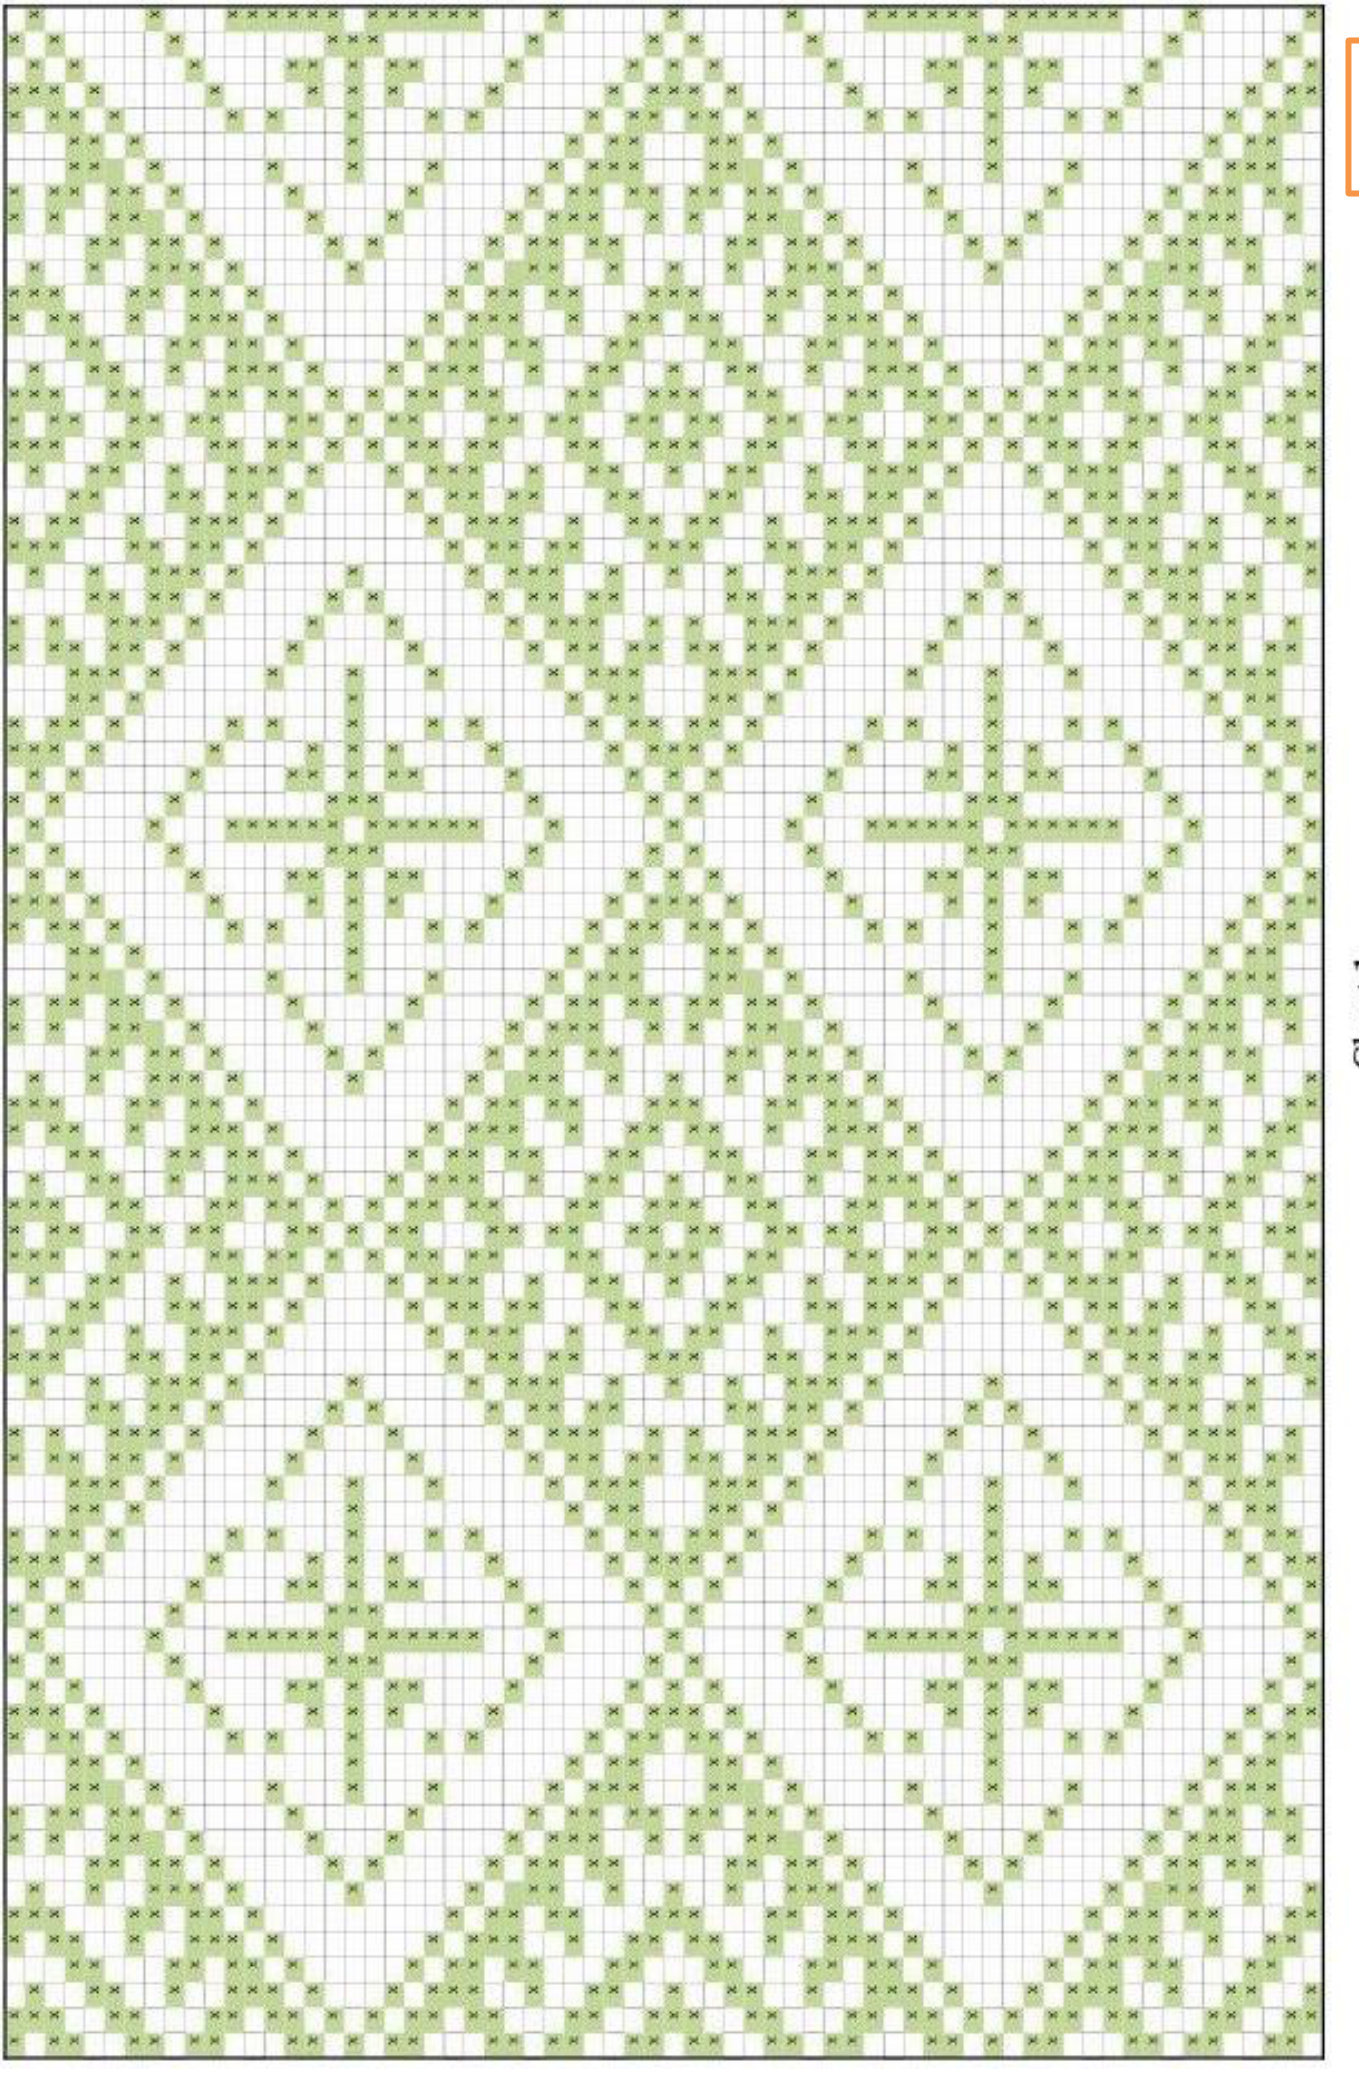
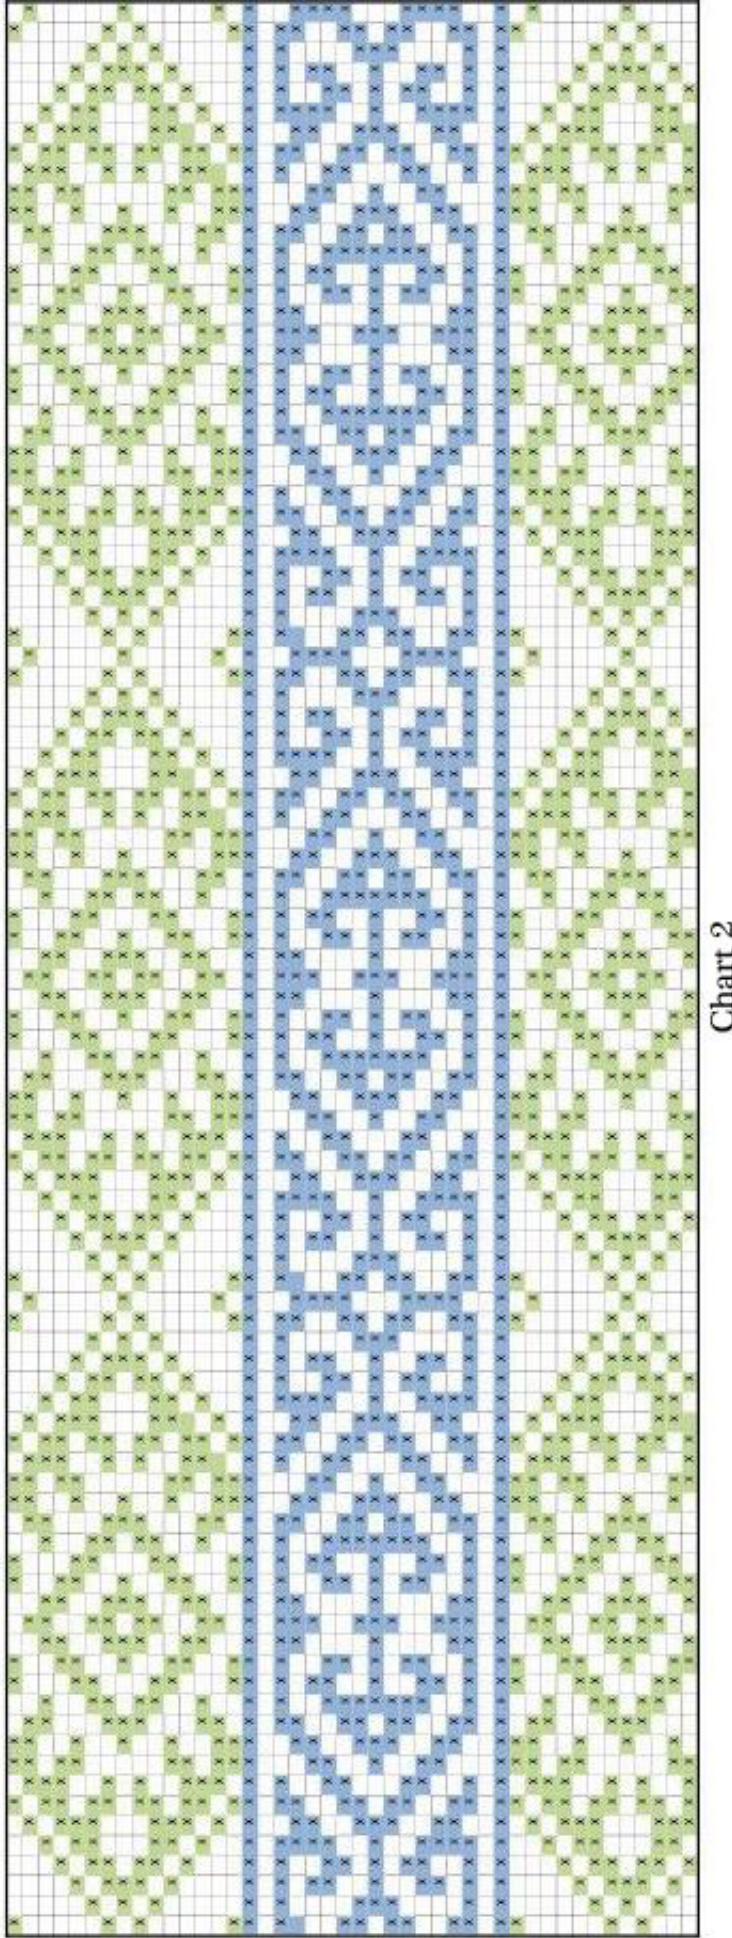
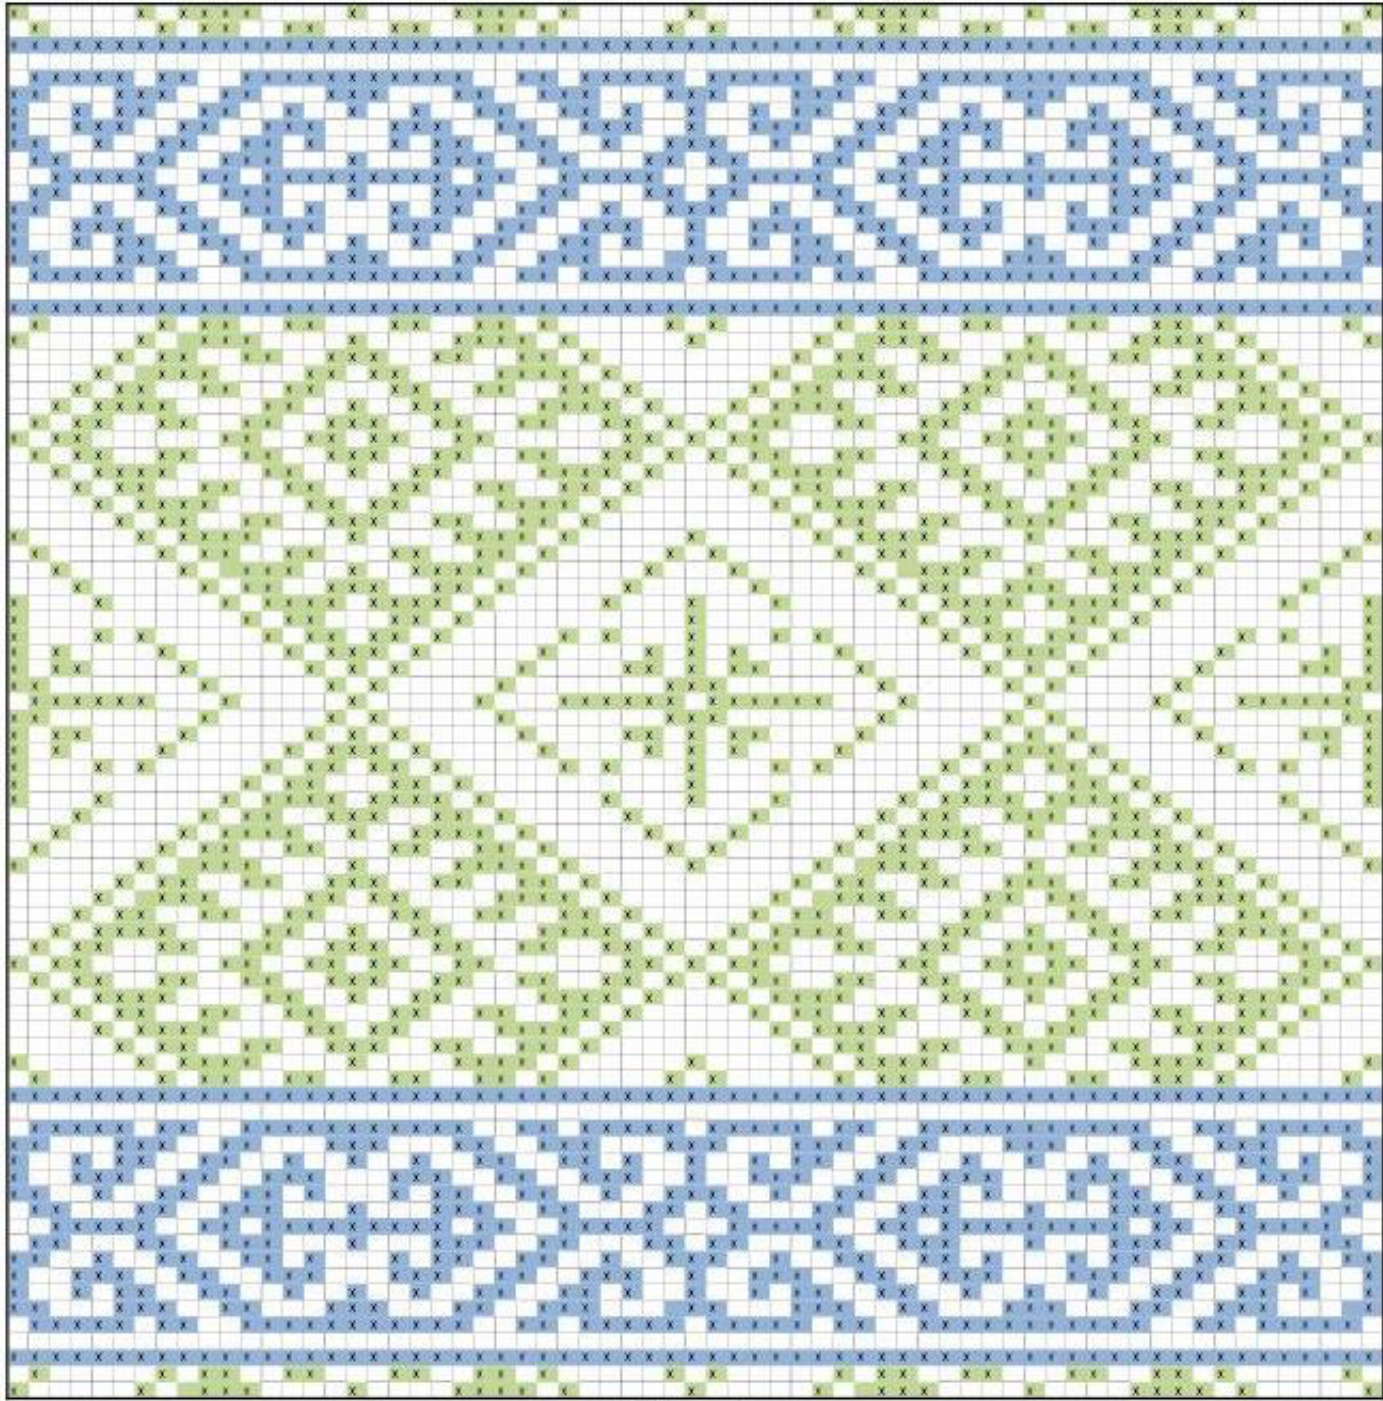
Chart3


