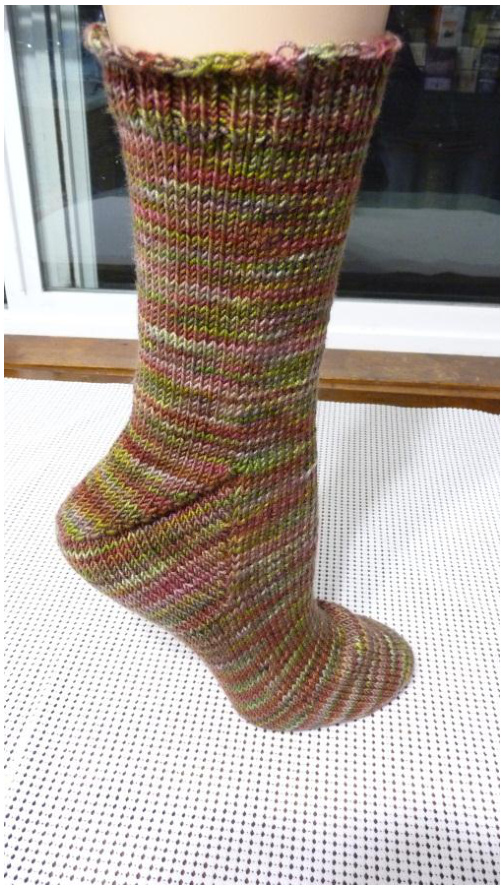
And So It Begins And So It Begins... Three Basic Sock Recipes This basic sock is worked from the toe up to your gauge for a custom fit. It has the option of one of four different heels. It can be worked in any yarn from fingering to worsted weight on needles to create a fabric pleasing to you. This is a pattern excerpt from Abundant Sole, with a projected release date in 2012. There are only so many ways to present this concept. The toe and heel will be used throughout the patterns that follow.I will refer to them repeatedly. I highly recommend that you knit the plain sock first, especially if this is your first foray into sock knitting. It will give you the basics you need to knit a sock for yourself, and information you will need to knit socks for anyone else. If you are using a variegated yarn, this is a chance to let the colorway show to best advantage. We will talk about gauge, but we are talking about your gauge, not someone else's. This sock has a plain increase toe, stockinette foot, one of three heels, plain ankle and leg, and a ribbed cuff. Sounds a bit like a diving competition doesn't it? A moment on heel designs. They are as personal and individual as the feet you knit for. You will need to try them out to decide which one works the best for you. The difference may be the construction of the heel, or the way it feels, or even the way it looks in the sock. If at any time in the process of knitting the sock you decide the stitch pattern isn't working, or the heel design isn't working, it can be ripped out and reworked, provided you have not bound off. Even then, it can be taken back out. Not a pretty process, but it can be done. Plus, because we are knitting from the toe up, the socks can be tried on as you go, ensuring that you like the fit. If you are not feeling entirely comfortable with the pattern or design, you can put in a lifeline. In fact, when you are beginning, lifelines are highly recommended. Dental floss works well, as does scrap yarn in an contrasting color. At the end of each section, thread a tapestry needle
And So It Begins
with the string of your choice and run it through all of the stitches on the needle. Knot it loosely so that the string is secure. Then continue knitting the sock, making sure you do not knit the lifeline strand. Instead let it rest in the stitch. Then if you decide to take out a section you can take out your needle and just rip the stitches out. The ripping will stop at the lifeline. Follow the string with your needle, and pick up the stitches. You are ready to start over. All you have invested is a bit of time...and a bit of learning. You have learned about what you do not like. A quick note on yarn weights: If you are using a yarn larger than fingering weight, change the cast on for the toe as follows: DK- cast on a total of 16 stitches, 8 on each needle (great boot socks) Sport - cast on a total of 12 stitches, 6 on each needle (great thick boot socks or bed socks) Worsted- cast on a total of 8 stitches, 4 on each needle (great, warm bed socks) Bulky - cast on a total of 8 stitches, 4 on each needle (who am I to judge?) Another thought: Use worsted or bulk weight to make a holiday stocking. Got your needles and yarn? Good, let's knit a sock.
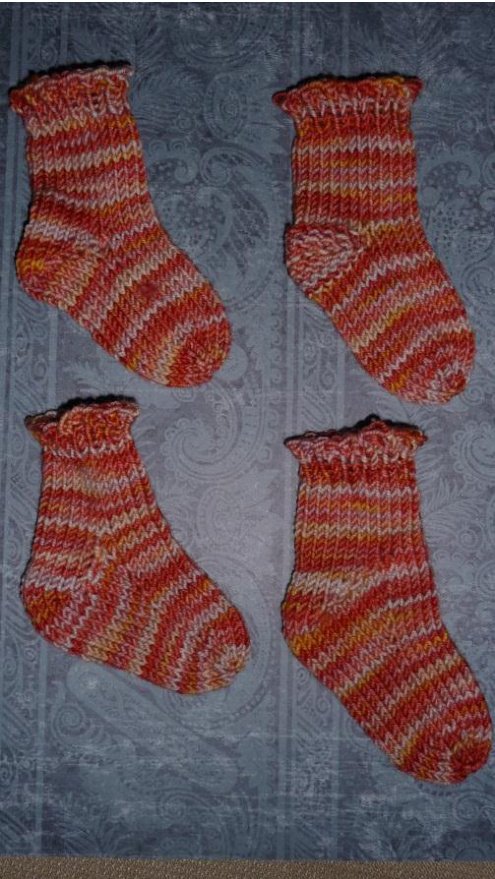
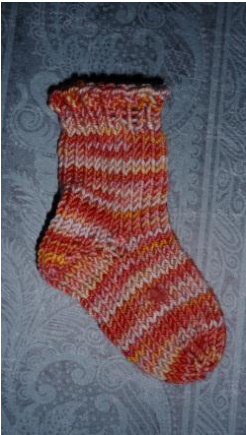
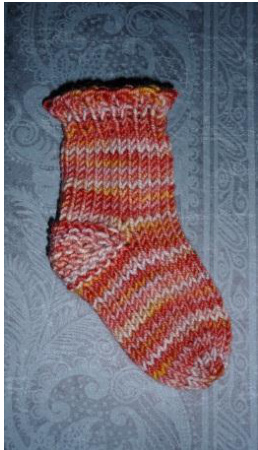
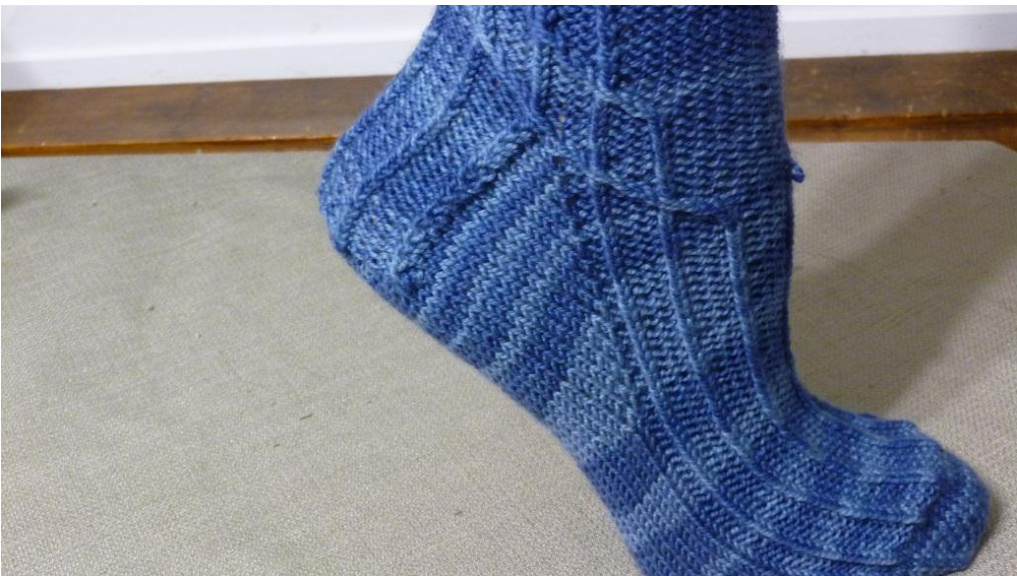
Short Row Heel Sock
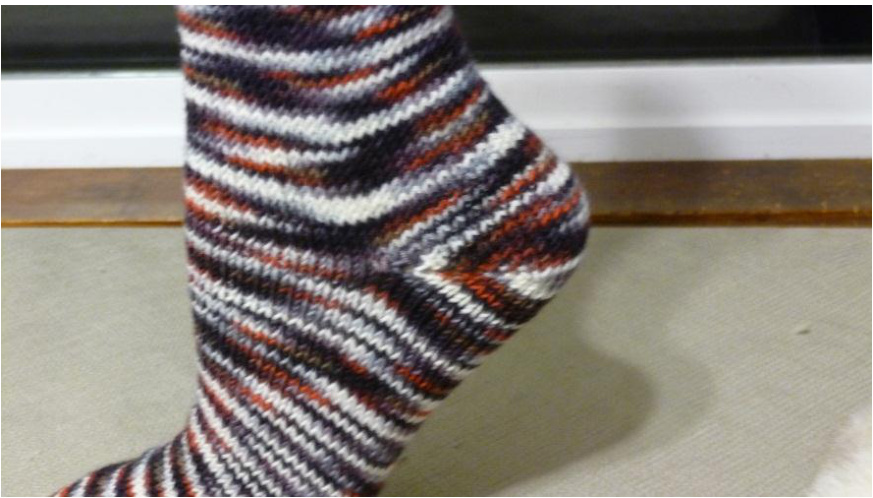
1 Measure your foot
1 Measure your foot length: inches 2 Measure how big around your foot is: inches
2 Increase Toe - will be worked in the round
1) Using either Figure 8 or Turkish method, cast on 12 stitches on each of 2 circular needles. 2) \*K1, M1, knit to 1 stitch before the end of the needle, M1, K1\* repeat for second needle 3) Knit all stitches 4) Work rows 2 and 3 until the toe of the sock fits over all of your toes without the little toe without stretching. This will give you the 10 % negative ease needed to allow the sock to stretch comfortably over your foot without slipping off.
And So It Begins
Write down how many stitches you have total: 3 Foot- will be worked in the round Knit all stitches for the the foot of the sock until it is 2 inches shorter than your foot length. If you want to try the sock on to measure it, stop working the foot when the edge of the sock just covers the ankle bone on your foot without stretching the sock. Write down how many rows you have: (count how many V's are in a column from your needle to the cast on end) 4 Short Row Heel - will be worked back and forth on the sole needle, there are two methods presented: one for those who don't mind purling, and for those who do not want to purl Purling method:
1) Using only the sole stitches (the needle without the markers), knit to 1 stitch before the end of the needle. Slip the last stitch to the right hand needle. Wrap the working yarn around the stitch (without working the stitch) and return the stitch totheleft needle. Turn your work around. This is called a wrap andturn. 2) Purl to one stitch before the end of the row, wrap and turn. 3) Knit to one stitch before the last wrapped stitch, wrap and turn. 4) Purl to one stitch before the last wrapped stitch, wrap and turn. 5) Repeat rows 3 and 4 until one half of the stitches on that needle have been worked altogether (example - there are 28 stitches on the needle, wrap and turn a And So It Begins total of 14 stitches, 7 on the knit side, and 7 on the purl side) 6) Knit to next wrap stitch, wrap and turn (this stitch will now be wrapped twice) 7) Purl to next wrap stitch, wrap and turn (this stitch wil now be wrapped twice) 8)Knit to double wrapped stitch, knit this stitch, wrap the next stitch and turn. 9) Purl to double wrapped stitch, purl this stitch, wrap the next stitch and turn. 10) Repeat rows 8 and 9 until all stitches have been worked and you are ready to work in the round again. 11) Knit one row, picking up a stitch in the bar between the front needle and back needle on each side. No-Purl method:
12) Using only the sole stitches (the needle without the markers), knit to 1 stitch before the end of the needle. Slip the last stitch to the right hand needle. Wrap the working yarn around the stitch (without working the stitch) and return the stitch to the left needle. Turn your work around. This is called a wrap andturn. 13) Knit to one stitch before the end of the row, wrap and turn. 14) Knit to one stitch before the last wrapped stitch, wrap and turn. 15) Knit to one stitch before the last wrapped stitch, wrap and turn. 16) Repeat rows 3 and 4 until one half of the stitches on that needle have been worked altogether (example - there are 28 stitches on the needle, wrap and turn a And So It Begins total of 14 stitches, 7 on the knit side, and 7 on the purl side) 17) Knit to next wrap stitch, wrap and turn (this stitch will now be wrapped twice) 18) Knit to next wrap stitch, wrap and turn (this stitch will now be wrapped twice) 19) Knit to double wrapped stitch, knit this stitch, wrap the next stitch and turn. 20) Knit to double wrapped stitch, knit this stitch, wrap the next stitch and turn. 21) Repeat rows 8 and 9 until all stitches have been worked and you are ready to work in the round again. 22) Knit one row, picking up a stitch in the bar between the front needle and back needle on each side.
Write down how many times you did a wrap and turn in each direction:
5 Leg - worked in the round Knit all stitches to desired length of leg. Write down how many rows you worked: (count asyou did for thefoot) 6 Cuff - worked in the round Knit in rib of choice for 1 %" . A 2X2 rib is the most stretchy, but 1x2 or 1x1 works just as well. Bind off loosely using a stretch bind off as follows: Knit 2 stitches, slip these 2 stitches back to the left needle, k2tog, \* k1, slip 2 stitches back to left needle, k2tog \* repeat to the end of the row. Break your yarn about 8 inches from the end, and secure it using a darning needle by slipping it into the first stitch on the sock and then weaving your ends. Weave in the end from the beginning of the sock.
Write down how many rows of ribbing you worked:
Measure your gauge. Why?, you ask. Well, knowing your gauge will allowyou to take measurementsof other people's feet, and translate those measurements into socks. Remember, we are gauge impaired, not gauge inept. We have our own inherent gauge. We just can't get anyone else's gauge. To measure your gauge, take a ruler to your finished sock. Count how many stitches you have in one inch in each direction. Write these numbers down. (There is a chart for you to do this at the end of the book, in the resources section.) This is your gauge. It will be different for different yarns and needles and combinations of the two. Don't fall into the trap of thinking ' get x stitches to the inch in sock yarn', this will lead you down a dangerous road every time. Instead think lI get x stitches to the inch in this sock yarn.' And So It Begins
| ShortRowHeel | ||
| Gauge | ||
| Stitches/inch | ||
| Rows/inch | ||
| Foot circumference | ||
| Footlength | ||
| Cast On | Stitches | |
| Increaseto | Stitches | |
| Footrows | Rows | |
| Shortrows | Rows | |
| Anklerows | Rows | |
| Leg rows | Rows | |
| Cuff rows | Rows |
Wedge Heel Sock
1 Measure your foot
3 Measure your foot length: inches 4 Measure how big around your foot is: inches
2 Increase Toe - will be worked in the round
5) Using either Figure 8 or Turkish method, cast on 12 stitches on each of 2 circular needles. 6) \*K1, M1, knit to 1 stitch before the end of the needle, M1, K1\* repeat for second needle 7) Knit all stitches 8) Work rows 2 and 3 until the toe of the sock fits over all of your toes without the little toe without stretching. This will And So It Begins give you the 10 % negative ease needed to allow the sock to stretch comfortably over your foot without slipping off.
Write down how many stitches you have total:
3 Foot - will be worked in the round
Knitallstitchesforthethefootofthesockuntilitisabout3% inches shorter than your foot length. If you want to try the sock on to measure it, stop working the foot when the edge of the sock just comes to the ankle bone on your foot without stretching the sock. Write down how many rows you have: (counthowmanyV's are in a column from your needle to the cast on end) Wedge Heel - worked in three parts - wedge increase in the round, short row worked flat, and heel flap worked flat Gusset increases - working in the round, increases are made on the sole needle Row 1 - make one stitch, place a marker, knit to the end of the needle, place a marker, and make one stitch, knit to the end of the round Row 2 - knit all stitches Row 3 - make one stitch, knit to end of needle slipping markers as you come to them, make one stitch, knit to end of row Repeat rows 2 and 3 until the wedge depth desired is reached (usually between 10 and 15 times), then repeat row 2 one more time. This section will wrap your foot comfortably to approximately past the ankle. Turn heel - using only the sole needle and short rows work as follows: 1) Using only the sole stitches (the needle with the markers), knit to 1 stitch before the second marker. Slip the last stitch to the right hand needle. Wrap the working yarn around the stitch (without working the stitch) and return the stitch to the left needle. Turn your work around. This is called a wrap and turn. 2) Purl to one stitch before the marker, wrap and turn. 3) Knit to one stitch before the last wrapped stitch, wrap and turn. Purl to one stitch before the last wrapped stitch, wrap and turn. 5) Repeat rows 3 and 4 until one half of the stitches on that in between the markers on that needle have been worked altogether (example - there are 28 stitches on the needle, wrap and turn a total of 14 stitches, 7 on the knit side, and 7 on the purl side) And So It Begins Heel flap - will be worked using only on the sole needle. The first row will be beginning in the middle of the heel on the right side. Row 1 - knit all stitches up to one stitch before the marker (knit the wraps together with the stitches as you come to them), place a new marker, knit the next stitch together with it's wrap and the first stitch after the marker (removing the old marker), turn Row 2 - slip one, purl to one stitch before the last marker (purl the wraps together with the stitches as you come to them), place a new marker, purl the next stitch together with it's wrap and the first stitch after the marker (removing the old marker), turn Row 3 - slip 1, knit until the marker, k2tog, turn row 4 - slip 1, purl to the marker, p2tog, turn Repeat rows 3 and 4 until all heel wedge stitches have been worked, turn work , slip one and knit to the end of the needle, removing the markers as you go.
5 Leg - worked in the round Knit all stitches to desired length of leg. Write down how many rows you worked: (count asfor the foot)
6 Cuff - worked in the round
Knit in rib of choice for 1 %" . A 2X2 rib is the most stretchy, but 1x2 or 1x1 works just as well. Bind off loosely using a stretch bind off as follows: Knit 2 stitches, slip these 2 stitches back to the left needle, k2tog, \* k1, slip 2 stitches back to left needle, k2tog \* repeat to the end of the row. Break your yarn about 8 inches from the end, and secure it using a darning needle by slipping it into the first stitch on the sock and then weaving your ends. Weave in the end from the beginning of the sock.
Write down how many rows of ribbing you worked:
Measure your gauge. Why?, you ask. Well, knowing your gauge will allow you to take measurements of other people's feet, and translate those measurements into socks. Remember, we are gauge impaired, not gauge inept. We have our own inherent gauge. We just can't get anyone else's gauge. To measure your gauge, take a ruler to your finished sock. Count how many stitches you have in one inch in each direction. Write these
And So It Begins
numbers down. (There is a chart for you to do this at the end of the book, in the resources section.) This is your gauge. It will be different for different yarns and needles and combinations of the two. Don't fall into the trap of thinking ‘I get x stitches to the inch in sock yarn', this will lead you down a dangerous road every time. Instead think 'I get x stitches to the inch in this sock yarn.
| Wedge Heel | |||
| Gauge | |||
| Stitches/inch | |||
| Rows/inch | |||
| Foot circumference | |||
| Foot length | |||
| Cast On | Stitches | |
| Increaseto | Stitches | |
| Footrows | Rows | |
| Wedgeincrease | Rows | |
| Shortrows | Rows | |
| Legrows | Rows | |
| Cuff rows | Rows | |
Fleegle Heel Sock
1 Measure your foot
5 Measure your foot length: inches 6 Measure how big around your foot is: inches
2 Increase Toe - will be worked in the round
9) Using either Figure 8 or Turkish method, cast on 12 stitches on each of 2 circular needles. And So It Begins 10) \*K1, M1, knit to 1 stitch before the end of the needle, M1, K1\* repeat for second needle 11) Knit all stitches 12) Work rows 2 and 3 until the toe of the sock fits over all of your toes without the little toe without stretching. This will give you the 10 % negative ease needed to allow the sock to stretch comfortably over your foot without slipping off. Write down how many stitches you have total:
3 Foot - will be worked in the round
Knit the foot of the sock until it is about 2 inches shorter than your foot length. To get technical about this, you will be increasing 2 stitches less than the total number of stitches on your sole needle ( half of the sock stitches -- 2 = number of stitches to increase as well as the number of rows it will take to do the increases). Calculate your row gauge, and divide the number of stitches to be increased by row gauge. This is how many inches you need to leave for the wedge. Subtract this number from the total length of the sock. This is how long the foot should be before you start the Fleegle wedge. If you want to try the sock on to measure it, stop working the foot when the edge of the sock just covers the ankle bone on your foot without stretching the sock.
Write down how many rows you have: (counthowmany V's are in a column from your needle to the cast on end)
4 Fleegle Heel - this heel is worked in two steps: Fleegle Wedge - worked in the round Row 1 M1, work to end of needle, M1, knit to end of row Row 2 - knit to end of row Repeat rows 1 and 2 until the sole needle has 2 stitches less than half the total number of stitches (example: if you started with a total of 60 stitches, then you will repeat rows 1 and 2 until there are 58 stitches on the sole needle → 30 stitches +28 increase stitches on the sole needle) When the Fleegle wedge is finished, the sock will be as long as your foot. For experience sock knitters, this will look way too long and a bit strange. Go with me on this. It works. If you are a couple of rows short, knit a couple of rows even. Fleegle Flap - worked flat on the sole needle only Setup row 1 - knit to half of the stitches, k2, k2tog, k1, Setup row 2 - slip 1 with yarn in front, p5, p2tog, p1, turn And So It Begins Row 1 - slip 1 with yarn in back, k to one stitch before the gap created in last row, k2tog, k1, turn (this closes the gap in this row and creates a new one for the next knit row) Row 2 - slip 1 with yarn in front, p to one stitch before the gap created in last row, p2tog, p1, turn (this closes the gap in this row and creates a new one for the next purl row) Repeat rows 1 and 2 until all sole stitches have been worked, you should have 2 stitches more than half of the total stitches left on the sole needle (if you have 60 stitches total, then you would have 32 stitches left on the sole) Knit one round, knitting the last stich on the sole needle together with the first stitch of the insole needle, knit to the last insole stitch, knit that stitch together with the first stitch on the sole needle, knit to the end of the sole needle. This closes up the gap between sole and insole, and should leave you with the same number of stitches you had before starting the Fleegle heel.
5 Leg - worked in the round Knit all stitches to desired length of leg. Write down how many rows you worked: (count asfor the foot)
6 Cuff - worked in the round
Knit in rib of choice for 1 %" . A 2X2 rib is the most stretchy, but 1X2 or 1x1 works just as well. Bind off loosely using a stretch bind off as follows: Knit 2 stitches, slip these 2 stitches back to the left needle, k2tog \* k1, slip 2 stitches back to left needle, k2tog \* repeat to the end of the row. Break your yarn about 8 inches from the end, and secure it using a darning needle by slipping it into the first stitch on the sock and then weaving your ends. Weave in the end from the beginning of the sock.
Write down how many rows of ribbing you worked:
Measure your gauge. Why?, you ask. Well, knowing your gauge will allow you to take measurements of other people's feet, and translate those measurements into socks. Remember, we are gauge impaired, not gauge inept. We have our own inherent gauge. We just can't get anyone else's gauge. To measure your gauge, take a ruler to your finished sock. Count how many stitches you have in one inch in each direction. Write these numbers down. (There is a chart for you to do this at the end of the book,
And So It Begins
in the resources section.) This is your gauge. It will be different for different yarns and needles and combinations of the two. Don't fall into the trap of thinking ‘I get x stitches to the inch in sock yarn', this will lead you down a dangerous road every time. Instead think 'I get x stitches to the inch in this sock yarn.'
| FleegleHeel | |||
| Gauge | |||
| Stitches/inch | |||
| Rows/inch | |||
| Footcircumference | |||
| Foot length | |||
| Cast On | Stitches | |
| Increaseto | Stitches | |
| Foot rows | Rows | |
| Fleegleincrease | Rows | |
| Legrows | Rows | |
| Cuffrows | Rows | |
But wait, I'm not knitting for me.
That's okay, your socks can be customized to fit any foot and you have two choices: 1) try sock on recipient 2)take measurements and do abit of math Generic formula: Toe - cast on 12, and work as written measuring your gauge as you go, calculate the number of stitches you need for this sock as follows: Total stitches = stitch gauge \*foot circumference\*0.9 Round this number to an even number Foot length - work in the round knitting all stitches as follows: Short row heel - measure row gauge Foot length = total length-(row gauge\*14) Wedge Heel - measure row gauge Foot length =total length-(row gauge\*34) Fleegle Heel - measure row gauge Foot length=total length-(row gauge\*(number total stitches-2)


