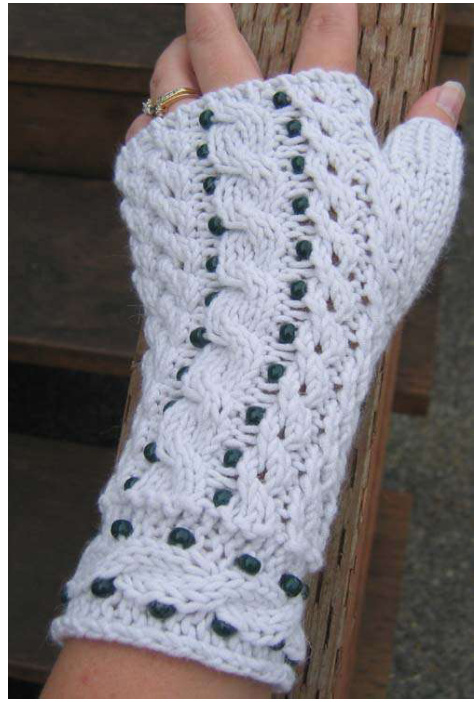
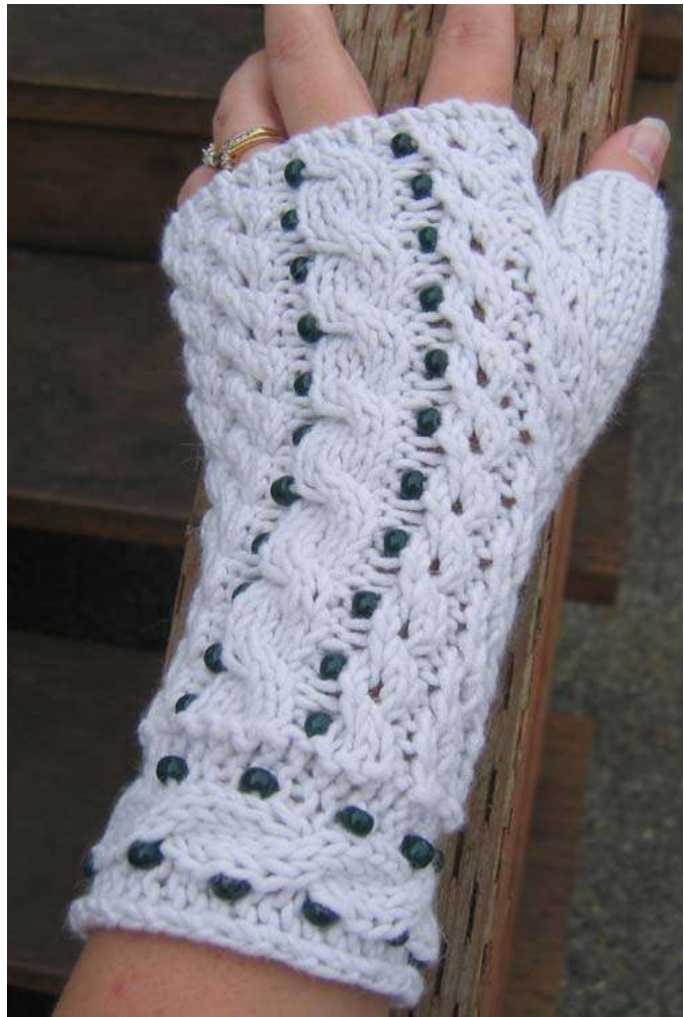
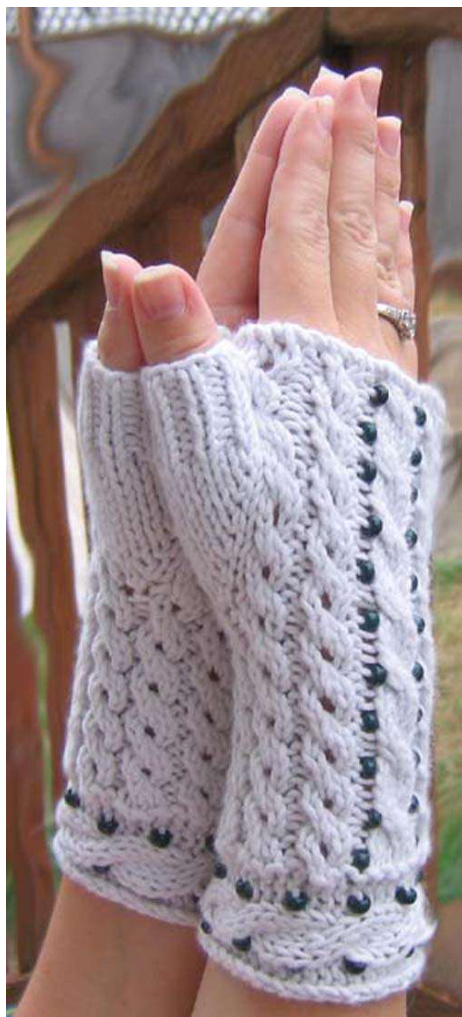
de lecet (French for "of lace") by Christie Pruitt When I saw this yarn, limmediately thought of fingerless gloves. The yarn has such a natural stretchthat it would makeforaperfect fit.And theeads?WelIhavedonesomejewelry making but it always seemed way too much work to combine beads with knitting. So'1 decided to start small and see howliked it.And-OhBoy!Do like it!So here's the product of my first time knitting (and designing) with beads! These gloves are done in Winter White with a touch of Dark Green beads for color. They have a certain luxuriousness with that touch of angora - and feel deliciously soft against the skin. They are snug and warm for those cold offices and an evening out too!
Due to the natural spring in this yarn, these should stretch to fit most hands.
Finished Size
3.25 inches wide (after blocking), will stretch to 4 inches comfortably 7.5 inches in length Fits a Woman's size Medium
Materials
2 skeins Jaeger Roma, $63\%$ Viscose, $22\%$ Nylon, $15\%$ Angora,137yardseach Size 8 knitting needles Size 8 DPN (for thumbs) 88sizeI/oSeedBeads Yarn Needle
Pattern Notes
\~ When threading beads onto the yarn, I used a dental floss threader. They are sturdy and have a loop already formed for attaching yarn. \~ If you need to check your stitch count, do so after completing a WS row.
Right Hand
Thread 44 beads onto the yarn. When a bead is needed, slide it up and snug it against the right needle tightly, then complete the stitch.
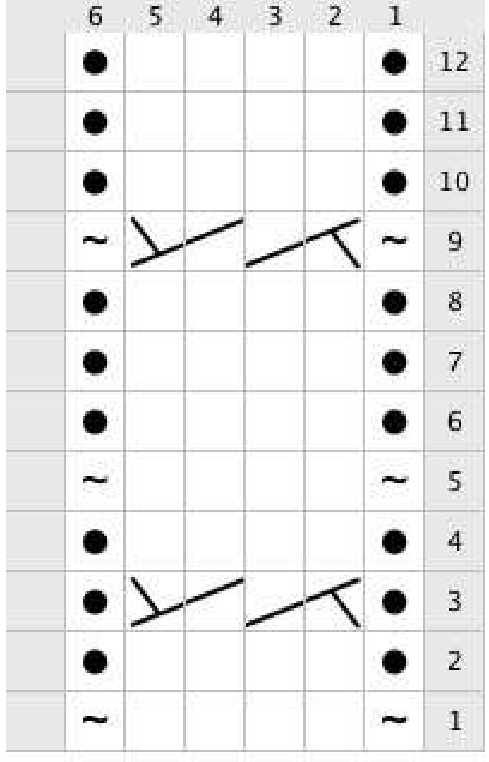
Cabled Cuff
CO 10. Begin Cuff Chart Row 1
Work this chart until piece measures 7 inches. BO.
Begin Glove
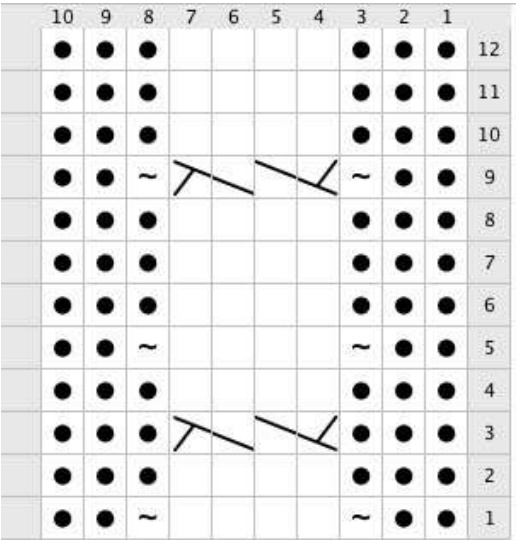
With RS facing, on one long edge of cuff, pick up and k 39 stitches evenly across. Knit one row. Row 1: k1 (selvage), begin 8 stitch repeat of eyelet cable chart for 1 rep, then work 6 stitch glove cable chart, then work 8 stitch eyelet cable chart to finish row, end p1, k1. Work from both charts until piece measures 5 inches, slightly stretched.
Thumb
Work across 21 sts in patt, pm, k f&b next st, pm, finish row. All WS rows: work in charts as established - purl across thumb sts. Work thumb increases on RS rows as follows: work to first marker, k f&b next st, then work to 2 sts before next marker: k f&b next St, k last st. Continue increases until there are 14 sts between markers. On next WS row, begin p1, k1 ribbing over thumb stitches for a total of 2 rows. Next WS row: work to one st before first maker, place thumb sts on waste yarn.
Close the Gap
Once you transfer the thumb sts to waste yarn, you will have to close the gap that is created. Cross the unworked st on RH needle over the first stitch on the LH needle. Now purl these 2 stitches separately, thereby crossing them over one another. On next RS row: you will need to add an extra stitch above that thumb gap since it was donated to the thumb. K f&b into the middle of the 2 sts you just crossed. (You should now have the original 39sts.) Continue with charts as established for 1 inch. BO. Cut yarn, leaving a long tail for seaming. With RS together, seam the glove. Secure ends and trim excess. Turn right-side out.
Finish Thumb (both gloves)
With 1 DPN, slip 7 sts onto needle from waste yarn. With 2nd DPN, transfer rem sts from waste yarn ontoneedle.Remove waste yarn.With 3rd DPN,attach yarn and beginknitting k1, p1 for 5 rounds. Bind off loosely. There willstill be a small gap formed between thumb and hand when knitting the thumb stitches in the round. Turn glove inside out and seam up that hole with a few overcast stitches.
Left Glove
Work Right Glove untilyou reach Row 1 of Begin Glove instructions. Then continue as follows: Row 1: k1 (selvage), work eyelet cable chart for 3 reps, pb (place bead) on last p1 of eyelet cable rep, work glove cable chart beg with k4, work eyelet cable chart to last 2 sts, end p1, k1. Continue as established until work measures 5 inches, slightly stretched. Thumb Work across first 14 sts, pm, k f&b next st, pm, finish row. Continue with thumb increases, following instructions from Right Glove.
Finishing
Idid block these gloves, onlytoflatten the cable cuffedge where it tended to curl. Otherwise, they don't need to be blocked!Enjoy!
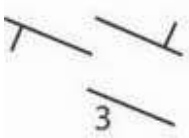
eyelet chart glove cable chart cuff chart
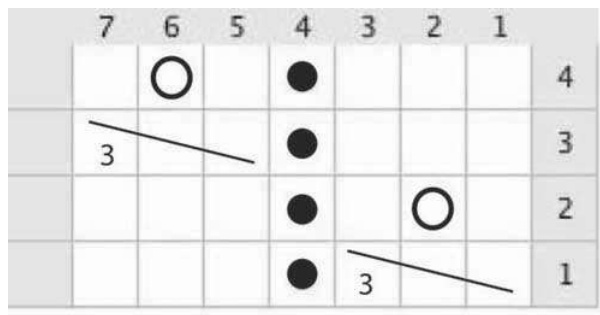
Legend
placebead slp2ststocn,holdtofront,k2,2fromn c3tog:slip2ststocn,holdtofrontk1k2togfromn