Ridcully
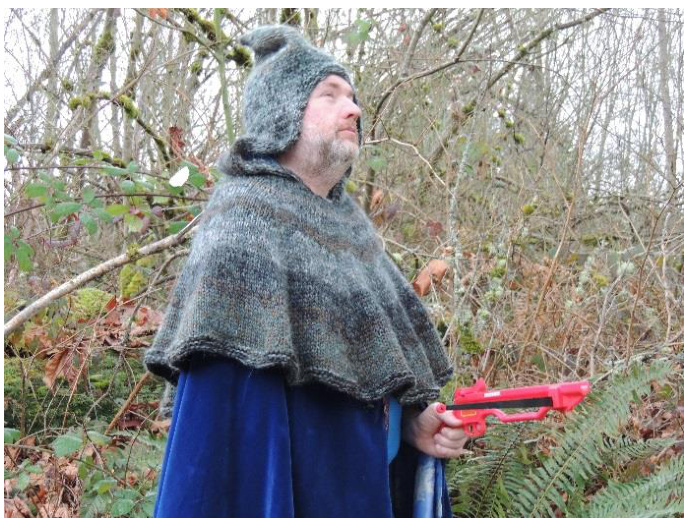
Named for the brothers Ridcully. Mustrum is the Archchancellor of Unseen University, and his brother Hughnon is the High Priest at the Temple of Blind lo. Both brothers live and work in Ankh-Morpork, in Terry Pratchett's Discworld stories. This cape is more than a full circle, for drape and for ease of movement, which can be knit for a dressy look (as in the Hughnon) or a more rustic hunter's look (as in the Mustrum). Hughnon (shown below in purple) requires the following: · Main Color, approximately 800 yards of a heavy worsted weight yarn. Prototype knit in Bartlettyarns' Worsted in"Thistle." ·Contrast color, 200 yards of a heavy worsted weight. Shown with Bartlettyarns' "Solid Black." Highlight color, about 150 yards of a decorative yarn. This can be any approximate weight from sport to heavy worsted; it will not significantly impact the gauge. Shown with Lincatex Gold Rush in #231, black (two strands worked together). reys and browns) requires three strands (worked together) of Istex Plotulopi in any colors you choose. Mustrum Ridcully is a hunter in the city, so I chose colors to evoke building stone, trees and grass. This cape is knit with three strands held together, with no alternate yarns, and colors are swapped out at random for a striped/camouflage effect. There were nine different colors used in the prototype and it took about 300 grams of yarn total.
TheMustrum Needles: US size 10.5 circular in increasing lengths Other notions: stitch markers, row counter, seaming needle. How to do an "m1" ("make 1") increase: With left needle, lift up the horizontal strand between stitches (inserting needle from front to back) and knit through the back of the loop that is created. This gives a clean increase with no bars (as a k1inc would create) or holes (as a yarnover would create).
Mustrum
With three strands of yarn, cast on 80 stitches. Join to work in the round. Round 1: Knit, placing markers after every 8th stitch (ten markers placed). Rounds 2-7: Knit Round 8: \*k1, m1, k to 1 stitch before marker, m1, k1, slip marker. Repeat around row. You are increasing two stitches at the outer edge of each wedge, with two plain stitches (flanking the marker) between wedges. Rounds 9-11: Knit. Round 12: as row 8. Repeat rounds 9-12 (increasing on every 4th row, and swapping out strands of yarn as desired for striping) until row 56 is complete, or to desired length. The Mustrum shown is about 15" long. Last three rounds: Round 1: purl Round 2: knit Round 3: purl Bind off all stitches loosely knitwise.
Hood
A certain amount of fiddling with stitch markers is involved. Find the place that you want to be the center front of the cape and mark it with a removable stitch marker. With this section facing you, as if you were facing someone wearing it, count 4 stitches to the left of your removable marker and 4 stitches to the right, and place removable stitch markers there. You can now remove the front center marker; there are 8 stitches between the new markers. Starting with the marker on your left (as you view it), pick up 72 stitches around the neckline, to the second marker. This willeave an 8-stitch gap in the center front. When all 72 stitches are on the needle, remove these markers. Row 1 (Ws): Working back and forth, k2 edge stitches, place new marker, p to last 2 stitches, place new marker, k2 edge stitches. Turn work. Row 2 (RS): k across, slipping markers. Repeat these two rows until hood piece is 10" high (approximately 40 rows), ending after a RS row. At the end of this row, cast on 10 stitches to bridge the gap in the front (this is where the hood will rest on the wearer's forehead) and join to work in the round. You should have 82 stitches on the needle. Place your removable stitch marker after the 5th new cast-on stitch (at the front center of the closed hood portion). First round (setup round), beginning at that removable stitch marker: knit 10, place marker for new beginning of round, knit 21, place marker, knit 20, place marker, knit 21, place marker, knit 10 (ending at your removable stitch marker) . Remove it; it is no longer needed. You now have four sections separated by markers. Begin working in the round as follows: knit to final marker of round, knit 5, purl 10 new stitches, knit to end of row. This is to create a garter band across the top of the hood opening so the edge does not curl. Round 2: Knit around. Round 3: as Round 1. Round 4: as Round 2. This ends the garter band. From now on all rows are knit, no purling. Decreases will be done every 5th round, each side of markers, so that eight stitches are decreased every 5 rounds. Round 5: \*k2tog, k to last 2 stitches before marker, k2tog, slip marker, repeat from \* to end of row. Rounds 6-9: knit around, slipping markers. Round 10: as round 5. Repeat these 5 rounds, switching to dpns when necessary. When you are down to the final stitch, cut yarn and draw through this stitch. Weave in all ends and block.
Hughnon
With your highlight yarn, cast on 80 stitches. Join to work in the round. Knit 4 rounds. Round 5 (folding row for picot edge): \*k2, yo, k2tog, repeat around row. Knit 4 more rounds even, knitting the yarnovers on round 6. Round 10: change to your contrast color and work 14 rows in garter stitch (knit one round, purl one round). Round 25: change to your main color and begin knitting in the round, placing stitch markers after every 8th stitch (ten sections are created).
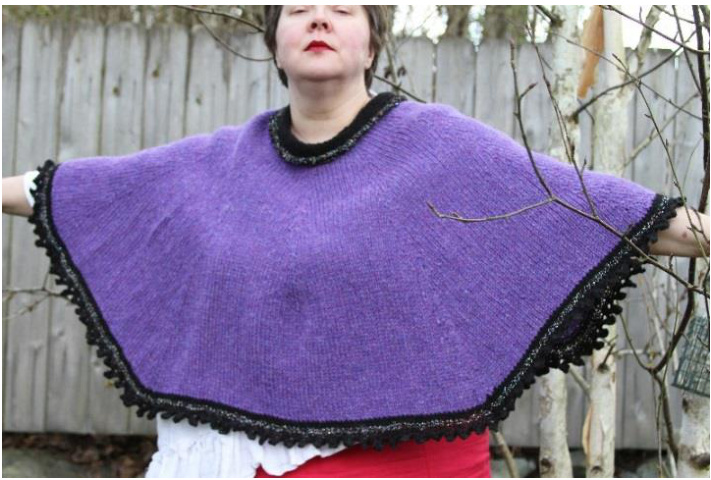
The Hughnon Rounds 26 and 27: Knit Round 28: \*k1, m1, kto 1 stitch before marker, m1, k1, slip marker. Repeat around row. You are increasing two stitches in each wedge. Rounds 29-31: Knit. Round 32: as row 28. Repeat rounds 29-32 (increasing on every 4th row) until row 110 is complete. The Hughnon shown is about 24" long. Switch to CC. Maintaining increases, work 2 rounds. Switch to highlight color. Maintaining increases, work 2 rounds. Switch back to CC. Maintaining increases, work 2 rounds. Bind off all stitches with a picot bind-off and CC. Neckline: fold under the highlight rows at picot edge, and seam the cast-on stitches to the main part of the collar. Then fold the collar in the center of the CC section and seam it to the body with a strand of CC. Weave in all ends and block. Wear and enjoy.
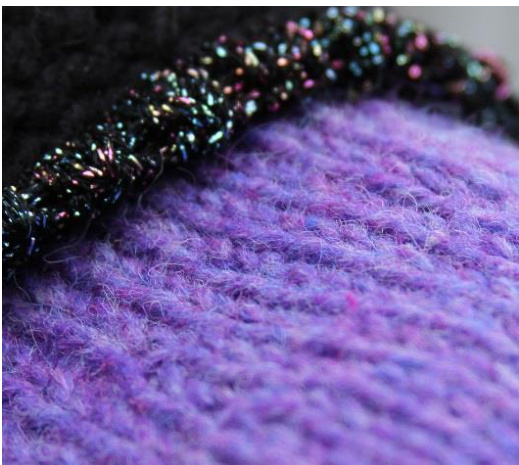
Detail of Hughnon Collar This pattern was designed for the 2013 Ankh-Morpork Knitter's Guild design challenge on Ravelry. Proceeds will be donated to the Alzheimer's Foundation in honor of Sir Terry Pratchett, the creator of Discworld.


