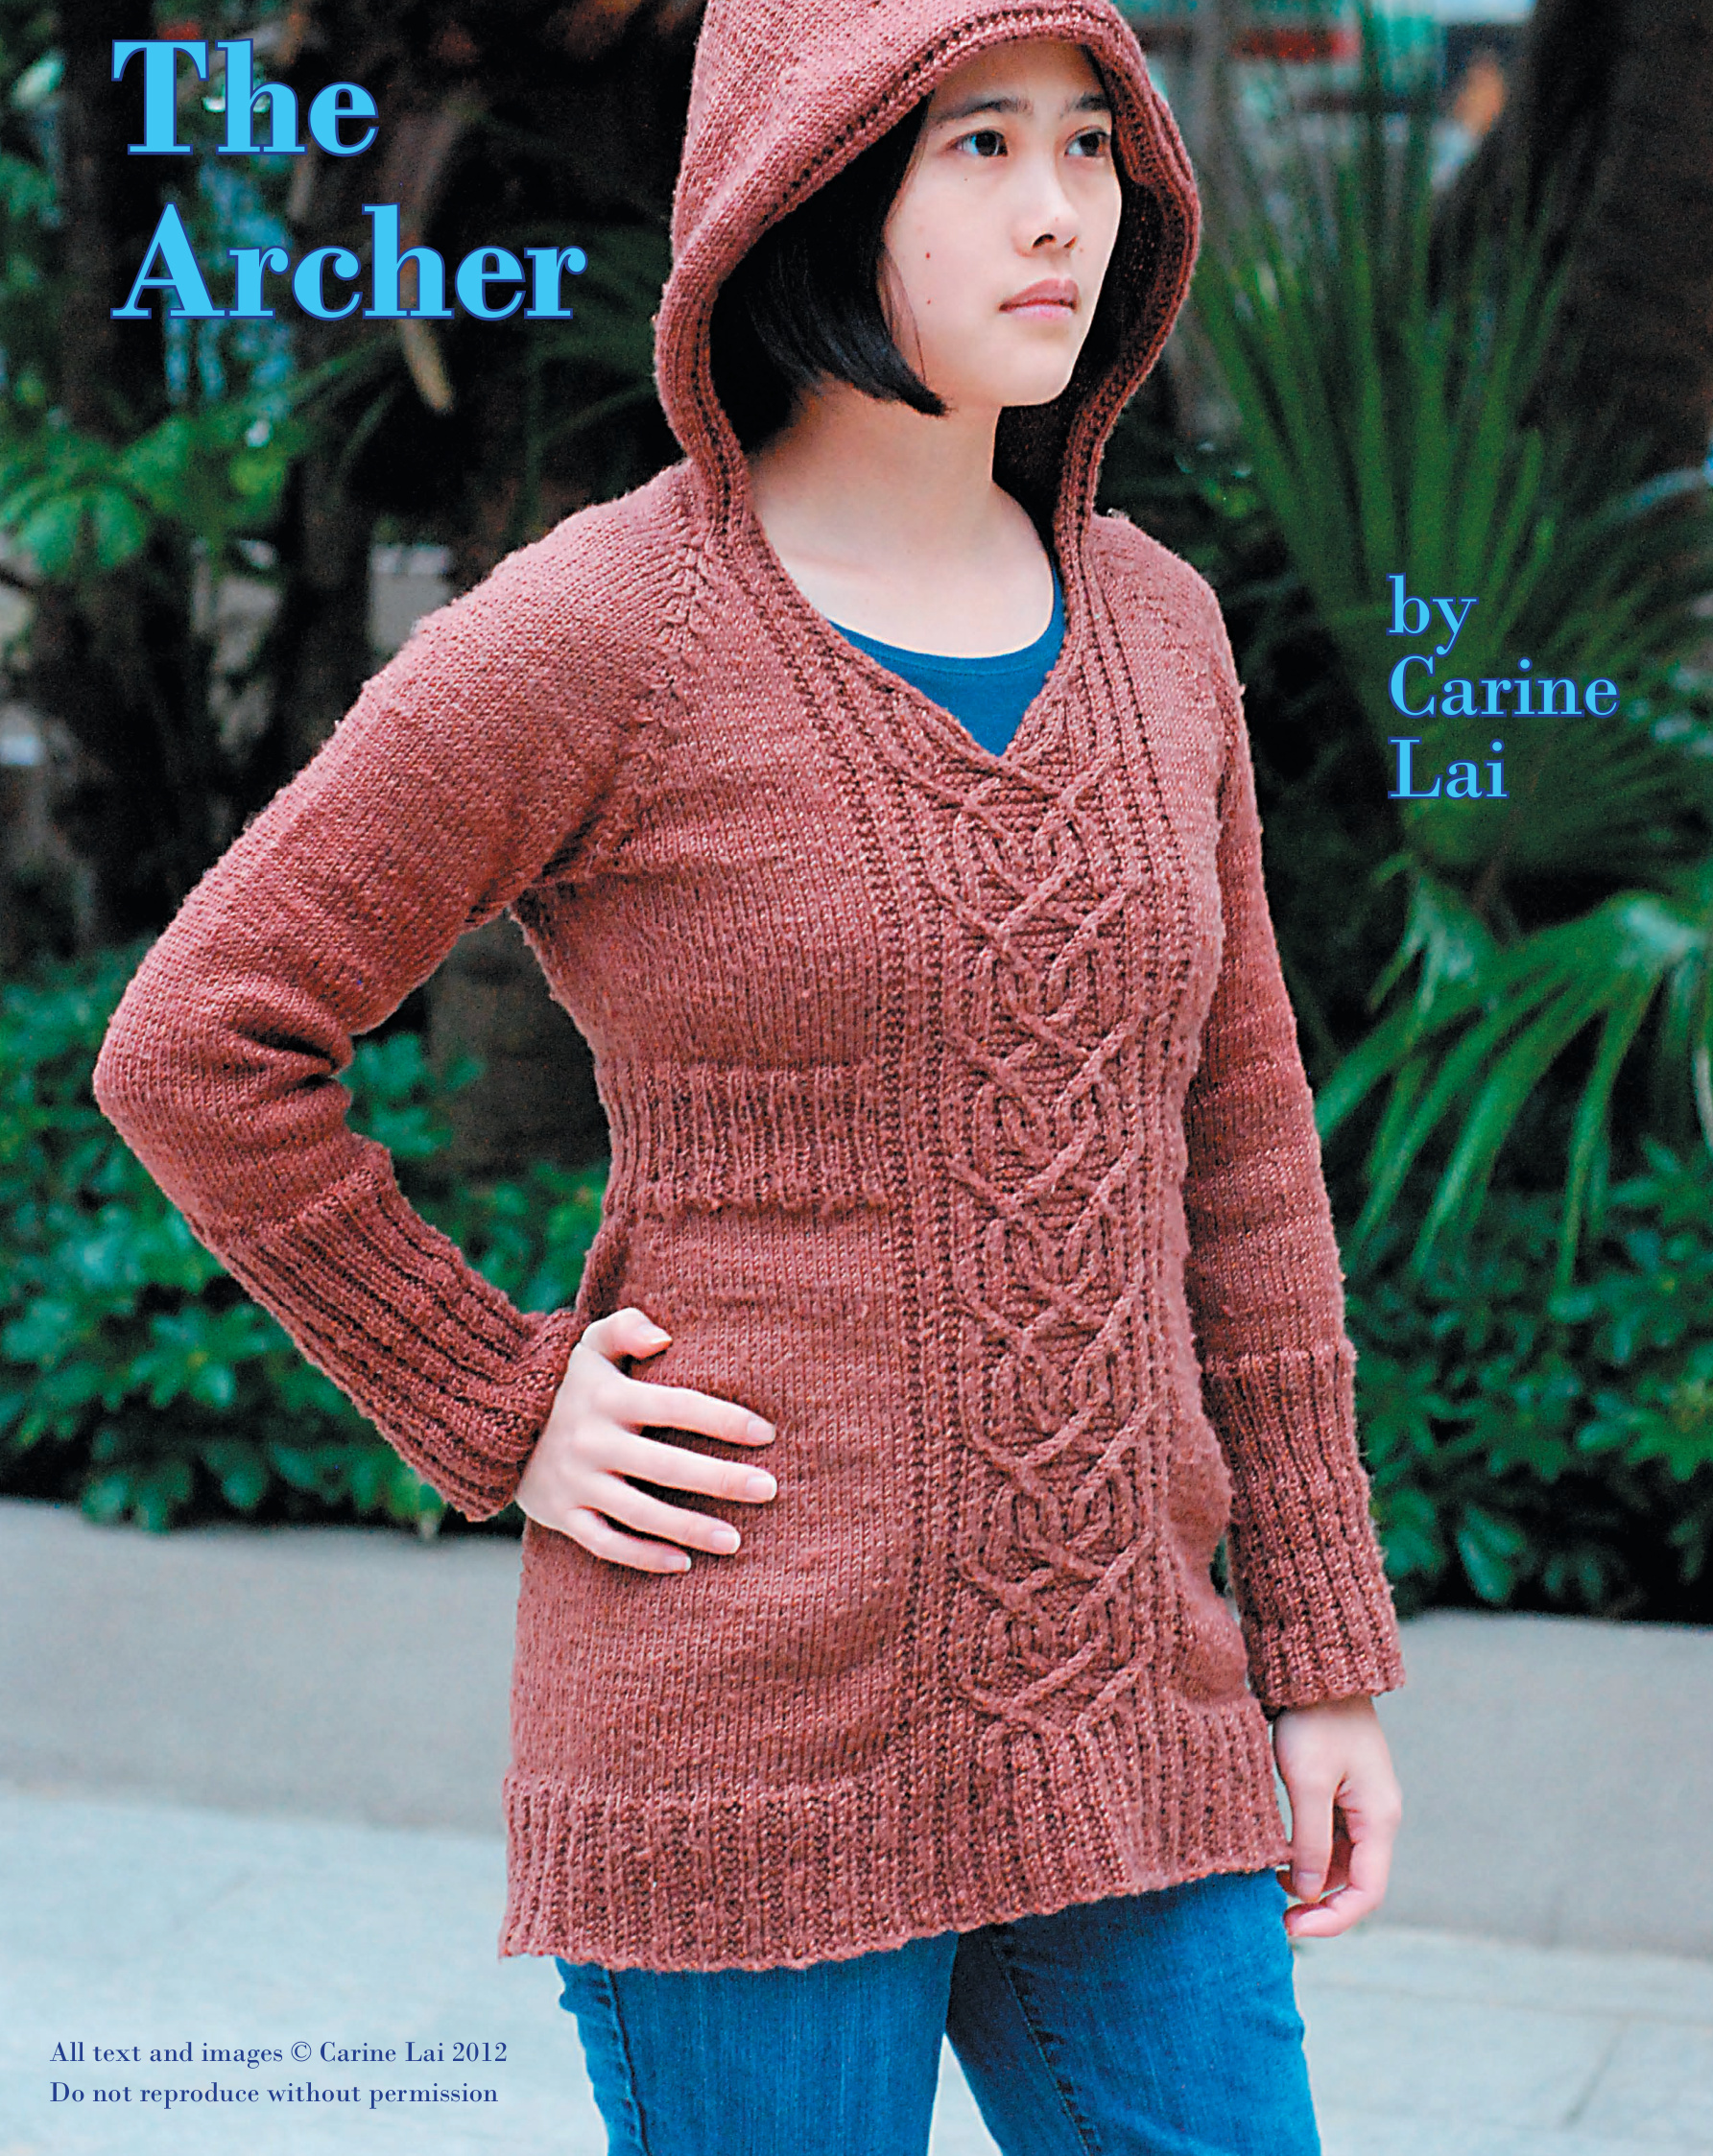
Pattern Information
Sizing
This pattern includes sizes from women's XS to 2XL, and has bust shaping for A to DDDD (US) cup sizes. Please see page 3 for details.
Difficulty
Intermediate. Techniques include reading charts, cables, short rows, cabled decreases, and grafting or 3 needle bind-off. Bust shaping requires careful row counting.
Gauge
22.5 stitches and 30 rows to 10 cm2/4 in2 in stockinette stitch = 2.25 sts and 3 rows per cm or 5.6 sts and 7.5 rowsperinch
Yarn weight & fibre
Double-knit wool, wool blend, or acrylic with high elasticity and good stitch definition. Solid colour preferable. My test knitters used and were happy with: Berroco Vintage DK, Debbie Bliss Rialto DK, ColourMart Extra Fine Merino DK, Stylecraft Pure Wool DK.
Equipment
3.5 mm/US size 4 or 3.75 mm/US size 5 straight or circular needles, cable needle, at least 4 stitch markers, 4 stitch holders or scrap yarn, large tapestry needle, at least 2 row counters.
Pattern Format
Written instructions with chart for cable pattern and neckline. Stitch counts referred to as XS (S, M, L, XL, 2XL).
Yardage
1375 (1485, 1,600, 1,700, 1,795, 1,895) metres or 1,500, (1,625, 1,750, 1,855, 1,960, 2070) yards.
Abbreviations
sts stitches kKnit pPurl sl Slip stitch m1 Make 1. Pick up the bar between the current st and the next, and k through the back loop. k2tog Knit 2 together (right-leaning decrease) skpo Slip 1, k1, pass slipped stitch over (left-leaning decrease) bo Bind off RS Right side of piece WS Wrong side of piece [..] Repeat contents of brackets as specified w&t Wrap and turn (for short rows). On the RS, knit up to specified place, hold yarn to the back, slip the next stitch from left to right needle, bring yarn around to the front as if to purl, slip stitch back onto left needle, and turn piece. On the WS, purl up to specified place, hold yarn in front, slip next stitch from left to right needle, bring yarn around to the back as if to knit, slip stitch back onto left needle, and turn piece. r2cd: Right-leaning double cabled decrease. Sl 2 sts onto cable needle. Holding the cable needle behind the left needle, insert right needle into both front and back sts knitwise, and knit the 2 sts together. Do this for both sts. I2cd: Left-leaning double cabled decrease. Sl 2 onto cable needle. Hold cable needle in front of left needle. Insert the right needle into both front and back stitches knitwise, and k the 2 st together. Do this for both sts. r3cd: Right-leaning triple cabled decrease. Sl 3 sts onto cable needle.Holding the cable needle behind the left needle, insert right needle into into both front and back stitches knitwise, and k the 2 sts together. Do this for all 3 sts. I3cd: Left-leaning cabled decrease. Sl 3 onto cable needle. Hold in front of left needle, insert right needle into both front and back stitches knitwise, and k the 2 sts together. Do this for all 3 sts.
Sizing
You should to choose your size according to your underbust measurement so that the ribbed belt band fits snugly. Vertical dart bust shaping can be added to fit US size C to DDDD/F/G cups. To measure your underbust, wrap a tape measure around your ribcage where your bra band sits. If you fall between sizes, choose the closest size.
| XS | S | M | L | TX | 2XL | |
| Wearer's underbust measurement | 61-66 cm 24-26 in | 71-76 cm 28-30 in | 81.5-86.5 cm 32-34 in | 91.5-96.5 cm 36-38 in | 101.5-107.5 cm 40-42 in | 112-117 cm 44-46 in |
| Circumference of tunic at full bust (excluding bust shaping) | 76.5 cm 30 in | 87 cm 34.5 in | 98 cm 38.5 in | 108.5 cm 42.5 in | 119 cm 47 in | 130 cm 51 in |
| Circumference around hem | 84 cm 33 in | 94 cm 37 in | 106 cm 42 in | 117 cm 46 in | 128 cm 50.5 in | 140 cm 55 in |
| Length of sleeve from cuff to armhole | 46 cm/18 in (customizable) | |||||
| Armhole depth in front (vertical) | 6 in 15 cm | 6.25 in 16 cm | 17 cm 6.75 in | 18.5 cm 7.25 in | 20 cm 8 in | 21.5 cm 8.5 in |
| Armhole depth in back (vertical) | 19 cm 7.5 in | 20 cm 8 in | 21 cm 8.25 in | 22.5 cm 9 in | 25 cm 9.75 in | 26.5 cm 10.5 in |
| Approx. length, shoulder to hem | Approx 68 cm/26.75 in. Will vary due to differences in torso length. | |||||
Next, determine your cup size by finding the difference between your underbust measurement and your full bust measurement. (The full bust measurement is your torso's circumference at the fullest part of the bust.)
| Cup size (US) | A | B | C | D | DD | DDD/E/F | DDDD/ F/G |
| Differencebetween underbustandfullbust circumference | 10 cm 4 in | 12.5 cm 5 in | 15 cm 6 in | 17.5 cm 7 in | 20 cm 8 in | 23 cm 9 in | 25.5 cm 10 in |
| Additionalhorizontal ease added by bust shaping | 0cm 0 in | 0 cm 0 in | 4.5 cm 1.75 in | 6 cm 2.5 in | 9 cm 3.5 in | 12.5 cm 5 in | 14 cm 5.5 in |
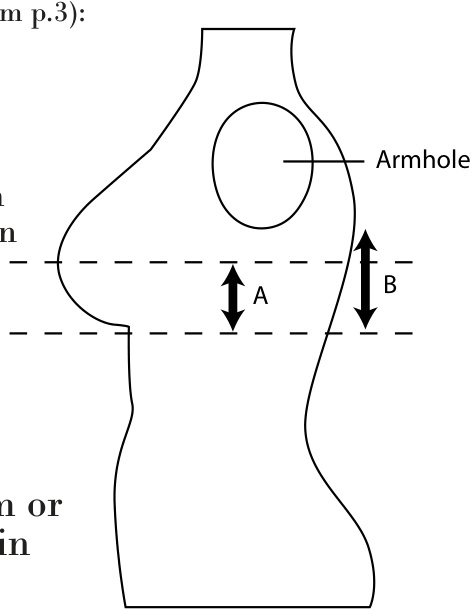
Before proceeding, measure your bust depth. This is the vertical distance between the fullest part of your bust and the bottom of your bra band, measured at the side of your body (see Diagram 1 overleaf for reference). We will call this Measurement A. You will need this later to customize the bodice of your sweate
Back
Skirt
Cast on 96 (108, 120, 132, 144, 156) sts. Work in broken rib for 40 rows. Broken rib for S, L, and 2XL: Row 1: k1, [k2, p2] to last 3 sts, k3. Row 2: K1, p to 2nd last st, k1. Broken rib for XS, M, and XL: Row 1: k1, [p2, k1] to last 3 sts, p2, k1. Row 2: K1, p to 2nd last st, k1.
Note 2:
Different sizes begin the broken rib on either a knit or a purl stitch so that the ribbing matches up with the cable panel in front.
Note l:
Knit the 1" and last stitch of every row on both the right and wrong sides. This will form a garter stitch selvage for seaming.
2X2 ribbing for S, L, and 2XL:
Row 1 (RS): K27 (33, 35,41,43, 49) sts, insert marker, k42 (42, 50, 50, 58, 58), insert 2nd marker, k to end. Row 2 (WS): K1, p to 2nd last st, k1. Continue in stockinette stitch—- remember to k the 1st and last st of everyrow. Work the decrease row below on the 13th row and every 12th row \*Row 1 (RS): k1, [p2, k2] until last 3 sts, p2, k1. Row 2 (WS): k1, [k2, p2] until last 3 sts, k3.\* Repeat \* to \* 10 times (20 rows).
Bodice
First you need to calculate the appropriate number of rows between the top of the belt band and the armhole bind-offs. Take "Measurement A"from p.3, and add 2.5 cm/1 in to it for A to D cups, or 5 cm/2 in to it for DD to DDDD cups. This will be called Measurement B (write it down on the diagram below). Multiply Measuremenet B it by the vertical gauge (3 rows/cm or 7.5 rows/in) to obtain Measurement C. This will be the number of rows between the top of the belt band and start of the armholes. Working in stockinette stitch, increase twice as described below (approx. every 12th row—-may vary depending on personal measurements). thereafter, a total of 6 times. Decrease row (RS): Kto 2 sts before 1st marker, k2tog and slip marker, k to 2nd marker and slip, skpo, knit to end. 84 (96, 108, 120, 132, 144) sts remaining. If you are knitting A to D cup, work even until the 80th stockinette row. For larger cup sizes, skip straight to the belt band section after the final decrease row. (The skirt is made shorter to compensate for a longer bodice.)
Diagram l: Bust depth measurement
2.5 cm/l in B=A+ or 5 cm/2 in
Belt band
The belt band sits at the empire waist. C = B x 3rows/cm or
2X2 ribbing for XS, M, and XL: \*Row 1 (RS): k1, [k2, p2] until last 3 sts, k3. Row 2 (RS): k1, [p2, k2] until last 3 sts, p2, k1.\* Repeat \* to \* 10 times (20 rows). 3. My Measurement C: rows Note: Remember Measurement A as you will need it later to calculate your bust shaping. Increase row (RS): K to just before 1st marker, m1, slip marker. Knit to 2nd marker and slip, m1, k to end of row. Work even until you have a total of C rows from the top of the belt band. 88 (100, 112, 124, 136, 148 stitches).
Armhole Shaping
All sizes:
Row 1: Bind off 4 stitches, knit to end. Row 2: Bind off 4 stitches, purl to end. Rows 3 and 4:Work even. 80, (92, 104, 116, 128, 140) stitches. Raglan shaping is worked 1 stitch from the edge of the piece, every 4 rows, beginning on Row 5. For each size, a specified sequence of single, double, and triple decrease rows are utilized to obtain the desired slope: Single decrease row (reduces 2 stitches) K1, k2tog, k to last 3 stitches, skpo, k1. Double decrease row: (reduces 4 stitches) K1, r2cd, k to last 5 stitches, I2cd, k1 Triple decrease row (reduces 6 stitches) K1, r3cd, k to last 7 stitches, I3cd, k1.
Sequence of raglan decreases
XS: [double, double, single] X 4; double, double. Total of 14 decrease rows. 32 stitches remaining. S: [double] X15. 32 stitches remaining. M: Triple; [double] X 15. Total of 16 decrease rows. 38 stitches remaining. L: [double, double, triple] X 5; double, double. Total of 17 decrease rows. 38 stitches remaining. XL: [double, double, triple] X 6; double. Total of 19 decrease rows. 40 stitches remaining. 2XL: [double, triple] X 10. Total of 20 decrease rows. 40 stitches remaining.
Note 3: Cabled decreases
r2cd: Right-leaning double cabled decrease. Sl 2 sts onto cable needle. Holding the cable needle behind the left needle, insert right needle into both front and back sts knitwise, and knit the 2 sts together. Do this for both sts. I2cd: Left-leaning double cabled decrease. Sl 2 sts onto cable needle. Hold cable needle in front of left needle. Insert the right needle into both front and back stitches knitwise, and k the 2 st together. Do this for both sts. r3cd: Right-leaning triple cabled decrease. Sl 3 sts onto cable needle. Holding the cable needle behind the left needle, insert right needle into into both front and back stitches knitwise, and k the 2 sts together. Do this for all 3 sts. I3cd: Left-leaning cabled decrease. Sl 3 onto cable needle. Hold in front of left needle, insert right needle into both front and back stitches knitwise, and k the 2 sts together. Do this for all 3 sts.
All sizes:
After the final decrease row, do not work any more rows. Place remaining 32 (32, 38, 38, 40, 40) stitches on scrap yarn or stitch holder.
Front
Skirt
Cast on 96 (108, 120, 132, 144, 156) stitches. Work in broken rib for 40 rows. Broken rib for S, L, and 2XL sizes: Row 1: k1 [p2, k1] to last 3 stitches, p2, k1. Row 2: K1, p to 2nd last st, k1. Broken rib for XS, M, and XL sizes: Row 1: k1, [k2, p2] to last 3 stitches, k3. Row 2: K1, p to 2nd last st, k1.
Skirt
Begin cable (see chart at back of pattern) Row 1 (RS): k 27 (33, 35, 41, 43, 49), insert marker, work 42 (42, 50, 50, 58, 58) stitches according to 1st line of chart, insert 2nd marker, k to end. Row 2 (WS): k1, p 26 (32, 34, 40, 42, 48), slip marker, work 2nd row of chart, slip marker, purl to 2nd last stitch, k1. Continue in stockinette stitch.Work the decrease row on the 13th row and every 12th row thereafter, a total of 6 times. Decrease row (Rs): K to 2 stitches before 1st marker, k2tog and slip marker. Work cable chart, slip 2nd marker, skpo, knit to end. For A to D cup, work even until the 80th stockinette row. For larger cup sizes, skip straight to belt band. 84 (96, 108, 120, 132, 144) stitches remaining.
Belt Band
XS, M & XL Sizes:
Row 1: k1, [p2, k2] up to cable panel, work cable panel, [k2, p2] up to last st, k1. Row 2: k1,[k2, p2] up to cable panel, work cable panel, [p2, k2] up to last st, k1. Repeat for 20 rows in total.
S, L & 2XL Sizes:
Row 1: k3, [p2, k2] up to cable panel, work cable panel, [k2, p2] until last 3 sts, k3. Row 2: k1, p2 [k2, p2] up to cable panel, work cable panel, [p2, k2] until last 3 sts, p2, k1. Repeat for 20 rows in total.
Bodice
For A and B cups, no bust shaping is needed, and the front of the bodice is shaped the same as the back up to the armholes (m1 on either side of the cable panel. twice, adding a total of 4 st). Vertical bust darts are recommended for C cup and larger (see pp. 7-8).
Armhole Shaping
All sizes:
Row 1: Bind of 4 stitches, work 1st bust decrease row (if any) to end. Row 2: Bind off 4 stitches purlwise, work to end. Rows 3 and 4:Work even. Raglan shaping is worked 1 stitch from the edge of the piece, every 4 rows, beginning on Row 5. For each size, a specified sequence of single, double, and triple decrease rows are utilized to obtain the desired slope:
Single decrease row (reduces 2 stitches)
K1, k2tog, work stockinette panel (including any bust decreases), work cable panel, work stockinette panel (including any bust decreases) to last 3 stitches, skpo, k1.
Double decrease row (reduces 4 stitches)
K1, r2cd, work stockinette panel (including any bust decreases), work cable panel, work stockinette panel (including any bust decreases) up to last 5 stitches, I2cd, k1
Triple decrease row (reduces 6 stitches)
K1, r3cd, work stockinette panel (including any bust decreases), work cable panel, work stockinette panel (including any bust decreases) up to last 7 stitches, I3cd, k1. Important: Do not forget to split the piece for the V-neck at the appropriate place. See p.9 before proceeding.
Sequence of raglan decreases
XS: [double, double, single] x3; double, single. Total of 11 decrease rows. S: [double] x12. M: [double] x 13. L: [double, double, triple] X 4; [double] X2. Total of 14 decrease rows. XL: [double, double, triple] X 4; [double] X 3. Total of 15 decrease rows. 2XL: [double, triple] X 8. Total of 16 decrease rows.
Bust S Shaping
C to D cups will need a single bust dart which adds 2 sts per increase row; DD to DDDD/F/G cups will need a double bust dart which adds 4 sts per increase row. Diagram 2 (below) shows the darts? positioning, while Table 2 and the worksheet provided (overleaf) show how to determine your cup size and calculate how many increase/decrease rows you will need. Bust increases are worked from the top of the belt band to 2.5 cm/l in before the armhole bind-offs, (1 inch below the fullest bust line). Space your increase rows close together at the beginning, and further apart as you approach the fullest bust line. Then work even for 5 cm /2 in (14-16 rows) for C to D cups, 7.5 cm/ 3 in (22 rows) for DD to DDDD cups, or until piece reaches same length as the back piece up to the armholes. Bust decreases begin at the same time as the armhole bind-offs (2.5 cm/1 in or 5 cm/2 in above the fullest bust line). Space them in the reverse order of the bust increases. Note that there are fewer decreases than increases. As bust decreases will be worked simultaneously with raglan shaping, use row counters to keep track of both.
C to D cup-Single Bust Dart
single bust dart willbe added on either side of the cable panel, just outside the existing marker Single increase row (RS): Knit to I stitch before Ist marker, ml, kl, slip marker. Work cable panel. Slip marker, k1, ml, knit to end. Single decrease row (RS): Work raglan shaping, if any. Work stockinette panel to 2 stitches before Ist marker, k2tog, slip marker. Work cable panel. Slip marker, k2tog. Work stockinette panel to end of row, including any raglan shaping.
DD to DDDD/F/GDouble Bust Dart
2 bust darts on either side will be added, one on either side of the cable panel, and another slightly further out. Insert a second set of markers 1/3 of the distance between the cable panel's edge and the edge of the knitting. Double increase row (RS): Work stockinette panel to Ist marker and slip, kl, ml. Knit to 1 stitch before 2nd marker, ml, kl, slip marker. Work cable panel. Slip 3rd marker, kl, ml, knit 1 stitch before 4th marker, ml, k1. Slip marker, and knit to end. Double decrease row (RS): Work raglan shaping, if any. K to Ist marker and slip, k2tog. K to 2 stitches before 2nd marker, k2tog, slip marker. Work cable panel. Slip 3rd marker, skpo. k to 2 sts before 4th marker, skpo. Work to end of row, including any raglan shaping.
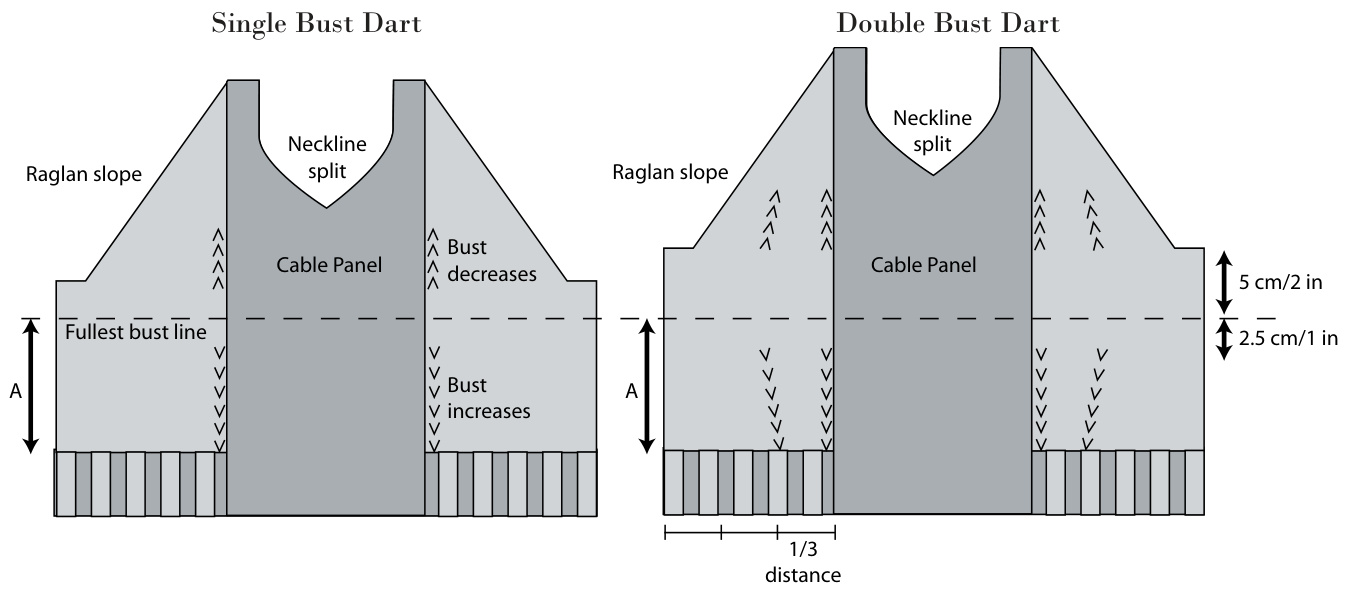
Diagram 2: Bust Dart Positioning
Bust Shaping continued)
Table 2: Bust Increases/Decreases
| Cup size (US) | c | D | DD | DDD/E/F | DDDD/F/G |
| Differencebetween underbust andfullbust circumference | 15 cm/6 in | 17.5 cm/7 in | 20 cm/8 in | 23 cm/9 in | 25.5 cm/10 in |
| Total stitches added | 10 | 14 | 20 | 28 | 32 |
| No.of increase rows | 5 | 7 | 5 | 7 | 8 |
| Type of bust dart | Single | Single | Double | Double | Double |
| Work even for: | 5 cm/2 in (14-16 rows) | 7.5 cm/3 in (22 rows) | |||
| No of stitches decreased | 6 | 10 | 16 | 24 | 28 |
| No of decrease rows: | 3 | 5 | 4 | 6 | 7 |
Bust Shaping Worksheet
| A=Sameas your Measurement A from p.3 | D=A-2.5 cm or 1 in | 3 rows/cm or E=DX 7.5 rows/in |
| My measurement A: cm/in | My measurement D: cm/in | My measurement E: rows |
I will increase times (refer to Table 2) over (E)rows. I will then work even for 14-16 rows for C-D cup, or 2 rows for DD-DDDD cup. Then I will decrease times (refer to Table 2) over rows (spaced in reverse order of increases).
| Increaserows (Max. 8) | Work increase on nth row after belt band (odd numbers - all RS) | Decreaserows (Max. 7) | Work decrease on nth row starting at armhole bind-offs (odd numbers - all RS) |
| lst inc.row | lst | lst dec.row | lst |
| 2nd inc.row | 2nd dec.row | ||
| 3rd inc.row | 3rd dec.row | ||
| 4th inc.row | 4th dec.row | ||
| 5thinc.row | 5th dec.row | ||
| 6th inc.row | 6th dec.row | ||
| 7th inc.row | 7th dec.row | ||
| 8th inc.row |
Note: In theory, increase and decrease rows should be located on the RS of the knitting, however if you are both short-waisted and large-busted, you may need to work some shaping on WS rows as well.
V-neck
Please note that due to differing bust depth measurements, the exact placement of the v-neck will vary slightly from person to person. The V-neck split occurs after the central cable cross-over (row 12) of the cable panel chart. For a deep V, split the neckline after the 1st central crossover that you encounter after the armhole bind-offs. For a shallower V, work 1 more cable pattern repeat and split the neckline at the next central cross-over. When you reach the desired spot, divide stitches in half. With RS of the work facing you, place the left half of the stitches on a holder or scrap yarn.
Right side:
Note 3:
Refer to chart on p.12. Begin making the V-neck on row 13 of the chart, while continuing right side raglan decreases & any remaining bust decreases. The last raglan decrease will include the outermost stitch of the cable panel. After the final raglan decrease, do not work any more rows. Place remaining 10 (10, 14, 14, 18, 18) stitches on holder or scrap yarn.
Left side
Attach new yarn in the centre, and begin working the V-neck on row 13, while continuing raglan decreases & any remaining bust decreases. (Note: the last raglan decrease will include the first stitch of the cable panel). After the final raglan decrease, do not work any more rows, and place remaining 10 (10, 14, 14, 18, 18) stitches onholderorscrapyarn.
Sleeves
Right Sleeve
Cuff Cast on 58 (62, 66, 74, 82, 94) stitches.
Broken rib
\*Row 1: k1, [k2, p2] until 2nd last stitch, k1. Row 2: K1, p to 2nd last st, k1.\* Repeat \* to \* 15 times (30 rows).
Ordinary rib:
\*Row 1: k1, [k2, p2] until last stitch, k1 Row 2: k1, [p2, k2] until last stitch, k1.\* Repeat \* to \* 15 times (30 rows).
Sleeve Shaping
Row 1 (RS): Knit all, decreasing 4 (4, 4, 6, 6, 6) stitches at equal intervals. Continue in stockinette stitch, working the first sleeve increase row on row 9. Then, increase every 8 rows 7 more times, ending on row 65. There are now 70 (74, 78, 84, 92, 104) sts. Work even for 15 more rows ending on row 80, or until sleeve reaches desired length from wrist to armhole.
Sleeve increase row:
K3, m1, knit to last 3 stitches, m1, k3.
Armhole & raglan shaping All Sizes
Row 1: Bind off 4, knit to end. Row 2: Bind off 4, purl to end. Row 3: Knit all. Row 4: Purl all.62,(66, 70, 76,84, 96) stitches Begin 1st raglan decrease on row 5, and on every 4th row thereafter. For each size, a specified combination of double and triple decrease rows are used to achieve the desired slope. Double decrease row (reduces 4 stitches) k1, r2cd k to last 5 st, I2cd, k1. Triple decrease row (reduces 6 stitches) K1, r3cd, k to last 7 st, I3cd, k1.
Sequence of raglan decreases:
XS: [double] x 11. 18 stitches remaining. S: [double] X 12. 18 stitches remaining. M: [double] X 13. 18 stitches remaining. L: Triple; [double] X 13. 14 decrease rows in total. 18 stitches remaining. XL: [triple, double] X 2; [double] X 11. 15 decrease rows in total. 20 stitches remaining. 2XL: Triple; [double, double, triple] X 5. 16 decrease rows in total. 20 stitches remaining. After the final raglan decrease, go to short rows:
Short Rows
The short rows create a sloping edge to the top of the sleeve so that it will match the higher back piece and lower front piece.
XS to L
Rows 1 (WS) and 2 (RS): Work even. Row 3 (WS): P up to last 2 stitches, w&t next st. Row 4 (RS): K up to last 5 stitches, I2cd, k1. Row 5: P up to 1 st before the previous wrap, w&t next st. Row 6: K to end. Row 7: P up to 2 st before previous wrap, w&t next st. Row 8: K to last 5 st, I2cd, k1. Row 9: P up to 1 st before previous wrap, w&t next st. Row 10:K to end Row 11: P up to 2 st before previous wrap, w&t next st. Row 12: K1, I2cd, k1. Row 13: P to end of row, picking up each wrap and working it together with its stitch. 12 sts remaining.
XL & 2XL
Rows 1 (WS) and 2 (RS): Work even. Row 3 (WS): P up to last st, w&t. Row 4: (RS): K up to last 5 sts, I2cd, k1. Row 5: P up to 1 st before previous wrap, w&t next st. Row 6: K to end. Row 7: P up to last st before previous wrap, w&t next st. Row 8: K up to last 5 st, I2cd, k1. Rows 9-12: Repeat rows 5-8. Rows 13-14: Repeat rows 5-6. Row 15: P up to 1 st before previous wrap, w&t next st. Row 16: k2, I2cd, k1. Row 17: P to end of row, picking up each wrap and working it together with its stitch. 12 sts remaining. All sizes: After completing the short rows, place the remaining 12 stitches on scrap yarn or a stitch holder.
Left Sleeve
Work the same as right sleeve until short rows.
Short Rows
XS to L:
Row 1 (WS): P to end. Row 2 (RS): K up to last 2 sts, w&t. Row 3: P to end. Row 4: K1, r2cd, k up to 1 st before previous wrap, w&t next st. Row 5: P to end. Row 6: K up to 2 sts before previous wrap, w&t next st. Rows 7-10: Repeat rows 3-6. Row 11: P to end. Row 12: k1, r2cd, k to end, picking up each wrap and working it together with its stitch. 12 sts remaining.
XL & 2XL
Row 1 (WS): P to end. Row 2 (RS): K to last st, w&t last st. Row 3: P to end. Row 4: K1, r2cd, k up to 1 st before previous wrap, w&t next st. Row 5: P to end. Row 6: K to 1 st before previous wrap, w&t next st. Rows 7-14: Repeat rows 3-6, twice. Row 15: P to end. Row 16: k1, r2cd, k to end, picking up each wrap and working it together with its stitch. 12 sts remaining. All sizes: After completing the short rows, place the remaining 12 stitches on scrap yarn or a stitch holder.
Hood
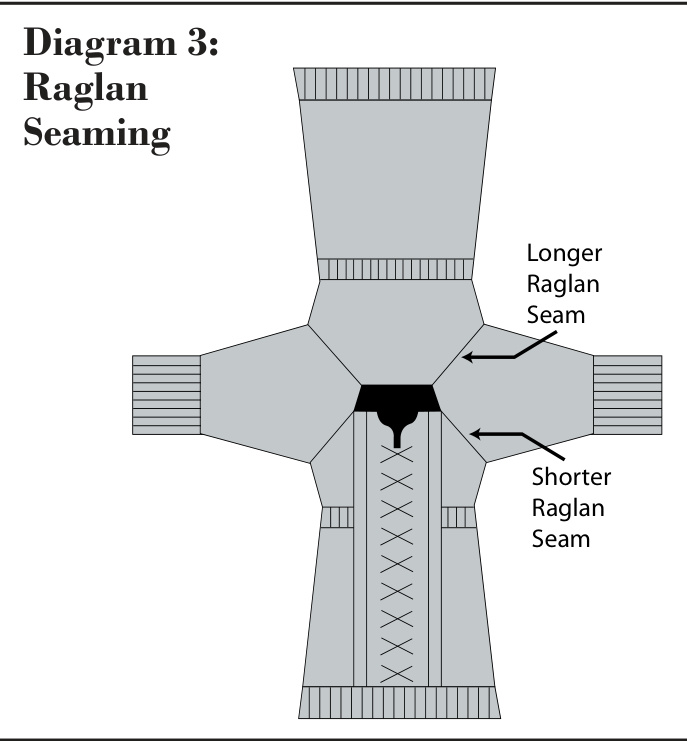
Sew the raglan seams together, as shown in Diagram 3 (p.10). Transfer all the live stitches to one needle. There are 10 (10, 14, 14, 18, 14) stitches on either side of the V-neck, 12 for each sleeve, and 32 (32, 38, 38, 40, 40) for the back. Total 76 (76, 90, 90, 100, 100) stitches. Row 1: Join new yarn. Slip 1st stitch, Work broken rib on hoodie edging as established. Knit 1st sleeve. Insert 1st marker. Knit back. Insert 2nd marker. Knit 2nd sleeve. Work broken rib on hoodie edging as established, ending on a knit stitch. Row 2: Work hoodie edging as established, purl up to opposite edging, work edging as established. Continue as established, increasing every 4th row as described below, a total of 9 times. 112, (112, 126, 126, 136, 136 stitches). Remove markers. Increase Row (RS): Work even up to 1 stitch before 1st marker, m1, k1, slip marker, k1, m1, knit to 1 stitch before 2nd marker, m1, k1, slip marker, k1, m1, work even to end of row. Work even for 29 rows, or to desired length, then go to short rows.
Short rows
The short rows will make the front area of the hood higher than the back to create a better fit. Row 1 (RS): Work 23 (23, 25, 25, 27, 27) stitches, w&t.. Row 2 (WS): Work back to end. Row 3: Work 46 (46, 50, 50, 54, 54) stitches, w&t. Row 4:Workback toend. Row 5: Work entire row as established, making sure to work wraps together with their stitches. Row 6 (WS): Work 23 (23, 25, 25, 27, 27), w&t. Row 7 (RS): Work back to end. Row 8: Work 46 (46, 50, 50, 54, 54), w&t, Row 9: Work back to end. Row 10 (WS): Work entire row as established, making sure to work wraps together with their stitches. Work even for 2 more rows. Insert marker in the centre of the row. On the next row, decrease as described below: Decrease row (Rs): Work to 2 stitches before marker, skpo. Slip marker. k2tog. Work to end of row. Work decrease row every 4th row, another 3 times. 104, (104, 118, 118, 128, 128) st remaining. Then decrease every other row, a total of 5 times. 94, (94, 108, 108, 118, 118) st remaining. On the next RS row, make a double-decrease as described below. Double decrease row: Work to 5 stitches before marker, skpo, k1, skpo. Slip marker. K2tog, k1, k2tog, work to end ofrow. Work double decrease every other row, a total of 3 times. 82 (82, 96, 96, 106, 106) stitches remaining Transfer half of the stitches to another needle, and graft the top of the hood together. Alternatively, holding needles parallel with the WS of knitting facing outwards, make a 3 needle-bindoff so that the seam remains is on the inside of the hood.
Finishing
Seam the sides and sleeves of the tunic together. Weave in ends. Wash tunic according to directions on ball band of yarn. Block gently or simply lay flat to dry. Do not stretch out the belt band.
Cable Panel Chart
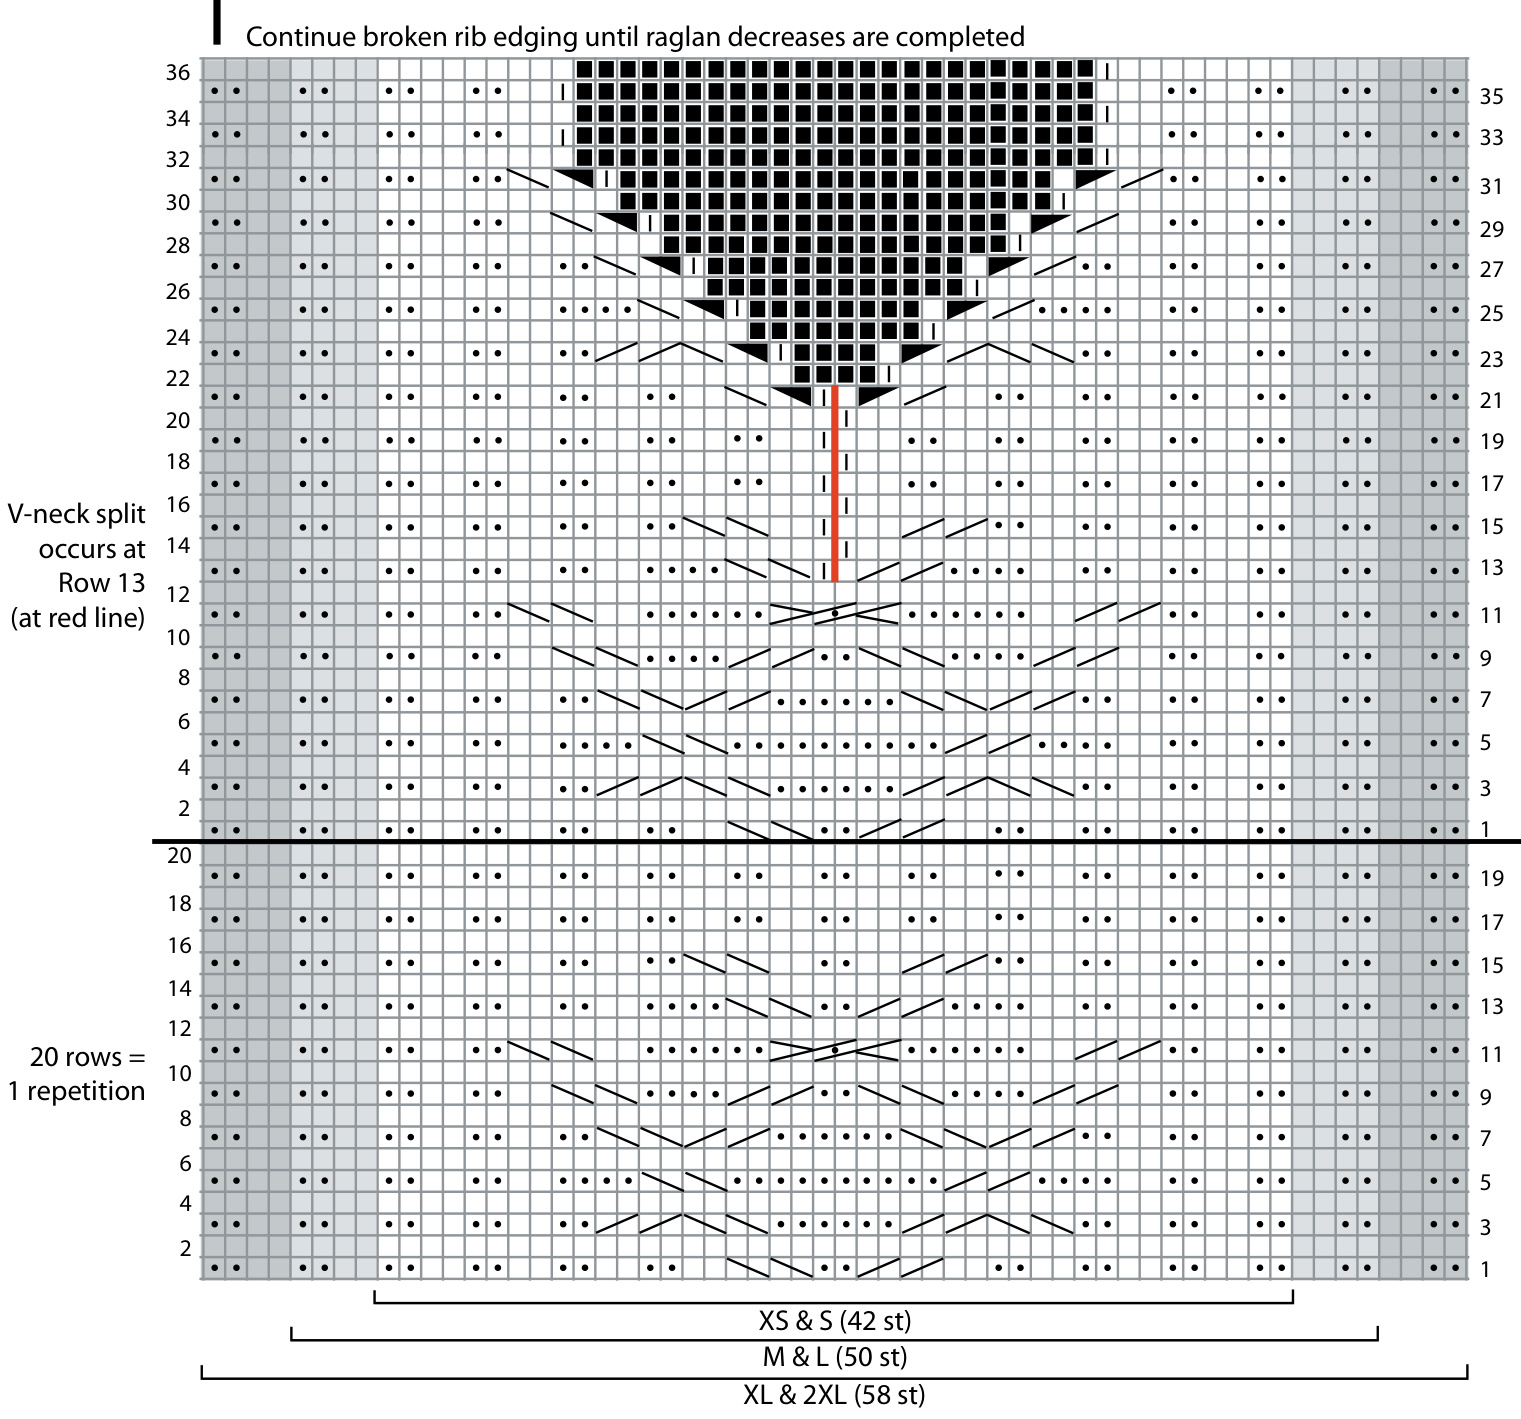
Kon RS, P on WS P on RS, Kon WS No stitch

Slip 2 sts onto cable needle, hold to back, k2 from left needle, k2 from cable needle.

Slip 2 sts onto cable needle, hold to front, k2 from left needle, k2 from cable needle.

Sl 2 sts onto cable needle. Holding the cable needle behind the left needle, insert right needle into both front and back sts knitwise, and knit the 2 sts together. Do this for both sts.
Sl 2 onto cable needle. Hold cable needle in front of left needle. Insert the right needle into both front and back stitches knitwise, and k the 2 st together. Do this for both sts.


