
The RPB is knit from the outside-in, starting on α 12ocm circular needle, and finishing up using magic loop on the same needle. Within the pattern are two variations - a plain blanket or a blanket| with decorative eyelets. You will also find a guide to customise the size of the finished blanket (warning, it involves a bit of math!), and guidance to convert your RPB into a Pinwheel Cardigan. This is an adaptation of Genia Planck's 'Round or Pinwheel Blanket' http://www.knitlist.com/oogift/round-baby-blanket.htm. materials 250g 8ply (DK weight) yarn equipment 120cm 4.omm circular needle $^+$ 30cm 4.omm if knitting cardy 10 stitch markers darning needle (for sewing in ends) gauge 22sts/1ocm on 4.omm needle A free pattern by Kelly Brooker www.knitsoquaint.blogspot.com Please do not sellitems crafted from this pattern without permission from author Please reference the author where appropriate; do not claim this pattern and contents as your own
Plain Version
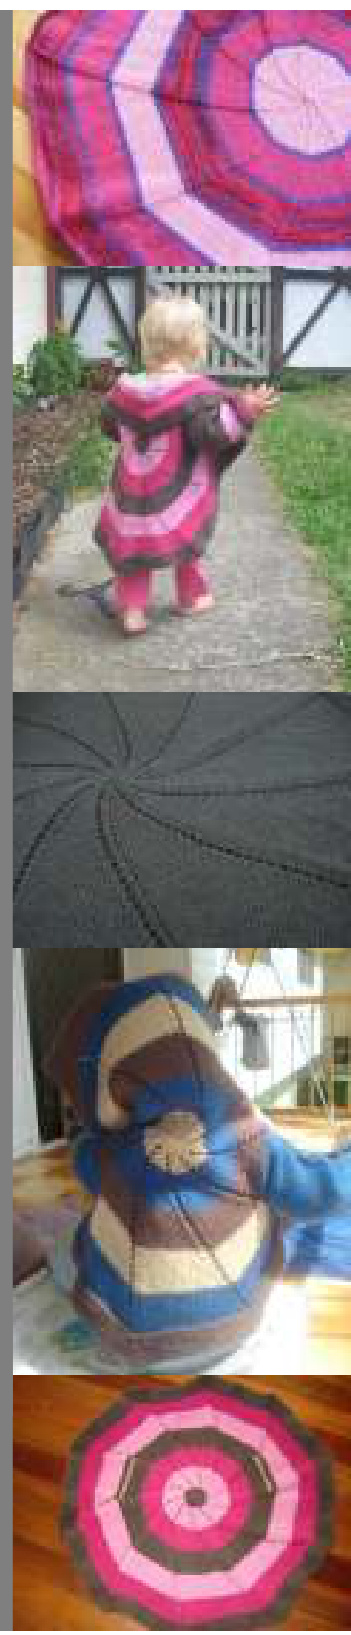
EyeletVersion
CO 45osts using long-tail CO. Place α marker after every 45th stitch (divides the blanket into 1o segments, each containing 45sts) Join for knitting in the round. CO 45osts using long-tail CO. Place α marker after every 45th stitch (divides the blanket into 10 segments, each containing 45sts) Join for knitting in the round. Round 1: (K2tog, K to next marker, SM) repeat across round (decreasing by 1osts) Round 2: (P to marker, SM) repeat across round Round 1: (K2tog, K to next marker, SM) repeat across round (decreasing by 1osts) Round 2: (P to marker, SM) repeat across round Repeat rounds 1&2 five more times to give a 12round garter stitchborder Repeat rounds 1&2 five more times to give a 12round garter stitchborder Round 13: (K2tog, K to next marker, SM) repeat across round (decreasing by 1osts) Round 13: (K2tog, YO, K2tog, K to next marker, SM) repeat across round (decreasing by 1osts) Round 14: (K to marker, SM) repeat across round Repeat rounds 13&14 until only 1osts remain, then K2tog across round (leaves you with 5sts) Repeat rounds 13&14 until only 10sts remain, then K2tog across round (leaves you with 5sts) (Switching to magic loop, or an alternative form of small diameter circular needle when required) (Switching to magic loop, or an alternative form of small diameter circular knitting when required) Drawstring remaining stitches and secure. Drawstring remaining stitches and secure.
Custom Sized Blanket
There are three stepsthat youneed toundertaketo custom sizethis blanket-Work out yourgauge, Know howbig youwant the finished product, and from those two steps calculate the number of stitches to cast on.
ONE: What gauge do you knit at?
Please dont doαgaugewath!Jstageneralguge(fyouhavebeenknitting awhileyouwillknowroughlywhat yourgauge is. Otherwise, suggest going with whatever is on youryarn ballband). Personally I knit at 22sts/1ocm using DK and 4.5mm needles (2.2sts/1cm) TWO: How big do you want the blanket; What diameter? For simplicity's sake, lets say you would like your blanket to be o.6m in diameter. If diameter is o.6m, then the radius will be o.3m. Use the radius (r) and the formula 2rto calculate the circumference of the blanket. To make it more simple, just call3 instead of 3.14...then you don't need a calculator! In this case the circumference willbe 1.8m/18ocm $(2\times3\times0.3)$
THREE: How many stitches to Cast On:
From Step one youcan seeIknit at2.2sts/cm.Ineed to CO18ocm worth ofstitches. $50,180\times2.2=C O$ 396stitches. You need your # of CO stitches to be a multiple of 1o, so round up to 4oostitches. Now you have your CO number, get knitting on yourborder, and then decide upon the plain blanket, or eyelet blanket.
Converting your blanket to a Cardy
To create a pinwheel cardy in reverse fashion you knit as per normalfor the blanket pattern until you reach the point where there are 1g or25sts between markers(dependent upon which size you are knitting). From here two contrast yarn segments are knit. This involves knitting two of the ten segments with contrast yarn effectivelya provisionalcast on', orafterthought heel') to create a place you can return to once the blanket is complete and release live stitches to knit the sleeves.
6m to 2y(2y to 4y)
CO 450(550)sts using long-tailCO. Placea markerafterevery 45(55)th stitch. Joinfor knitting in the round. Round 1: (Kztog, Kto next marker, SM) repeat across round (decreasing by 1osts) Round 2: (P to marker, SM) repeat across round Repeat rounds 1&2 five more times to give a 12round garter stitch border Round 13: (K2tog, YO, K2tog, Kto next marker, SM) repeat across round (decreasing by 1osts) Round 14: (K to marker, SM) repeat across round Repeat rounds 13&14 until there are 19(25) stitches between each marker. Sleeve insertionround:Segment Ktog,YKtog,Ktonextmarker, MSementUsing αmallengthof contrast yn Kall sts to thenext marker, tunyourwork and purlbacktomarker.Changebacktomainyarn,and workthissectionas normal-K2tog, YO, Ktog,Ktonext marker, SM.Segments3and4-Knit asforSegment, Segment5Knit asforSegment 2. Segments 6-10 - Work as for Segment 1. Repeat rounds 13&14 until only 1osts remain,then K2tog across round (leaves you with 5sts) (Switching to magicloop, oran alternativeform of small diametercircular knitting when required) Drawstring remaining stitches and secure.
Converting your blanket to a Cardy continued...
Return to sleeve insertion segment. Release contrast yarn PCO and place live stitches onto a 3ocm 4mm circular needle. Knit allstitches until seeve measures approximately 25 (35) cm in length. Knit 5cm cuff of your choice (garter stitch or rib works best here). BO. Repeat for second sleeve. Finishing: Sew in all ends. Wash in a gentle wool wash, then layflat and in shape, opening alleyelets up, to dry. Please do not sell items crafted from this pattern without permission from author. Please reference the author where appropriate, and do not claim this pattern and i's contents as your own - send people to the original source: www.knitsoquaint.blogspot.com A Free pattern by Kelly Brooker


