THYONE
By Letipanda
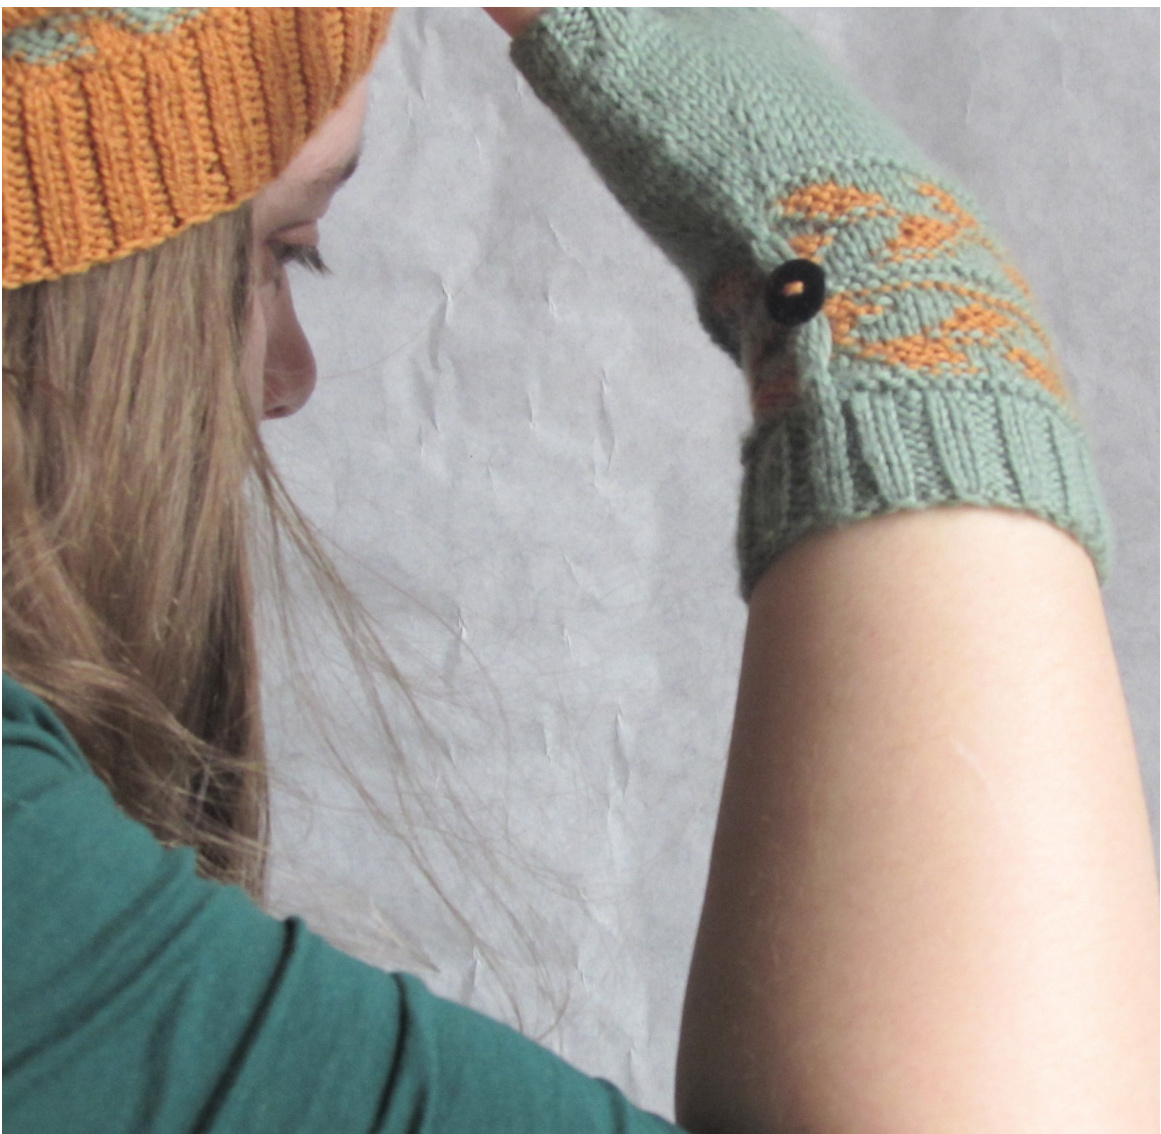
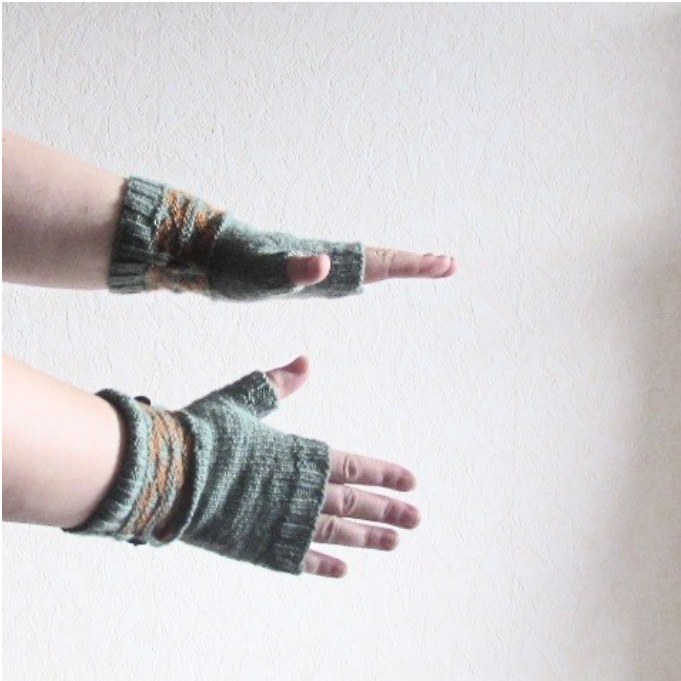
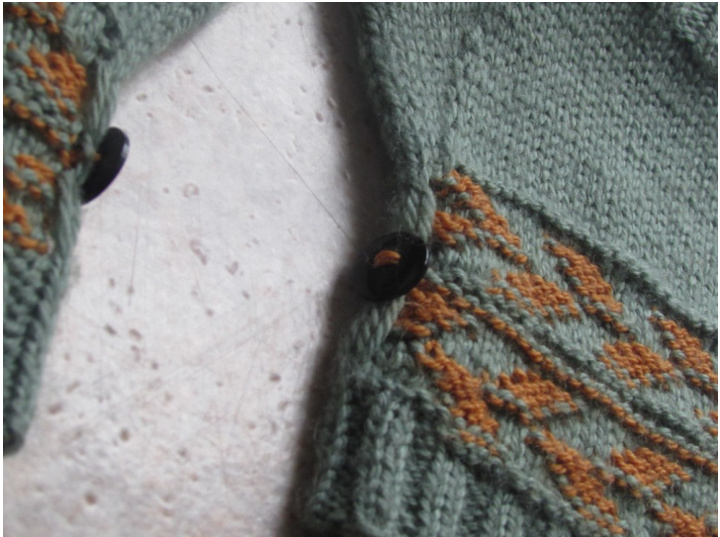
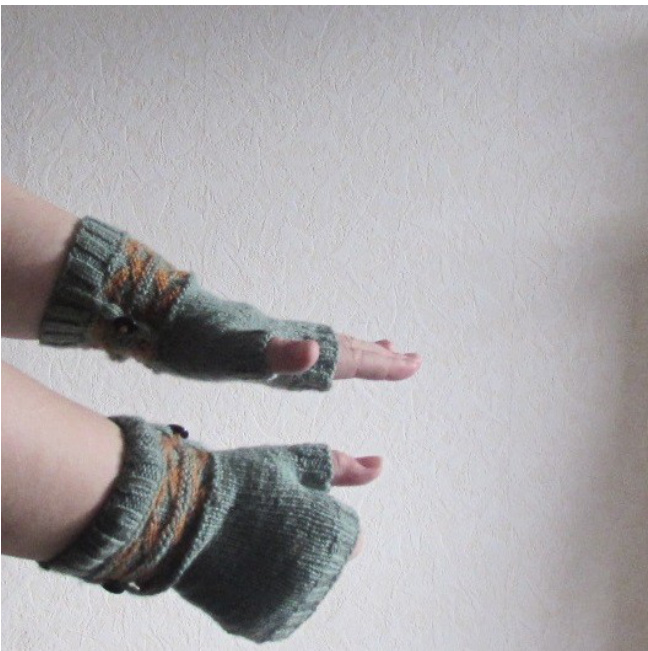
This pattern is my intellectual property. It's for PERSONAL USE ONLY. It means you cannot sell or distribute this pattern on. commercial or non commercial purpose, fully or partially, or any objectbased on it. Contact me if you need any information : LetipandaBC@gmail.com. Since I have always been fond of ancient Greek culture and mythology, I wanted to create the two little sisters of Sémélé, the Thyoné mitts. Actually, Thyoné and Sémélé are the same person in the mythology. When Dionysos brought back Sémélé from Hell, he gave her immortality and a place on Mount Olympus. This rank gave her a new name : Thyoné. Like the hat Sémélé, those mittens are knit with a light-weight yarn, but since it is soft merino, they will indeed keep you warm ! About techniques : these mittens are worked in the round, from the wrist to the fingers. To be at ease, there is an elastic cast on and en elastic bind off. This way, the hand or the wrist will not be hurt, or marked, or constricted. The Fair Isle part and the slip stitches part (which creates a slight wrinkle on the wrist where the buttons are sewn) are the same than the ones you can find in the Sémélé pattern. Yet, unlike Sémélé, the measures for those mittens have been calculated to fit your hands with negative ease. This way, it fits closely at palm level. Severalsizes are available in this pattern, from child size to adult large size, yet without clear distinction. The sizes are indicated in centimeters. Choose the closer size to your palm measure, fingers slightly spread (at the stronger point, in general right under the fingers).
Material:
Thread : Fingering 4ply, between 75 and 220 ydof MainColor, between 12 and 55 yd of contrasting color, according to size. My version, size 19 cm, I used BB Mérinos from Fonty (100% merino, 50 gr = 220 yd) colors : Moutarde (10gr, about 46 yd) and Tilleul (40gr, about 175 yd). Circular needles 3 and 2.5 mm 4 markers. Gauge : 28 st.x 34 r = 10 cm in stockinette, in the round.
You have to respect this gauge if you want to obtain indicated final size.
In accordance with your thread's choice, choose needle size which give this exact gauge. Each size has been calculated to the right stitch as closely as possible, you will have a smaller or bigger mittens if you do not respect the gauge.
Abbreviations :
K : Knit P : Purl st : stitch. r : row. PM : place marker - SM : slip marker MC : Main color. CC : Contrasting color. N1 : needle 1 - N2 : needle 2. M1 : Make One (see annexes p. 6). K2tog : Knit 2 together. Advices and information : You will find at the end of this pattern, in annexes P 5 and 6, all techniques use with step-by-step descriptions. I advise you to check them, even if you already know how to knit them. All the important information are indicated in italic, underlined and colored. In this pattern, only important rows are written, the rest is simply pointed out. Count your rows. N1 contains the palm's stitches, N2 contains back of the hand's stitches. Do not forget to cross the threads during Fair Isle part. You can cross threads every 4 stitches, without tightening too much, it should be enough. I highly recommend you to read entirely the pattern before beginning, at least once, to avoid any kind of surprise. Moreover, always read entirely each paragraph before continuing. If you want to save paper and ink, print only pages 3 and 4, chart is on p.6 ;) . PATTERN : Each size is indicated in this order with this color code 15 [16, 17, 18, 19, 20, 21] cm, or sizes 1 [2, 3, 4, 5, 6, 7].
1- Fore-arm :
With the thinner needles and MC thread, cast on 52 [56, 60, 64, 68, 68, 72] stitches with elastic cast on. No panic, if you do not know how to do it, there is a step-by-step p. 5. Place a marker at the beginning of the row. Knit ribs 2/2 on 10 rows (or more if you want) (K2, P2): Each size is indicated in this order with this color code 15 [16, 17, 18, 19, 20, 21] cm, or sizes 1 [2, 3, 4, 5, 6, 7].
2 - The wrist :
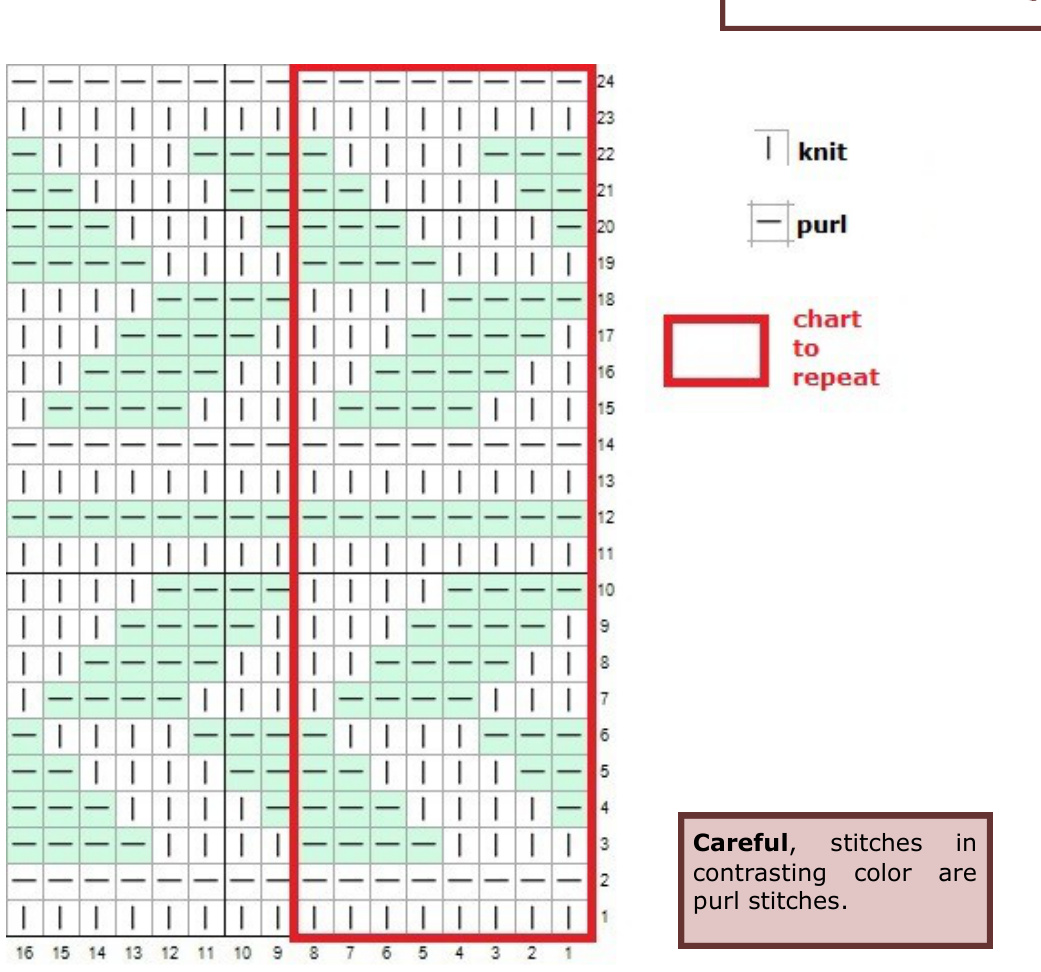
Take the bigger needles. On the next row, decrease8stitches(sizes1,3,5,6and Z)/10stitches(sizes2and 4 anywhere on the row butina homogeneous way (do it with K2tog). You have 44 [46, 52, 54, 60, 60, 62] stitches. Before knitting the next row, place a marker 2 stitches after the one which mark the beginning of the row, count 20 [20,24, 24, 28, 28, 29] stitches, PM, count 2 stitches, PM. Be careful, for sizes 2,4 and 7, count 3 stitches instead of 2. Careful: the two (or three) stitches placed between the markers should be knitted only on rows 1, 11, 13 and 23 of the chart. On the others rows of the chart, you must slip them, as they come, on the right needle without knitting them and continue the chart as if they do not exist. Then, you should knit them as usual. Follow the chart on p. 6. Repeat the 8 stitches boxed in red. The green stitches on the chart must be done with CC thread. On 13rd row of the chart, decrease again 8 stitches, in a homogeneous way, 4 on the back of the hand, 4 on the palm. You have 36 [38, 44, 46, 52, 52, 54] stitches. Pour the first two sizes, the chart ends here. For the others sizes, finish the chart entirely.
3 - Body of the mitten :
Once the chart is finished, decrease 0 [0, 2,2,6, 6, 6] stitches anywhere on the next row. You have 36 [38, 42, 44, 46, 46, 48] stitches. You can remove the 2nd marker. The marker of the beginning of the row remains, as well as the two markers on the left (N1 facing you) with 2 slip stitches between them. Move those two from one stitch in order to have 4 st. between them. This will be the thumb. It is knitted at the same time than the hand. Continue, in stockinette, following these rows: R 1_: K to the marker, SM, M1, K to the marker, M1, SM, K to the end. Repeat rows 1&2 : 4 [5, 5, 6,6, 7,7] times in total. Continue, in stockinette, until you reach the junction of the thumb without pulling. I do not indicate a measure to follow because each hand is different. Do try the mitten and see by yourself:). Then, divide the work by knitting until the first marker, putting the 12 [14, 14, 16, 16, 18, 18] stitches aside, and continuing after the second marker. Continue until you reach the length you want, adjust the number of stitches to a multiple of 4 and knit 10 row of ribs 2/2 (K2, P2). Favor an elastic bind off (see annexes p. 5).
4 - The thumb
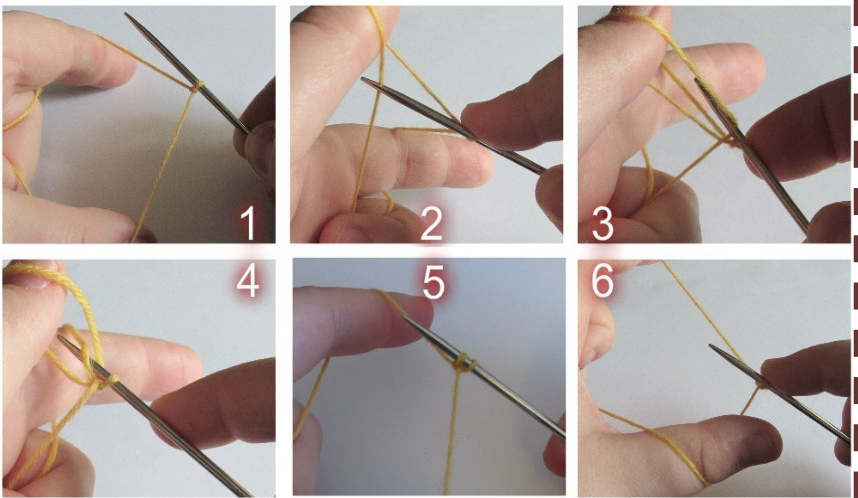
Take back the stitch of the thumb. Pick up and knit, at the level of the junction, between 2 and 6 stitches, as you prefer. Adjust the number of stitches to a multiple of 4. Knit 10 rows of ribs 2/2 (K2/ P2) and bind off. Make the second one. . It's over ! Weave in end, sew buttons, wash and dry flat. Make sure you have enough thread to cast on all stitches. 1 - Cast on 1 stitch, put the cast on thread on your forefinger and the knitting thread around your thumb, from inside to outside and keep a good thread tension with your others fingers. 2&3-Put the needle under the"outside"thread of thethumb. 4 - Then, put the needle under the thread of your forefinger and pull it through the thread of your thumb. 5 - Pull the two threads. You have got 1 st. 6 - Now, place the thread around your thumb from outside to inside.
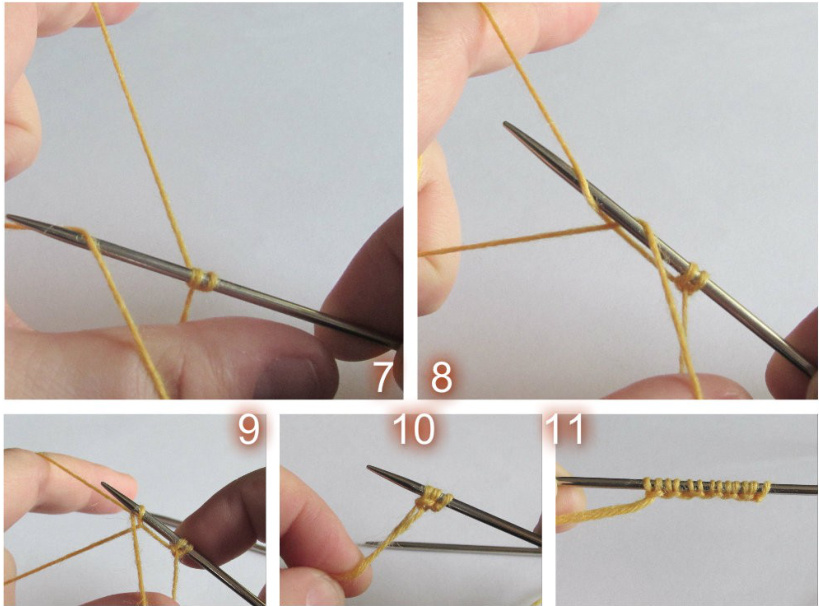
7 - Put the needle under the "inside" thread of your thumb. forefinger and pul it through the thread of your 9 -Pull the two threads. You have got 1 new st. 10&11-Repeat steps 1 to 9(without casting on 1 st)until you have the given number of stitches.
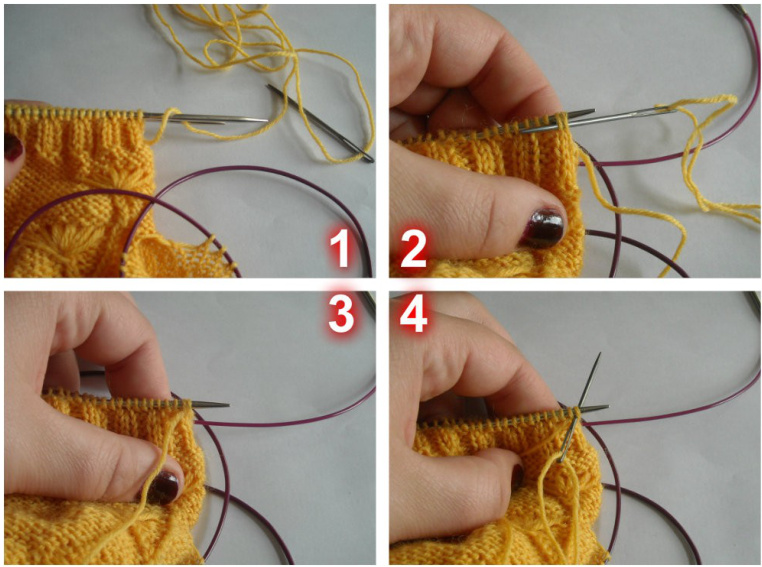
E. ZIMMERMAN ELASTIC BIND OFE:
Make sure you have enough thread to bind off all stitches. At least, 3 times the length of the row. 1 - This is what you have at the start. 2 - With a sewing needle and the thread : put the needle through the first two stitches, as if to purl. 3 - Pull the thread. 4 - Then, put the needle through the first one, as if to knit, and pull the thread.
5 - Slip the stitch off the needle. 6 - Put again the sewing needle through the two first stitches as if to purl and pull the thread. 7 - Put the needle through the first one as if to knit, pull the thread and slip the stitch off the needle. 8 - Bind off all stitches, repeating steps 6&7. Be careful, do not tighten to much, work loosely.
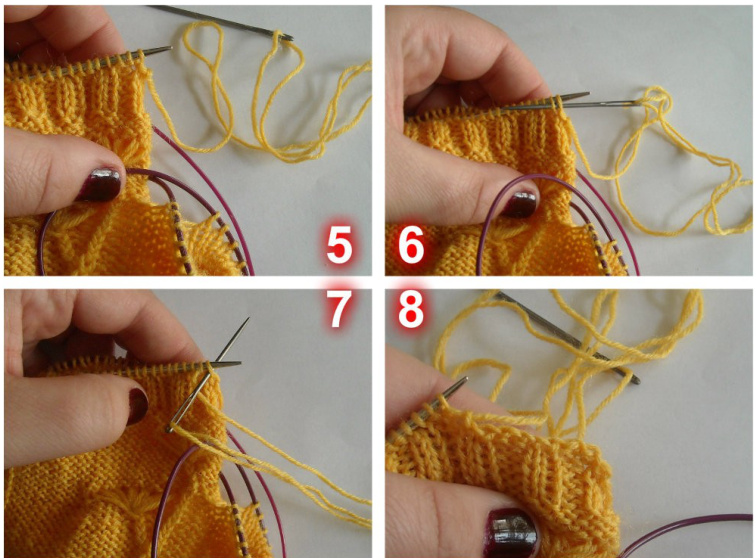
When it remains 1 stitch before end, put the needle as if to purl, with the first one of the row, then as if to knit in the last one only. Weaveinends.
Whenyouhave toMake One on theleftsideof the work (picture 1), from the front, pick up the thread between two stitches with left needle (picture 2) thenknit throughbackloop(picture3).It corresponds to the increase you have to do on the left of a marker.
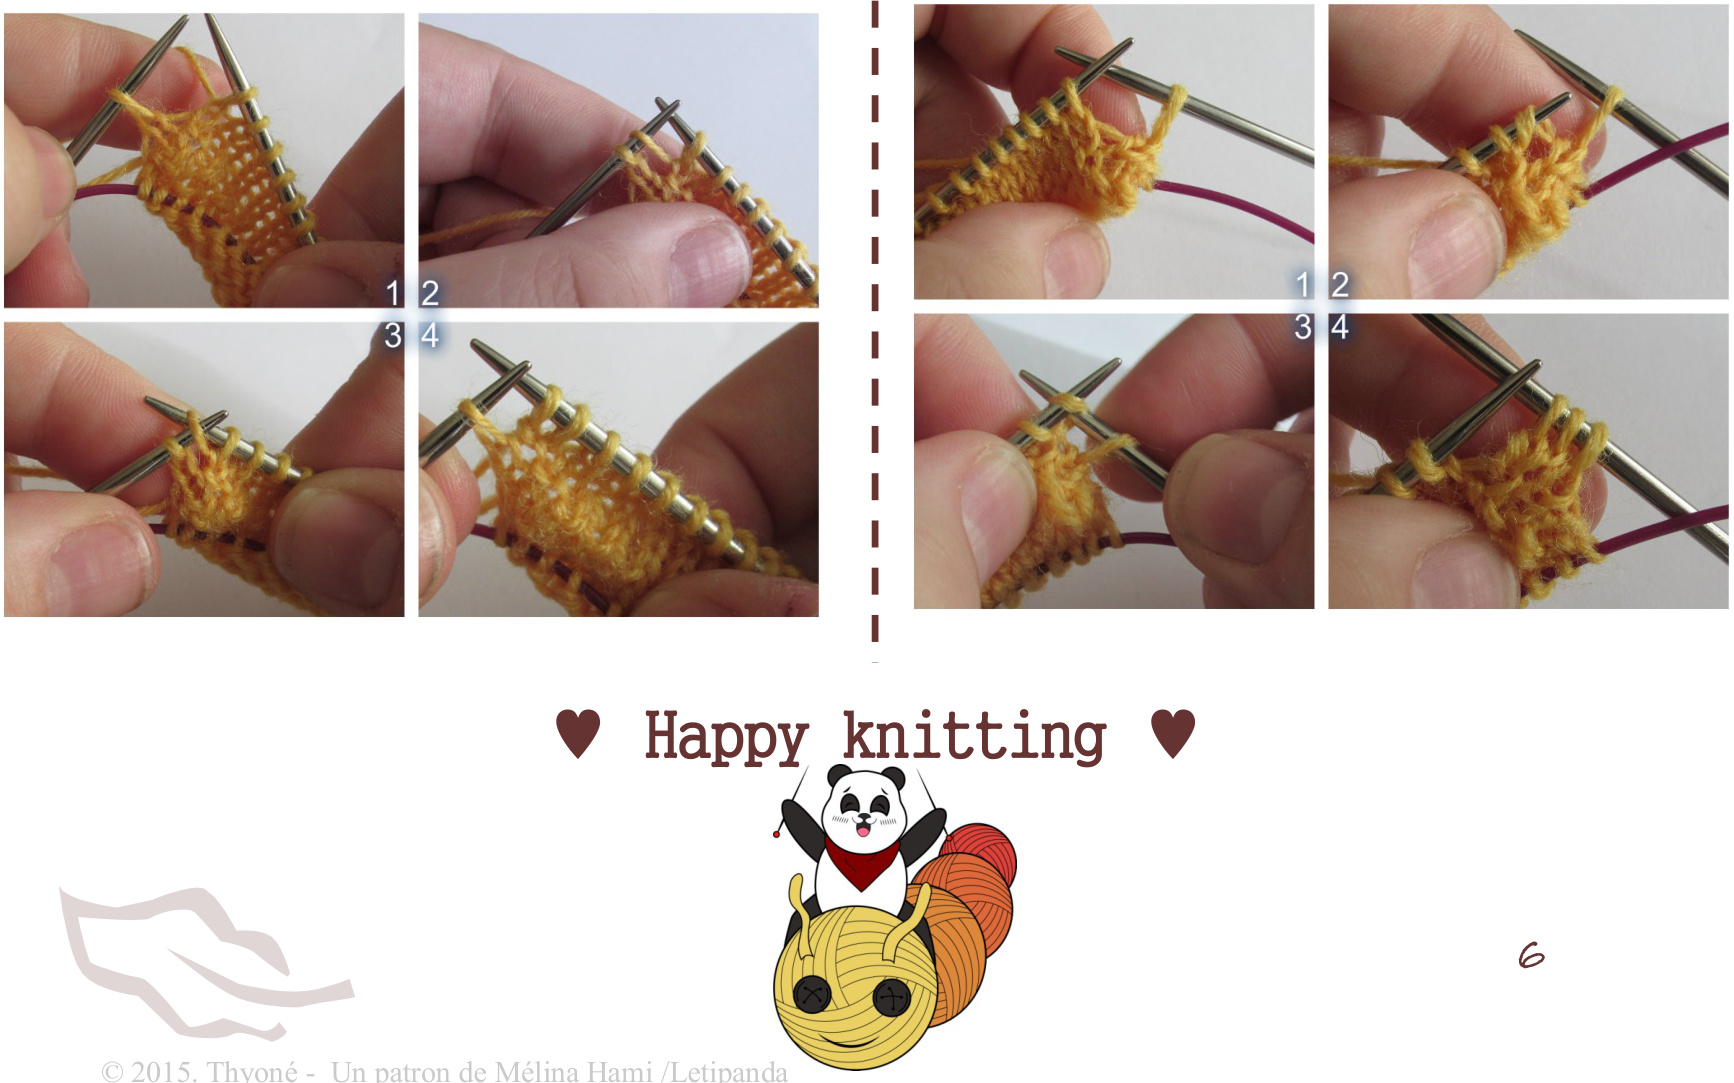
M1 : When you have to Make One on the right side of the work (picture 1), from the back, pick up the thread between two stitches with left needle (picture 2)and knit through front loop (picture3).It corresponds to the increase you have to do on the right of a marker.


