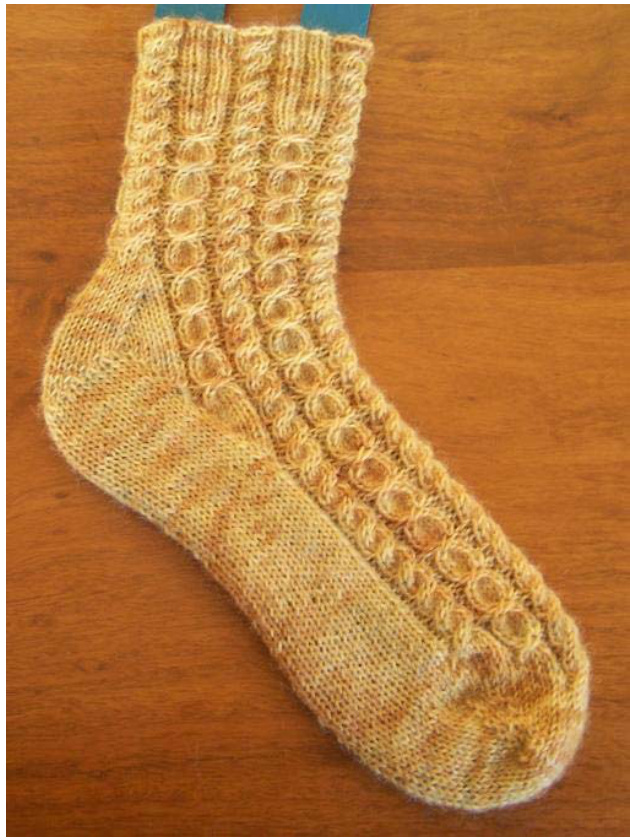
Penny Socks
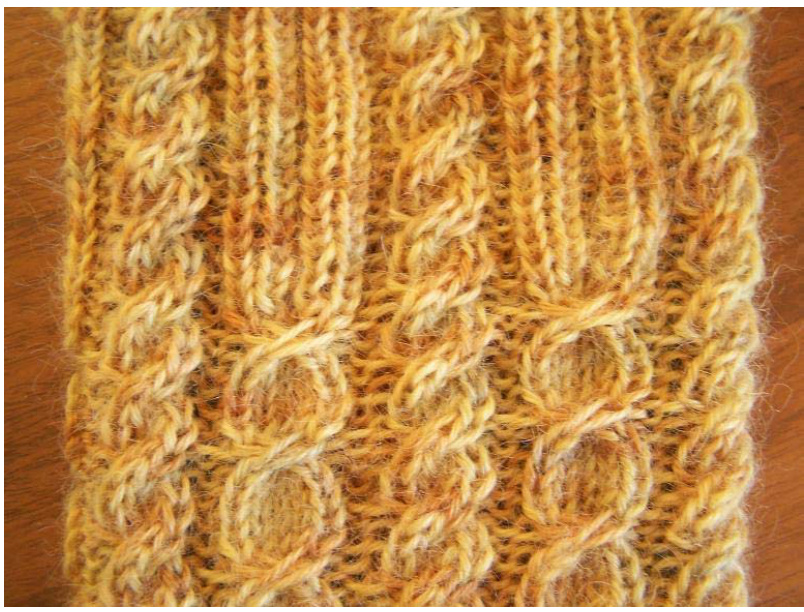
Cable toe-up socks with a gusset heel.
Materials:
4 oz (114 gram) of sport weight yarn, 270 yards minimum. set of 5 double pointed needles sized to get gauge Cable needle, the u-shaped kind works best for the coin crosses Blunt tapestry needle to weave in ends
Gauge:
23 sts $\times\,34$ rows over 4 inches x 4 inches (10 cm x 10 cm) in stockinette stitch
Sizes:
Woman's medium, large. The pictures are of the large size.
Abbreviations:
yo...yarnover tbl ... through the back of the loop ssk . . . slip, slip, knit ssp . . . slip knitwise, slip knitwise, place back on left needle, purl through the back of the loop M1 ... Make a stitch by lifting the bar between the 2 stitches below and knitting it through the back of the loop P1 . . Make a stitch by liting the purl bar below and purling it RC ... Right cross cable: place 2 stitches on a cable needle and hold at the front, k2, k2 from cable needle CC ... Coin Cross: place 4 stitches on a cable needle and hold at the back, k1, place 3 stitches back on the left needle, bring the remaining stitch on the cable needle to the front, k3 from the left needle, k1 from the cable needle. You are knitting 5 stitches in this order: 5th, 2nd, 3rd, 4th, 1st.
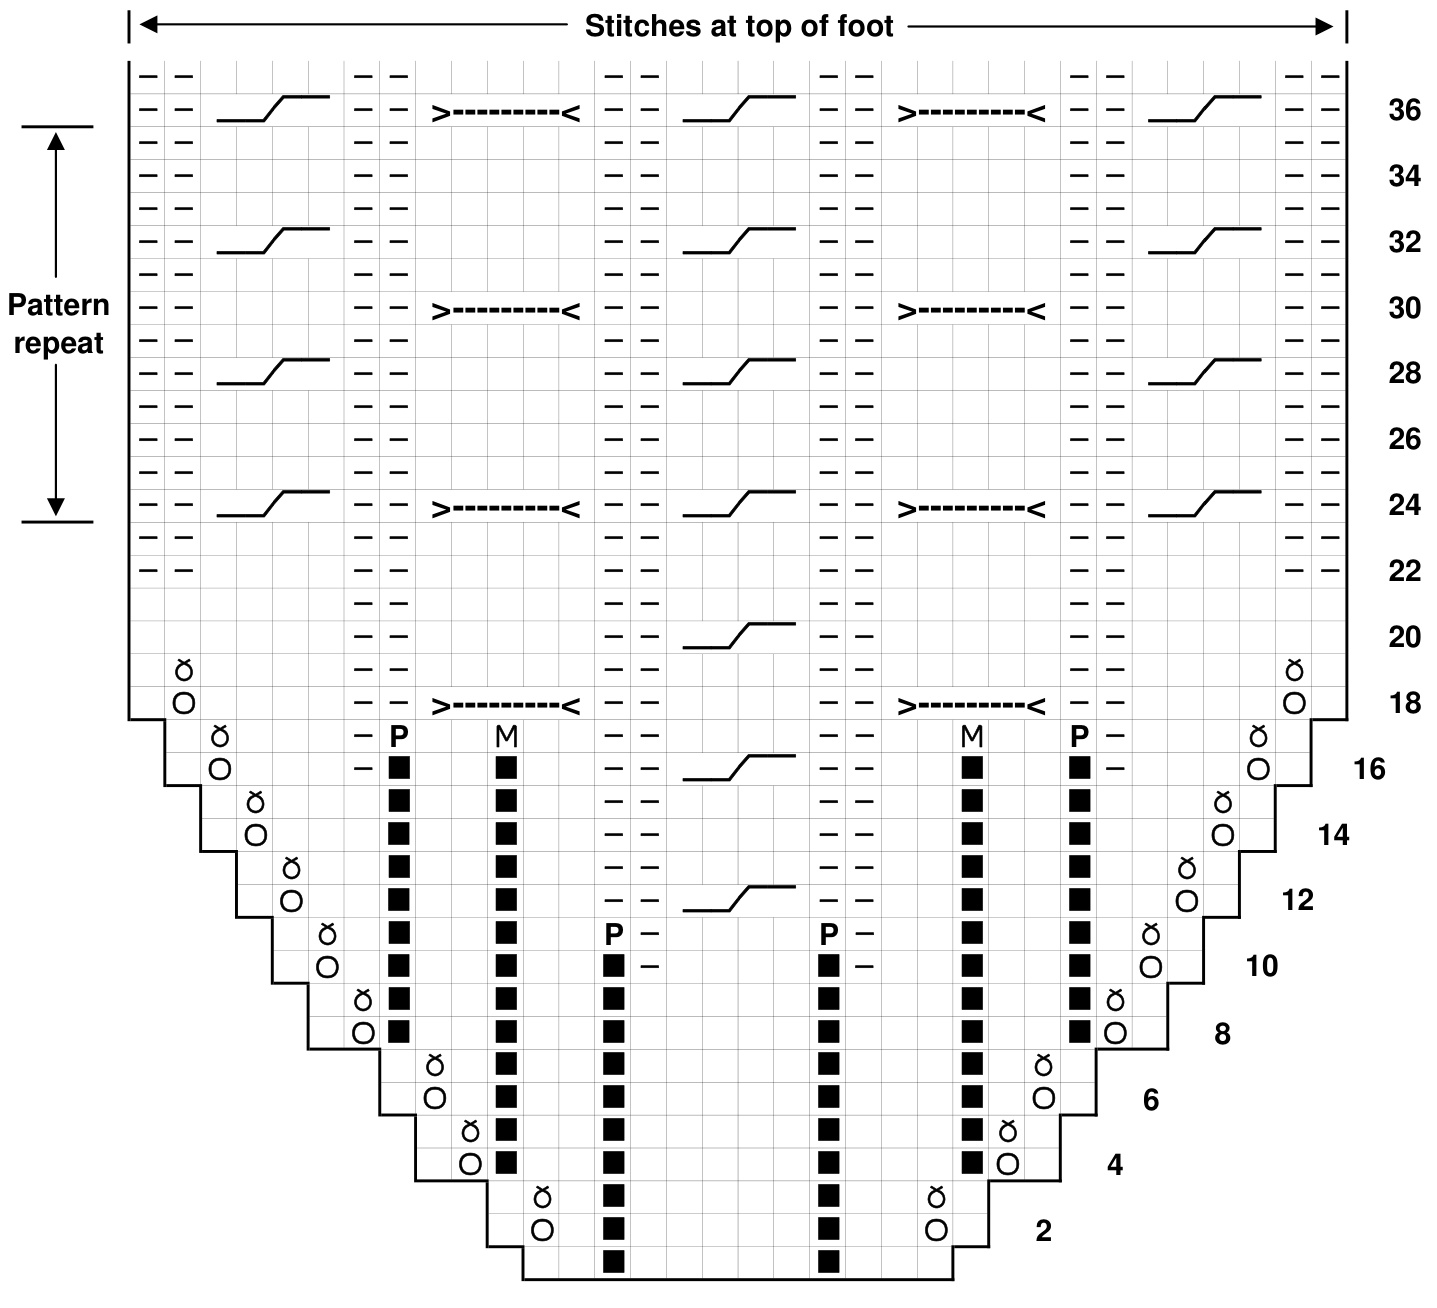
Cast on 20 stitches using your preferred toe-up cast on method. I used Judy's Magic Cast-On. Follow the charts if you prefer.
Toe Round 1: knit Toe Round 2: $^{\star}\mathsf{k}\,^{\sf d}$ , yo, k8, yo, k1\*, repeat for second half of stitches (<4SLS) Toe Rounds 3, 5, 7, & 9: \*k1, knit yo tbl, knit to yo, knit yo tbl, k1\*, repeat Toe Round 4: \*k1, yo, k10, yo, k1\*, repeat (28 sts) Toe Round 6: \*k1, yo, k12, yo, k1\*, repeat (32 sts) Toe Round 8: \*k1, yo, k14, yo, k1\*, repeat (36 sts) Toe Round 10: k1, yo, k16, yo, k2, yo, k5, p1, k4, p1, k5, yo, k1 (40 sts) Toe Round 11: k1, knit yo tbl, k16, knit yo tbl, k2, knit yo tbl, k5, p1, P1, k4, p1, P1, k5, knit yo tbl, k1 (42 sts) Toe Round 12: k1, yo, k18, yo, k2, yo, k6, p2, RC, p2, k6, yo, k1 (46 sts) Toe Round 13: k1, knit yo tbl, k18, knit yo tbl, k2, knit yo tbl, k6, p2, k4, p2, k6, knit yo tbl, k1 Toe Round 14: k1, yo, k20, yo, k2, yo, k7, p2, k4, p2, k7, yo, k1 (50 sts) p2, k7, knit yo tbl, k1 Toe Round 16: k1, yo, k22, yo, k2, yo, k3, p1, k4, p2, RC, p2, k4, p1, k3, yo, k1 (54 sts) Toe Round 17:k1, knit yo tbl, k22, knit yo tbl, k2, knit yo tbl, k3, pi, P1, k2, M1, k2, p2, k4, p2, k2, M1, k2, p1, P1, k3, knit yo tbl, k1 (58 sts) Toe Round 18: k27, yo, k4, $\star_{\mathsf{p}2}$ CC, p2, ${\sf K4^{\star}}$ 2x, yo, k1 (60 sts) Toe Round 19: k27, knit yo tbl,k4, $\star_{\mathsf{p}2}$ k5, p2, ${\sf k4^{\star}}$ 2x, yo, k1 Toe Round 20: k32, p2, k5, p2, RC, p2, k5, p2, k6 Toe Round 21: k32, p2, k5, p2, k4, p2, k5, p2, k6 Toe Rounds 22 & 23: p2. k4. b2. k5. b2. k4. b2. k5. 02. k4. p2
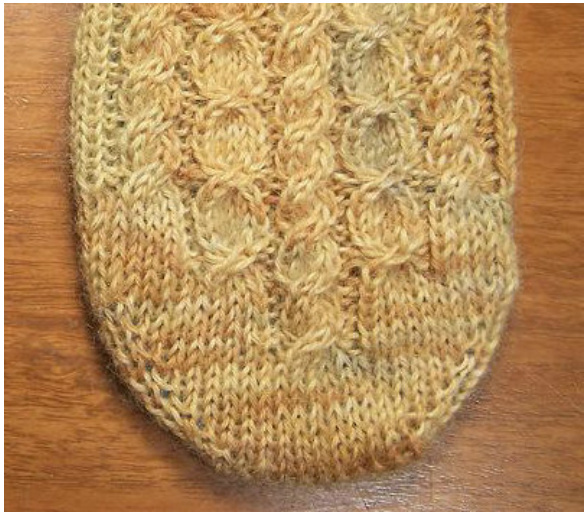
Foot:
Start stockinette stitch on the bottom of the foot (needles 3 & 4) and the cables on the top of the foot (needles 1 & 2). Round24:k26, $\star_{{\sf p}2}$ RC,p2,CC\* 2x,p2,RC,p2 Rounds 25,26,27,29,1,,34,&35 $\star_{\mathsf{p}2}$ k4, p2, ${\sf k5^{\star}}$ 2x, p2, k4, p2 Rounds 28 & 32: k26, $\star_{{\sf p}2}$ ,RC, p2, ${\sf k5^{\star}}$ 2x, p2, RC, p2 Round 30: k26, $\star_{{\sf p}2}$ ,k4, p2, $\mathsf{C C}^{\star}$ 2x, p2, k4, p2 Repeat rounds 24-35 3 $(3+)$ times, ending on round 35 (round 29).
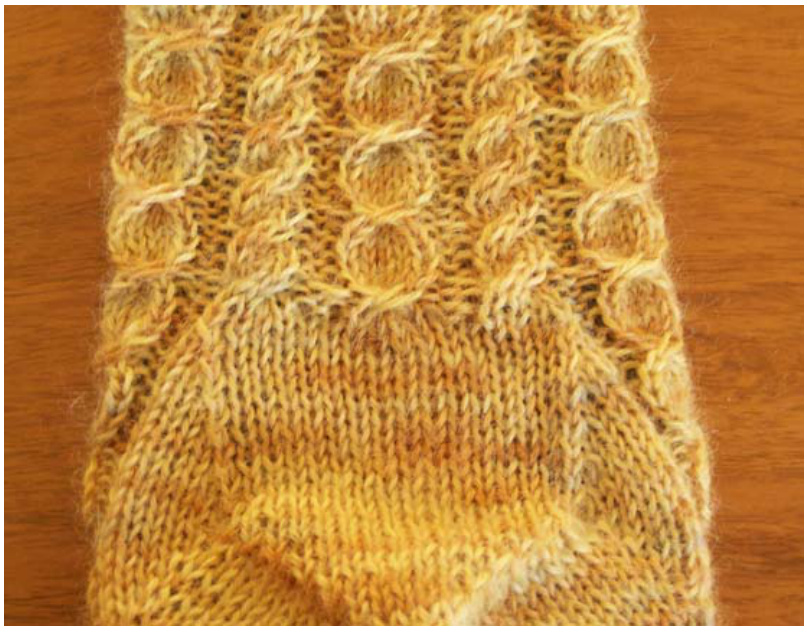
Gusset:
You will now start increasing for the gusset on every even row by increasing before the first purl stitch and after the last purl stitch of the round. Place the increase stitches on the needles with the cables. These gusset increase stitches will be knit unless otherwise stated. Work until there are at least 8 gusset increases. Two rounds before the next CC, frame it with 2 purl stitches (see the gusset chart). The cabling will continue in pattern with the additional coin cross cables at the beginning and end of the pattern repeat. Continue working in the established pattern until 12 stitches have been increased. End on round 24 (round 30). (84 sts)

Heel:
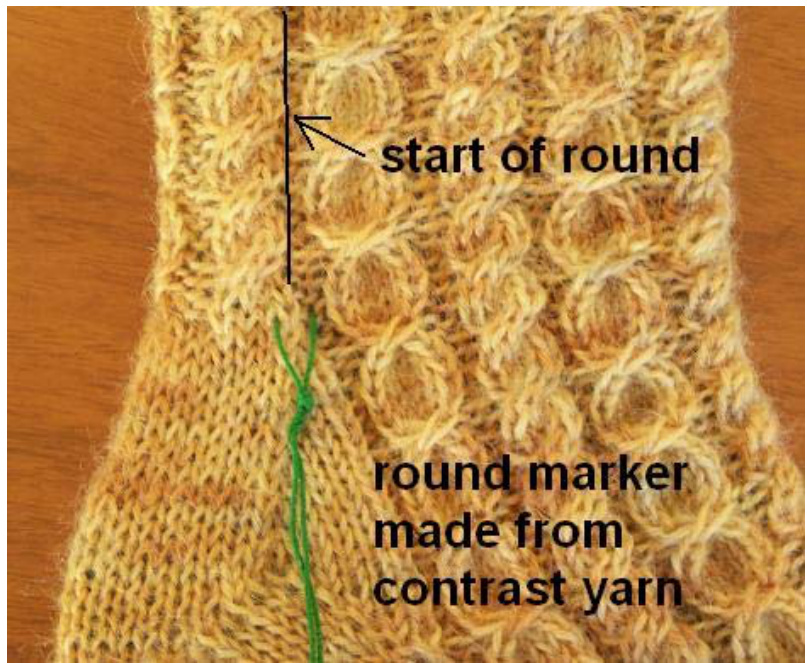
Shift all the gusset stitches to the needles with the cables if they are not there already. Work the heel on the 26 stitches from the sole needles as follows: K15, k2tog, k1, turn Sl1,p5, ssp, p1,turn Sl1, k6, k2tog, k1, turn S1,p7, ssp, p1, turn Tun, sl,k15M (btwentuned helandthnext edethis willprevent hole), work across pattered stich to the other side of the turned heel, M1 (same as above). (76 sts) You wi now start the second half of the gusset shaping. I recommend that you move the increase stitches to the needles withthe heel (used to be the sole) stitches, leaving the gusset purl and coin cable stitches with the other The first heel stitch will be referred to as the leading stitch. While maintaining the established pattern, decrease on each even round at the leading stitch by ssk'ing the leading stitch with the adjacent gusset stitch. It will be similar on the other side of the gusset, only now it will be knit the leading stitch together with the adjacent gusset stitch (k2tog). Work in this manner until all of the knit gusset stitches are incorporated ending on an odd round. There should be 16 heel stitches and 48 cable stitches. (64 sts) Place a marking thread to indicate the round starting point. I use a contrast piece of yarn or string looped through the knitting below.
Leg:
You will now start working the cables on all the stitches. Leg Set-up Round 1: (heel stitches only, the rest remain in the established pattern): k4, p2, k4, p2, k4. Leg Set-up Round 2: (heel stitches only, the rest remain in the established pattern): k4, p2, k2, M1, k2, p2, k4. (65 sts) The pattern stitches should be at Round 35. Divide the stitches evenly across your needles. Be sure to keep the round starting point constant. Continue in the established pattern with the incorporated RC, CC, & RC into the heel stitches. Work 1 round past the 4th coin cross. If you have more yarn than I did you can continue the leg longer. Keep in mind that the cables don't have a lot of lateral stretch so this sock would be pretty snug as it moves from the ankle up the calf. Try it on as you go to make sure it is comfortable.
Ribbing:
At the ribbing, the coin cables will become $_{2\times2}$ ribbing and the 4-stitch cables remain. Ribbing Set-up Round 1: $^{\star}{\sf k4}$ p2, k2, p1, k2, p2 Ribbing Set-up Round 2: $^{\star}{\sf k4}$ , p2, k2, p1, P1, k2, $\mathsf{p}2^{\star}$ (70 sts) Work the ribbing for at least 2 inches or until the yarn runs out. Continue to cross the cables every 4th round. End 2 rounds past a cable crossing. Cast off loosely.
Finishing:
Weave in ends. Wash in mild soap and block to dry. Or slap 'em on your feet and wear them.
Tips:
When deciding how to divide the stitches onto the double pointed needles, I recommend the center of the 4-stitch cable or the center of the p2 between the cables. Both locations as less likely to show the stretched stitches sometimes caused between needles. Having a 4-stitch cable on two needles also makes crossing easier. Cables don't have as much lateral stretch as stockinette or most pattern stitches. Be aware of this if you choose to make the leg longer than the pattern indicates. One way to accommodate some calf shaping is to increase the number of purl stitches between the cables. I would add them gradually. The cleanest way would be to increase after every coin cross on one round, work a few rounds (maybe an inch? it depends on the amount of shaping you want) and then increase after every 4-stitch cable. This is probably best for a moderate amount of shaping, maybe up to 4 purl stitches between cables. Keep in mind how it will work with the ribbing when you get there. Pattern doesn't make sense? You found an error? Have a question? Contact me at miss maia@hotmail.com. Larger pictures along with corrections and questions regarding this pattern will be answered at http://maiaspins.typepad.com/maiaspins/2006/09/design_ a_cable_.html. $\copyright$ 2006 Maia Discoe, Dea Terra Youmayuthis patr peral gifts,orfrcharitab dnato.Cpiof this patmayae as lng as te pais unchangedandcontains allcpright andcntat ifmatonhis patemayntbe old, givenawaybya store rused treats for profit without my written consent.

Note:
The sole stitches are not shown. Toe increases at the sole occur on the same rounds except for round 18. There is a total of 26 sole stitches at the foot.

information


