Happymaking Designs
by Jacqui Harding
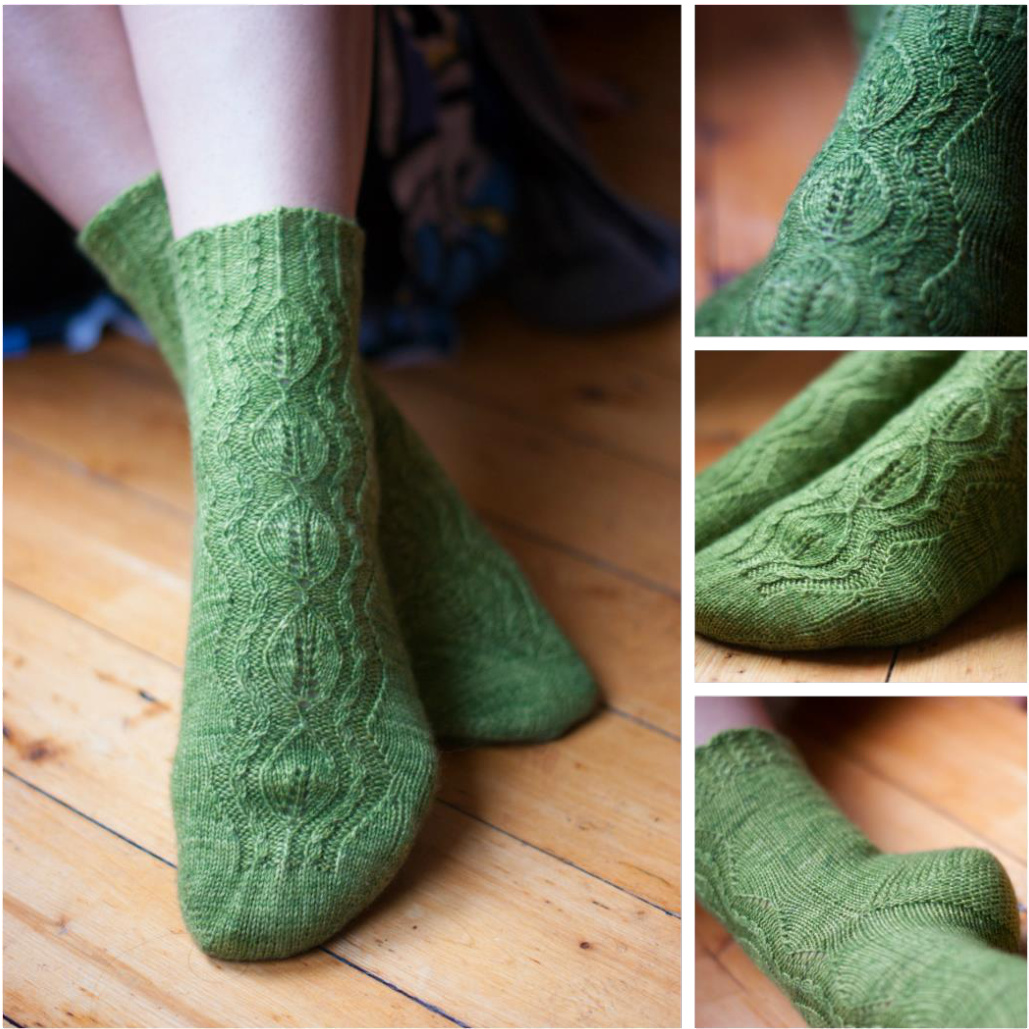
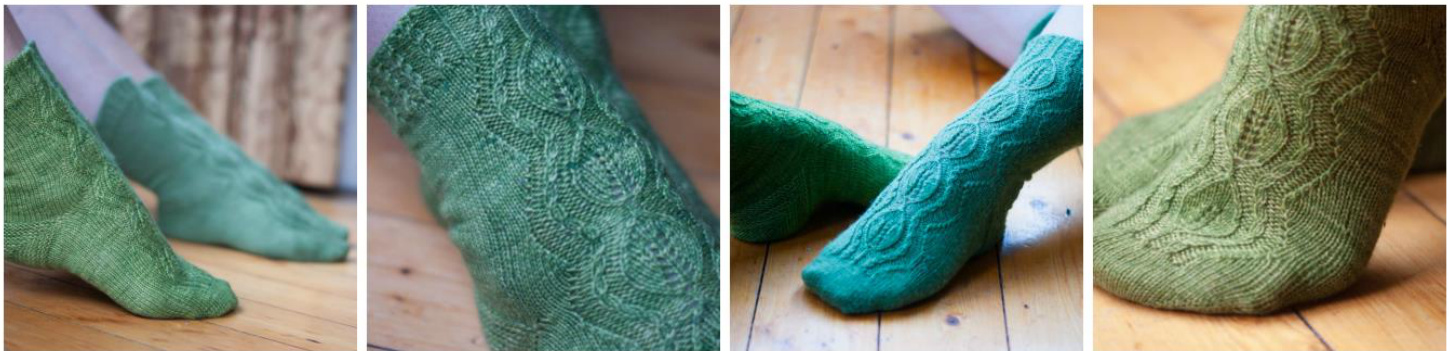
Tendril Sock
These toe up socks feature a pretty leaf lace framed by mini twisted cables. The garter stitch heel is comfy & k. The lace panel grows into a twisted cable cuff that is both functional & interesting.
Materials
Yarn: Skein Queen Blush (80% merino, 20% cashmere) 435 yds per 100g Needles: 2.5mm long circular needle(s) or size to obtain tension. Sizes: S(M,L) 6" (7",8")/ 15(17.5,20)cm diameter unstretched. Length is adjustable. Shown in size L on 9.5"wide foot Tension: 36st and 40 rows to 10cm in stocking stitch Notions: 3 stitch markers Tips: The pattern is written for either magic loop or two circular needles to avoid a needle change in the centre of the charted pattern.
Stitch Notes:
1/1RC - work next two sts as if to k2tog, but before taking the sts off the needle, insert the needle into the first st on LH needle & knit. Take both sts off needle together
Fitting notes:
Toe increases - generally you should increase until the toe of the sock reaches the start of your little toe. This should give you the best indication of which size to knit if you are unsure. Note about foot length. If you are making socks for someone else, it can be hard to work out their foot length. This table may help, but do remember that the most accurate way is to measure their foot:
| UK shoe size | 3 | 4 | 5 | 6 | 7 | 8 |
| Approx.foot | ||||||
| length in cm | 21.5 | 22.5 | 23.5 | 24.5 | 25.5 | 27 |
Heel increase: The lace pattern tends to distort if pulled widthways across the top of your foot. I have provided instructions for an increase heel (High Instep/Wide Heel) and standard heel (Low Instep/Narrow Heel) Lace chart: If you are unfamiliar with working lace charts the 'no stitch' grey boxes can be confusing. This pattern increases from 1 to 11 sts and then back down again, the grey boxes are simply there to allow room on the chart. The grey boxes are simply ignored. So when you are working the chart simply move from the stitch on the right of the grey boxes to the stitch on the left of the boxes. I have also included the written instructions at the end so you can check with them if you are unsure.
PATTERN
Using a Turkish cast on (see video at http:/happymakingdesigns.com/free-patterns-and-tutorials), cast on 32 sts (16 on each needle). Pm for start of rnd. Knit 1 rnd plain. Rnd 1: (K1, kfb, k12, kfb, k1) twice. 36sts Rnd 2 and all even rnds: K Rnd 3: (K1, kfb, k14, kfb, k1) twice. 40sts Rnd 5: (K1, kfb, k to last 2 sts on needle, kfb, k1) twice. 4 sts increased Repeat Rnds 5&6 until there are 56 (64, 72) sts Knit 1 rnd plain. Set up pattern (Lace panel chart & written instructions on p4) Rnd 1: K1(3,5), pm, work Lace Panel chart over 25 sts, pm, k1(3,5), move next st to back needles, k 29(33,37) Rnd 2: K to marker, sm, work Lace Panel chart, sm, k to end Rep Rnd 2 until you have reached the length described in the heel options.
HEEL OPTIONS
HIGH INSTEP / WIDE HEEL
Work in pattern as established to 5.5(6, 6.5)cm less than desired foot length (See Fitting Notes) Rnd 1: Continuing to work in pattern across the top of the foot, k14(16,18) sole stitches, m1 (backwards loop), pm, k1, m1, k to end of needle Rnd 2: Work in established pattern around Rnd 3: work in pattern to marker on sole, m1, sm, k1, m1, k to end of rnd. Rnd 4: Work in established pattern around Repeat rows 3&4 another 0(1, 1) times - 4(6,6) sts increased, all on needle 2.
Work the short row heel
Work in pattern across needle 1.These stitches now remain unworked and the heel is worked over the next 33(39,43) sts. Row 1: K to last st, w&t. Row 2: K31(37,41), w&t. Row3: K to last unwrapped st, w&t. Rep last row until there are 7 unwrapped stitches in the centre. Row 1: K7 to first wrapped st, w&t (this stitch is now double wrapped). Row 2: K7 to first wrapped st, w&t. Row 3: K to double wrapped st, knit double wrapped st, w&t. Row 4: K to double wrapped st, knit double wrapped st, w&t. Rep last row, knitting the double wrapped stitches across, until all the stitches have been worked. Resume working across needles 1&2 again, from Cuff section.
LOW INSTEP / NARROW HEEL
Work in pattern as established to 4.5(4.75,5.25)cm less than desired foot length (See Fitting Notes) Worktheshortrowheel Work in pattern across needle 1. These stitches now remain unworked, and the heel is worked over the next 28(32,36) sts. Row 1: K to last st, w&t. Row 2: K26(30,34), w&t. Row 3: K to last unwrapped st, w&t. Rep last row until there are 7 unwrapped stitches in the centre. Row 1: K7 to first wrapped st, w&t (this stitch is now double wrapped). Row 2: K7 to first wrapped st, w&t. Row 3: K to double wrapped st, knit double wrapped st, w&t. Row 4: K to double wrapped st, knit double wrapped st, w&t. Rep last 2 rows, knitting the double wrapped stitches across, until all the stitches have been worked. Resume working across needles 1&2 again, from Cuff section.
CUFF:
Joining rnd: Start knitting across all sts again. Work in pattern across needle 1. If you worked the heel increases, reduce 2(4,4)sts across the top of the heel by working k2tog at even spaces across needle 2(4,4) times. 56 (64, 72) sts total. If you didn't work the increases, k across needle 2. (Note -you may find you get a neater join if you pick up a st at either side between the needles, which you can then decrease by k2tog with the neighbouring st on the next rnd) Continue to work in established pattern up the leg of the sock, repeating the lace chart at least twice. Repeat chart rows 1-3 once more, then work the cuff chart (p5) in full 4 times. Cast off using Jeny's surprisingly stretchy bind off (http://www.knitty.com/IsSUEfallo9/FEATjssbo.php) or another very stretchy method. Weave in all ends, soak and block.
Enormous thanks go to Ruth Garcia Alcantud for photography and tech editing. You can find her at www.rockandpurl.com Want to follow me? You can catch me on Ravelry (www.ravelry.com) and Twitter (www.twitter.com) as Curvyjax and on my Happymaking Facebook page (www.facebook.com/happymaking)
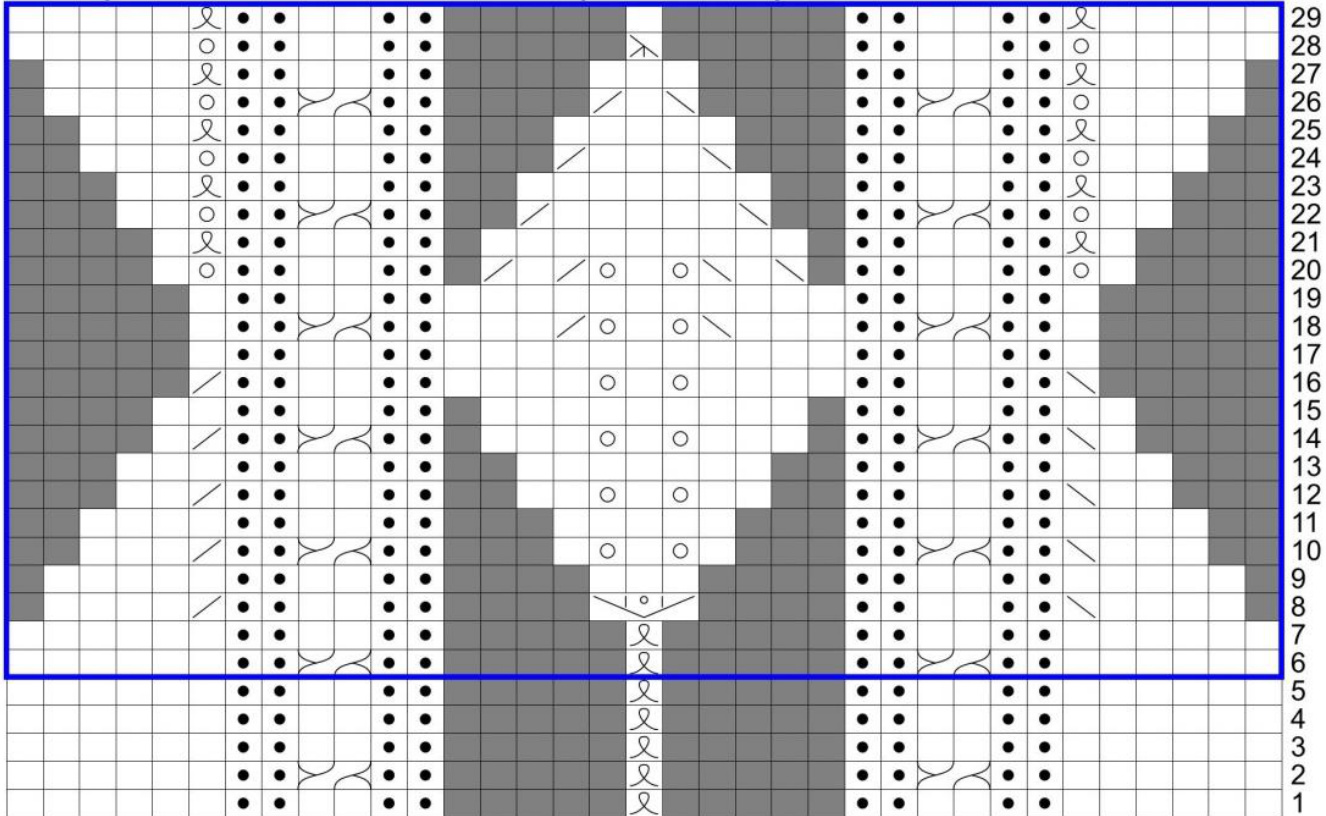
Written instructions for lace panel chart
Rnd 1: K4, [k2, p2] twice, k-tbl, [p2, k2] twice, k4. No s Rnd 2: K6, p2, 1/1 RC, p2, k-tbl, p2, 1/1 RC, p2, k6. k Rnds 3-5: K4, [k2, p2] twice, k-tbl, [p2, k2] twice, k4. p \*Rnd 6: K6, p2, 1/1 RC, p2, k-tbl, p2, 1/1 RC, p2, k6. k-tbl Rnd 7: K4, [k2, p2] twice, k-tbl, [p2, k2] twice, k4. 回 yo Rnd 8: K4, ssk, p2, k2, p2, (k, yo, k) in next st, p2, k2, p2, k2tog, k4. Rnd 9: K5, [[p2, k2] twice, k1] twice, k2. Rnd 10: K3, ssk, p2, 1/1 RC, p2, k1, [yo, k1] twice, p2, 1/1 RC, p2, k2tog, k3. Rnd 11: K2, [k2, [p2, k2] twice, k1] twice, k1. Rnd 12: K2, ssk, [p2, k2] twice, yo, k1, yo, [k2, p2] twice, k2tog, k2. Rnd 13: K1, [k2, p2] twice, k7, [p2, k2] twice, k1. Rnd 14: K1, ssk, p2, 1/1 RC, p2, k3, [yo, k1] twice, k2, p2, 1/1 RC, p2, k2tog, k1. Rnd 15: [K2, p2] twice, k9, [p2, k2] twice. Rnd 16: Ssk, [p2, k2] twice, k2, [yo, k1] twice, k1, [k2, p2] twice, k2tog. Rnd 17: [K1, p2, k1] twice, k9, [k1, p2, k1] twice. Rnd 18: K1, p2, 1/1 RC, p2, k3, ssk, yo, k1, yo, k2tog, k3, p2, 1/1 RC, p2, k1. Rnd 19: [K1, p2, k1] twice, k9, [k1, p2, k1] twice. Rnd 20: K1, yo, p2, k2, p2, ssk, k1, ssk, yo, k1, yo, k2tog, k1, k2tog, p2, k2, p2, yo, k1. Rnd 21: K1, k-tbl, [p2, k2] twice, k5, [k2, p2] twice, k-tbl, k1. Rnd 22: K2, yo, p2, 1/1 RC, p2, ssk, k5, k2tog, p2, 1/1 RC, p2, yo, k2. Rnd 23: K2, k-tbl, [p2, k2] twice, k3, [k2, p2] twice, k-tbl, k2. Rnd 24: K3, yo, p2, k2, p2, ssk, k3, k2tog, p2, k2, p2, yo, k3. Rnd 25: K3, k-tbl, [p2, k2] twice, k1, [k2, p2] twice, k-tbl, k3. Rnd 26: K4, yo, p2, 1/1 RC, p2, ssk, k1, k2tog, p2, 1/1 RC, p2, yo, k4. Rnd 27: K4, k-tbl, p2, [k2, p2, k1] twice, k1, p2, k-tbl, k4. Rnd 28: K5, yo, p2, k2, p2, s1-k2tog-psso, p2, k2, p2, yo, k5. Rnd 29: K5, k-tbl, p2, k2, [p2, k1] twice, k1, p2, k-tbl, k5. Repeat chart from \* S FOR CUFF - Repeat chart at front & back of Small size cuff

Medium size cuff


