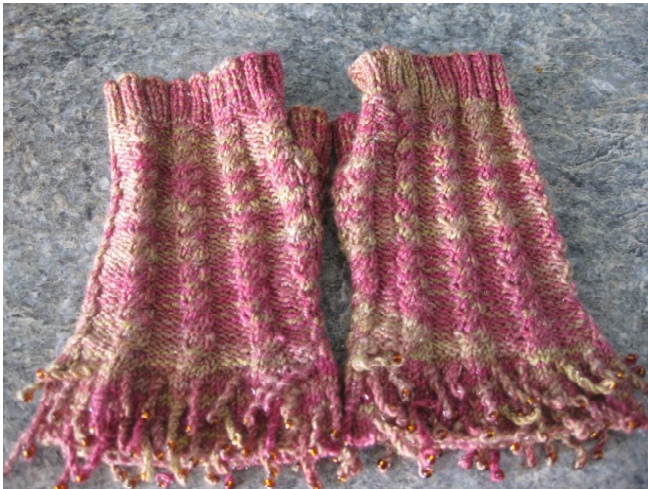
Curly Cuffs
Beaded Fingerless Mittens and Boot Toppers by Liz Rollo
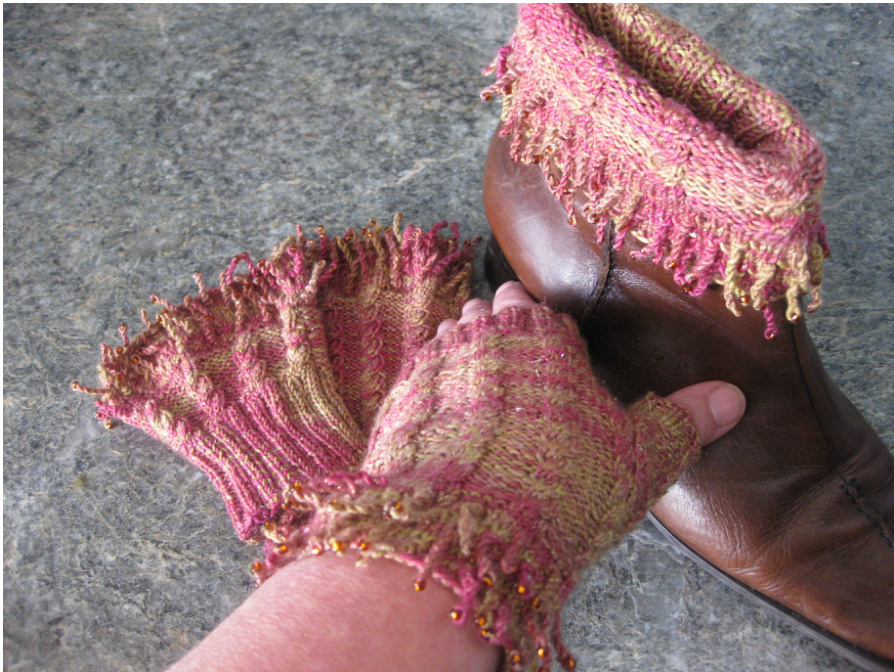
Size -ladies medium You will need: Needles - 2.25mm circular needles, or dpns Yarn - 80g(320m) 4ply sock yarn -(I actually used 44g for the mittens and 33g for the boot toppers.) Beads -size 8/0 - 128 for the mittens and 144 for the boot toppers. You will also need: A 0.6mm crochet hook if using the crochet hook method to add beads. A needle for sewing in ends. Stitch markers (two for each mitten) Tension 18sts and 24rows to 5cm measures over cabled pattern.
Abbreviationsused
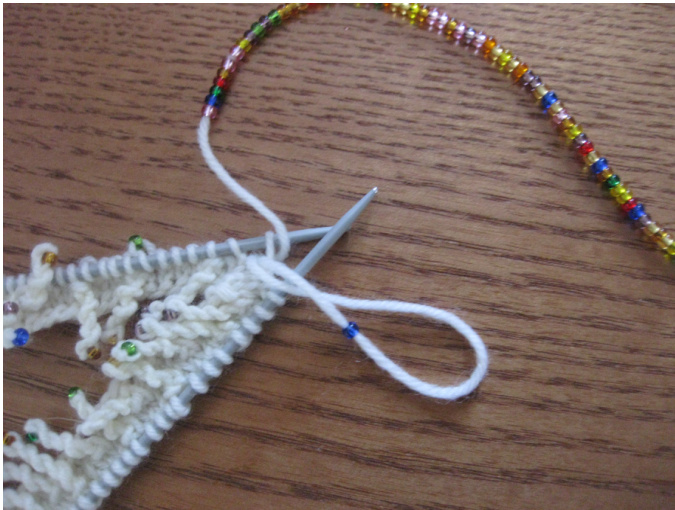
C4B Slip 2 sts onto cable needle and place the needle at back , k2 sts and then k 2 sts fromcableneedle kknit p purl p2tog purl 2 together m1k Pick up loop between 2 stiches and knit it mlp Pick up loop between next to stitches and purl it PM place marker MT make tendril St stitch Before you start, you need to know how to make tendrils. View Cat Bordhi's instructions on youtube: http://www.youtube.com/watch?v=qgD6U8SEEbE
You will also need to know how to add beads to your tendrils.
This can be done in either of two ways:
Crochet hook method
Slip a bead onto a very Transfer the bead Slide the bead to the fine crochet hook. onto the unwound centre and wind the (0.6mm). tendril loop. . tendril.
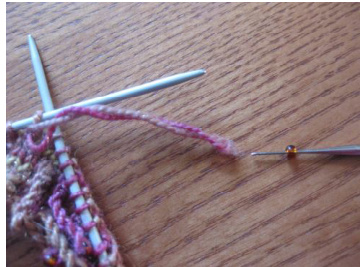
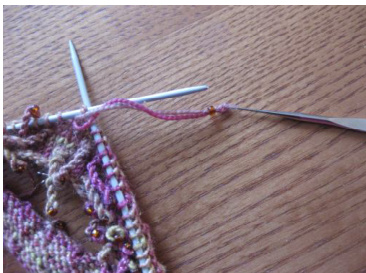
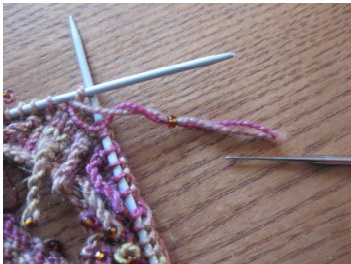
Or,
Thread all the beads you will need onto the yarn BEFORE CASTING ON - that is 64 beads for each mitten and 72 for each boot topper. As you reach each tendril, slide a bead to this position before winding the tendril
FINGERLESS MITTENS
Hem with tendrils Cast on 64 sts, and divide equally between needles Rounds 1 and 2 Knit all sts (taking care not to twist stitches) Round 3: \*k1, MT, k2, repeat from \* to end of round Rounds 4 and 5 , knit all sts Round 6:\* k3, MT repeat from \* to end of round Repeat rounds 1-6 once, then rounds 1 and 2
Cable pattern
Rounds 1,2 and 3: \* p2, K4, p2 , repeat from \* to end of round Round 4 \*p2, C4B, p2, repeat from \* to end of round Repeat rounds 1-4 two more times. I wanted to make the mittens short so that the tendrils would not be hidden by the sleeve of a coat. If you prefer to make them longer, repeat rows 1-4 as often as you like.
Thumb Gusset
Right and left mittens are identical. Round 1. p2, k4, p1, PM, k2, PM, p1, continue in cable pattern to end of round. For rounds 2 -28 , instructions are given only for the section between the markers. For the rest of each round, continue with the cable pattern as established. Round 2. mlk, k2, mlk Round 3. k4 Round 4. mlp, C4B, mlp Round 5. pl, k4, pl Round 6. mlp, pl, k4,p1,mlp Round 7. p2 ,k4, p2 Round 8. mlp, p2 C4B,p2, mlp Round 9 p3,k4,p3 Round 10. mlp, p3, k4, p3, mlp Round 11. p4, k4, p4 Round 12. m1k, p4, C4B, p4, mlk Round 13. k1,p4,k4,p4,k1 Round 14. m1k, k1, p4,k4,p4,k1,m1k Round 15. k2, p4, k4, p4, k2 Round 16. m1k, k2, p4, C4B, p4, k2, mlk Round 17. k3, p4, k4, p4, k3 Round 18. mlk, k3, p4, k4, p4,k3, mlk Round 19. k4, p4, k4, p4, k4 Round 20. m1p, C4B, p4,C4B,p4,C4B,m1p Round 21. p1, K4, p4, k4, p4, k4, pl Round 22. m1p,p1,k4,p4,k4,p4.k4,p1,m1p Round 23. p2,k4,p4,k4,p4,k4,p2 Round 24.p2, C4B, p4,C4B, p4, C4B, p2 Rounds 25,26, 27 - as row 23 Round 28 -as row 24
Next FULL ROUND -
P2, k4, p into front and back of next stich (ie increasing one stitch), slip all 24 gusset stitches onto a spare piece of yarn, return to main part of mitten, p into front and back of next stitch , continue in pattern to end of round (64 sts). Work 7 more rounds in cable pattern, ending on row 4 Work 8 rounds in k2, p2 rib and cast of loosly.
Finishing Thumb
Pick up the 24 stitches from the spare yarn, join in a circle and work 6 rounds in k2, p2 rib Cast off loosly. Sew in all loose threads, then knit your second mitten.
BOOTTOPPERS
Cast on 72 sts, dividing them between needles Work the 8 rounds of the hem with tendrils the same as mitten pattern. Next 3 rounds \* p3, k4, p2, repeat from \* to end of round Round 4 \* p3, C4B, p2 , repeat from \* to end of round Repeat rounds 1-4 once Next round \* p1, p2tog,k4. p2, repeat from \* to end of round
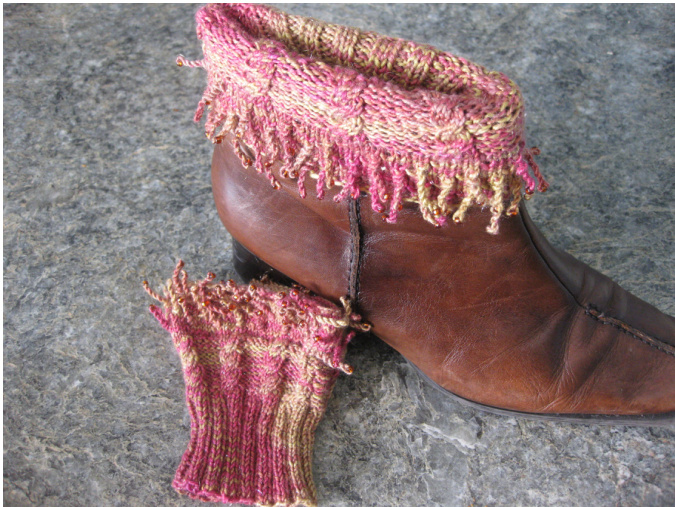
Next 2 rounds \*p2,k4,p2, repeat from \* to end of round Next round \*p2, C4B, p2, repeat from \* to end of round The next section will be tucked into the inside of the boot: Work at least 5cm in k2 p2 rib. Cast off loosly Sew in loose ends and then knit your second topper.


