Moogle Amigurumi Pattern
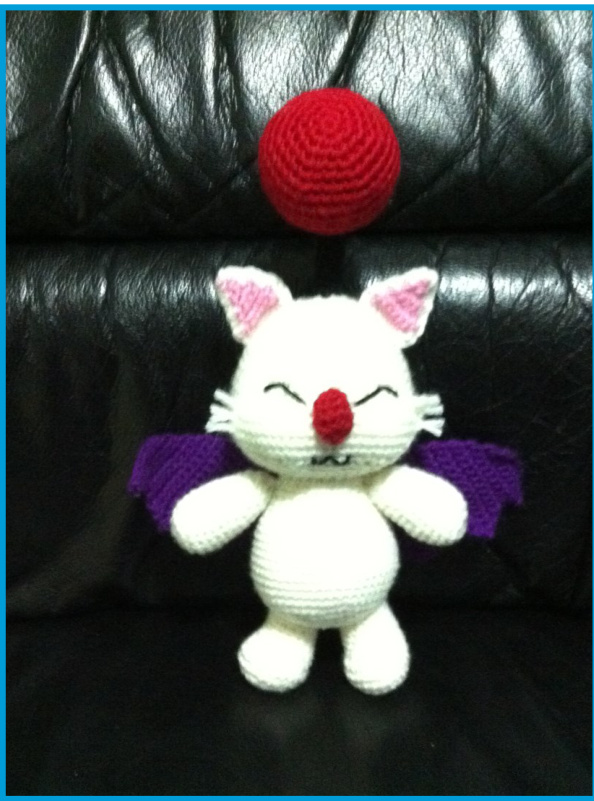
One of my friends is a HUGE fan of Final Fantasy. For Christmas I decided I would make all my gifts so that it would be more personal. This was the gift I gave him. He thought it was the cutest thing in the world and now it's proudly displayed at his place. Unless otherwise stated, work in continuous rounds. Also, I assume that you have basic knowledge in crochet. If not there are many tutorials on YouTube. Good luck!
Materials Required:
Black, white, red, pink and purple coloured yarn Fibrefill 3.5mm (E) hook Yarn needle Pipe cleaners
Moogle Amigurumi Pattern
Head: Using White Rnd 1: 6 sc into magic circle (6) Rnd 2: 6inc (12) Rnd 3: \*sc, inc\* x 6 (18) Rnd 4: \*2sc, inc\* x 6 (24) Rnd 5: \*3sc, inc\* x 6 (30) Rnd 6: \*4sc, inc\* x 6 (36) Rnd 7-8: 36sc Rnd 9: \*5sc, inc\* x 6 (42) Rnd 10-11: 42sc Rnd 12: \*6sc, inc\* x 6 (48) Rnd 12-15: 48sc Rnd 16: 6inc, 6sc, 6inc, 30sc Rnd 17-20: 60sc Begin stuffing the head. Continue stuffing as you work on the piece. Rnd 21: 6dec, 6sc, 6dec, 30sc Rnd 22: \*6sc, dec\* x 6 (42) Rnd 23: \*5sc, dec\* x 6 (36) Rnd 24: \*4sc, dec\* x 6 (30) Rnd 25: \*3sc, dec\* x 6 (24) Rnd 26: \*2sc, dec\* x 6 (18) Rnd 27: \*sc, dec\* x 6 (12) Rnd 28: 6dec (6) F/O and weave in tail.
Moogle Amigurumi Pattern
Body: Using White Rnd 1: 6 sc into magic circle (6) Rnd 2: 6inc (12) Rnd 3: \*sc, inc\* x 6 (18) Rnd 4: \*2sc, inc\* x 6 (24) Rnd 5: \*3sc, inc\* x 6 (30) Rnd 6: \*4sc, inc\* x6 (36) Rnd 7: \*5sc, inc\* x 6 (42) Rnd 8: \*6sc, inc\* x 6 (48) Rnd 9-12: 48sc Begin stuffing body. Continue to stuff the body as the piece is worked. Rnd 13: \*6sc, dec\* x 6 (42) Rnd 14-15: 42sC Rnd 16: \*5sc, dec x 6 (36) Rnd 17-18: 36sc Rnd 19: \*4sc, dec\* x 6 (30) Rnd 20-21: 30sc Rnd 22: \*3sc, dec\* x 6 (24) Rnd 23-24: 24sc F/O and leave a long enough tail to attach other pieces.
Moogle Amigurumi Pattern
Arm: (Make 2) Using White. Rnd 1: 6 sc into magic circle (6) Rnd 2: 6inc (12) Rnd 3: \*sc, inc\* x 6 (18) Rnd 4-7: 18sc Rnd 8: \*4sc, dec\* x 3 (15) Rnd 9-10: 15sc Rnd 11: \*3sc, dec\* x3 (12) Rnd 12-13: 12sC Rnd 14: 6dec (6) F/O and eave a long enough tail to sew closed the 6 stitc. opening and attach pieces. Leg: (Make 2) Using White. Rnd 1: 6 sc into magic circle (6) Rnd 2: 6inc (12) Rnd 3: \*sc, inc\* x 6 (18) Rnd 4: \*2sc, inc\* x 6 (24) Rnd 5-6: 24sc Rnd 7: 6dec, 12sc (18) Rnd 8: 3dec, 12sc (15) Rnd 9-12: 15sc F/O and eave a long enough tail to attach pieces.
Moogle Amigurumi Pattern
Nose:
Using Red Rnd 1: 4 sc into magic circle (4) Rnd 2: \*sc, inc\* x 2 (6) Rnd 3: 5sC Rnd 4: \*2sc, inc\* x 2 (8) Rnd 5: 4dec (4) F/O and leave a long tail for attaching the nose to the head.
Head Bobble:
Using Red to make the ball Rnd 1: 6 sc into magic circle (6) Rnd 2: 6inc (12) Rnd 3: \*sc, inc\* x 6 (18) Rnd 4: \*2sc, inc\* x6 (24) Rnd 5: \*3sc, inc\* x 6 (30) Rnd 6: \*4sc, inc\* x 6 (36) Rnd 7-12: 36sc Rnd 13: 4sc, dec\* x 6 (30) Rnd 14: \*3sc, dec\* x 6 (24) Rnd 15: \*2sc, dec\* x 6 (18) Rnd 16: \*sc, dec\* x 6 (12) Rnd 17: 6dec (6) F/O and weave in tail.
Moogle Amigurumi Pattern
Using Black to make the connection and leave a long tail at the beginning for attaching. Rnd 1: 6sc in magic circle Rnd 2 6sc in back loops only Rnd 3-12: 6sC F/O and leave a long enough tail to attach piece. Ear: (2 Pink & 2 White Pieces) Using Pink/White and working in rows. Row 1: ch2 Row 2: inc in 2nd ch from the hook, ch1, turn Row 3: 2sc, ch1, turn Row 4: 2inc, ch1, turn Row 5: 4sc, ch1, turn Row 6: inc, 2sc, inc, ch1, turn Row 7: 6sc F/O the pink pieces and weave in the tail. Leave the yarn attached to the white pieces and single crochet around the edge of both pieces to join them together. Leave a long enough tail to sew ears to head.
Wings: (Make 2)
Using Purple and working in rows. Row 1: ch10 Row 2: sc in 2nd ch from the hook, 8sc, turn Row 3: ss into 2nd sc, 6sc, inc, ch1, turn Row 4: inc, 6sc, ss, turn Row 5: skip ss, ss into 1st sc, 6sc, inc, ch1, turn
Moogle Amigurumi Pattern
Row 6: inc, 7sc, ch2, turn Row 7: 9sc, inc, ch1, turn Row 8: 11sc, ch2, turn Row 9: 11sc, inc, ch1, turn Row 10: 12sc, ss, turn Row 11: ss into 1st sc, 10sc, inc, ch1, turn Row 12: 11sc, ss, turn Row 13: ss into 1st sc, 9sc, inc, ch1, turn Row 14: 11sc, ch2 turn Row 15: 11sc, inc, ch1, turn Row 16: 13sc, ch2, turn Row 17: 14sc, ch1, turn Row 18: 13sc, ss, turn Row 19: ss into 1st sc, 12sc, ch1, turn Row 20: 11sc, ss, turn Row 21: ss into 1st sc, 10sc, turn Row 22: ss into 2nd sc, 7sc, ss, turn F/O and leave a long enough tail to attach wings. Please note that when I write ch2, I am actually increasir length of the row by 1. You will need to sc into the secon from the chain in the next row.
Moogle Amigurumi Pattern
Assembly:
1) Attach the head to the body with the tail from the head. I just weaved in and out of each piece with the tail. Ensure the neck is in the bottom centre of the head. Firmly stuff the neck before completely sewing openings close to ensure it can support the weight of the head.
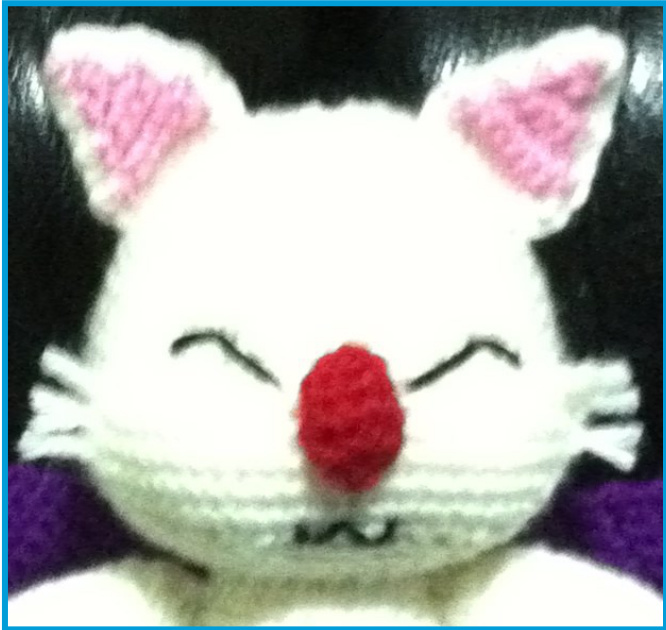
2) Sew the nose onto the head so that it is positioned between the two cheeks created by the increase and decrease rounds. I used the yarn tail and a whip stitch. It may help to pin the nose onto the head first. 3) Sew the ears with the yarn tails as positioned in the above photo. The ears are basically isosceles triangles so the shorter side should be attached to the head. I used the yarn tail and whip stitched the ear. It may help to pin it in place before sewing them on. 3) Use black yarn to embroider the eyes and mouth. I made the eyes by looping a piece of black yarn through the head to create a diagonal line pointing towards the nose. I then counted 2 stitched in and 2 stitches up from the corner, pulled up the yarn, looped around the original black line, then went back through the same spot to create the peak. The mouth is a simple 'W' shape created in a similar manner.
Moogle Amigurumi Pattern
4) Cut 6 one inch pieces of yarn for the whiskers. Fold your yarn in half. Grasp your hook, insert it under the stitch you want the yarn to attach to and up through the other side, hook your yarn where it's folded in half and pull it through just enough that you have a small loop. Keeping the loop on your hook grab the two strings left on the other side of the stitch and pull them through the loop. Pull the strings tight. Put 3 pieces on either side of the head on the cheeks. 5) Attach the arms to the body with the tails from each piece. I used a whip stitch again. Pin all the limbs in the desired position before attaching. 6) Attach the legs to the bottom of the body. Ensure that the feet are pointed forwards. Stuff the legs firmly before closing the opening.

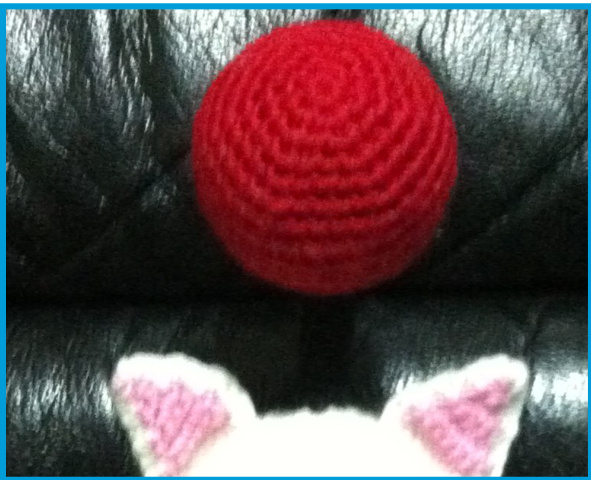
7)Sew the closed end of the connector to the bobble with the tail. 1 used a whip stitch. Using a pipe cleaner to stuff the connector for the head bobble. This will help to hold the bobble up. You may need to thread the pipe cleaner through the bobble and the head to give it extra support. The connector can also be stuffed to add more volume to the piece. Attach the open end of the connector to the top of the head with the yarn tail.
Moogle Amigurumi Pattern
8) Attach the wings to the back of the body. Ensure they are centred properly and at the same angle. The wings may need to be blocked to keep them from curling.

Now it's complete! Hope you enjoyed making this! And just in case for legal reasons.. Moogle is a copyright of Square Enix . This crochet pattern is an original pattern by Edward Yong (June 2014). Please do not claim this pattern as your own. If you wish to share this pattern, you may link to this pattern but please do not reprint it on your site. You may keep a copy for your own personal use but you may not sell or distribute it, or sell items made from this pattern.


