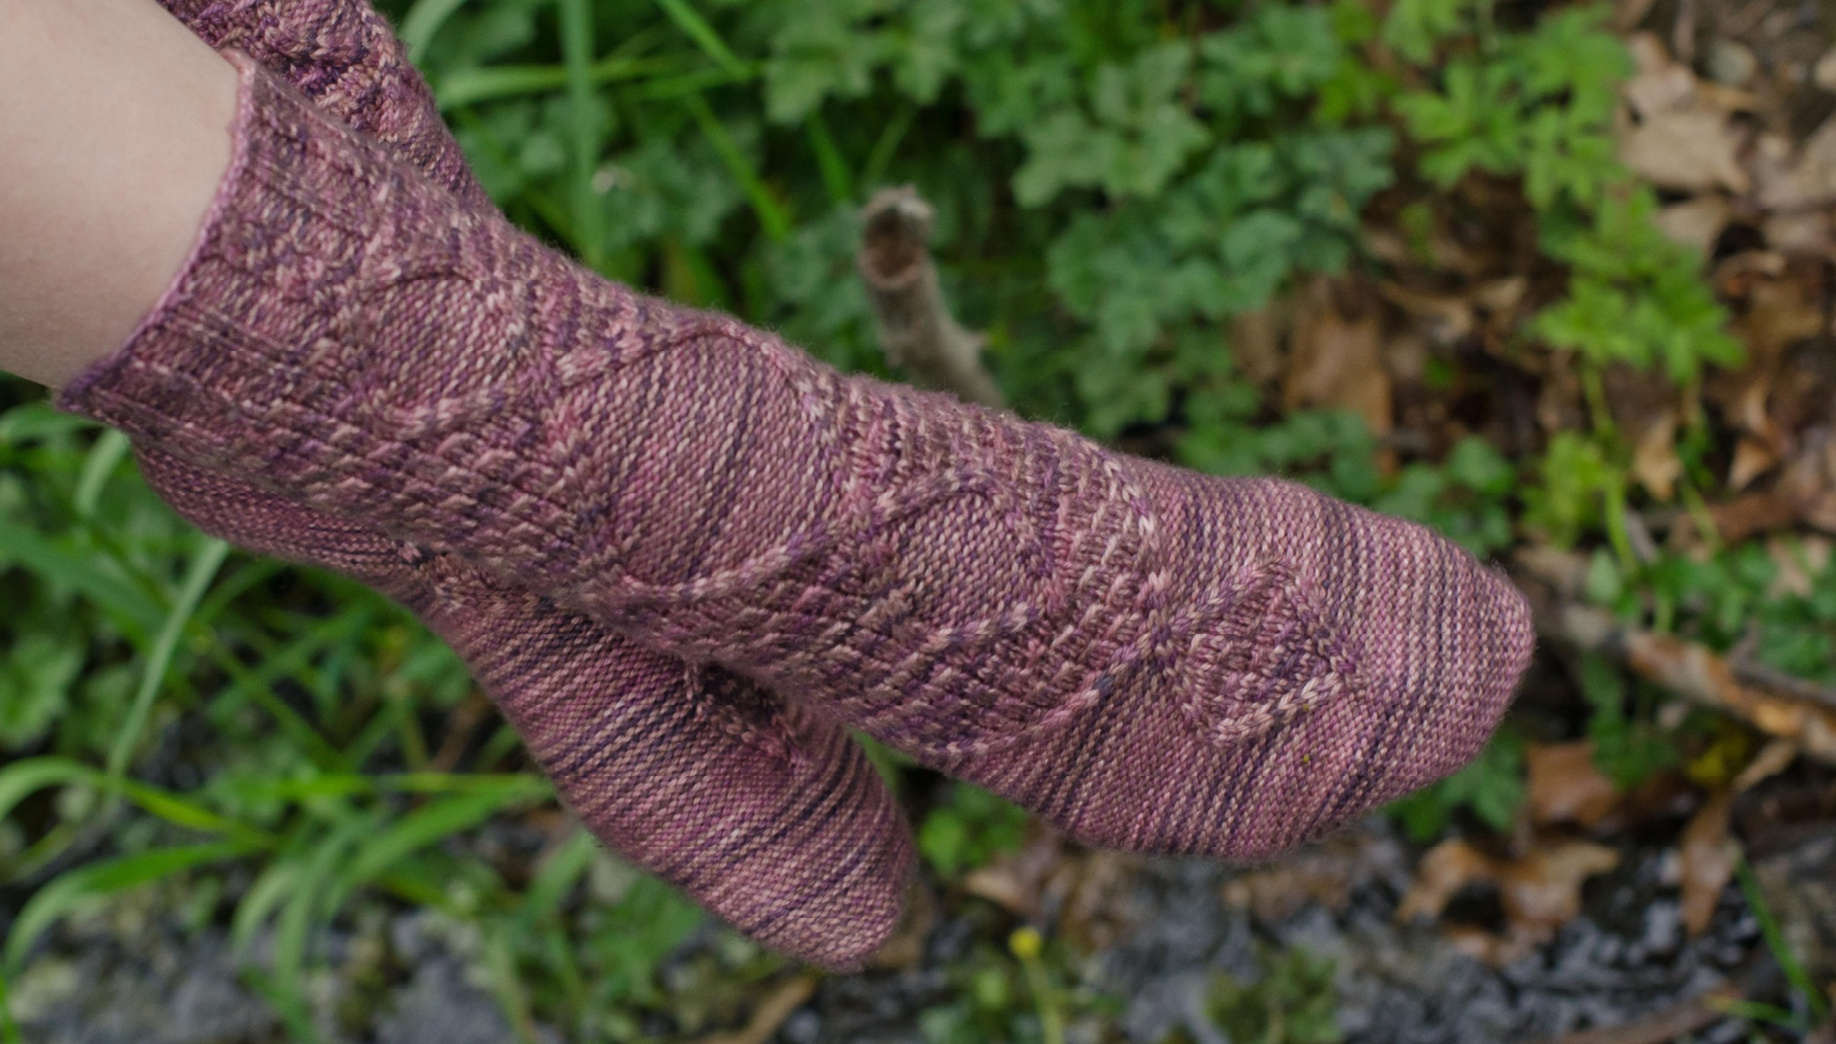
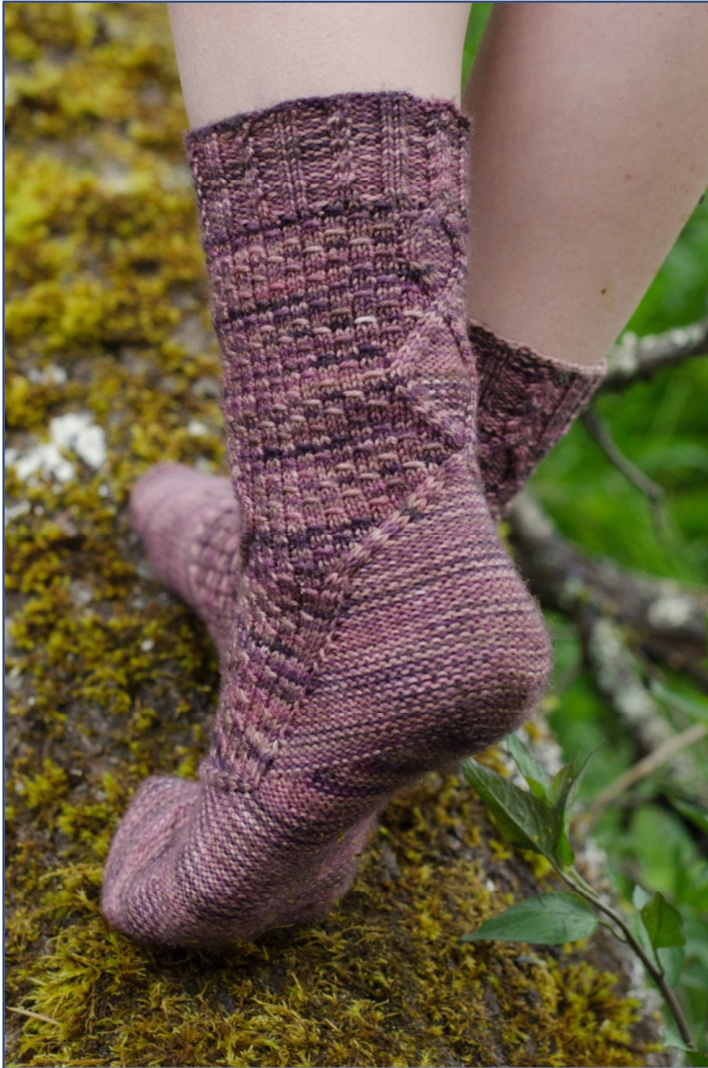
Cheshire
This pattern is a sister to my Jabberwonky sock pattern. Cheshire slips back and forth between a patterned background and reverse stockinette, much as the Cheshire Cat slips in and out of view.
MATERIALS
1 skein of Fly Designs Cashmara (390 yds / 356 m, 4 oz / 113 g; 80% superwash merino wool, 10% cashmere, 10% nylon); shown in Chocolate US 1.5 (2.5mm) needles (double-pointed or circular), or size needed to get gauge 4 stitch markers Tapestry needle Cable needle (optional)
SIZE & GAUGE
S (M, L, XL): 9 (10, 11, 12.5)" leg circumference; shown in M 34 sts & 46 rows = 4" / 10 cm in stockinette st
GLOSSARY
cn cable needle eor end of row/round kknit k2tog knit 2 sts together LLinc-p lifted left increase, purled: lift up the left leg of the st 2 rows below the st you just knit, and purl it LRinc-p lifted right increase, purled: lift up the right leg of the st below the 1st st on the left needle, and purl it mstitch marker ppurl p2tog purl 2 sts together pCL purl cable left: sl2 to cn and hold to front, p1, k2 from cn pCR purl cable right: sl1 to cn and hold to back, k2, p1 from cn pm place stitch marker rnd round RS right side sl slip (purlwise) ssk slip, slip, knit st(s) stitch(es) WS wrong side yo yarn over
ChaRT LEGEnd
knit purl yo, k2, pass yo over k2 k2tog, leaving both sts on left needle; k 1st st again, drop both sts from left needle
INSTRUCTIONS
Slip all markers as you come to them unless otherwise instructed. CUFF Loosely cast on 60 (68, 76, 84) sts-l like the German Twisted cast-on, but any loose cast-on will do. Join for knitting in the round, making sure not to twist. Pm to indicate beginning of round. Note: I use stitch markers throughout this pattern to mark the beginning/end of the round, and sometimes to mark where the instep meets the heel/sole on the other side of the sock. If you wish, you can use the break between your needles to mark these places instead of using markers (i.e., put the instep sts on your first needle(s) and the heel sts on your last needle(s); the break between your last & first needle is now your eor marker). Work Chart A around leg. Repeat Chart A four times total (16 rounds). Repeat rows 1 & 2 once more. Remove m, kl, pm; this is now the beginning of the round.
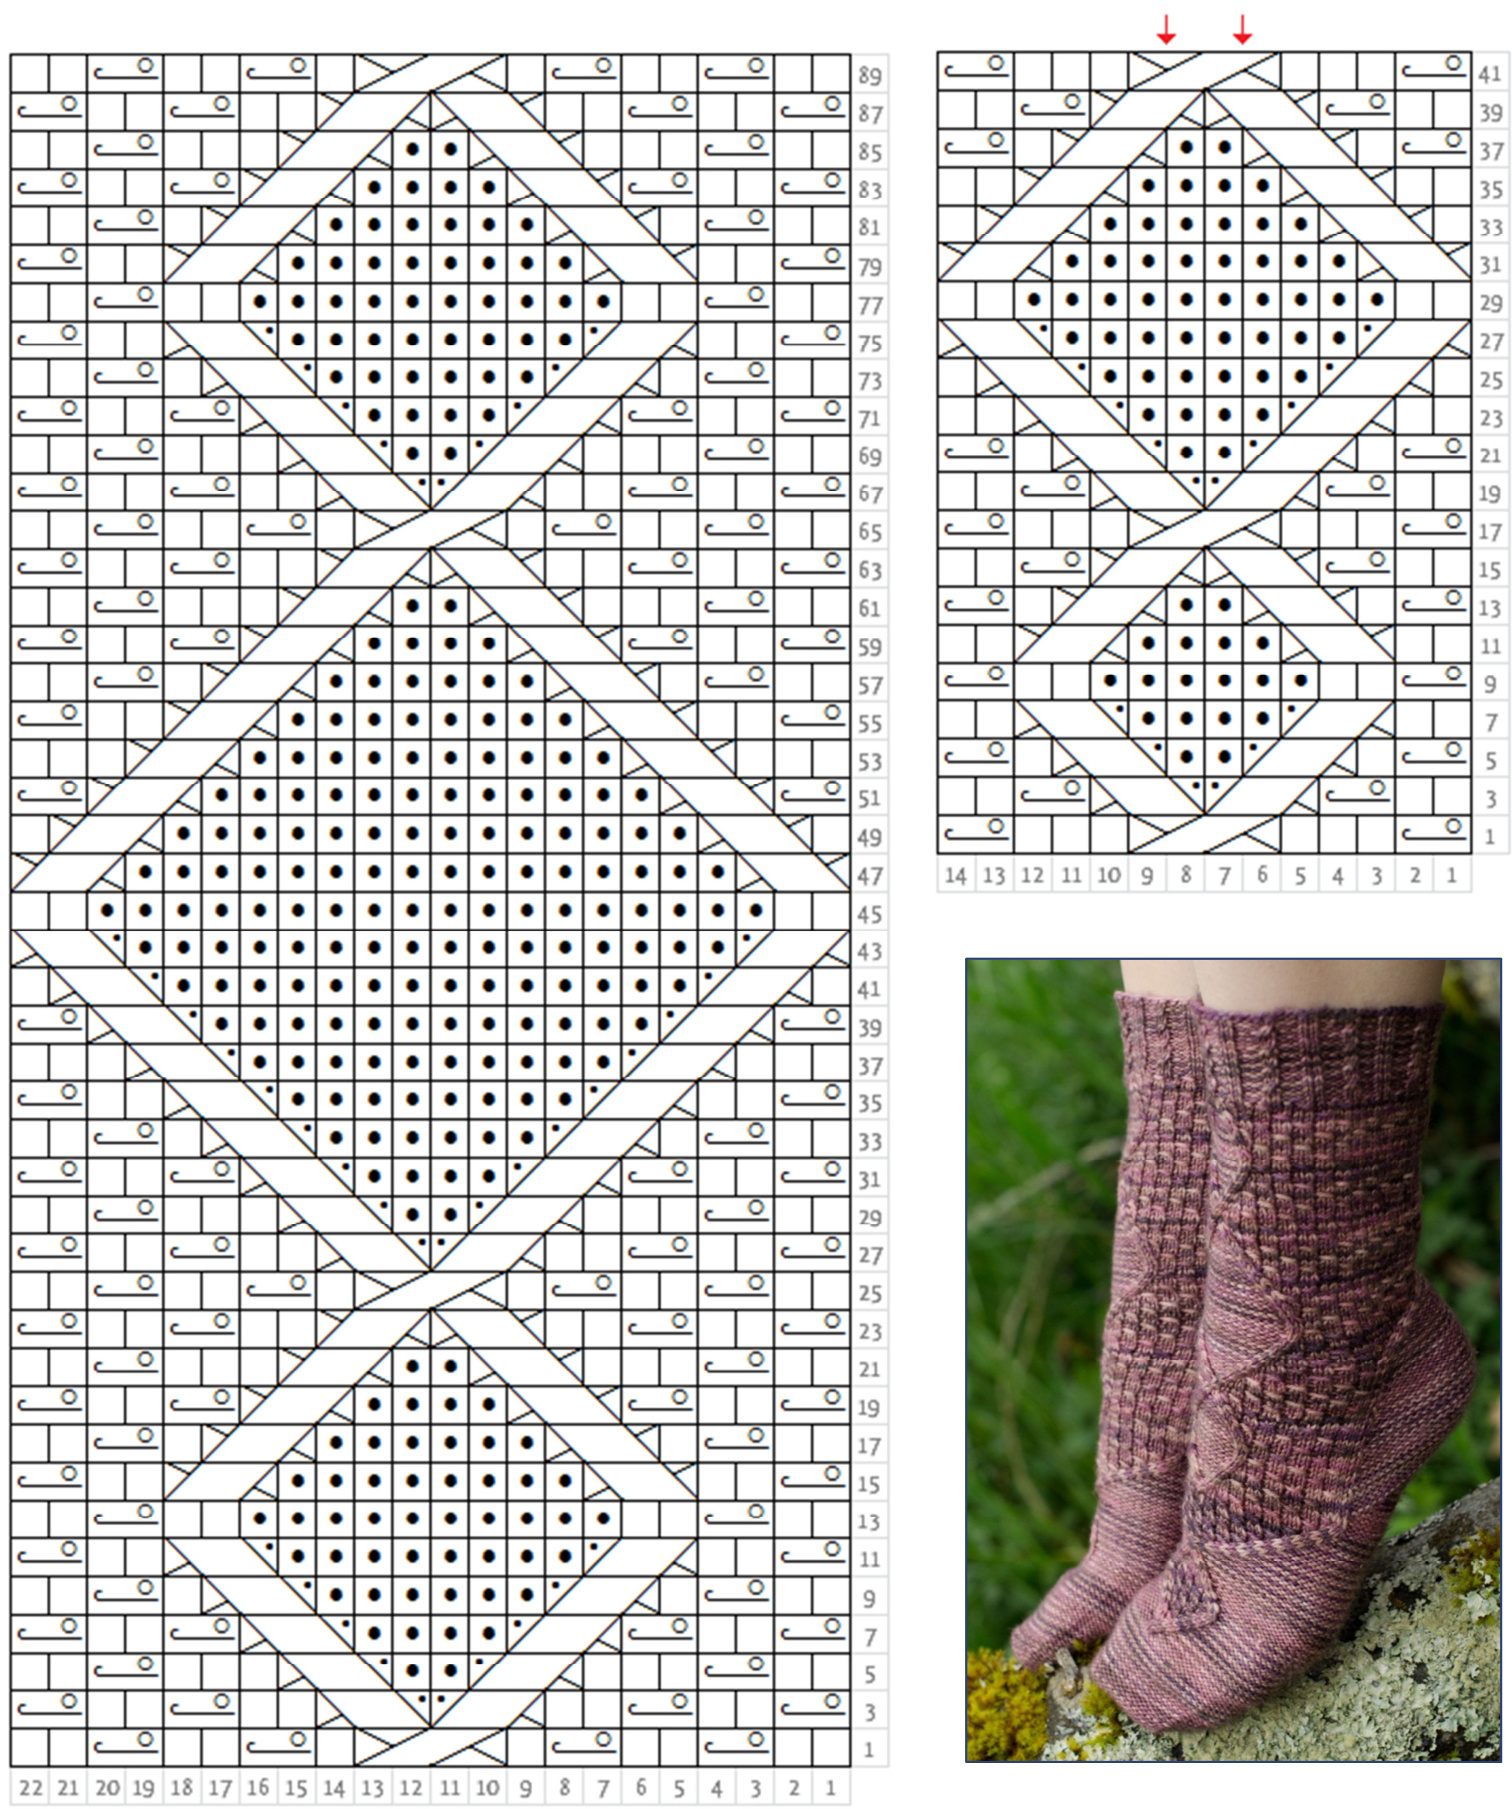
CHART A
Size S: Only work sts 7-36. Size M: Only work sts 5-38 (start & end with blue sections). Size L: Only work sts 3-40(start & end with gold sections). Size Xl: Work all sts.
| 4 3 | |||||||||||||||||||||||||||||||||||||
| 2 | |||||||||||||||||||||||||||||||||||||
| 8 | 7 6 | 5 | 4 | 3 | 2 | 1 |
LEG Rnd 1: K2 (0, 2, 0), yo, k2, pass yo over k2, [k2, yo, k2, pass yo over k2] 0 (1, 1, 2) times. Work Chart B. [Yo, k2, pass yo over k2, k2l 3 (4, 5, 6) times, work Chart C.IK2, yo, k2, pass yo over k2] 2 (2, 3, 3) times, ko (2, 0, 2). Rnd 2: Work all sts as they appear (knit the knit sts, purl the purl sts). Rnd 3: K0 (2, 0, 2), [yo, k2, pass yo over k2, k2] 1 (1, 2, 2) times. Work Chart B. [K2, yo, k2, pass yo over k2] 3 (4, 5, 6) times, work Chart C. Yo, k2, pass yo over k2. [K2, yo, k2, pass yo over k2] 1 (2, 2, 3) times, k2 (0, 2, 0). Rnd 4: Work all sts as they appear. Repeat these four rounds until all rows of Chart C have been worked. You should end after a round 1. Place 2 stitch markers where the arrows on Chart C indicate (in the center back of the leg, 2 sts apart).
HEEL SPLIT Rnd 1: Work sts as they appear to 2 sts before m, pCR, pCL, work sts as they appear to eor. Markers will move 1 st outward as you cable the sts on either side of them. Rnd 2: Work yo pattern as established to Chart B, work Chart B. Work yo pattern as established until 2 sts before m, pCR, p to 1 st before m, pCL, work yo pattern as established to eor. Rnd 3: Work sts as they appear to 2 sts before m, pCR, p to 1 st before m, pCL, work sts as they appear to eor.
Rnds 8-12: Repeat rounds 2 & 3. Rnd 13: Repeat round 7. Repeat rounds 2 & 3 until 1 st remains between the second heel marker and the eor marker (no repeats will be necessary for size S). You should have 30 (34, 38, 42) instep sts and 26 (30, 34, 38) heel sts, including the 2 cable sts on each side. Work yo pattern as established to Chart B, work Chart B, work yo pattern as established to 1 st before m, k2, p to 1 st before m, k2. Rnd 2: Work yo pattern as established to Chart B, work Chart B, work yo pattern as established to 1 st before m, k2, p to 1 st before m, k2. Repeat these two rounds until you have 80 (90, 102, 112) sts total, ending with round 2 Pm in the middle of the heel sts. Row 1 (Rs): Work sts as they appear to m, k1, p to m, p4 (3, 3, 4), p2tog, pl, turn work. Row 2 (Ws): Sl1, k to m, k4 (3, 3, 4), k2tog, k1, turn work. Remove the middle-of-heel marker. Row 3: Sl1, p to 1 st before the gap created by turning on the previous row, p2tog the sts on either side of the gap, p1, turn. Row 4: Sli, kto 1 st before the gap created by turning on the previous row, k2tog the sts on either side of the gap, k1, turn. Repeat rows 3 & 4 until all the purl sts have been worked and 2 knit sts remain unworked on each side of the heel (60 (68, 76, 84 sts)). Row 5: Sl1, p to 1 st before the gap, k2tog, kl; remove eor marker. At some point you'll come to the end of Chart B. When you do, simply continue the yo pattern across the instep as established. FOOT Setup rnd 1: Work yo pattern as established to Chart B, work Chart B, work yo pattern as established to m; ssk, p to 1 st before m. Note: The rest of the foot is worked without reference to the beginning/end of round, which is why you removed the eor marker. Instead, you have 2 markers in the middle of the 2 knit sts on each side, which will move 1 st inward as you cable on each round. Use these markers as reference points and don't worry about where the beginning of the round is; we'll resolve that later on. Setup rnd 2: K2, work sts as they appear to 1 st before m, k2, p to 1 st before m. Pm in the middle of the sole sts. Rnd 1: PCL, work yo pattern as established to Chart B, work Chart B, work yo pattern as established t sts before m, pCR; p to 3 sts before m, p2tog, p2, p2tog, p to 1 st before m (56 (64, 72, 80) sts). Rnd 2: PCl, work sts as they appear to 2 sts before m, pCR, p to m, sl m, p to 1 st before m. For a larger or smaller foot circumference, omit or repeat rounds 1 & 2. Remove middle-of-sole marker. Rnd 3: PCL, work yo pattern as established to Chart B, work Chart B, work yo pattern as established to 2 sts before m, pCR, p to 1 st before m. Rnd 4: PCl, work sts as they appear to 2 sts before m, pCR, p to 1 st before m. Repeat rounds 3 & 4 until 2 sts remain between markers.
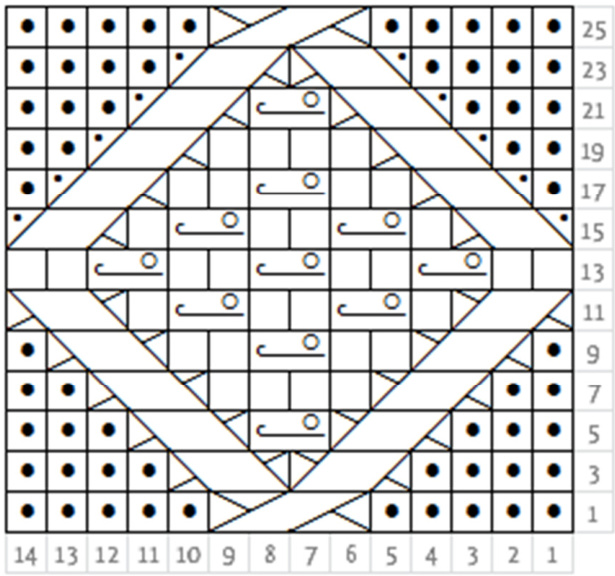
CHART D
Remove all markers. Divide your sts into two equal groups (sole & instep) with the instep pattern centered on the instep sts. Place markers between sole & instep sts on each side, or distribute the sole & instep sts onto different needles; you should have 28 (32, 36, 40) sts on both the sole and the instep. Rnd 1: P7 (9, 11, 13), work Chart D, p to eor. Rnd 2: Work all sts as they appear. Repeat these two rounds until all rows of Chart D have been worked, ending with round 1 (chart row 25). On the following round, purl all sts. Work even (purl all sts) until sock is 1.25" shorter than desired length.
TOE Rnd 1: \*P1, p2tog, p to last 3 instep sts, p2tog, p1, repeat from \* for sole. Rnd 2: Purl around. Repeat these two rounds until 32 sts remain, then repeat round 1 once more. Graft toe closed using Kitchener st (http://goo.gl/tWjsJ). Weave in ends. Repeat for second sock!
CREDITS
Photography by Kathy Cadigan (http://www.kathycadigan.com). Hat tip to Fleegle (http://fleeglesblog.blogspot.com) for the heel construction. Thanks to my test knitters Katie, Michelle and Sandra. If you have any questions or problems, please email me or message me on Ravelry: rogue.edits@gmail.com http://www.ravelry.com/people/MoulinRogue


