Flatmates Fingerless Gloves
Cosplay for your hands!
Flatmates Fingerless Gloves
Cosplay for your hands!
Yarn
1 ball Knitpicks Galileo in Nebula (Sport/5 ply, 50g/131 yards) Sample used 28g. 1 ball Knitpicks Andean Heather in Meringue Heather (Sport/5 ply, 50g 110 yds) Sample used 35g. ...or your favorite sport-weight yarn in purple and oatmeal.
Notions
Sz 2/3.00mm dpns or longish circular for magic loop Sz 3/3.25mm dpns (set of 5) or longish circular for magic loop 2 stitch holders (or safety pins or scrap pieces of yarn) Tapestryneedle 5-8 smallish purple buttons (the ones I used were 3/16"/1cm) Needle that can get through button holes, preferably blunt tipped, but not necessarily Stitch markers
Size
Small/Medium: hand circumference 7-8"/18-20.5cm
Gauge
Sherlock
Using Galile0 and Sz 3/3.25mm needles, 0ver K4, P1 rib, 17 st = 2"/5cm unstretched. 8 rows = 1"/2.5cm
John
Abbreviations
K knit P purl Co cast on BO bind off st stitch or stitches dpn double-pointed needles rnd round Inc Knit-style increase. My preferred method is to knit into the st below the next st (leans to the right) or two st below the st I just knit (leans to the left). Here's what I mean. YO yarn over, like this. SSK slip, slip, knit, a left-leaning decrease K2tog knit two together, a right-leaning decrease WS wrong side SI slip 1 st purl-wise Pfb Purl into the front and back of the next st. Creates a P st to the left of the worked st. Kfb Knit into the front and back of the next st. Creates a P st to the left of the worked st. Like so. C2L Left-leaning 2 st cable: Sl 1 st to an extra dpn, hold to front, K1, K1 from dpn C4L Left-leaning 4 st cable: Sl 2 st to an extra dpn, hold to front, K2, K2 from dpn C4>3L Left-leaning 4 st cable with a hidden decrease: Sl 2 st to an extra dpn, hold to front, K1, K the 1st st from dpn together with the next st on left needle, K the 2nd st from dpn
Sherlock glove (right hand)
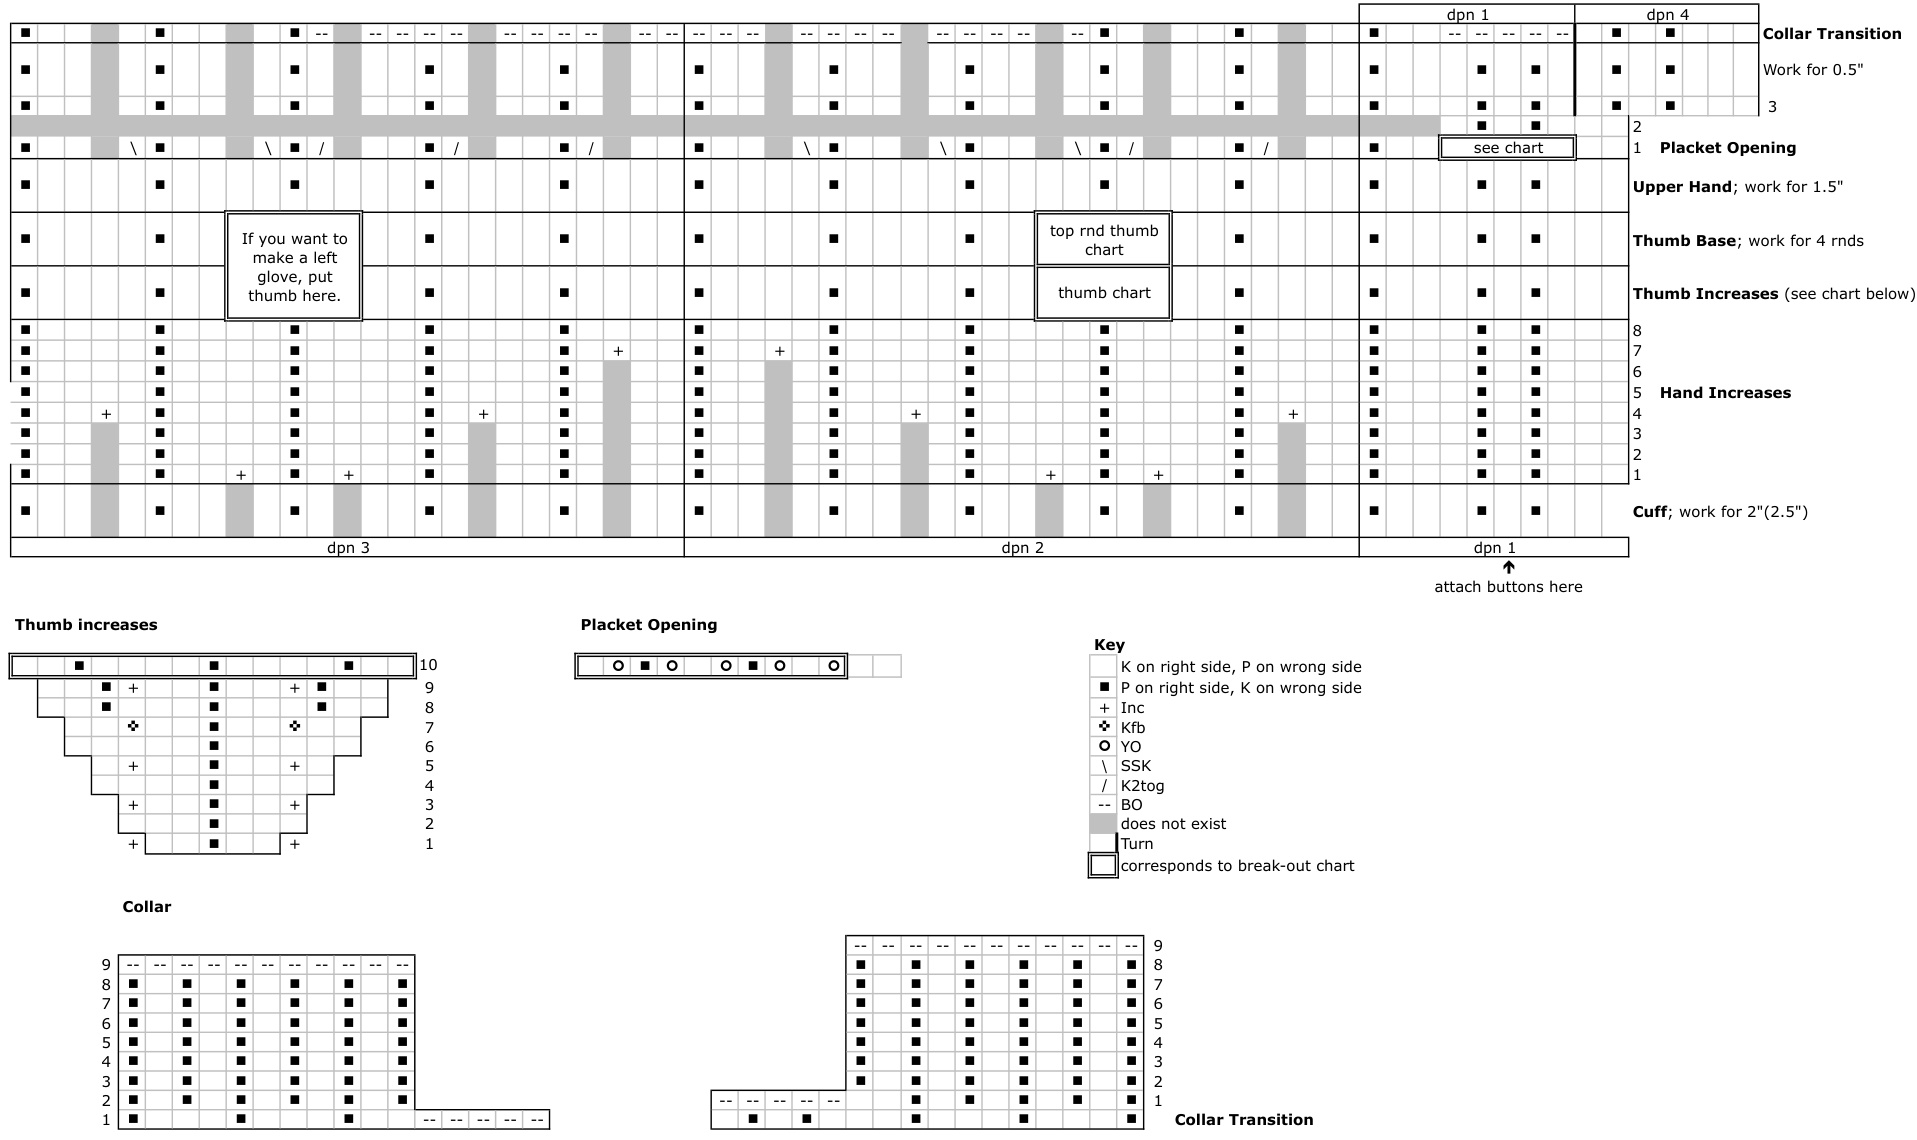
)lacket opening, then back and forth. Instructions for a left hand version are include Cuff With Sz ?/3 25mm dnns and purnle varn c0 50 st using long tail or With Sz 3/3.25mm dpns and purple yarn, C0 50 st using long tail or vour favorite.stretchyCO. and distribute as follows: yoarfavontestretenyeo,anaaistnba Dpn 1: 10 st, Dpns 2 & 3: 20 st each (lf you're using magic loop, place markers as noted, because I refer to the dpns throughout the pattern.) Join in the rnd, being careful not to twist Work as follows for 2" or desired length of cuffs: Dpn 1: K3, P1, K1, P1, K3, P1 Dpns 2 & 3: [K3, P1] 5 times
Hand Increases
Rnd 1 Dpn 1: Work in established pattern [10 st] Dpn 2: K3, P1, K2, Inc1, K1, P1, K1, Inc1, K2, P1, [K3, P1] 2 times [22 st] Dpn 3: [K3, P1] 2 times, K2, Inc1, K1, P1, K1, Inc1, K2, P1, K3, P1 [22 st] Work in pattern for 2 rnds Rnd 4 Dpn 1: Work in pattern [10 st] Dpn 2: K2, Inc1, K1, P1, [K4, P1] 2 times, K1, Inc1, K2, P1, K3, P1 [24 st] Dpn 3: K3, P1, K2, Inc1, K1, P1, [K4, P1] 2 times, K1, Inc1, K2, P1 [24 st] Work in pattern for 2 rnds Rnd 7 Dpn 1: Work in pattern [10 st] Dpn 2: [K4, P1] 4 times, K1, Inc1, K2, P1 [25 st] Dpn 3: K2, Inc1, K1, P1, [K4, P1] 4 times [25 st] Work in pattern for 1 rnd. During this rnd, place markers after the 7th and 13th st on Dpn 2. There should be 5 st between the markers, with a P centered. By the end of the thumb increases (after rnd 8), your st count should be: Dpn 1: 10 st, Dpns 2&3: 25 st.
Thumb Increases
(See separate thumb increase chart. Note that rnd numbers restart.) Rnd 1 and all odd rnds: Work in pattern to first marker. Increase 1 st before marker. Work in pattern to second marker. Increase 1 st after marker. Work in pattern to end. Rnd 2 and all even rnds: Work in established pattern. Nuance: on rnd 7, use kfb. Work the thus-created st as a P for remaining rnds. By the end of the thumb increases (after rnd 9), your st count should be: Dpn 1: 10 st, Dpn 2: 35 st, Dpn 3: 25 st
Thumb Base
Work in pattern for 4 rnds, or until you want the thumb to split off.
Upper Hand
Work in pattern to the 7th st on Dpn 2. Place the next 15 st on a stitch holder. Using a cable cast-on, CO 5 st, then keep going with next st on Dpn 2. Your st count should now be: Dpn 1: 10 st, Dpn 2: 25 st, Dpn 3: 25 st Work in pattern, working the new 5 st as: K2, P1, K2. Keep knitting for another 1.5" (approx 12 rnds) or until the hand measures 0.5" less than the total length you want the hand portion to be.
Placket Opening and Decreases
(See separate Placket Opening chart. Rnd numbers restart.) Rnd 1: K2, YO, K1, YO, P1, YO, K1, YO, P1, YO, K1. Pause now to backtrack a bit. Place the 5 regular st on the left dpn, and the YOs on an extra dpn, which should lie paralle with dpn 1 on the Ws. Move the 5 regular st back to the right dpn, and you should be back to where you paused. Work remainder of dpn 1 in pattern. Dpn 2: [K2, K2tog, P1] 2 times, [SSK, K2, P1] 3 times Dpn 3: [K2, K2tog, P1] 3 times, [SSK, K2, P1] 2 times Rnd 2: Work 1st 7 st on dpn 1, trying your best to ignore the extra dpn. This is now dpn 4. Sl the remaining st on dpn 1 to the extra dpn (which is now dpn 1), and TURN. Rnd 3: (WS) Sl 1st st, then work in established pattern. When you get around to dpn 1, work the new YOs as follows, working into the back of each loop to tighten it: P1, K1, P1, K1, P1. TURN. Your st count should be: Dpn 1: 8 st, Dpns 2 & 3: 20 st, Dpn 4: 7 st Work in established pattern for about 4 rows, or until the upper hand is as long as you want it. Remember to sl the 1't st of each row. End with aWS row.
Collar Transition
Starting on the RS with dpn 1, BO 5 st in pattern. Work in pattern the remainder of dpn 1 and the first 8 st on dpn 2. BO the rest of the st on dpn 2. Dpns 1 and 2 should now have 11 st in total. Sl these st ontoastholder. BO the first 11 st on dpn 3. Work remaining 9 st in pattern. Work dpn 4 in pattern. Place st from dpns 3 and 4 onto a single dpn, which should now have 16 st.
Collar
(See separate collar chart. Note that rnd numbers restart.) Starting on the WS, BO 5 st in pattern. Work remaining 11 st in 1x1 rib (K1, P1). Continue to work this section in 1x1 rib for approximately 1"/2.5cm/8 rnds. BO on a WS row, so that the tail is at the end away from the placket. Cut yarn, leaving at least 12" of tail for later sewing-up. Move st from the st holder to a needle. Join yarn and start working on WS. Work 1x1 rib for approximately 1." BO on a RS row, so that the tail is at the end away from the placket. Cut yarn, leaving at least 12" of tail for later sewing-up.
Thumb
Transfer thumb st from st holder to 2 dpns. With a 3'd dpn, pick up 5 st across CO section. Join yarn, and work in the round, following st pattern [K4, P1]. Work the picked-up st as [K2, P1, K2]. Work for approx. %"/2cm or as long as you want the thumb to be. If you would like the thumb to be a little snug, the last 3 or so rnds as [K2, P1, K1, P1]. BO loosely.
Finishing
Sew in all ends EXCEPT for collar tails. I find that there's always a couple of holes where the thumb joins the hand - you can cinch these with the tail from when you joined the yarn for the thumb. Fold collar sections down and use tails to sew side seams closed. Leave bottoms and placket area loose. Stretch glove until you see the line of K1 running down from the center of the placket. Attach buttons along this line. Block if convenient. If not convenient, block anyway. Or don't.
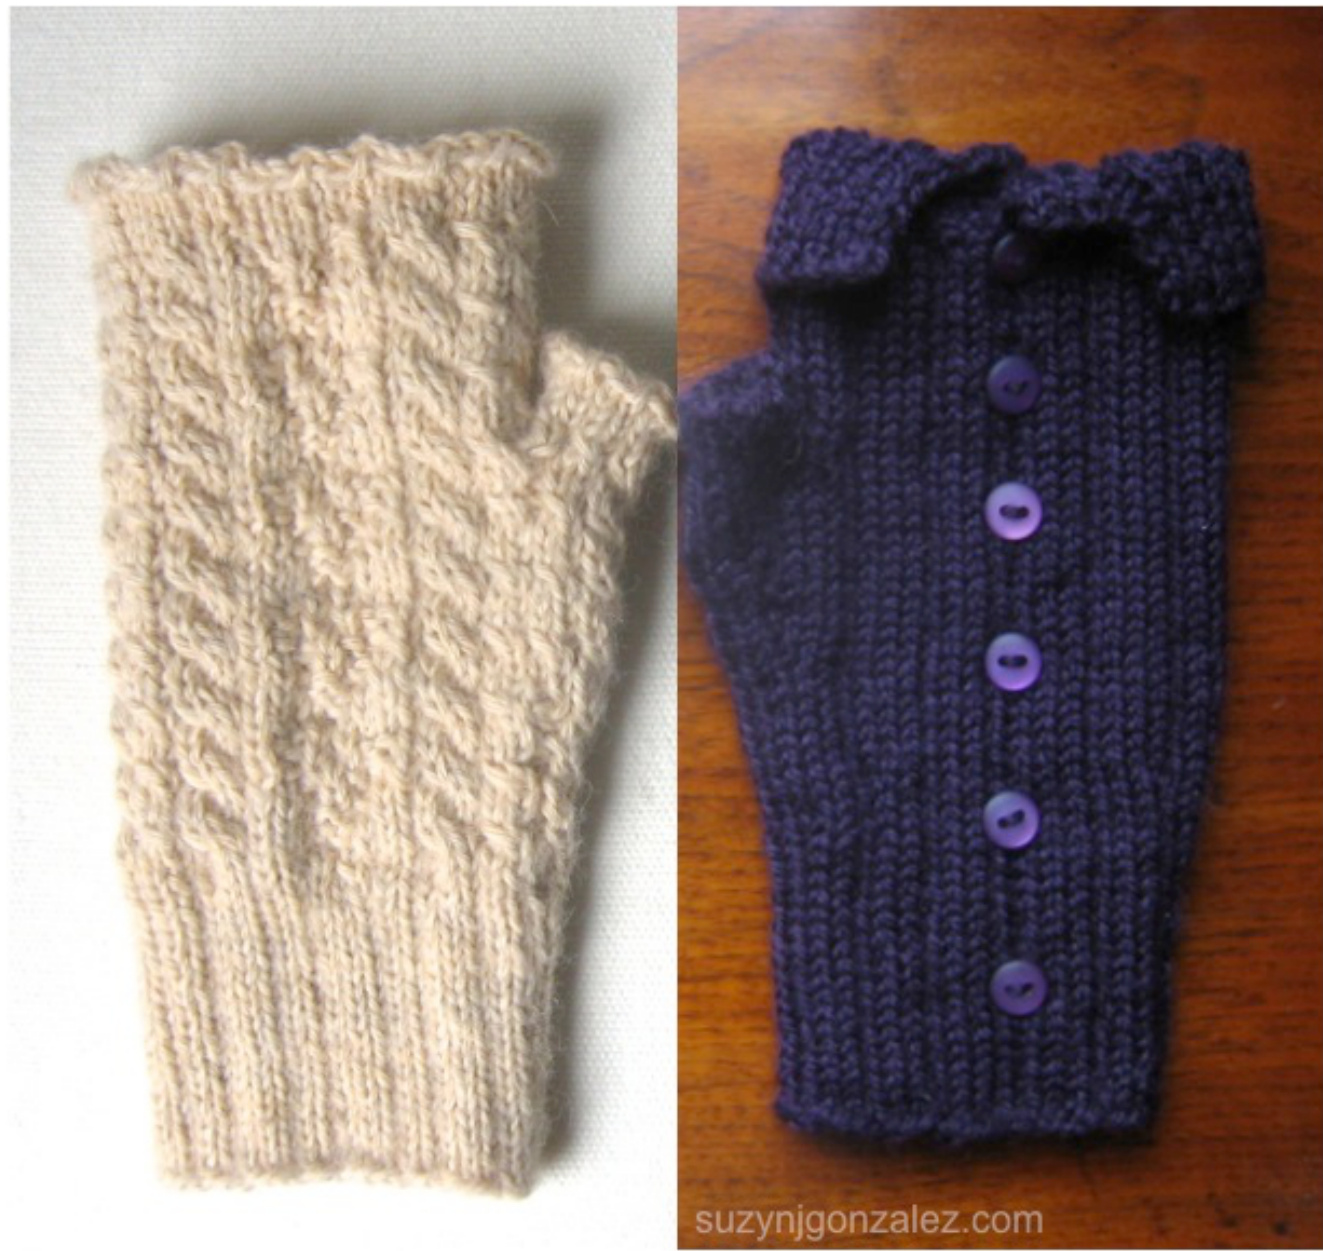
Sherlock's Glove
John Glove (left hand)
n the round. This glove doesn't have a front or back, so to make a pair, just make tv
Cuff
With Sz 2/3.00mm dpns and oatmeal yarn, CO 56 st. Distribute in multiples of 7 over 3 dpns. Join in the round, careful not to twist. [K2, P1, K3, P1] to end. Work thus for 2", or until your cuff is as long as you want it to be.
Hand Increases
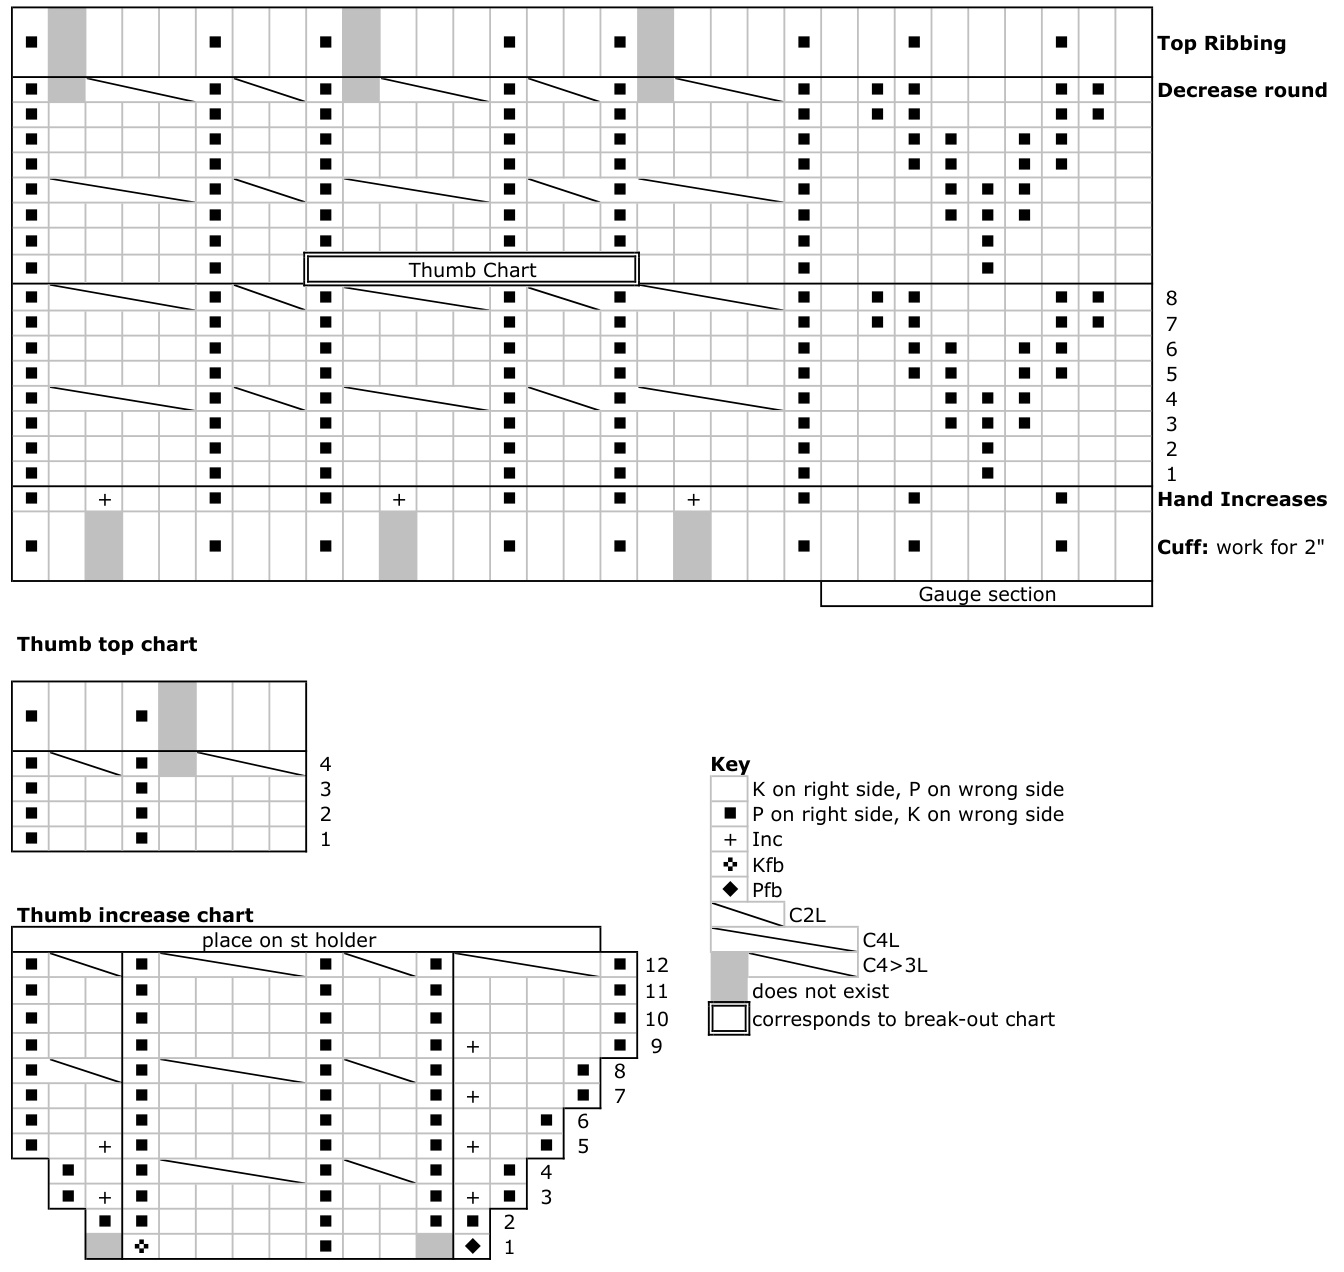
\*K2, P1, K3, P1, K2, P1, [K2, Inc1, K1, P1, K2, P1] twice, K2, Inc1, K1, P1, repeat from \* once more. [62 st] Switch to sz 3 dpns. Work rnds 1-8 of chart, working chart twice in each round. During rnd 8, place marker after the 14th and 22nd st in the rnd.
Thumb Increases
(See separate thumb increase chart. Rnd numbers restart.) Rnd 1 Work in pattern to first marker. Pfb, then place marker between the two st. Work in pattern to st before second marker, kfb. Rnd 2 and even rnds: Work in pattern. Odd rnds: Work in pattern to first marker. Increase 1 st before marker. Work in pattern to second marker. Increase 1 st after marker. Work in pattern to end. Continue until you've added 3 st before and 3 st after the original section. Odd rnds: Work in pattern to first marker. Increase 1 st before marker. Work in pattern to end. Continue until you've added 2 MORE st before the original section By the end of the thumb increases (rnd 10 of chart), your st count should be 70st.
Thumb Base
Work in pattern for about 8-10 rnds, or until you want the thumb to split off. Stop after a cable rnd.
Upper Hand
Work the first 15 st in pattern. Place the next 16 st on a stitch holder. Using a cable cast-on, CO 8 st, then keep working in pattern. Your st count should now be 62 st. Work in pattern, working the new 8 st as: K2, P1, K4, P1. Keep working for 1.5" (approx 12 rnds) or until the hand measures 0.5" less than the total length you want the hand portion to be. End just before a cable rnd.
Top Ribbing
Work decrease round as charted. Notice that the 4st cables are C4>3L (with a hidden decrease). Work top ribbing as [K2, P1, K3, P1] for approx 3-4, then BO loosely.
Thumb
(See separate thumb top chart. Rnd numbers restart.) Transfer thumb st from st holder to 2 dpns. With a 3rd dpn, pick up 8 st across CO section. Join yarn, and work in the round, [K4, P1, K2, P1] for 3 rounds. On the 4th rnd, work C4>3L and C2L cables. Work [K2, P1, K3, P1] ribbing for 3-4 rnds, then BO loosely.
Finishing
Sew in all ends. Cinch thumb holes. Block, or not.
John's Glove