Page 1 of 8
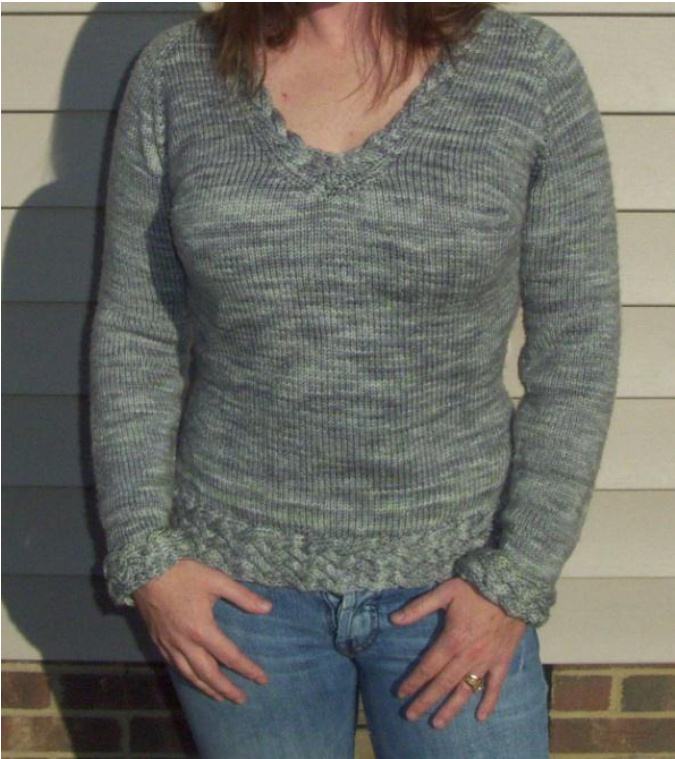
Cross Creek
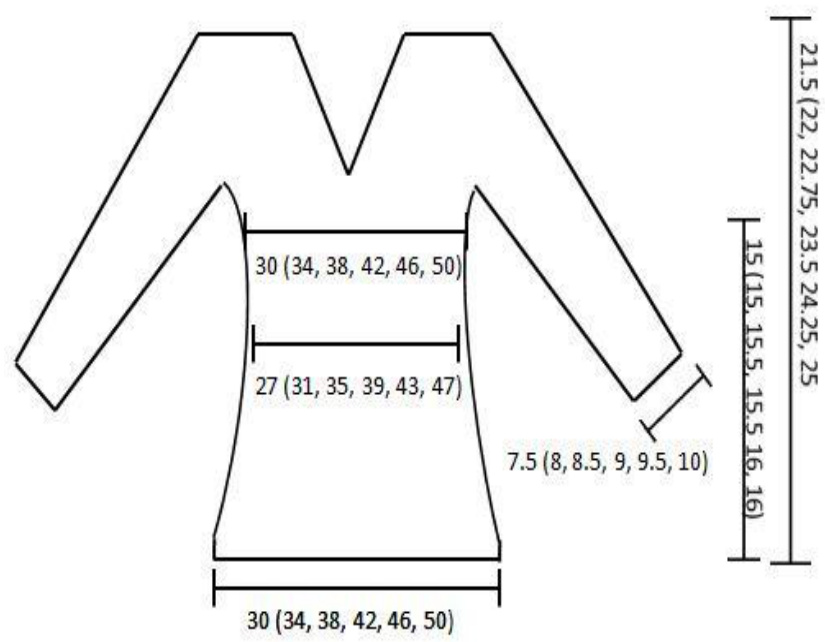
Sizes: 30 (34, 38, 42, 46, 50)
Materials Needed:
1000 (1200, 1400, 1600, 1800, 2000) yds Worsted weight yarn, preferably wool or wool blend. The yarn pictured is Sheepy Time Knits Superwash Merino Worsted. Sweater pictured measures 34" at the overbust, worn with 2" negative ease. US size 6 needles or whatever gives you gauge Waste yarn Tapestry needle for finishing
Skills Needed:
Provisional Cast on Increasing and decreasing Cabling Short Rows (explanation in pattern) Kitchener Stitch
Gauge:
Stockinette: 16 st x 32 rows = 4" on US size6 3-rib Braid: 1" wide (9 st) 5-rib Braid: 1.5" wide (15 st) 7-rib Braid: 2.5" wide (21 st)
Pattern Notes:
Read through the pattern BEFORE starting! There is a lot going on, and a lot of it is simultaneous. Please choose a size based on your overbust measurement, not your full bust. Please note: Stitch counts are not essentially important. There MAY be some variation in stitch counts between front and back - this is okay!
Yoke:
Provisionally cast on 68 (72, 86, 92, 102, 108) stitches. These will be divided as follows: 11 (11, 13, 14, 16, 17) stitches -Right Front 9 (10, 12, 13, 14, 15) sts - Right Arm, 28 (32, 36, 38, 42, 44) st -Back 9 (10, 12,13, 14,15) st -Left Arm, 11 (11, 13, 14, 16, 17) sts -Left Front. Place markers between each of the five sections on the first row. Standard raglan shaping is as follows: Odd rows: p across, slipping markers as you come to them. Even rows: k to last st before marker, kfb, slip marker, kfb, k to last st before marker, kfb, slip marker, kfb, k
Page 2 of 8
Short Rows:
Cross Creek
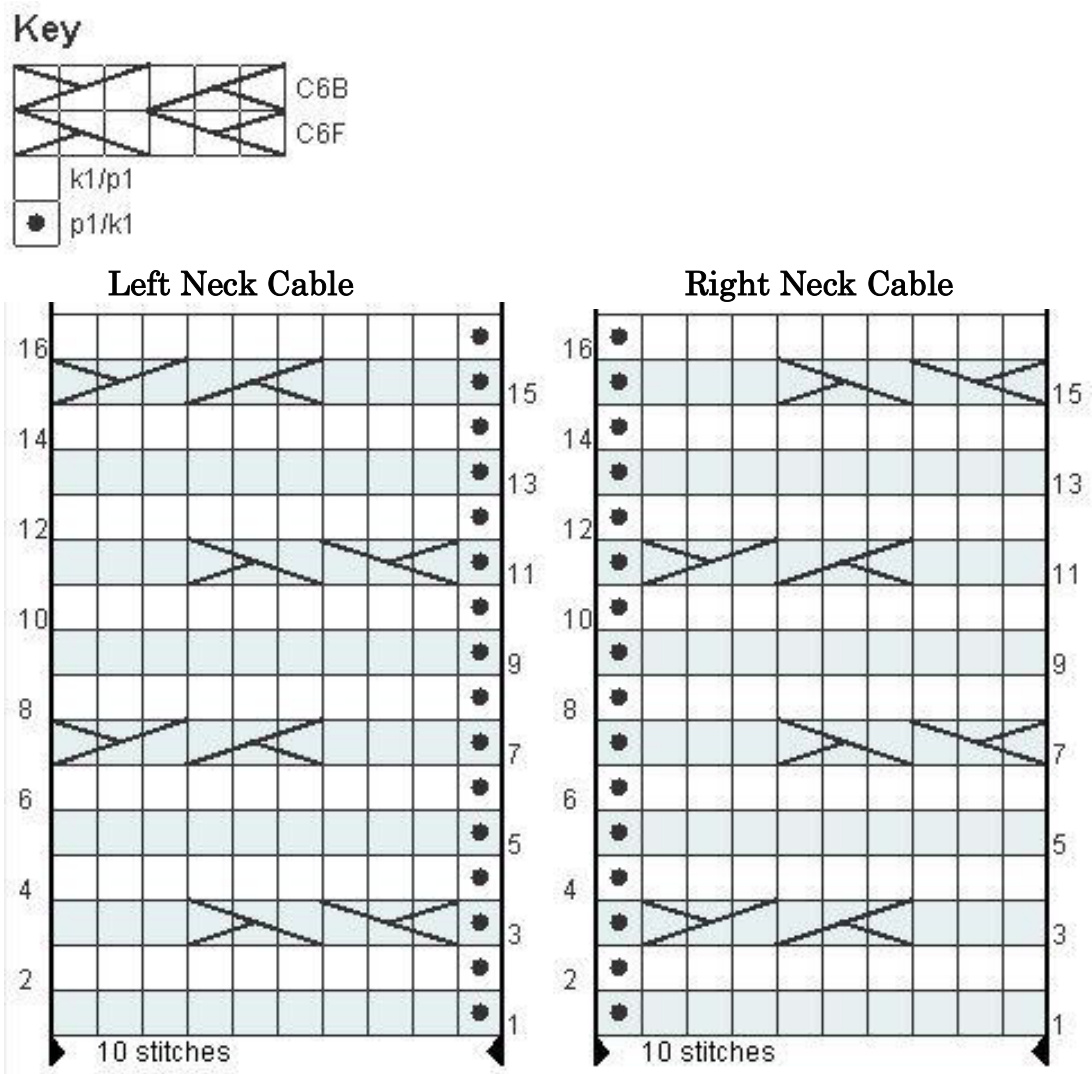
to last st before marker, kfb, slip marker, kfb, k to last st before marker, kfb, slip marker, kfb, k to end. Neck Cable: The first 10 sts of the Right Front and the last 10 sts of the Left Front are the Right Neck chart and the Left Neck chart respectively. Neckline shaping: Every 4th row starting on Row 4, M1 immediately after the Right Neck chart and immediately before the Left Neck chart. Continue raglan shaping, neck shaping, and neck cable until work is 5.75 (6.25, 7, 7.75, 8.5, 9.25) inches from cast on.
Divide Sleeves and Start Body
On RS, continuing neck shaping and cables (the neck is not joined yet) k across Left Front to first marker. Remove marker and place arm sts on waste yarn. Cast on 6, (8, 8, 10, 10, 12) sts for underarm, placing a marker after 3, (4, 4, 5, 5, 6) sts to mark the center of the underarm and the start of the round. K across Back, remove marker, place arm stitches on waste yarn. Cast on 6, (8, 8, 10, 10, 12) sts for underarm, placing a marker after 3 (4, 4, 5, 5, 6) sts to mark the center of the underarm. K to end. Knit 2 more rows flat, then join the neck. At this point, you will start knitting in the round. To finish the neckline with the purl gutter while maintaining the stitch count, make a double decrease at the center of the neckline while making a stitch in the stockinette outside the purl gutter. For example: k toward the collar. M1, p1, k8, sll, k2tog, psso, k8, p1, M1, knit the rest of the round. Next round: M1, pl k7, sll, k2tog, psso, k7, pl, M1, knit the rest of the round.
Bust Shaping:
The pattern contains enough ease to accommodate A-cups.
B-cup:
Start top-down short rows, starting 8 sts from the underarm marker, and completing 6 sets of w&t rows on each side. Knit across short rows, picking up final wraps.
C-cup:
Start top-down short rows, starting 11 sts from the underarm marker, and completing 9 sets of w&t rows on each side. Knit across short rows, picking up final wraps.
D-cup:
Start top-down short rows, starting 14 sts from the underarm marker, and completing 12 sets of w&t rows on each side. Knit across short rows, picking up final wraps.
DD-cup:
Start top-down short rows, starting 17 sts from the underarm marker, and completing 15 sets of w&t rows on each side. Knit across short rows, picking up final wraps. There are lots and lots of tutorials regarding short rows. Here is a good one: http://knitty.com/ISSUEsu mmer03/FEATbonnetric.ht ml However, most short row directions seem to be meant for bottom up knits. This is a top down sweater! So what's the difference? In most directions, you knit to, say 10 sts from the end of the row. Wrap and turn, and purl to 10 sts from the end of the row. Wrap and turn, knit to 12 sts from the end of the row. Wrap and turn, purl to 12 sts from the end of the row, etc. When this is knit bottom up, it points the dart upward. If we do this from the top down, the dart points down. If you're okay with that, great! Ihappen to like the look of the dart pointing upward. So with Cross Creek, we knit the shortest rows first. What does this mean? For your first W&Ts, knit (or purl) to the stitch indicated in the directions for your cup size. After that, pick up the wrap on the way back. W&T the next stitch. Continue on until you have created as many W&Ts as are indicated for your size.
Page 3 of 8
Cross Creek
Waist Shaping:
After finishing the bust shaping, count your stitches. If you have the same count on the front side as the back side, great! (I didn't) If you don't, decrease 1 st on the front side of each underarm marker every other row until the front count matches the back count. At the same time, knit .5 (.5, 1, 1, 1.5, 1,5) inches. On the next round, kl, ssk, k to 3 sts before the underarm marker, k2tog, k1, slip marker, k1, ssk, k to 3 sts before the marker, k2tog, k1. Knit 5 rows even. Repeat this 4 more times. Knit straight for 2".
Hip Shaping:
K1, MiL, k to the last st before themarker, M1R, k1, slip marker, k1, M1L, k to the last st before the marker, MiR, k1. Knit 5 rows. Repeat this 4 more times. Note: This gives a measurement the same size as the overbust. This should hit you at the HIGH hip, not the full hip. If you need more room at the high hip than at the overbust, decrease the number of rows knit even, and continue increasing - 1 round of increases for every inch of room you need. Knit even for 2".
Hem:
Follow the instructions for applying horizontal cables, using the 7-Rib Cable chart. Note: This chart starts on the wrong side of the knitting!
Sleeves:
Using Magic Loop or DPNs, pick up the arm stitches you put on waste yarn. Pick up 8 sts from the underarm, placing a marker after 4 to indicate the center of the underarm. Knit even for 1" K1, ssk k to 3 sts before the marker, k2tog, k1. Knit 3 rows. Repeat this 6 more times. Knit even for 3" K1, ssk k to 3 sts before the marker, k2tog, k1. Knit 8 rows. Repeat this 4 more times. Knit even until sleeve measures 16" from underarm.
Cuff:
Follow the directions for applying horizontal cables, using the 5-Rib Cable chart. Note: This chart starts on the wrong side of the knitting! Repeat from beginning of sleeve directions for second sleeve.
Finishing:
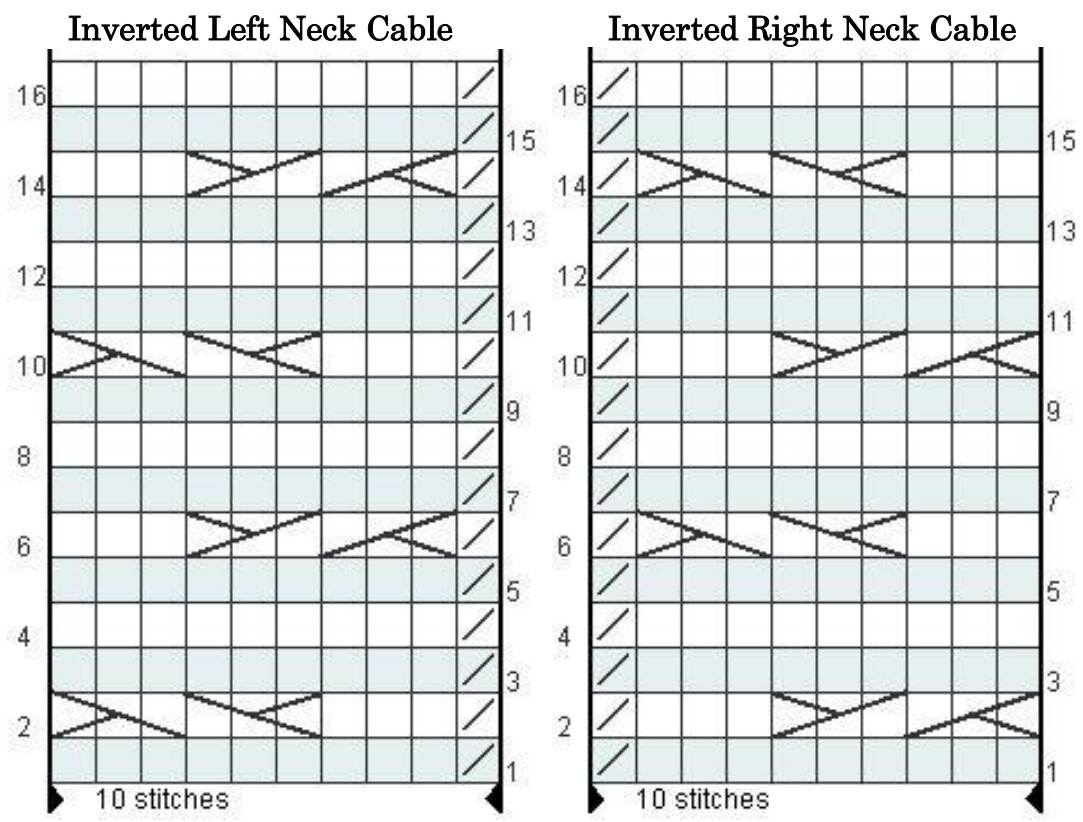
Undo the provisional cast-on at the neckline and place stitches on the needle. Place a marker at the center of the back. Using the Inverted Left Neck Cable and Inverted Right Neck Cable charts, continue the neckline cable upward, attaching it to the arm and back stitches in a similar manner to the sleeve cuffs
Page 4 of 8
Cross Creek
and hem. You will NOT knit the arm and neck sts - they are only used in the p2tog/k2tog for the cable! Since you are picking up from a provisional cast on, make sure you have 10 sts in the cable portion - 9 to cable, 1 to p2tog (RS) or k2tog (WS) with the arm and neck stitches you are attaching the cable to. When the cables reach the marker, kitchener the cable together. Weave in all ends and block.
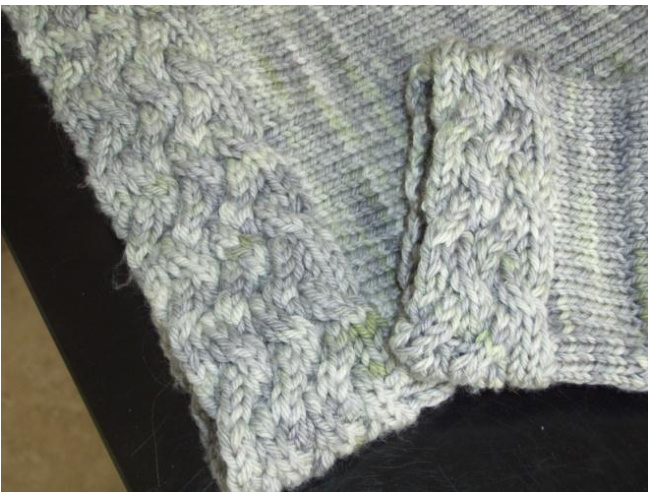
Applying perpendicular cables:
Using a circular needle longer than the hem, place the hem stitches on the needle. Slide the hem stitches to the center of the cable. Cast on (15, 21) stitches with a contrasting waste yarn. Knit a couple of rows flat, not involving the sleeve. When ready to start the actual hem, position the needles so that the waste yarn stitches are on the left needle, and the sleeve stitches are on the right needle. The wrong side (inside) of the sleeve will be facing you. The sweater yarn should be right next to the right needle. Follow the cable directions, remembering that you are on the wrong side of the cable on Row 1, and skipping the first stitch. Turn the work and follow the cable directions starting with Row 2. The last stitch should be a P - P2tog with 1 of the sleeve stitches. Turn the work, slip the next sleeve stitch from the right needle to the left needle, K2tog, and continue the pattern. Pick up 1 stitch for every 3 hem stitches. When you run out of hem stitches, undo the provisional cast-on and kitchener the 2 sets of live stitches. For the neckline cables, the charts start on the WS - this is to make the join between your work invisible. The p2tog/k2tog for the neck uses a neck/arm stitch every row - no picking up extra stitches like on the sleeve cuff or hem.
Page 5 of 8
Cross Creek
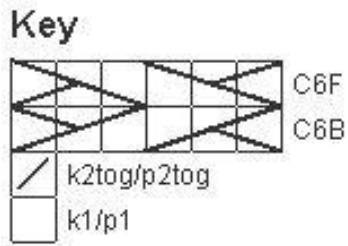
Cable Charts:
Written Directions:
This is an 8-row repeat, 16 rows are shown in chart for clarity. Row 1 (RS): p1, k9 Row 2 (WS): p9, k1 Row 3 (RS): p1, C6F, k3 Row 4 (WS): p9, k1 Row 5 (RS): p1, k9 Row 6 (WS): p9, k1 Row 7 (RS): p1, k3, C6B Row 8 (WS): p9, k1 Row 1 (RS): k9, p1 Row 2 (WS): k1, p9 Row 3 (RS): k3, C6B, p1 Row 4 (WS): k1, p9 Row 5 (RS): k9, p1 Row 6 (WS): k1, p9 Row 7 (RS): C6F, k3, p1 Row 8 (WS): k1, p9 C6F: Slip the next 3 sts onto cable needle, hold to the front, k3, k3 from cable needle. C6B: Slip the next 3 sts onto cable needle, hold to the back, k3, k3 from cable needle
Page 6 of 8
Cross Creek
Written Directions:
This is an 8-row repeat, 16 rows are shown in chart for clarity. Row 1 (WS): k2tog, p9 Row 2 (RS): p2tog, k3, C6F Row 3 (WS): k2tog, p9 Row 4 (RS): p2tog, k9 Row 5 (WS): k2tog, p9 Row 6 (RS): p2tog, k3, C6F Row 7 (WS): k2tog, p9 Row 8 (RS): p2tog, k9 Row 1 (WS): p9, k2tog Row 2 (RS): C6B, k3, p2tog Row 3 (WS): p9, k2tog Row 4 (RS): k9, p2tog Row 5 (WS): p9, k2tog Row 6 (RS): k3, C6F, p2tog Row 7 (WS): p9, k2tog Row 8 (RS): k9, p2tog C6F: Slip the next 3 sts onto cable needle, hold to the front, k3, k3 from cable needle. C6B: Slip the next 3 sts onto cable needle, hold to the back, k3, k3 from cable needle Page 7 of 8
Cross Creek
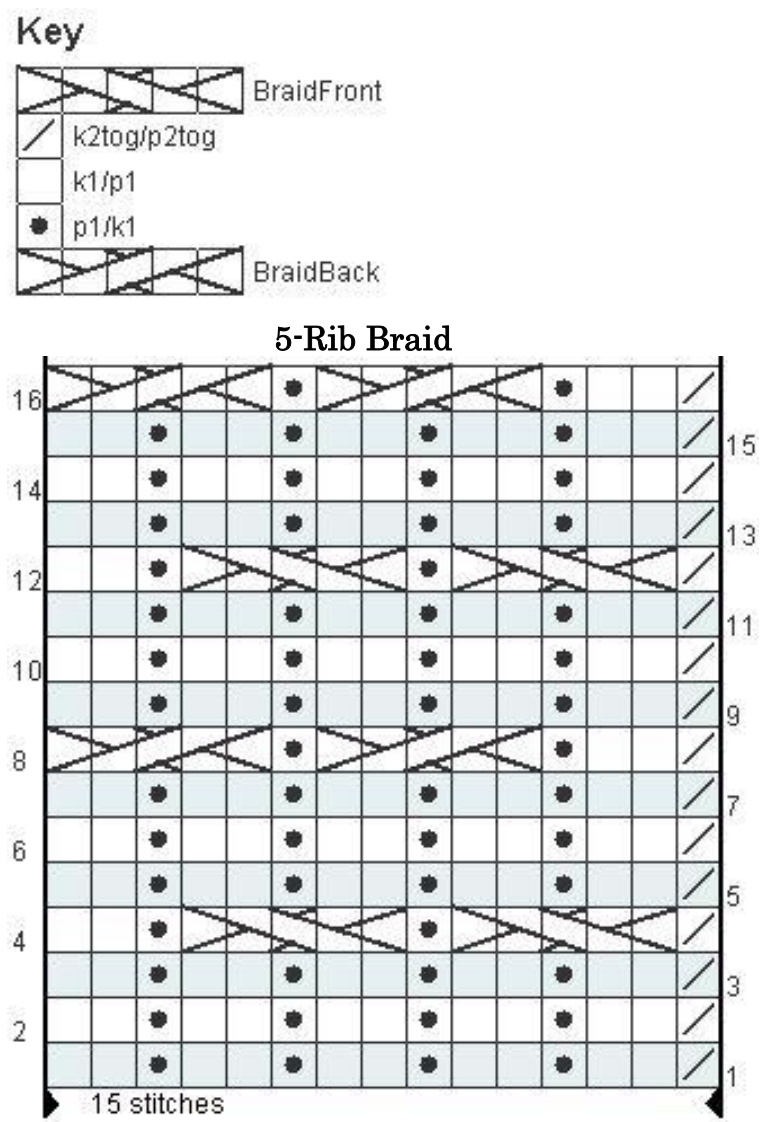
Written Directions for 5-Rib Braid:
This is an 8-row repeat - 16 rows are provided in the chart for clarity. Row 1(WS): k2tog, (p2, k1)x4, p2 Rows 2(RS): (k2, p1)x4, k2, p2tog Row 3(WS): k2tog, (p2, k1)x4, p2 Row 4 (RS): k2, p1 (BraidFront, p1)x2 Row 5(WS): k2tog, (p2, k1)x4, p2 Row 6(RS): (k2p1)x4, k2, p2tog Row 7(WS): k2tog, (p2, k1)x4, p2 Row 8(RS): )BraidBack, p1)x2, k2 BraidFront: Slip next 3 sts to cable needle, hold in front, k2, slip purl st (leftmost on cable needle) onto left needle and purl, k2 from cable needle. BraidBack: Slip next 3 sts to cable needle, hold in back, k2, slip purl st (leftmost on cable needle) onto left needle and purl it, k2 from cable needle.
Page 8 of 8
Cross Creek
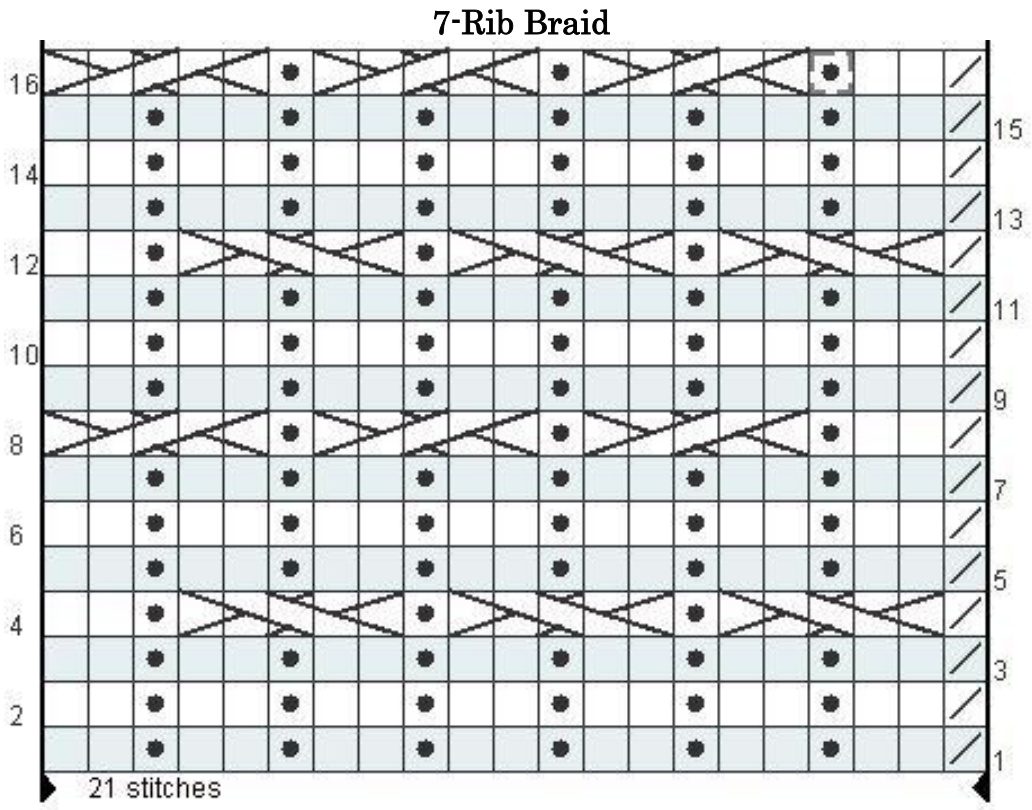
Written Directions for 7-Rib Braid:
This is an 8-row repeat - 16 rows are provided in the chart for clarity. Row 1(WS): k2tog, (p2, k1)x6, p2 Rows 2(RS): (k2, p1)x6, k2, p2tog Row 3(WS): k2tog, (p2, k1)x6, p2 Row 4 (RS): k2, p1 (BraidFront, p1)x3 Row 5(WS): k2tog, (p2, k1)x6, p2 Row 6(RS): (k2p1)x6, k2, p2tog Row 7(WS): k2tog, (p2, k1)x6, p2 Row 8(RS): )BraidBack, p1)x3, k2 BraidFront: Slip next 3 sts to cable needle, hold in front, k2, slip purl st (leftmost on cable needle) onto left needle and purl, k2 from cable needle. BraidBack: Slip next 3 sts to cable needle, hold in back, k2, slip purl st (leftmost on cable needle) onto left needle and purl it, k2 from cable needle.


