Newborn Baby Chick Hat
Finished Hat Circumference: approximately 13” Finished Hat Length: approximately 5" Gauge: (dcc, ch 1, dcc) = 1" with H hook
Abbreviations & Stitches used:
st ~ stitch ch \~ chain sp ~ space sl st \~ slip stitch sC ~ single crochet \*\*dc3tog\*\* \~ double crochet next 3 stitches together To do this stitch, yarn over, insert hook into specified stitch, pull up a loop, yarn over and draw thru 2 loops (2 loops still on hook), yarn over, insert hook into next stitch, pull up a loop, yarn over, draw thru 2 loops (3 loops on hook), yarn over, insert hook into next stitch, pull up a loop, yarn over and draw thru 2 loops (4 loops on hook), yarn over and draw thru all 4 loops on hook. \*\*dcc\*\* \~ double crochet cluster To do this stitch, yarn over, insert hook in specified stitch or space, pull up a loop, yarn over and draw thru 2 loops (2 loops still on hook), yarn over, insert hook into same stitch or space, pull up a loop, yarn over, draw thru 2 loops (3 loops on hook), yarn over and draw thru all 3 loops to complete. \~You may sell finished items made from this pattern/tutorial.\~ \*DO NOT\* sell or redistribute this pattern in any format. \~Please use your own photos for any online sales.\~ Page 1 of 4 @2013 Tiffany D. Garrett www.etsy.com/shop/tiffer93
Supplies You Will Need:
Worsted yarn in desired colors (Main Color [MC] and Contrasting Color [CC]) Shown in photo is I Love This Yarn! by Hobby Lobby, Yellow and Orange H Hook \~ or size needed to give you the desired gauge Yarn needle for weaving in ends Scissors 2 black buttons Pompom maker or piece of cardboard to make your pompom. I used an extralarge pompom maker and did not fully cover the entire thing, just wrapped loosely about the same number of times on each side. This hat begins with a Magic Loop. If you're unfamiliar with this technique, you may choose to ch 3 and place the first round of sts in the 3rd ch from hook. If you want to learn, there are numerous videos on how to make the Magic Loop on YouTube.
Pattern Notes:
Pattern is written in standard American Terminology. The ch 2 at the beginning of each round does NoT count as a st Join each round with a sl st in the beginning dcc or sc Repeat instructions within \* - \* specified number of times St counts are given at the end of rows within brackets {} Gauge varies from individual to individual. If you're having trouble achieving the gauge listed with the hook you're using, try going down a size if you're a loose crocheter, or up a size if you are a tight crocheter. Weave in ends as work progresses. \~You may sell finished items made from this pattern/tutorial.\~ \*DO NOT\* sell or redistribute this pattern in any format. \~Please use your own photos for any online sales.\~ Page 2 of 4 @2013 Tiffany D. Garrett
Hat \~ Using MC
Beginning with a Magic Loop: Round 1: ch 2, dcc (see instructions on first page on how to make this st), ch 1, \*(dcc, ch 1)\*. Repeat from \* to \* 6 more times, join, pull yarn tail to close ring. {8 dcc & 8 ch 1 Sp} Round 2: sl st into next ch sp, ch 2, (dcc, ch 1, dcc) in same sp, ch 1, \*(dcc, ch 1, dcc) in next ch sp; ch 1\*. Repeat from \* to \* around, join. {16 dcc & 16 ch 1 sp} Round 3: sl st into next ch sp, ch 2, (dcc, ch 1, dcc) in same sp, ch 1, dcc in next ch sp, ch 1, \*(dcc, ch 1, dcc) in next ch sp, ch 1, dcc in next sp, ch 1\*. Repeat from \* to \* around, join. {24 dcc & 24 ch 1 sp} Rounds 4 -10: sl st into next ch sp, ch 2, (dcc, ch 1) in each sp around, join. {24 dcc & 24 ch 1 sp} Round 11: ch 1, \*skip next dcc, sc into next ch sp, ch 1\*. Repeat from \* to \* around, end by joining with sl st into first sc. Fasten off, weave in ends. [24 sc & 24 ch 1 sp}
Beak \~ Using CC
:h 5, dcc in 3rd ch from hook, dcc in each ch across, ch 2, turn {3 dcc} Row 2: dc3tog over next 3 sts, ch 1, turn {1 dc} Round 1: working in row ends, place 4 sc down side of beak evenly, rotate and work on opposite side of foundation chain, place 3 sc in first ch, sc in next ch, 3 sc in last ch, rotate to work back up other side of beak, place 4 sc up side of beak evenly, place 1 sc in turning ch of previous row, join, fasten off leaving a long tail for sewing. Weave in the shorter tail from the beginning foundation ch. \~You may sell finished items made from this pattern/tutorial.\~ \*DO NOT\* sell or redistribute this pattern in any format. \~Please use your own photos for any online sales.\~ Page 3 of 4 @2013 Tiffany D. Garrett
Assembly:
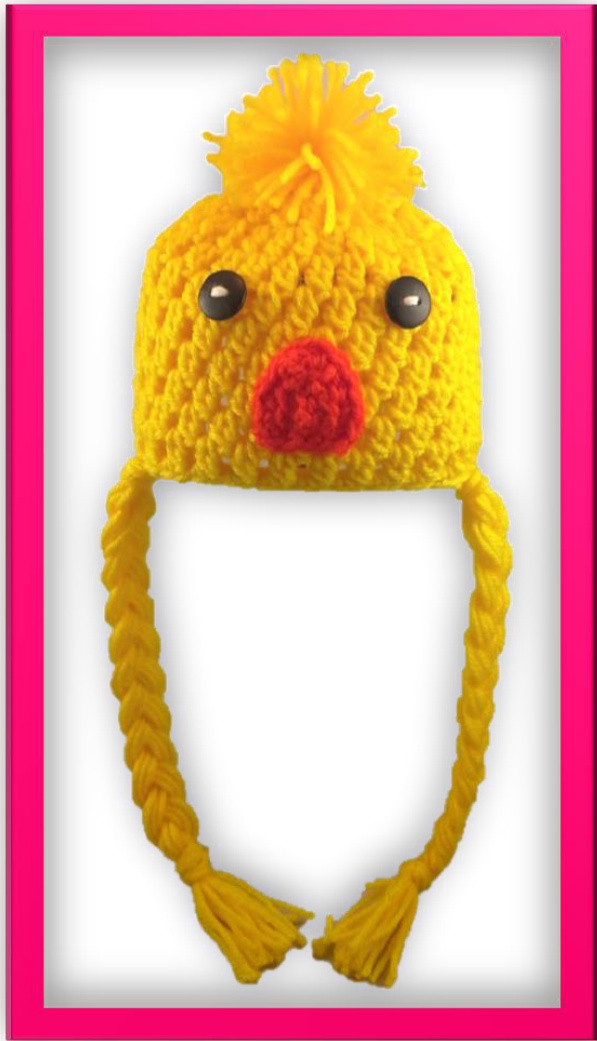
Lay hat flat with seam on bottom and centered. Locate the center of the front of your hat and sew the beak onto hat, puting the bottom (pointed end) of the beak just above Round 10 (see photo for placement help \~ but beware, I sewed the beak on upside down on the test hat in the photo. It should be pointed part at the bottom). Sew buttons evenly spaced above beak on approximately Round 5 (see photo for placement help).
Braids
Cut 18 pieces of yarn that are 36 inches long. Divide into 2 groups of 9 strands. With hat lying flat again, fold one group of 9 strands in half and attach them to a ch 1 sp on one side of hat with a Lark's Head knot. Repeat on opposite side with other group of 9. Divide the attached strands into 3 groups of 6 strands and braid loosely, or as desired. Trim ends evenly.
Pompom
Using desired Pompom making technique, make a large pompom and attach to the center top of the hat. Double check that you've woven in any ends. Your hat should be ready for baby to wear. \*Permission to sell finished items given, but please do not use my images. \*A link back to my Ravelry, Etsy or Facebook page appreciated. I would love to see your finished items.
ENJOY!
\~You may sellfinished items made from this pattern/tutorial.\~ \*DO NOT\* sell or redistribute this pattern in any format. \~Please use your own photos for any online sales.\~ Page 4 of 4


