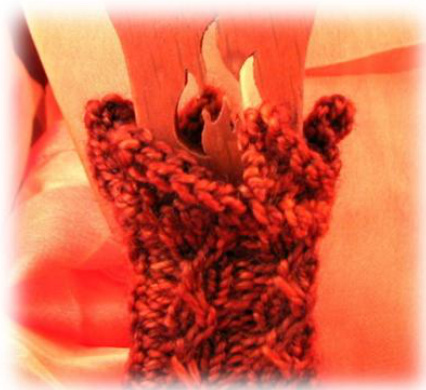
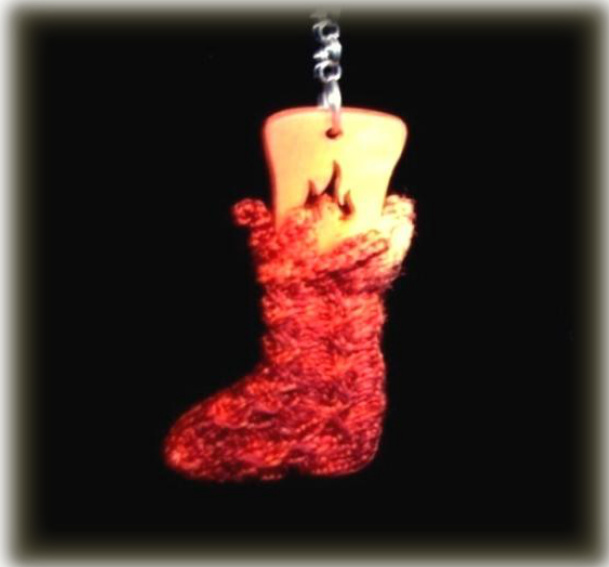
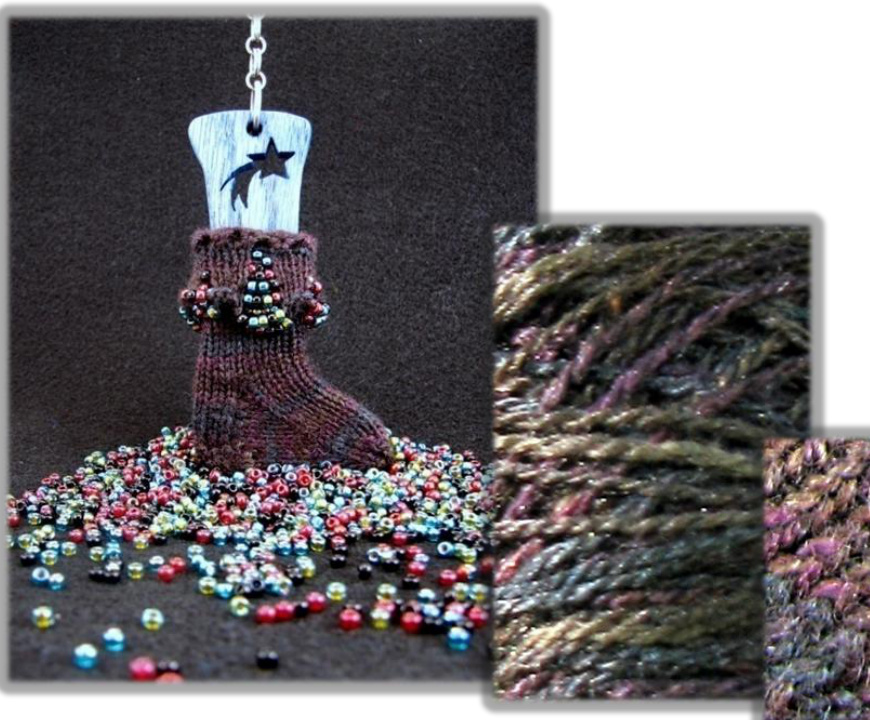
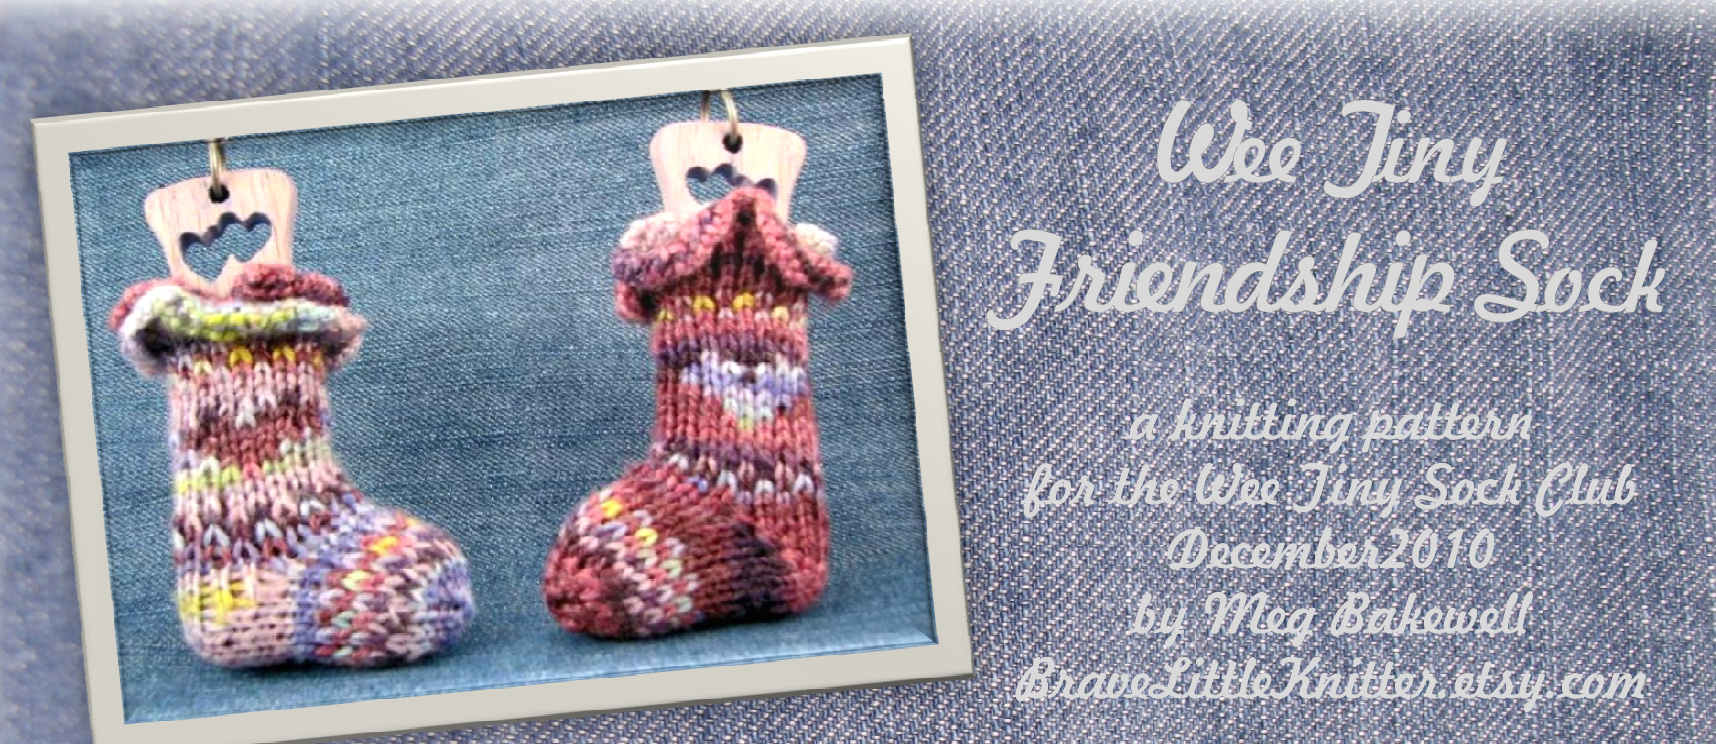
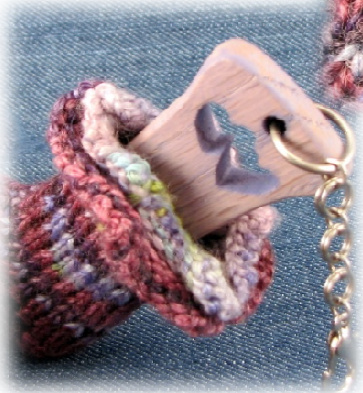
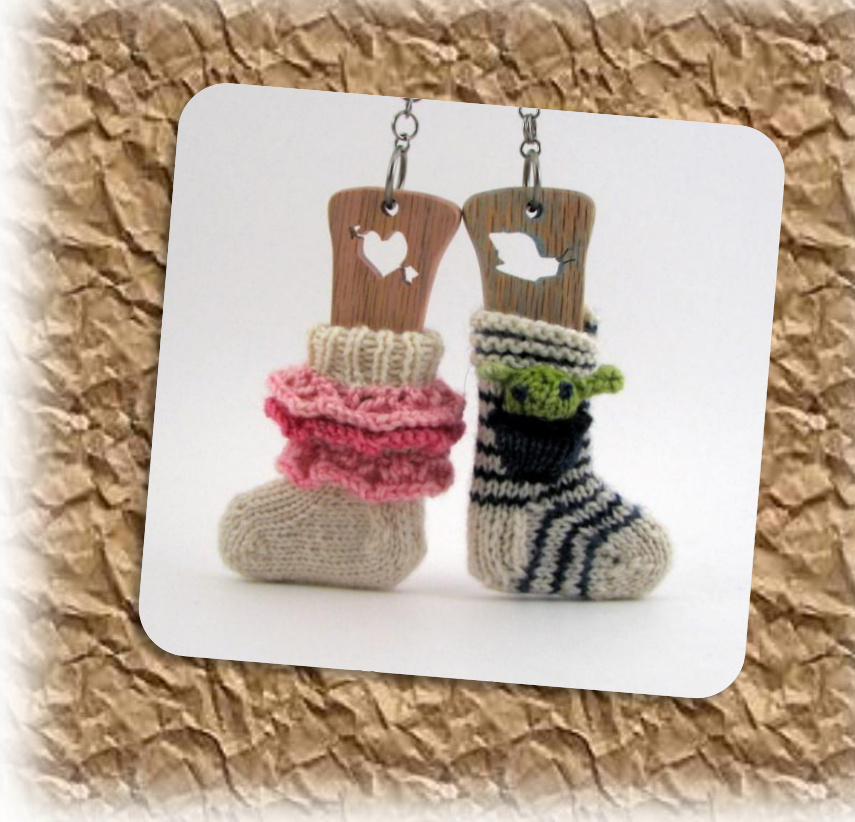
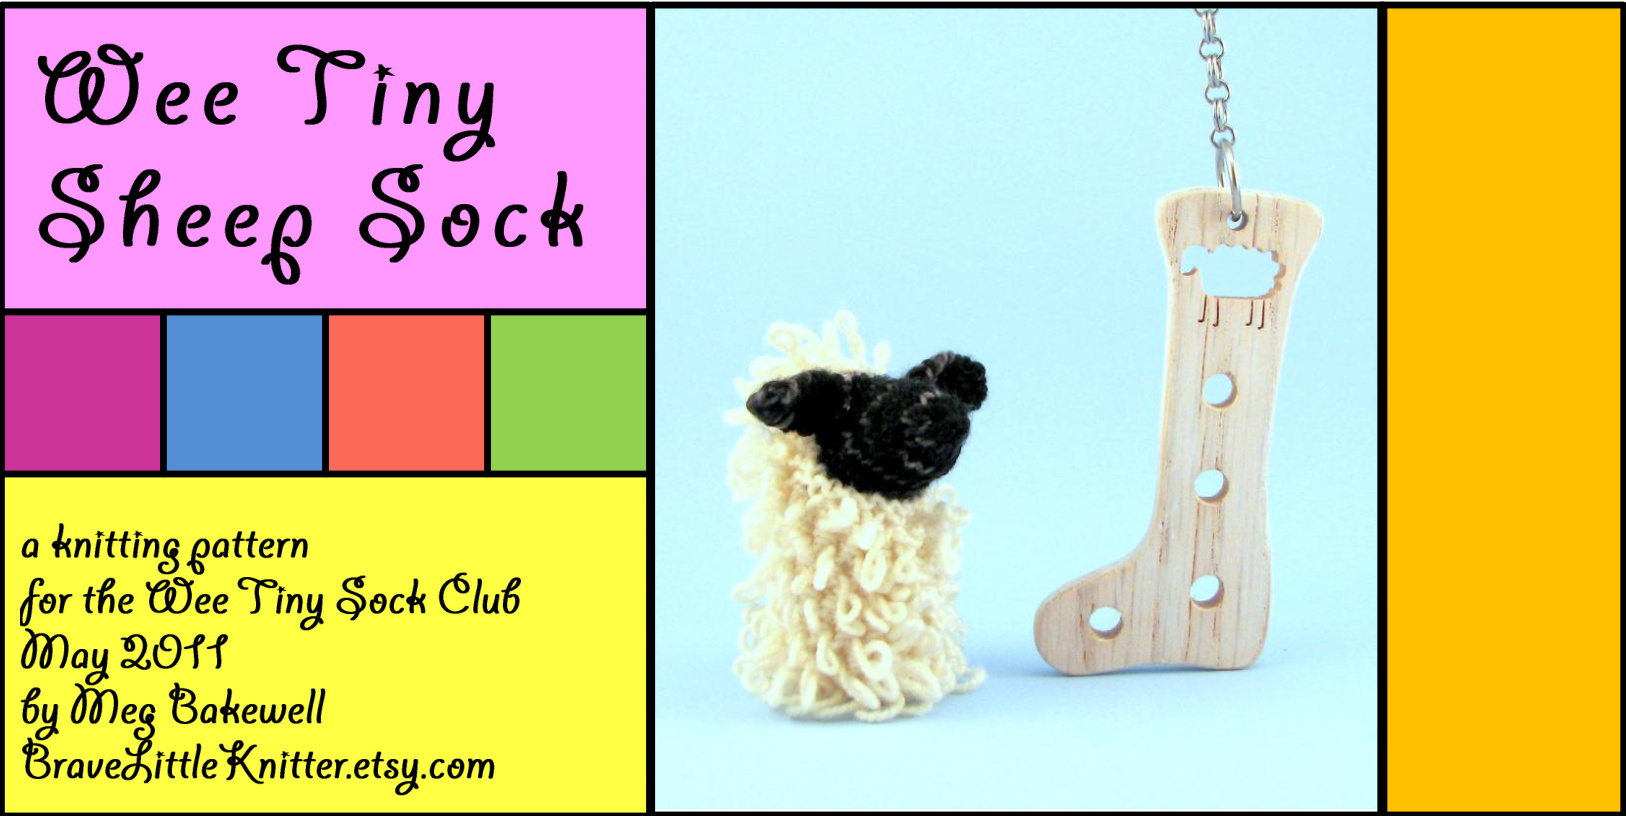
A knitting pattern for the Wee Tiny Sock Club June 2010 by Meg Bakewell BraveLittleKnitter.etsy.com The Wee Tiny Campfire Sock was inspired by a beautiful limited edition colorway from Sundara Yarn. The deep oranges and hot reds tinged with just a bit of darkness remind me of the glowing embers of a dying campfire. A twisted rib stitch pattern imitates flickering flames on the foot and leg of this toe-up sock. Slipped stitches in the pattern show off the subtle color variations of the yarn. The blaze continues along the top edge with a knitted on edging. All these fiery stitches look their best after being soaked in water for a few minutes and blocked.
Materials
Sundara Sock 100% Superwash Merino, fingering weight yarn about 14 yards/13 meters, colorway “Feet to be Tickled" Set of 4 US size 1/2.25 mm DPNs or size to obtain gauge Cable needle (an extra DPN works fine, especially if it's wood) Suggested gauge: 7.5 sts and 14 rows per 1"/2.5cm in stockinette Note: The slipped sts and cables in this pattern make the knitting less stretchy, so it may be a tight fit on the sock blocker if your gauge is tighter than recommended.
Abbreviations
Sl: Slip st, purlwise unless otherwise indicated. SSK: slip, slip, knit. (slip 2 sts knitwise, individually, and knit LC: Slip 1 st to cable needle and hold in front. Knit 2 sts from the working needle, then knit 1 st from cable needle. RC: Slip 2 sts to cable needle and hold in back. Knit 1 st from the working needle, then knit 2 sts from cable needle. pattern @ 2010 Meg Bakewell, for personal use only.

Begin pattern
Cast on 8 sts using the cable cast on. Row 1: (K1, sl 1) four times. Row 2: Repeat row 1. Next, transfer 4 stitches to each of 2 DPNs, alternating between the 2 needles for each stitch. In other words, transfer the first stitch to needle #1, the second to needle #2, the third to needle #1, the fourth to needle #2, and so on. Now if you hold the 2 needles side by side and look at the knitting you have done, you will see that one side has a clear ridge from the cast-on, while the other side is smooth. The side with the ridge is the inside of the sock. Using a third DPN, divide the stitches on needle #2 so that each needle has 2 sts. Begin working in the round. Round 1, 3, 5, 7: K all sts. Round 2: (Kfb, k1) four times. 12 sts. Round 4: (Kfb, k3, kfb, k1) twice. 16 sts. Round 6: (Kfb, k5, kfb, k1) twice. 20 sts. Rearrange sts so there are 5 sts on the first needle, 7 sts on the second needle and 8 sts on the third needle. Round 8: (P1, k3) five times. Round 9: (P1, sl1, k2) five times. Round 10: Repeat round 9. Round 11: (P1, LC) five times. Round 12: Repeat round 8. Round 13: (P1, k2, sl1) five times. Round 14: Repeat round 13. Round 15: (P1, RC) five times. Rounds 16-19: Repeat rounds 8-11. Round 20: (P1, k3) twice, P1, K1. (10 sts of the round haven't been worked yet. These will now begin the short row heel.)
Short Row Heel
K9, w&t, p8, w&t, k7, w&t, p6, w&t, k5, w&t, p4 w&t, K5, w&t, p6, w&t, k7, w&t, p8, w&t, k9. Pick up one st in the gap between the heel and the instep. This st will be purled together with the first instep st. (end of heel)
Leg
Important Note: In round 1 only, remember to purl the picked up st together with the first st right after the heel is finished. Round 1: (P1, k2, sl1) five times. Round 2: Repeat round 1.
Leg, continued
Round 3: (P1, RC) five times. Round 4: (P1, k3) five times. Round 5: (P1, sl1, k2) five times. Round 6: Repeat round 5. Round 7: (P1, LC) five times. Round 8: Repeat round 4. Rounds 9-24: Repeat rounds 1-8 two more times. Rounds 25-28: Repeat rounds 1-4 one more time.
Cuff
The cuff is finished with a knitted on edging. This means you will not bind off in the normal way, but rather will knit an edging that travels around the top of the sock. The edging is connected to the top of the sock by SSKs that are formed using one st from the edging and one st from the sock. Also, the edging is worked back and forth in rows rather than in the round, so you will turn work at the end of each row. Using the backward loop method, cast on 2 sts. Turn work so you can work back across the two sts you just cast on. Row 1: K1, ssk. (2 edging sts) Row 2: SI1 WYIB, YO, kfb. (4 edging sts) Row 3: K1, p2, ssk. Row 4: Sl1 WYIB, YO, k2, kfb. (6 edging sts) Row 5: K1, p4, ssk. Row 6: Sl1 WYIB, YO, k5. (7 edging sts) Row 7: Bind off 5 knitwise, ssk. (back to 2 edging sts) Row 8: SI1 WYIB, k1. Repeat rows 1-8 four more times. On the final row 8, you will be back to the starting point. Pick up 1 st from the base of the first repeat of the edging, and knit the 2 remaining edging sts together with the picked up st through the back loop. Break the yarn and thread through the last remaining st. Weave in ends and wet block. For each of the points of the edging, pull it upward and twist clockwise to create the look of flames leaping up from the fire.
Time for some S'mores!
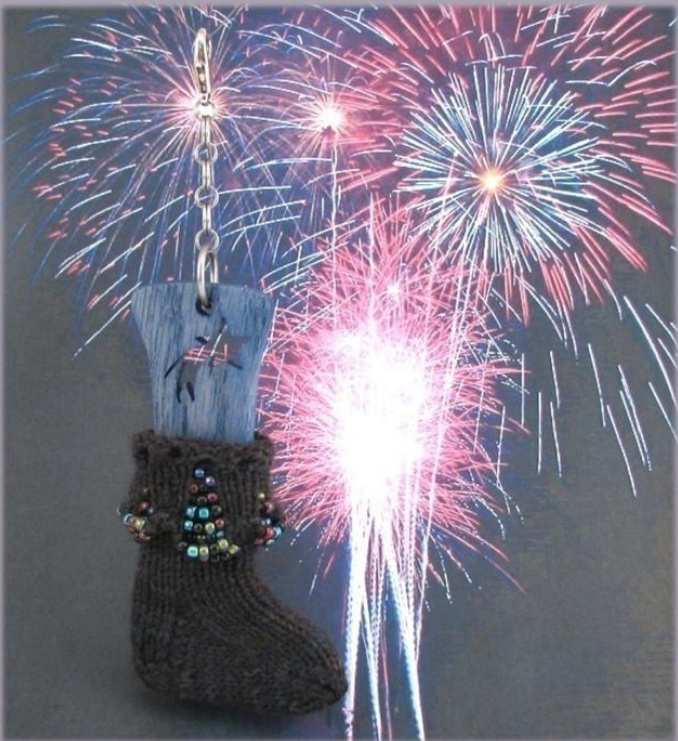
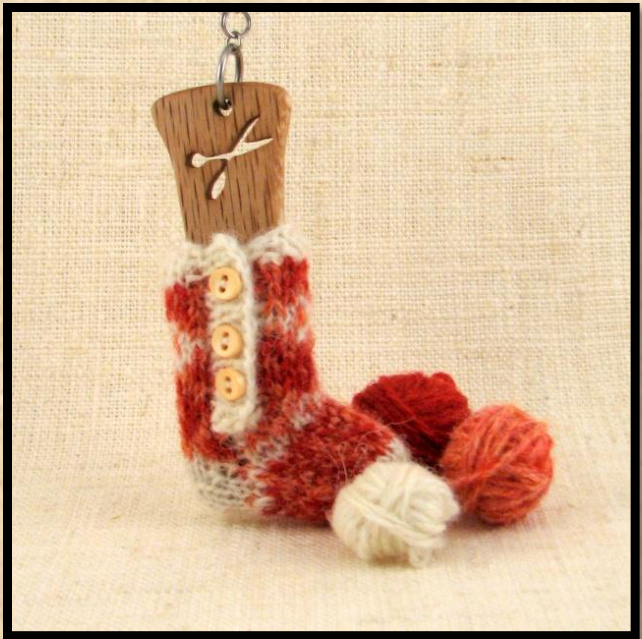
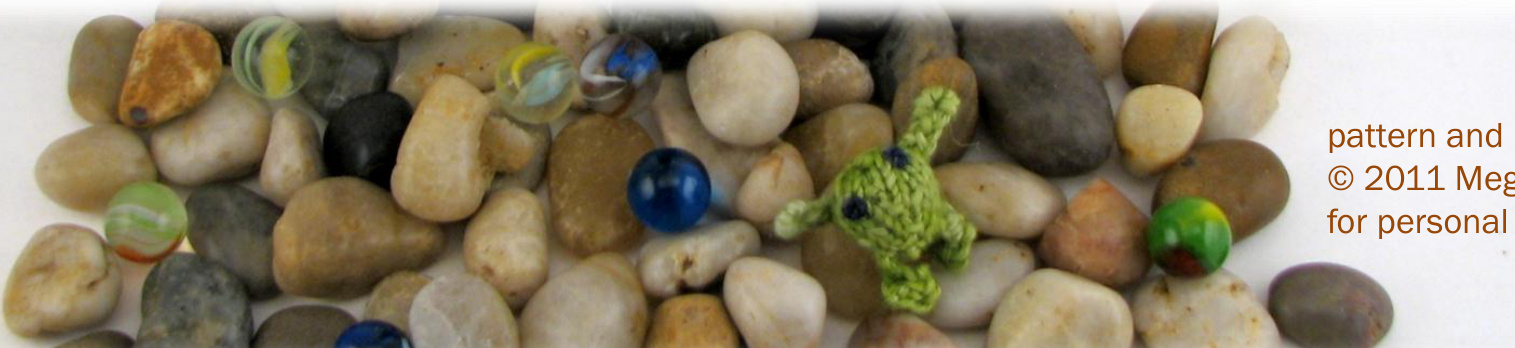
Fireworks are used in celebrations all over the world, all throughout the year. In the United States, Independence Day celebrations usually feature pyrotechnics of one sort or another, whether sparklers held by kids or professional displays high in the sky. According to Wikipedia, this tradition started on the very first anniversary of the signing of the Declaration of Independence, July 4th, 1777. I'm celebrating the second summer of Wee Tiny Sock Club with a sock exploding with over 120 beads. All the bead work is done in the cuff of this top down sock. The rest is simple stockinette, a “plain vanilla sock" to show off a subtly dyed merino/silk yarn the color of summer's night sky.
Materials
Perchance to Knit 50% Merino/50% Tussah Silk, lace weight yarn, held double throughout about 30 yards/27.5 meters (2.6 g), colorway “Midnight Rainbow /Harlot's Peacock" Note: The mini skein in the kit is already doubled. There is a knot at each end to hold the 2 strands together. You can also substitute 15 yards of fingering weight yarn. 126 size 8 seed beads, in a mixture of black, red, blue and green (about 150 included in kit) Beading needle (included in the kit, in the bag with the beads) gested gauge: 8.5 sts and 15 rows per 1"/2.5cm in stockinet
Hbbreviations
B: Push the indicated number w&T: wrap and turn. pattern and photos of beads up to the needle. YO: Yarn over. ① 2010 Meg Bakewell SSK: slip, slip, knit. Co: Cast on. for personal use only K2tog: Knit 2 together. Sl: Slip st(s) purlwise.
Begin pattern
Using a beading needle, string 126 beads on the yarn. (String them onto both strands of the lace weight yarn.) You can string them randomly with respect to color. Push the beads down the yarn a bit until you need them.

Note: Use the backward loop method to cast on all sts. Begin with a slip knot, then cast on 1 st. (2 sts on the needle) \*B5, CO 3, B3, CO 3, repeat from \* two more times, ending with CO 1 instead of CO 3. (18 sts on the needle, and 24 beads used) The first row will now be worked flat, just because it's easier than re-arranging the sts to work in the round right away with all those beads. k3, b5, k3, repeat from \* two more times, ending k2 instead of k3 Now, distribute sts evenly among three needles (6 sts on each) Rounds 1 & 2: P1, \*B2, p3, b4, p3, repeat from \* two more times, ending p2. Rounds 3 & 4: P1, \*B1, p3, b3, p3, repeat from \* two more times, ending p2. Rounds 5 & 6: P4, \*B2, p6, repeat from \* two more times, ending p2. Rounds 7 & 8: P4, \*B1, p6, repeat from \* two more times, ending p2. Round 10: K1, \*YO, k2tog, repeat from \* to end of round, end with one more YO. (19 sts) Continue in stockinette (knit all sts) until work measures 1.5"/4cm from Round 10, about 22 rounds.
Heel Flap
To set up, knit 9 sts onto 1 DPN - these sts will be held for the instep. Slip remaining 10 sts onto a second DPN for the heel flap. Row 1: \*Sl1, k1, repeat from \* to end of row. Turn work. Row 2: Sl1, p to end of row. Rows 3-10: Repeat rows 1-2 four more times. Row 11: Repeat Row 1.
Gusset
Note: The heel turn comes after the gusset sts have been picked up. This may be a bit non-traditional, but it works justaswell! Pick up 6 sts along the edge of the heel flap. Using needle 2, knit across the 9 held instep sts. Using needle 3, pick up 6 sts along the other side of the heel flap.
Heel Turn
K6, w&t, p2, w&t, k3, w&t, p4, w&t, k5, w&t, p6, w&t, k7, w&t, p8, w&t, k9. (end of heel turn) Knit 20 sts. You are now at the center of the heel, the new beginning of round. Arrange sts so that needle 1 has 11 sts, needle 2 (instep) has 9 sts, and needle 3 has 11 sts. (31 sts total)
Foot
Round 1: K to last 2 sts of needle 1, k2tog, k across 9 sts on needle 2, ssk, k to end of round. (29 sts remain) Round 2: Knit all sts. Rounds 3-12: Repeats rounds 1-2 five more times. (19 sts remain after round 12)
Toe
Round 1: K to last 2 sts of needle 1, k2tog, ssk, k to last 2 sts of needle 2, k2tog, ssk, k to end of round. (15 sts remain) Round 2: Knit all sts. Rounds 3-6: Repeat rounds 1-2 two more times. (7 sts remain after round 6.)
Finishing
Break yarn and thread through remaining 7 sts. Weave in ends and cuff beaded portion over. Celebrate!
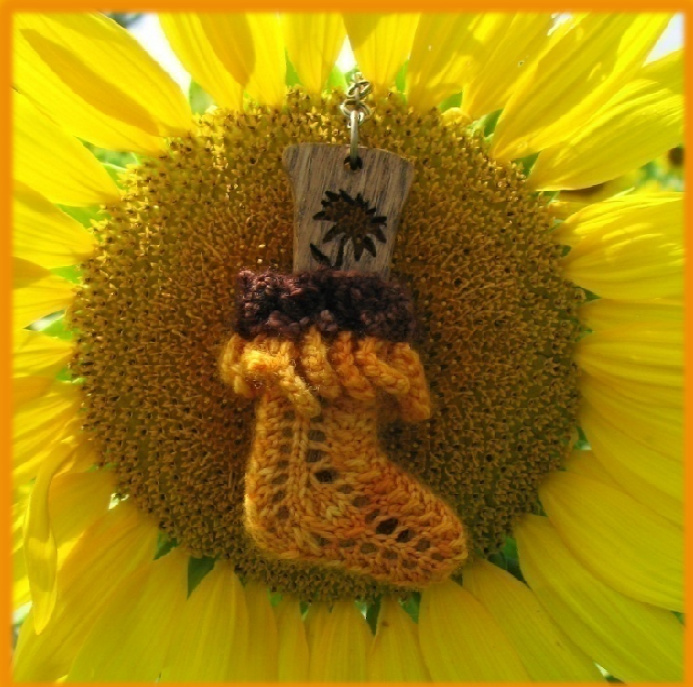
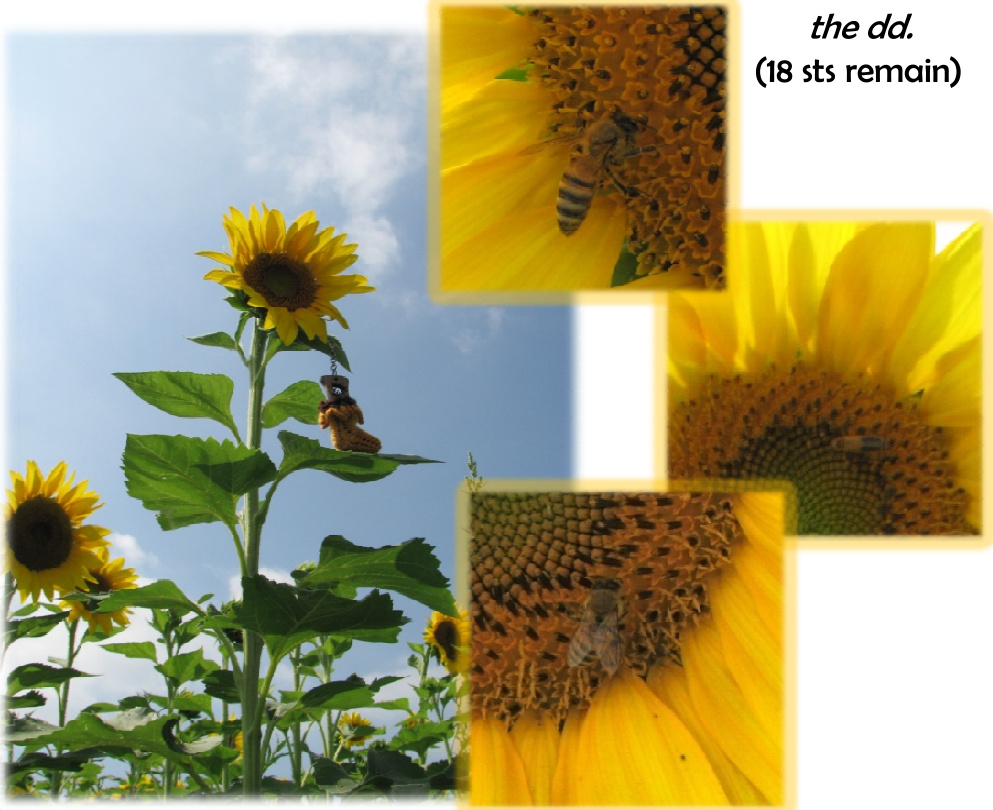
Wee Tiny Sunflouer Sock
A knitting pattern for Bhe Wee Tiny Sock Club August 2o10 by neg Bakeuell BraveLittleknitter.etsy.com Walking through a field of mammoth flowers a dozen feet high or higher gives a taste of Alice's world after she sipped from the little bottle that said “Drink Me." This wee tiny sock turns that equation upside down and miniaturizes the sunflower. The knitting begins with a cuff of little bobbles, eight bobbles in each round, then a row of thirteen petals, followed by three repeats of a simple lace pattern down the leg, continuing on the heel flap and foot. The repeat numbers (3, 8, 13) are elements of the Fibonacci sequence. Numbers in this sequence are often found in nature, including the number of petals on a sunflower and the number of spirals seen in the arrangement of its seeds.
meteriels
Beyond Basic Knits Prima Sock, about 12 yards Sunflower (MC), and 7 yards CoffeeBean (CC) Set of 4 US size 1/2.25 mm DPNs or size to obtain gauge Suggested gauge: 8.5 sts and 15 rows per 1"'/2.5cm in stockinette pattern and photos @ 2010 Meg Bakewell for personal use only
Abbrevietions
TW: Turn work. Sl Slip stitch purlwise. K2tog: Knit 2 together. Psso: Pass the slipped st over. SsK: Slip, slip, knit. WYIB: With yarn in back. DD: SI 1, k2tog, pass the slipped st over. Kfb: Knit into the front and back of next st. Yo: Yarn over. MB: (Make bobble) Knit into the front, the back, and the front again of the next st. (3 sts made from 1). TW. P3. TW. SI 1, K2tog, PSSO. MP: (Make petal) Using the knit cast on, cast on 6 sts. Row 1: K5, SSK, TW. Row 2: SI 1 WYIB, k5, TW. Row 3: Sl1, k1, PSSO, bind off 4 more sts knitwise. K1. (2 sts on the right hand needle after the first petal.)


Begin pattern
Using CC, cast on 25 sts. Round 1: (P2, MB) eight times, P1. Round 2: P1, (MB, P2) eight times. Round 3: (MB, P2) eight times, MB. Round 4: Repeat round 1. Round 5: Switch to MC. Kfb, k to end of round. (26 sts) Round 6: (Petal round) MP thirteen times. Round 7: Knit. Round 8: (K2, k2tog, k1, k2tog) three times, k1, k2tog, k2tog. (18 sts remain. Arrange sts so there are 6 sts on each of 3 needles.) Round 9: (YO, k1, DD, k1, YO, k1) three times. Note:ForYOatthestartofthe needle: Put the empty working needleintothefirststontheleft hand needleasiftoknit.Bringthe working yarn under the empty needle and to the front, then bring it over the top of the needle toknit thefirstst. Round 10: Knit. Round 11-18: Repeat rounds 9-10 four more times.
Gusset Decredses
Heel Flap Row 1: YO, k1, DD, k1, YO, k2. Rows 2, 4, 6, 8: SI 1, p8. Rows 3, 5, 7, 9: Sl1, k1, YO, k1, DD, k1, YO, k2.
Begin Gusset
Pick up and knit 3 sts from the side of heel flap. YO, pick up and knit one st in the YO at the edge of the instep, DD, k1, YO, k1, YO, k1, DD, pick up and knit 1 st in the YO from previous row of instep, YO, pick up and knit 3 sts from side of heel flap, k1 st from heel needle. (26 sts on the needles now.) This point is the new beginning of round. Knit around one time, arranging sts as you go so that the first needle has 7 sts, the second has 10 and the third has 9. Note: There is no separate heel turn in this sock. The first coupleroundsofgussetdecreasesincludeabitof shapingfortheheel. Round 1: Needle 1: Sl2, k3, sl2. Needle 2: K1, k2tog, k1, YO, k1, DD, k1, YO, k1. Needle 3: YO, k1, DD, k1, YO, k1, ssk, k1. (24 sts remain) Round 2: Needle 1: Sl2, k3, sl2. Needle 2: K9. Needle 3: K8. Round 3: Needle 1: K1, YO, k1, DD, k1, YO, k1. Needle 2: K2tog, K1, YO, k1, DD, k1, YO, k1. Needle 3: YO, k1, DD, k1, YO, k1, sk. (22 sts remain) Round 4: Needle 1: K7. Needle 2: K8. Needle 3: K7. Round 5: Needle 1: K1, YO, k1, DD, k1, YO, move one st to needle 2. Needle 2: DD, YO, k1, DD, k1, YO, k1. Needle 3: YO, k1, DD, k1, YO, DD. Note: Use one st from needle 1 so you have enough for
Foot & Goe
Round 1: (YO, k1, DD, k1, YO, k1) three times. Round 2: Knit. Rounds 3-10: Repeat rounds 1-2 four more times. Round 11: (K1, DD, k2) three times. (12 sts remain) Round 12: Knit. Round 13: (Dd, k1) three times. (6 sts remain) Round 14: Knit. Break yarn and thread through remaining 6 sts. Weave in ends and block if desired. The lace looks best after blocking. @ Turn your face to the sun!
Wee Tuny Sampler Sock
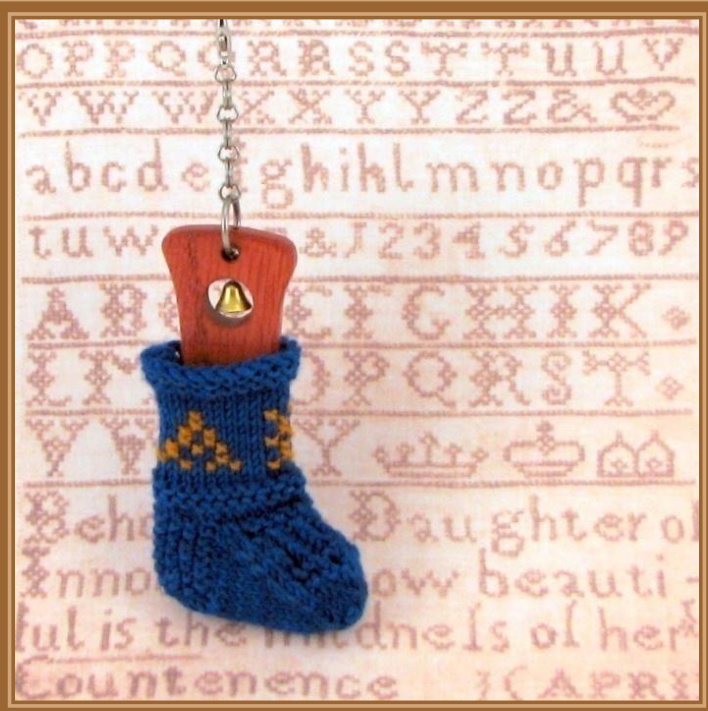
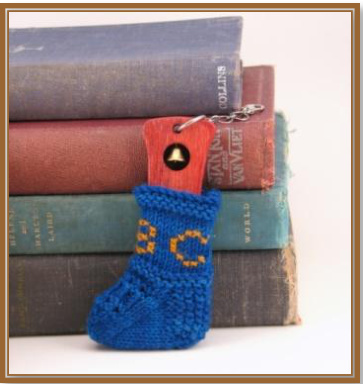
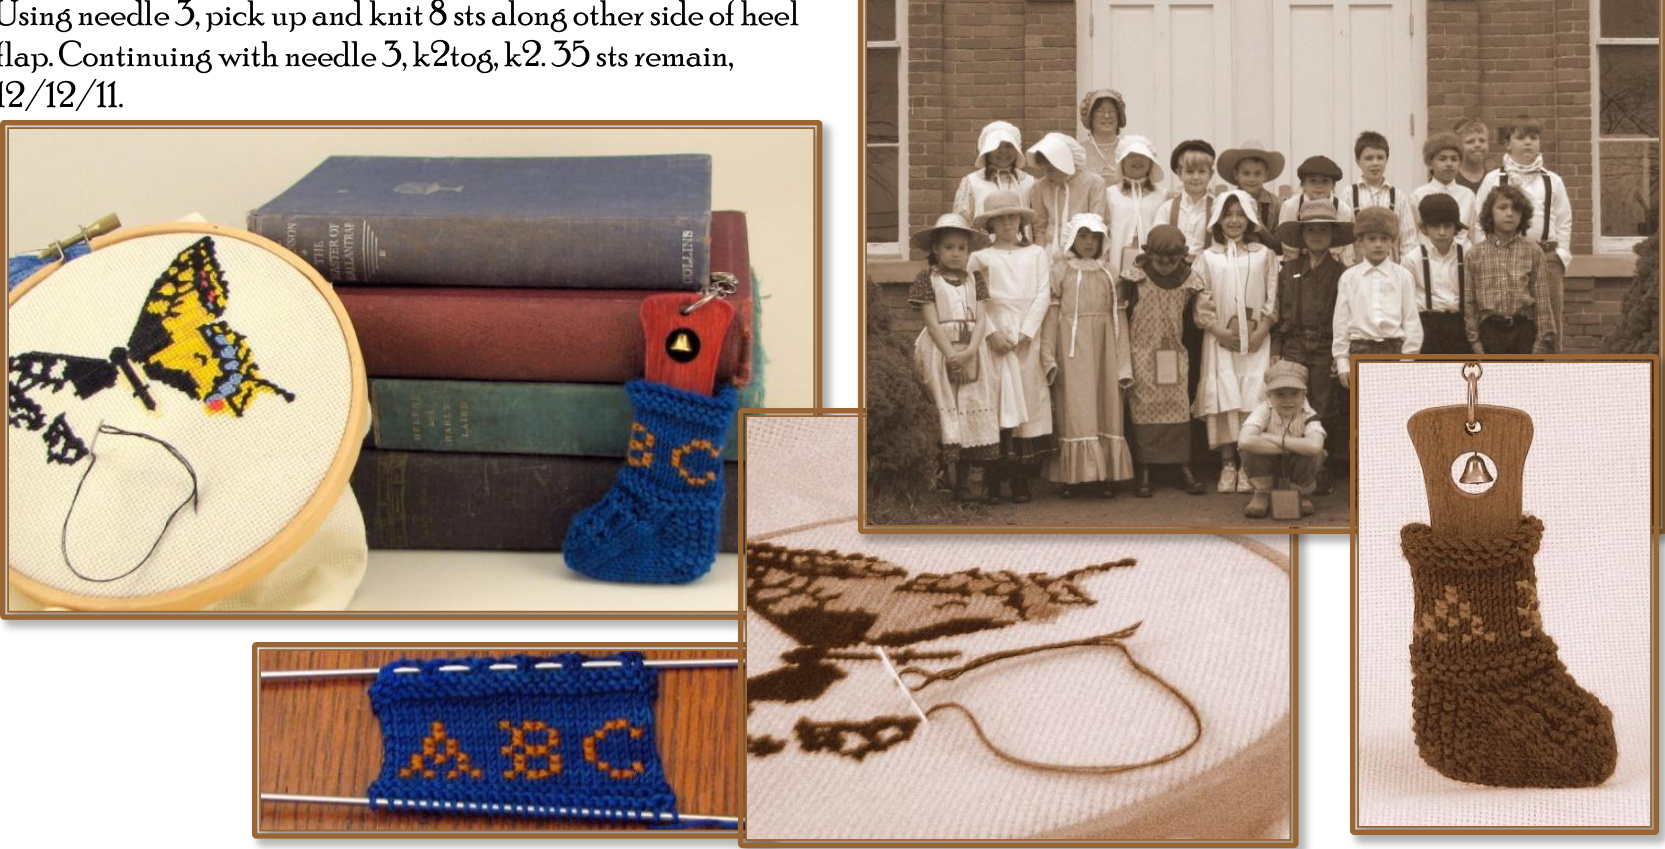
A knitting pattern for the Wee Tiny Sock Club September 2010 by Meg Bakewell BraveLittleKnitter.etsy.com Can you hear the school bell ringing? Time for reading, writing and arithmetic,and maybe if you're lucky some needlework,to.Fine embroidery skills were considered an essential part ofa young lady'seducation in days gone by. She would start with simple stitches, much as we might learn garter stitch as beginning knitters. As her technique improved, new skills and stitches would be added to her repertoire. A sampler preserves a record of stitches learned for future use. The Wee Tiny Sampler Sock begins with the knit stitch alone in simple garter, knit flat, then adds the purl stitch to create stockinette and seed stitch. The leg is embellished with the ABC's in cross stitch, using the knitted stitches themselves as the canvas. Just as a learning knitter would branch out into new stitch combinations, the pattern then adds knitting in the round, increases, decreases and ribbing as you create the foot.
MATERIALS
Wollmeise Sockenwolle 80/20 Twin colorway Blue Curacao (bright blue, MC) about 17 yards Wollmeise 100% Merino Superwash colorway Safran (golden yellow, CC), less than 1 yard divided into plies, or substitute 3 strands embroidery floss or a lace weight yarn. Set of 4 US size 1(2.25mm)DPNs pattern and photos @ 2010 Meg Bakewell for personal use only
ABBREVIATIONS
K2tog:Knit 2 together. SSK:Slip the next 2 sts individually, knitwise, then knit them together through the back loops. Tbl: through the back loop. YO: Yarn over. Sl: Slip the st purlwise. WYIF: With yarn in front. WYIB: With yarn in back.
BEGIN PATTERN
Using MC and leaving a tail of about 12", cast on 25 sts. The le8 of the sock is worked flat. Row 1-5:Knit. Even rows 6-16 (wrong side): Purl. Odd rows 7-17 (right side): Knit. Row 18-20:Knit. Row 21: Bind off 1 st, knit to last 2 sts, k2tog. (23 sts remain)
EMBROIDERY
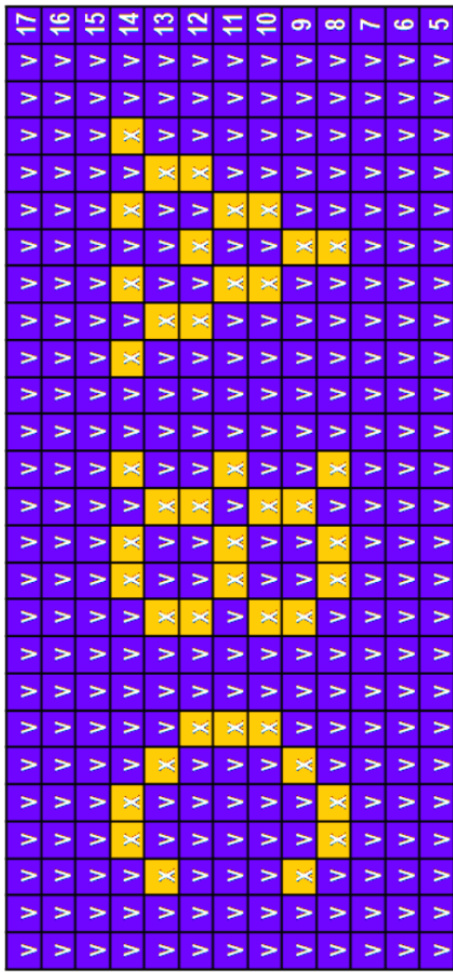
See Important Notes (next page) before starting! The Wollemeise 100% Merino Superwash yarn consists of 8 plies. Carefully untwist the plies at the end of the CC yarn and divide the yarn into 2 strands containing 4 plies each. You will use only 4 plies for the embroidery. Thread about 18-24" of CC on a tapestry needle. You will use this yarn to cross-stitch the letters onto the stockinette portion of the leg according to the chart on the next page.
JOINING IN THE ROUND
Distribute sts on 4 DPNs (5/6/6/6) starting with the location of the working yarn. Join to begin working in the round. Knit 18 sts (first 3 needles). Slip the next 5 sts onto needle 1. The heel flap will be knit on the l1 sts that are now on needlle 1.
HEEL FLAP
Row I: Sll WYIB, (pl, k1) to the end of row. Row 2: Sl1 WYIF, (p1, k1) to the last 2 sts, p2. Rows 3-14: repeat rows 126 more times.
HEEL TURN
Sl1, k6, wt, p3, wt, k3, k2to8, wt, p4, p2tog, wt, k5, k2to8. Continuing with heel flap needle (needle 1), pick up and knit 8 sts along the edge of heel flap. Usin8 needle 2, knit 12 instep sts.
GUSSET
On odd (decrease) rows, k to the last 3 sts of needle 1, k2tog, k1, follow written instructions below for needlle 2, k1, ssk, k to end of needle 3. On even (no decrease) rows, simply knit all sts on needles 1 ? 3, and follow written instructions below for needle 2.
NEEDLE 2 INSTRUCTIONS
Needle 2, Round 1. Purl. Needle 2Round 2: (YO, k2tog) 6 times. Needle 2 Round 3. Purl. Needle 2 Round 4-7: (K1tbl, p1) 6 times. Needle 2 Round 8-10: Repeat rounds 1-3. (25 sts remain after round 9,the last decrease round for the gusset.)
TOE DECREASES
Round 1: K to last 3 sts of needle 1, k2to8, k2, ssk, k to last 3 sts of needle 2, k2tog, k2,ssk, k to end of needle 3. Round 2, 4: Knit. Rounds 3,5,6,7: repeat round 1. (9 sts remain after round 7.) K2tog, k1. Arange remaining 8 sts on 2 needles (sole sts on 1 and instep sts on the other.)
FINISHING
Break yarn and graft toe closed. Using mattress st and long tail from cast on, sew seam at back of leg. With mattress st, one st from each edge disappears into the seam and the seam is invisible from the right side. This leaves exactly 2 sts between the embroidered "A" and the "C”. Weave in ends. Your homework is done,8o play!
IMPORTANT NOTES BEFORE BEGINNING TO CROSS STITCH
Note that there are 25 sts in the chart, representing the 25 knit sts in the leg. However, the edge st on each side of the knitting will tend to curl over toward the back of the work, so the first full st you see in the knitting is the second st of the chart. Also notice the direction of the“V's" in the blue part of the chart. This is the direction of the V's formed by the knit sts. Make sure you align your cross stitches on the knitting so that each cross st covers one knitted "V" stitch, with the point of the V toward you when you hold the work with the cast on edge toward you. Otherwise the whole design will be shifted by %2 st. Finally, notice that the first and last row of knitted sts in stockinette can be somewhat hidden by the adjacent row of purls from the garter sections. Carefully count the rows of stockinette in your knitting to make sure you have 13 rows, coresponding to rows 5-17 of the knitting. The numbers along the edge of the chart to the right correspond to the numbers of the rows in the knitting instructions. Hf cross stitch is new to you, simply imagine that each knit st is a square of a grid. You will make 2 diagonal sts over each square, from corner to opposite corner, thus formin8 an X. You make an X at the locations indicated in the chart. For an even appearance of sts, it is recommended to make each of your X's with the first diagonal in a uniform direction. Begin by fastening the end of your yarn to the wrong side of the knittin8, then come up at the corner of a square and go back to the other side at the opposite corner. See the Ravelry 8roup for links to tutorials! A knitting pattern for the Wee Tiny Sock Club October 2010 by Meg Bakewell BraveLittleKnitter.etsy.com
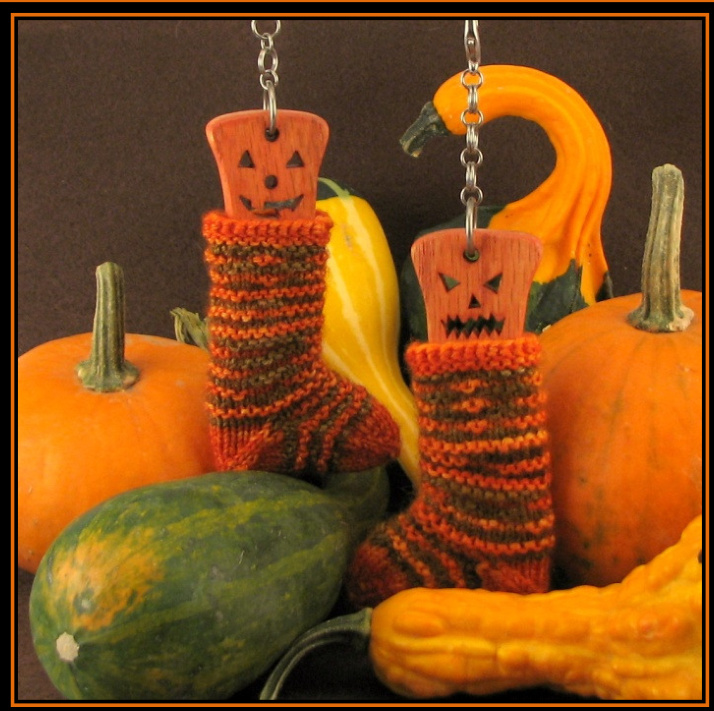

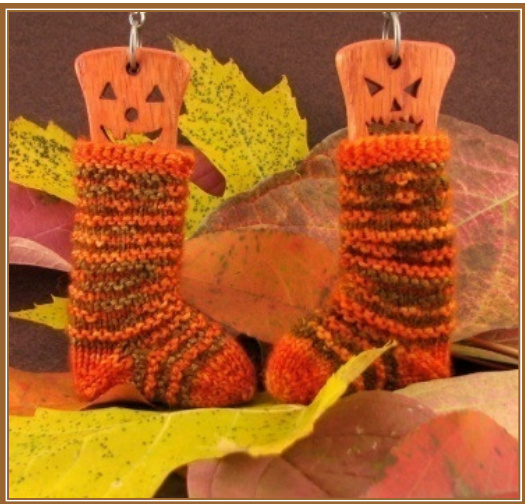
This sock is full of magic, surprise and illusion. Start at the toe with Judy's Magic Cast On. Knit two row stripes with knits and purls carefully placed to create a shadowy image that appears and disappears before your very eyes. End up at the cuff with Jeny's Surprisingly Stretchy Bind Off. Did we forget something? Oh yes, the heel, but no worries, EZ's Afterthought Heel will do the trick. What a treat!
Materials
Beyond Basic Knits 100% Superwash Merino Prima Sock about 10 yards The Great Pumpkin (MC) about 8 yards Olive Branch (CC) Set of 4 US size 0 (2 mm) DPNs pattern and photos @ 2010 Meg Bakewell for personal use only
Ahbreviations
K2tog: Knit 2 together. SSK: Slip the next 2 sts individually, knitwise, then knit them together through the back loops. KFB: Knit into the front and back of the next st. RYO: Reverse Yarn Over. Bring yarn from back to front over the top of the needle, and then to the back again under the needle.


begin Jattern
Hold 2 DPNs in your right hand, one closer to you (front needle) and one farther (back needle). Using MC and leaving a tail of about 8", make a slip knot and put it on the back DPN. Wrap the yarn tail over your left index finger, and the working yarn over your left thumb. \*Still holding the needles together and parallel, bring the front needle over the yarn tail, and then come around below the yarn to scoop up a loop of yarn onto the front needle. Now bring the back needle over the working yarn, and then come around below the yarn to scoop up a loop onto the back needle. Repeat from \* until there are a total of 8 sts cast on, including the slip knot. Divide the sts on the back needle between 2 DPNs. St arrangement is 2/2/4 on 3 needles. Rounds 1, 3, 5, 7, 9: Knit. Round 2: (Kfb, k1) four times. (12 sts) Round 4: (Kfb, k3, kfb, k1) two times. (16 sts) Round 6: (Kfb, k5, kfb, k1) two times. (20 sts) Round 8: (Kfb, k7, kfb, k1) two times. (24 sts) Knit 6 sts. You are now at the top of the foot and the new beginning of round. Join CC. Do not break MC.
Foot
Round 10: Using CC, k all sts. Round 11: (K2, p1) 8 times. Round 12: Using MC, k all sts. Round 13: (P2, k1) 8 times. Rounds 14-21: Repeat rounds 10-13 two more times. Rounds 22-24: Repeat rounds 10-12. Round 25: Using MC, (P2, k1) twice, k12, (p2, k1) twice. Rounds 26-27: Using CC, knit.
Leg Ghart Jnstructions
You can choose one of the charts for each side of the sock, or do the same one on both sides. You could even create your own chart if you like. XEach row on the chart represents 4 rounds of knitting. XContinue with 2 row stripes as established. In the first round of a color, knit all sts. In the second round with that same color, purl the sts that are that color on the chart, and knit the sts that are the opposite color in the chart. For example, if you were doing Chart 1 on the first side and Chart 2 on the second side, Rounds 5-8 would be as follows: Round 5: Using MC, k all sts. Round 6: (P4, k4, p4) (p3, k2, p2, k2, p3) Round 7: Using CC, k all sts. Round 8: (K4, p4, k4) (k3, p2, k2, p2, k3)
begin Leg
Following the chart(s) you selected, work rounds 1-36. Break CC. For rounds 37-40, using MC, (k one round, p one round) twice. Bind off as follows: RYO, k1, pass the RYO over the knit st. \*RYO, k1, pass the RYO and the previous st together over the last st. Repeat from \* until all sts are bound off. Break MC. This is a simple version of Jeny's Surprisingly Stretchy Bind Off.
Afterthought Heel
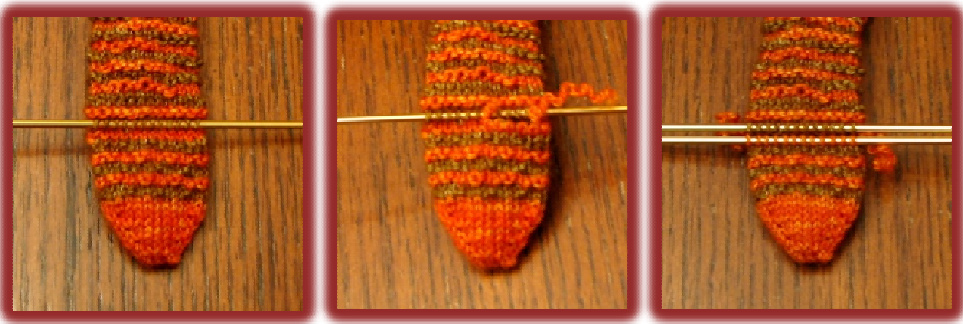
Lay the sock out flat and look for the side where, back in Rounds 25-27 of the foot, you created a patch of stockinette. There are 2 rows of MC and 2 rows of CC where the heel will go. With the toe pointing toward you, in the row of CC closer to the toe, pick up the right side of each little V shaped st onto a needle. You should pick up 12 sts. Then, pull up 1 st in the center of the MC row below the needle. Snip this st and unravel in both directions. As sts are freed by the unraveling, pick them up and place them onto another needle. Unravel until 12 sts are on each needle. Divide the sts on one of the needles evenly among 2 needles. Join MC and knit 1 round.
Round 1: (Ssk, k8, k2tog) twice. (20 sts remain) Round 2, 4, 6: K all sts. Round 3: (Ssk, k6, k2tog) twice. (16 sts remain) Round 5: (Ssk, k4, k2tog) twice. (12 sts remain) Round 7: (Ssk, k2, k2tog) twice. (8 sts remain)
Finishing
Graft heel and toe closed. Weave in ends, using yarn tails to close any holes that may appear at the corners of the heel.
Alternate Charts
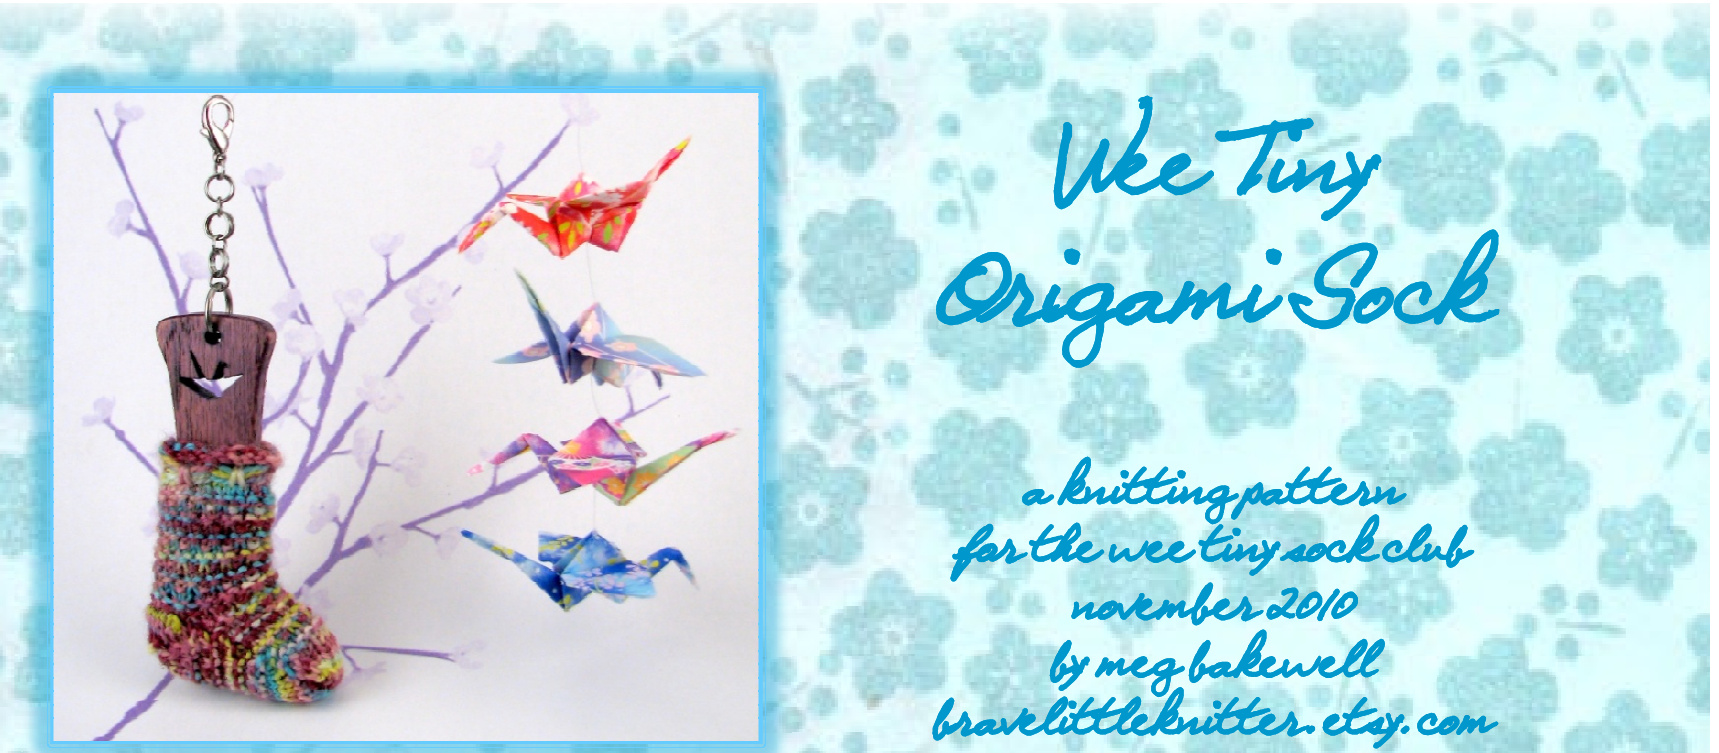
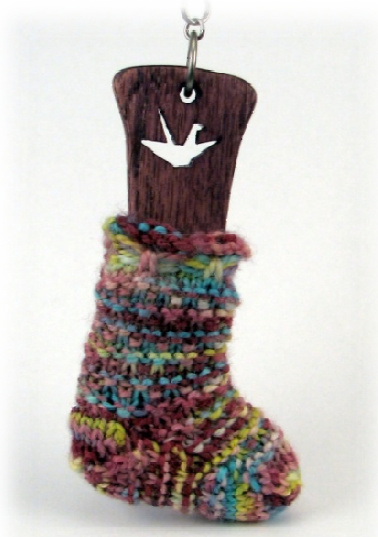
Origami is the traditional Japanese art of paper folding. Take a square of paper, fold it just so, and a crane or a frog or a flower springs to life in your hands. The wee tiny origami sock was suggested by my oldest daughter, who loves origami. “Mom, could you design a wee tiny origami sock? There are many full size sock patterns knit flat and folded up, so this wee pattern follows in that tradition. A curious shape, knit flat, is folded up and seamed to form a sock. The beautiful variegated yarn and slipped stitch pattern together form an intricate fabric reminiscent of fine washi paper, the traditional material for origami. Legend holds that if you fold one thousand origami cranes, you will be granted one wish. I wish you happy knitting!

Sunshine Yarn Classic Sock, about 15 yards Dragonfly (MC) Set of 2 US size 1 (2.25 mm) needles Tapestry needle for seaming pattern and photos ① 2010 Meg Bakewell for personal use only
ablreviatiors
YF: Bring yarn to the front. YB: Bring yarn to the back. Sl: Slip the stitch, purlwise unless otherwise indicated. SSK: Slip the next 2 sts individually, knitwise, then knit them together through the back loops. KFB: Knit into the front and back of the next st. MBK: (make bow in a knit row) Slip RH needle under the 4 strands at the front of the work. Knit the next st on the LH needle normally. Pull the RH needle with the new st back under the 4 strands, trapping them inside the newly formed st. Snug up the new st on the needle before continuing. MBP: (make bow in a purl row) Just as for MBK, but the 4 strands are at the back of the work instead of the front, and you will purl instead of knit.

Note: Yourfinisbed sock will be approximately the same size as this diagram before folding, so you can lay it on top of this to visualize the parts of the sock.
Begin Pattern
Using MC and leaving a tail of about 18", cast on 22 sts. The entire sock is worked back and forth in rows, so do not join in the round! Note: Tbe strands of yarn are carried across tbe work wben certain sts are slipped in rows 1-8. All of these strands areon thefront oftbework. Row 1 (RS): Knit 6, YF, sl5, YB, k5, YF, sl5, YB, k1. Row 2: P6, YB, sl5, YF, p5, YB, sl5, YF, p1. Rows 3-8: Repeat rows 1-2 3 more times. Row 9: k8, MBK, k9, MBK, k to end. Row 10: p8, MBP, p9, MBP, p to end. Row 11: K10, kfb, k11. (23 sts) Row 12: Knit. Row 13: k1, (sl1, k1) to end. Row 14: k1, (YF, sl1, YB, k1) to end. Rows 15-16: knit. Row 17: k2, (sl1, k1) to last st, k1. Row 18: k2, (YF, sl1, YB, k1) to last st, k1. Row 19-20: Knit. Row 21-35: Repeat rows 13-20 two more times, leaving off the last Row 20.
Foot
Row 36 (WS): BO 5, k13, BO 4. There should be 13 live sts in the center of the needle, and the last st at the end of the row. The rest are bound off. Break yarn and pull through the last st. (13 sts remain) Join a new piece of yarn to begin Row 37. Row 37 (RS): k2, (sl1, k1) to last st, k1. Row 38: k2, (YF, sl1, YB, k1) to last st, k1. Row 39-40: Knit. Row 41: k1, (sl1, k1) to end. Row 42: k1, (YF, sl1, YB, k1) to end. Row 43-44: Knit. Row 45-48: Repeat rows 37-40. Row 49: K1, ssk, k to last 3 sts, k2tog, k1. (11 sts) Row 50: Purl. Rows 51-56: Repeat rows 49-50 three more times. (5 sts remain after row 56) Row 57: Kfb, k to last 2 sts, kfb, k1. (7 sts) Row 58: Purl. Rows 59-64: repeat rows 57-58 three more times. (13 sts after row 64) Row 65-92: Repeat rows 37-64. Bind off all sts. Break yarn leaving 10" tail.
Finiahing
Weave in tails from Row 36/37. Note: Use mattress stitcb for all seaming. Refer to the diagram for color and letter coding used in the seaming instructions. Use bind off tail to sew the heel seams (shown in blue in diagram). Bring F to G and sew seam between them, and H to I and sew the seam between them. Use cast on tail to sew remaining seams. Begin at top of cuff, bring point A to N and B to M, forming the tube of the leg. Sew down leg seam (yellow on diagram). B now lines up with the center of the bind off edge between G and H. Join point G to C and sew a short seam along half of the top of the heel (purple) Join D to E and C to F. Sew side seam (red). Sew toe seam (blue) starting with point D/E down toward tip of toe, weave across toe and sew up to J /K. Join L to I and sew other side seam (green). Join M to H and sew other side of heel top (purple).
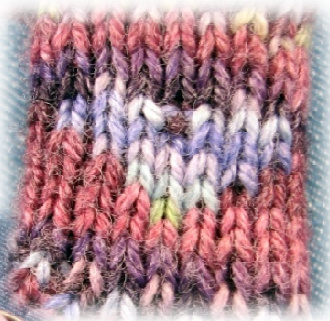
Chocolate chip cookies in the oven, your favorite pair of jeans, a steaming mug of tea, a little extra time to knit, your best friend's voice on the phone - just a few of the simple pleasures that can make any day as special as the holidays. This little sock celebrates the people who are knit into the fabric of our lives - the friends we've known forever and the new ones, too, and the people in our family who we'd want to be friends with even if we weren't related. The sock is made using the double knitting technique - two socks knit simultaneously, one inside the other, a stitch on the outside followed by a stitch on the inside. The two strands switch places to form a pattern that weaves the two socks toaether. best friends forever.
Materials
Ruby Sapphire Panda 60% superwash merino/30% bamboo/10% nylon about 16 yards/4g Persia (lavender, MC) about 16 yards/4g Sugar Plum (plum, CC) Set of 4 US size 0 (2 mm) needles Stitch holder, or an extra needle or cableneedle Tapestry needle for seaming
abbreviations
Double Knitting Wrap and Turn (W&T)
Bring both yarns to the back, slip the next st purlwise, bring both yarns to the front, slip the next st purlwise. If you're on a right side row: Bring CC only to the back, MC remains in front. If you're on a wrong side row: bring MC only to the back, CC remains in front. Slip both sts back to the left hand needle. Bring the yarn from the back to the front side. Turn work. Be sure to pull the wraps tightly as you continue working.
Double Knitting Double Decrease (DD):
You need to get 2 front side (Mc) sts next to each other so you can knit them together for the decrease. Likewise, you need to get 2 inside sts together so they can be decreased together. So, you wil rearrange the sts a bit, then work the decreases. Slip the first st off the needle, purlwise, onto a spare needle. Slip the second st onto a different needle/cable needle. Slip the 3rd st onto the same spare needle as the first. Now, slip the second sts back to the left, then the 3rd, then the first. K2tog with MC, SSP with CC. K2tog: Knit 2 together. P2tog: Purl 2 together. SSP: Slip the next 2 sts individually purlwise, then purl them together through the back loops. Note: Main color (MC) and contrast color (CC) are completely interchangeable. The sock will be reversible when you are done.
pattern and photos ①2010 Meg Bakewell for personal use only
Begin Qattern
Cast on 72 sts using MC and leaving a 6" tail. Note: Do NOT join in the round, you are starting with the ruffle, which is knit flat. Row 1,3,5 (right side): Knit. Row 2:P2tog across (36 sts remain) Row 4: P2tog across (18 sts remain) Break MC yarn leaving a 4"tail, and set aside MC ruffle. Make another ruffle just like the first using CC, leave CC yarn attached. Joining Row: Place the two ruffles together, with the wrong sidesfacing each other and theright sides facing out.The CC ruffle should be in back, with the attached CC yarn on the right hand side of the work. Using CC, knit 1 st from the front needle (MC ruffle), then purl one st from the back needle (CC ruffle). Repeat from \* to end of both needles. 36 sts on one needle. Distribute the sts evenly among 3 DPNs (12/12/12) and join for knitting in the round. CC ruffle will be on the inside, and MC ruffle will be on the outside. The ruffles want to bunch up and get in the way but just push them down; it will not be a problem after the first couple of rows. You will join MC again as you begin the first round.
Instructions Ror double knitting
Always bring both yarns to the back of the work for a knit st. Always bring both yarns to the front of the work for a purl st. Even though both yarns are held together, only use one strand (either MC or CC) to work the sts as indicated.
Short Row Heel
Set up: (K1 MC, P1 CC) four times. Rearrange sts so the 20 sts following the last st worked are on one needle, the next 8 are on a second needle and the remaining 8 are on a third needle. The heel will be worked on the 20 sts on the first needle. Row 1: (K1 MC, P1 CC) nine times, w&t. (Note the special W&T instructions on the front.) Row 2: (K1 CC, P1 MC) eight times, w&t. Row 3: (K1 MC, P1 CC) seven times, w&t. Row 4: (K1 CC, P1 MC) six times, w&t. Row 5: (K1 MC, P1 CC) five times, w&t. Row 6: (K1 CC, P1 MC) four times, w&t. Row 7: (K1 MC, P1 CC) three times, w&t. Row 8: (K1 CC, P1 MC) two times, w&t. Row 9: (K1 MC, P1 CC) three times, w&t. (The last 2 sts (one MC and one CC) before the w&t will be wrapped. You can pick up these wraps on to the needle and work them together with their respective sts if you like.) Row 10: (K1 CC, P1 MC) four times, w&t. (As in Row 9, pick up the wraps on the last 2 sts if you want.) Row 11: (K1 MC, P1 CC) five times, w&t. (In this row and the remaining rows of the heel, the last 2 sts before the w&t will be double wrapped. If desired, pick up both wraps, place them on the needle and knit or purl them together with the st they were wrapping.) Row 12: K1 CC, P1 MC) six times, w&t. Row 13: (K1 MC, P1 CC) seven times, w&t. Row 14: K1 CC, P1 MC) eight times, w&t. Row 15: (K1 MC, P1 CC) nine times, picking up the double wraps on the last 2 sts if desired.
Log
Note: Begin leg using double knitting technique. Round 1: (K1 MC, P1 CC) around. Round 2: (K1 MC, P1 CC, K1 CC, P1 MC) around. Round 3: (K1 CC, P1 MC, K1 MC, P1 CC) around. Round 4: Repeat Round 2. Rounds 5-6: Repeat Round 1. Round 7: \*(K1 MC, P1 CC) twice, K1 CC, P1 MC, (K1 MC, P1 CC) three times, K1 CC, P1 MC, (K1 MC, P1 CC) twice. Repeat from \* one more time. Round 8: \*K1 MC, P1 CC, (K1 CC, P1 MC) three times, K1 MC, P1 CC, (K1 CC, P1 MC) three times, K1 MC, P1 CC. Repeat from \* one more time. Round 9: \*K1 MC, P1 CC, (K1 CC, P1 MC) seven times, K1 MC, P1 CC. Repeat from \* one more time. Round 10: \*(K1 MC, P1 CC) twice, (K1 CC, P1 MC) five times, (K1 MC, P1 cC) twice. Repeat from \* one more time. Round 11: \*(K1 MC, P1 CC) three times, (K1 CC, P1 MC) three times, (K1 MC, P1 CC) three times. Repeat from \* one more time. Round 12: \*(K1 MC, P1 CC) four times, K1 CC, P1 MC, (K1 MC, P1 cC) four times. Repeat from \* one more time. Rounds 13-14: Repeat Round 1. Rounds 15-17:Repeat Rounds2-4. Round 18: Repeat Round 1.
Foot
Resume knitting in the round, pulling tightly on the working yarn toavoid agap atthe corner oftheheel. Round 1: (K1 MC, P1 CC) eight times. (K1 MC, P1 CC) picking up the double wraps on these 2 sts if desired. (K1 MC, P1 CC) thirteen times. You should now be at the top of the foot, the new beginning of round. Arrange sts equally on three DPNs (12/12/12) starting from this point. Round 2,4,6: (K1 MC, P1 CC, K1 CC, P1 MC) around. Round 3,5: (K1 CC, P1 MC, K1 MC, P1 CC) around. Round 7-8: (K1 MC, P1 CC) around. Round 9: \*DD, (K1 MC, P1 CC) to end of needle. Repeat from \* to end. (30 sts remain) Repeat Round 9 three more times. (12 sts remain.) Break both yarns, leaving 6" tails. Thread CC on a yarn needle and run it through the CC sts only. Thread MC on a yarn needle and run it through the MC sts only, being careful not to twist or catch the CC yarn. Remove DPNs from the work. Pull the CC yarn tail up tight to close up the toe. Weave yarn end in between the outer (MC) and inner (CC) layers. Pull up MC tail tightly and weave in end. Hide tail in between the layers. Using cast on tails, sew small seams in both MC and CC ruffles where they were knit flat. Weave in ends.
Wee Tiny Steeked Sock
a knitting pattern for the wee tiny sock club january 211 by meg bakewell BravelittleKnitter.etsy.com At the start of a new year, optimism abounds. There is no better time to try something new., take on a challenge, overcome old habits and fears. For many knitters, the scariest technique in needlework is cutting a steek. lIn this traditional Shetland method, a garment is knit in the round, with extra stitches (the steek) added in the location where an opening will be cut later. After cutting. the sleeves or button bands for a cardigan are added in the location of the steek. The Wee Tiny Steeked Sock is the perfect way to try this method without the investment of a full size project. The leg is knit top down in the round, using a fuzzy Shetland wool whose fibers readily grab onto each other, thus preventing stitches from unraveling and making it an ideal yarn for steeking. After the steek is stabilized with hand stitching. and carefully cut, the sock is finished in the round. Then, button bands are added for a finishing touch. Brave little knitters cut their knitting!
materials
abbreviations
Jamieson's Shetland 2-ply Spindrift about 7 yards/6.5m Flame (peach, MC) 10 yards/9m Natural White (white, CC1) 5 yards/4.5m Poppy (red, CC2) Note: If substituting yarns, choose a non-superwash fingering weight wool, preferably one that is a bit fuzzy or "sticky" Set of 4 US size (2 mm) DPNs Tapestry needle for weaving in ends Sharp sewing needle for reinforcing the steek Contrasting color sewing thread Three 4" (\~.6 cm) buttons pattern and photos 2Oll Meg Bakewell for personal use only PZtog SI W&T Ztog Knit 2 together Purl 2 together Slip the st, purlwise unless otherwise indicated Wrap and turn On a knit row: Bring the working yarn to the front. slip the next st purlwise, bring the yarn to the back again, turn work, slip the first st purlwise. On a purl row: Bring the working yarn to the back. slip the next st purlwise, bring the yarn to the front again, turn work, slip the first st purlwise. Yarn over
Begin Pattern
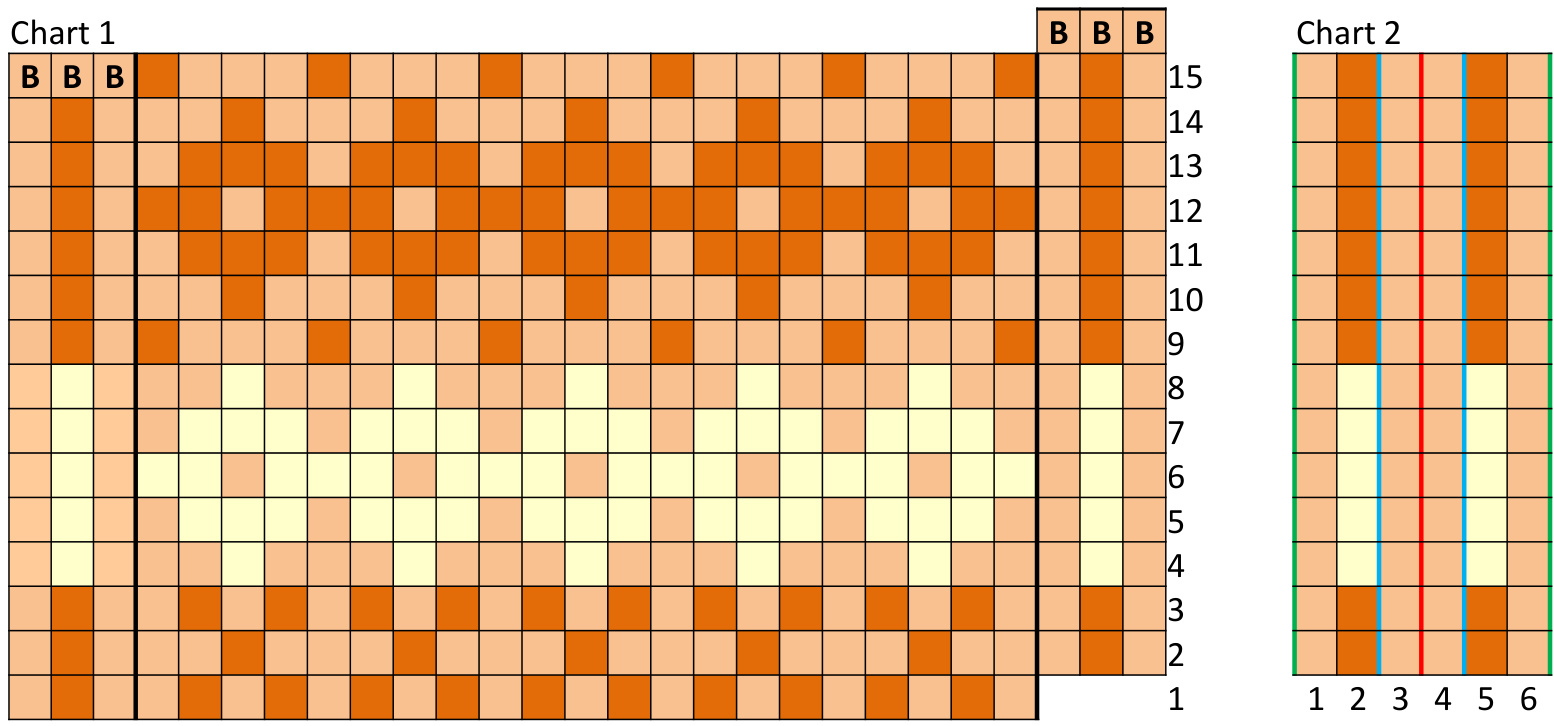
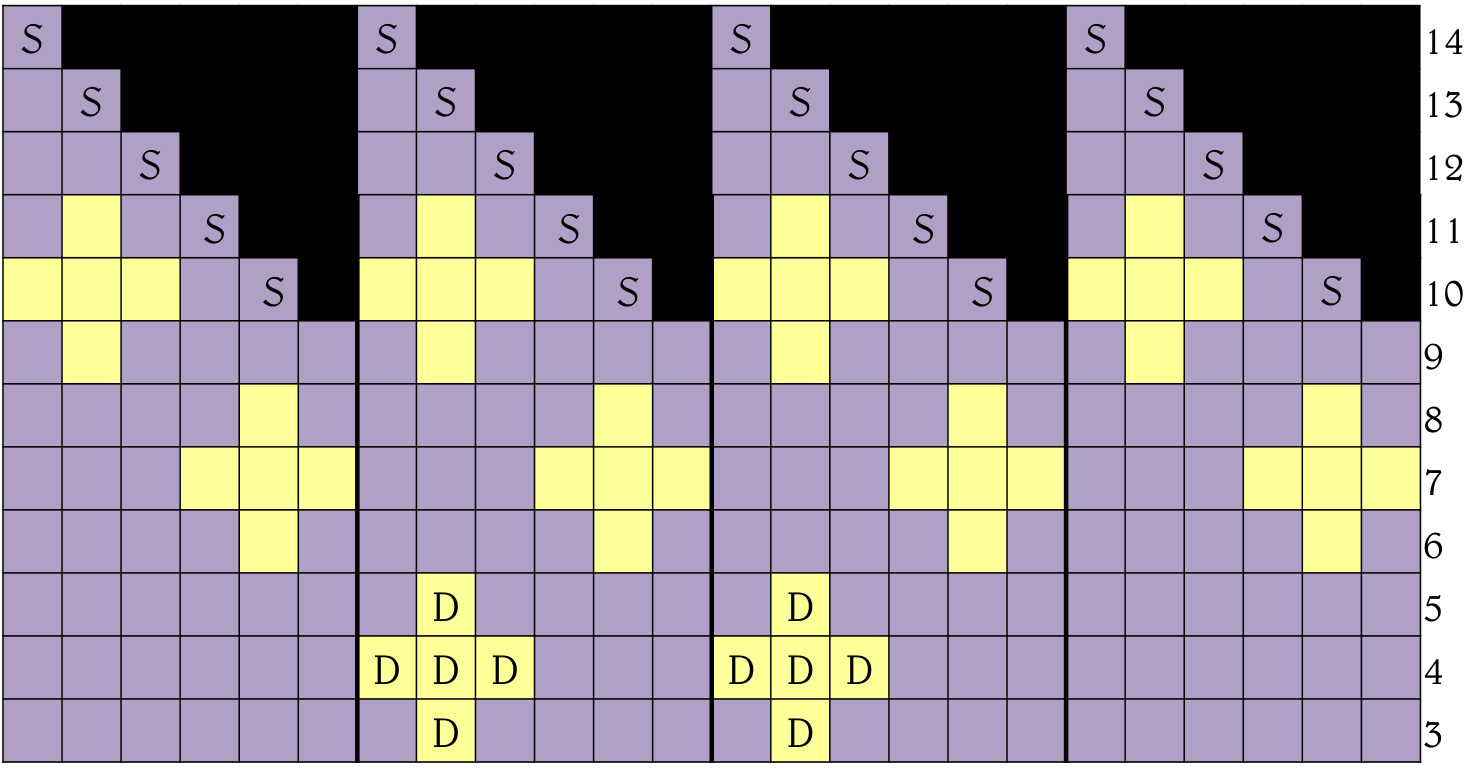
Cast on 21 sts in CC1. Row 1: Sl1, k1, p1 to end. Row 2: Sl1, p1, k1 to end. Row 3: Repeat Row 1.Break CC1. Using MC, cast on 6 sts at the end of row 3. These 6 sts form the steek - border sts that will ultimately be turned under and not seen on the finished sock. Join for knitting in the round so that the first st you will knit at the start of the first round is a CC1 st from the ribbing. Begin working Chart 1 using MC and CC2 in the first round as indicated. You will reach the end of round 1 in the middle of the 6 sts that you cast on after the ribbing. This is the beginning of round and the center of the steek. Continue following the chart for Rounds 2-15. When you get to a color change, break the old color leaving a short tail. 1- 2" is plenty as these ends will not be woven in. (Everywhere else in the pattern you need normal length ends to weave in.) At the end of round 15, bind off all 6 steek sts. Break CC2, but leave MC working yarn attached.
Cutting the Steek
Take a look at your steek and compare it to Chart 2. Notice that there are 2 sts in the center of the steek in MC, st columns 3 and 4 as indicated on the chart. Sew a line of reinforcing sts to the left of st 3, between st 2 and st 3. Sew another line of reinforcing sts between sts 4 and5. Note: The blue lines on the chart represent the location of your reinforcing sts. Use backstitch to sew the reinforcements, with tight, tiny sts that go right through the plies of yarn, including the floats on the back. Use a contrasting color of sewing thread and a sharp sewing needle to do it. Secure the thread at either end with a few tight sts. Once you have sewn the reinforcements, you are ready to cut! The reinforcing sts are easier to see (in order to avoid cutting them) if you turn the sock inside out. So, turn the sock inside out, get a nice sharp pair of small scissors, and, being careful not to cut the reinforcing sts, cut right up the center of your steek. The placement of the cut is indicated by the red line on Chart 2. Don't worry about unraveling — this fuzzy yarn does not want to unravel anyway. You are brave; you cando it!
Lower Leg
Return to where the MC working yarn is waiting for you. Cast on 3 sts in MC. (24 sts on the needles, arranged 7/8/9 on needles 1/2/3). Knit across needles 1, 2 and 3 following row 1 of Chart 3. As you start row 2, join for knitting in the round again. Work Round 2 and 3A following the chart.
Short Row Heel and Foot
For the heel, using CC1, sl1, k7, w&t, P7, w&t, k6, w&t, p5, w&t, k4, w&t, p3, w&t, k4, w&t, p5, w&t, k6, w&t, p7, w&t. For the foot, resume working chart 3 with round 3B and continue until Round 14 is completed. Break MC and CC2.
Toe
Join CC1 and work rounds 1-6. Round 1,3,5: Knit. Round 2: (K2, k2tog) six times (18 sts remain) Round 4: K1, k2tog) six times. (12 sts remain) Round 6: K2tog six times. (6 sts remain) Break yarn and thread through remaining 6 sts.
Button Bands
Hold the sock with the cuff at the top, and the steek facing you - the first button band is picked up on the right side of the steek opening. Start at the top with the ribbing and pick up 2 sts onto a DPN from the edge of the ribbing. (Note: You arejustpickingupstsandputting themontheneedle-don't knit them yet!) Next, pick up 13 more sts along the edge of the steek. You will pick up the right half of the "v" formed by each st in the 6th column of sts, as indicated by the green line on Chart 2. In the leg section, you knit 15 rows here, so you can skip a couple sts along the way to come out with 13 sts picked up in this section. Now you should have 15 sts on the needle. Starting at the cuff, with right side facing, and using CC1, work rows 1-4 below. Break CC1 yarn, leaving a slightly longer tail than usual - you will sew a very short seam with this tail. Repeat the process of picking up 15 sts on the left side of the steek. This time you will be using the left half of the "v" of the edge st to pick up. Starting at the ankle, with right side facing, and using CC1, work rows 1-4 below. Row 1: Knit. Row 2 and 4: (K1, p1) to last st, k1. Row 3 (right side): (P1, k1) to last st, p1. Row 3 (left side): (P1, k1, p2tog, Y0) 3 times, p1, k1, p1. Bind off in ribbing pattern.
Finishing
Use the yarn tail from the right side button band to sew the bottom edge of the button band to the edge where 3 sts were cast on at the start of the lower leg. Weave in all remaining yarn ends. Sew three buttons on the right side button band facing the button holes.

Will you document your steek cutting with photos? Post them in the Wee Tiny Sock Club group on Ravelry!
The cut edge of the steek The inside of the sock, after sewing the reinforcements. Ready to cut! The right side of the work, flattened out after cutting the steek.
The number one reason that I started knitting is that cool socks for little boys are hard to find. For little girls, you have your pick of ruffles, lace, flowers, kitties, fairies, rainbows, and hearts: the list is endless and they are waiting for you wherever little girls' clothes are sold. For my son, I expected to find frogs and puppy dogs, pirate ships and rocket ships, dinosaurs and superheroes. I'd have bought two pairs with dinosaurs, if I could find them, one for my son and one for his big sister. But, alas, the usual offerings for boys are plain white, maybe with stripes. Once I learned you could knit socks, I figured that was the solution. This wee sock is a hybrid - yes, it's white with navy stripes, not too exciting there, but the navy stripe starts at the toe and wraps around and around the sock in one continuous helix to the cuff, like a spiraling snail shell. And, it has a pocket and comes with a frog - that's much more fun!
Snips and snails and puppy dogs tails, that's what little boys are made of. Stripes and pockets and all things wool, that's what wee tiny socks are made of.
MATERIALS
Beyond Basic Knits Prima Superwash Sock, 1oo% Merino wool 12 yards main color (MC1 and Mc2), Innocence, white 8 yards contrast color 1 (CC1), Cold Steel, navy blue 5 yards contrast color 2 (cc2), Seagrass, frog green Set of 4 US size 1/2.25mm DPNs Gauge is not critical, but 8 sts and 14 rows per inch in stockinette gives a sock about 21/2"cuff to heel and 2" heel to toe. Important note: MC should be divided into 2 small balls of about equal size before beginning. These will be called MC1 and Mc2.
BeGin pAttern
Using MC1, provisionally cast on 10 sts.
Short row toe
K10, turn work. P9, w&t, k8, w&t, P7,w&t, k6 ,w&t, P5,w&t, k4,w&t, P4, p1tww, w&t, k5, k1tww, w&t, P6, p1tww, w&t, k7, k1tww, w&t, P8, p1tww, turn work, k9, k1tww. Remove waste yarn and place 10 sts from provisional cast-on onto 2 needles, 5 sts each. (20 sts total) Place marker for beginning of round at the location of the working yarn. Knit 1 round. K14. Drop MC1 but do not break yarn - just leave it there, you will come back to it. Using MC2, knit the next 3 sts. Drop MC2. Using CC1, knit the next 3 sts. You should now be at the beginning of the round again.
INSTRUCTIONS FOR HELICAl STRIPES
Knit until you come to a location where a previously dropped strand is waiting for you. At this point, drop the current strand and pick up the waiting yarn. Do not twist the yarns and always pick up the waiting strand from below the yarn you are now dropping. Knit with the strand you just picked up until you come to the next waiting strand. Whenever there are increases, just work them with the current yarn. Simple as that. For the first 3 rounds of the pattern below, the number of sts worked in each color is specified. After that, the color changes are omitted, but you should continue the procedure as above, dropping the working yarn and picking up the waiting yarn each time you come to it. You could put st markers at the locations of the yarn changes if you are concerned about missing them.
FOOt AND GuSSEt InCREASeS
Round 1: Continuing with CC1, K14. Drop CC1 and pick up the waiting MC1 strand. K3. Drop MC1 and pick up the waiting MC2. K3. Round 2: Continuing with MC2, K14. Drop MC2 and pick up the waiting CC1 strand. K3. Drop CC1 and pick up the waiting MC1. K3. Round 3: Continuing with MC1, k1, m1R, k8, M1L, k5. Drop MC1 and pick up the waiting MC2 strand. K3. Drop MC2 and pick up the waiting CC1 strand. K3. (22 sts)
foot, continued
Continue with the helical stripes method, picking up waiting yarns as you come to them, for the remainder of the gusset. Round 4, 6, 8, 10: Knit. Round 5: K2, m1R, k8, m1L, K to end of round. (24 sts) Round 7: K3, m1R, k8, m1L, K to end of round. (26 sts) Round 9: K4, m1R, k8, m1L, K to end of round. (28 sts) Round 11: K5, m1R, k8, m1L, Kto end of round. (30 Sts) Round 12: K20. Note: You should have just knit across the 2 instep needles, which have 10 sts each. The heel turn will be worked on the third needle, which also has 1o sts.
Heel turn
The heel turn will be worked in MC1 only, so we need to get MC2 and CC1 out of the way. SI4, K3 MC2, K16 CC1. CC1 is 3 sts into instep needle 2. Slip the last 3 sts worked in CC1 back onto instep needle 2. Return to the heel needle. Sl7, K13 Mc2. Mc2 is at the end of instep needle 1. Return to the heel needle where MC1 is waiting and work the heel turn as follows. K1, sl1, k6, w&t, sl1, p5, w&t, sl1, k4, w&t, sl1, p3,w&t, sl1, k2, w&t, sl1, p1, w&t.
HEEl FlAP
Note: The decreases worked in the heel flap will bring you back to 20 sts. Each time you work a ssk or p2tog, you will be using one st from the heel needle and one st from the adjacent instep needle. There will be 10 sts on the heel needle the whole time, but the number of sts on the instep needles will decrease down to 5 each by the time the heel flap is done. If you prefer, you can rearrange the sts now. Move 5 sts from each instep needle to the heel needle, so that the st arrangement is 5/5/20. Row 1: Sl1, k1, k1tww three times, ssk. Turn work. (29 sts) Row 2: Sl1, p5, p1tww three times, p2tog. Turn work. (28 sts) Row 3, 5, 7, 9: (Sl 1, k1) 4 times, sl1, ssk. Turn work. Row 4, 6, 8, 10: S1, p8, p2tog, turn work. (20 sts at the end of Row 10)
LeG
Continue in helical stripe method, picking up the waiting yarns as you come to them Set up round: Sl1, k9. Pick up 1 st in gap between needles, k10, pick up 1 st in gap, k15. You should now be at the center of the instep. This is the new beginning of round. (22 sts) Rounds 1-12: Knit. At the beginning of round 13, you should be picking up MC1. From this point forward, all sts in MC1 will be purled instead of knit. Round 13-18: Continue in helical stripes, knitting all sts in MC2 and CC1, purling all sts in MC1. You should be finishing the end of round 18 with CC1. Break CC1. Pick up waiting MC1. Round 19: Bind off sts purlwise with MC1 until you come to MC2. Knit with MC2 to end of round. Break MC2. Return to the location of MC1 and finish binding off all sts purlwise. There will be a step up where the three strands end, just like the end of a snail shell.
Using CC1, cast on 8 sts leaving a 6-8 inch tail, which will be used to sew pocket to the sock. Rows 1-2: Knit. Row 3, 5, 7, 9: Purl. Row 4: Knit. Row 6: Ssk, k4, k2tog. Row 8: Ssk, k2, k2tog. Bind off all sts purlwise. Weave in bind off tail. Use cast on tail of pocket to sew the pocket in place on the sock as shown in the photo.
FroG
Using Cc2, cast on 4 sts. For first row, you will work as for i-cord - that is, turn the needle with the cast on sts around, slide the sts back down to the right hand side of the needle, with the working yarn at the left end of the 4 sts. Bring the yarn snugly across the back to begin the first row. Round 1: Kfb four times (8 sts) Now, divide sts among 3 needles. Needle 1 has 2 sts, needle 2 has 2 sts and needle 3 has 4 sts. Round 2, 4, 6, 7: Knit. Round 3: (Kfb, k1) four times. (12 sts) Round 5: (Kfb, k2) four times. (16 sts) Round 8: (K2tog, k2) four times. (12 sts) Round 9: (K2tog, k1) four times. (8 sts) Stuff body of frog with some white yarn, about a yard should do it. Round 10: (K2tog) four times. (4 sts) Break CC2 and thread through remaining sts. Weave in the yarn ends from the frog's body. The frog body was knit tail to head - that is, the pointier end where you began is the frog's rear end. Pinch him a bit to flatten him, so he has a top and a bottom. To make a hind leg for the frog, pick up and knit 2 sts on the side of the frog's body near the back. Work in i-cord for 3 rows. Turn work, kfb, k1 (3 sts on the needle). Knit 1 row, then bind off all sts. Repeat on the other side for a 2nd hind leg. To make the frog's front legs, cast on 2 sts, leaving a 5" tail, and work in i-cord for 1.25". Break yarn leaving a 5" tail and thread through the 2 sts. Thread the yarn tail on a tapestry needle and use the needle to pull the i-cord through the frog's belly, near the front of the frog so that each end of the i-cord is sticking out one side of the frog, forming his front arms. Using tapestry needle, pull the bind-off yarn tail through the i-cord between the last st and the second to last st. Bring the yarn around the edge of the i-cord, back to the other side, and thread it back through the same location again. Repeat 8-10 times, forming a small foot. Repeat the foot procedure on the other front arm. Thread the tapestry needle with CC1 and run it back and forth through the frog's body a couple of times to secure the yarn. Then, come up on the top of the frog near the head end and form a French knot eye. Form a second French knot about 3 sts over from the first. Secure yarn inside the frog and break it off.
FINISHinG
Weave in all remaining ends on the sock and the frog. In your pocket, put a frog, or a rock, or a marble, or a piece of bubblegum, or an earthworm, or a snail shell, or a piece of yarn, or a magic bean, or a bottlecap, or
| back of the work. Knit the next row. After a few rows, to work will begin to form a tube. The back side may be slightly looser than the front, but it won't be noticeable when you are done. Continue in this manner for desired length. | |
| K1tww k1 together with wrap | Pick up the wrap around this st and place it on the left hand needle. Knit the wrap togetherwith thest itwrapped. |
| K2tog | Knit 2 together. 1 st decreased. |
| M1R Make 1 Right | Insert the left needle from back to front under the strand running between the 2 sts in the row below the present row. Knit into the front leg of this new st. 1 st increased. |
| M1L Make1Left | Insert the left needle from front to back under the strand running between the 2 sts in the row below the present row. Knit into the back leg of this new st. 1 st increased. |
| P1tww p1 together with wrap | Slip the st you are about to purl to the right hand needle. Pick up the wrap around this st and place it on the right hand needle. Slip the 2 loops back to the left needle and purl them together. |
| P2tog | Purl 2 together. 1 st decreased. |
| Provisional cast on | Start with a piece of waste yarn about 8" long. Knot your working yarn and the waste yarn together. Hold the knot next to your needle in your right hand, and with your left hand, hold the waste yarn wrapped over your index finger, and the working yarn wrapped over your thumb. Hold your left hand so that your thumb is closer to you and y s o s x needle between the working yarn and the waste yarn from the top, and come under the working yarn, picking up a loop. Next, bring the needle up over and behind the waste yarn, then over the top of and to the front of the working yarn, grabbing another loop. Bring the needle back up behind the waste yarn to the starting position.* 2 sts cast on. |
| SI Slip stitch | Slip stitch from the left needle to the right, purlwise. |
| SSK Slip, slip, knit | Slip each of the next 2 sts knitwise to the right hand needle. Then, insert the left needle through the front of both of them and knit them together. 1 st decreased. |
| W&T wrap and turn | d s s yarn to the back again, turn work, slip the first st purlwise. Continue as instructed. On a purl row: Bring the working yarn to the back, slip the next st purlwise, bring the yarn to the front again, turn work, slip the first st purlwise. Continue as instructed. |
WEE TINY A MARDIGRAS SOCK Brc
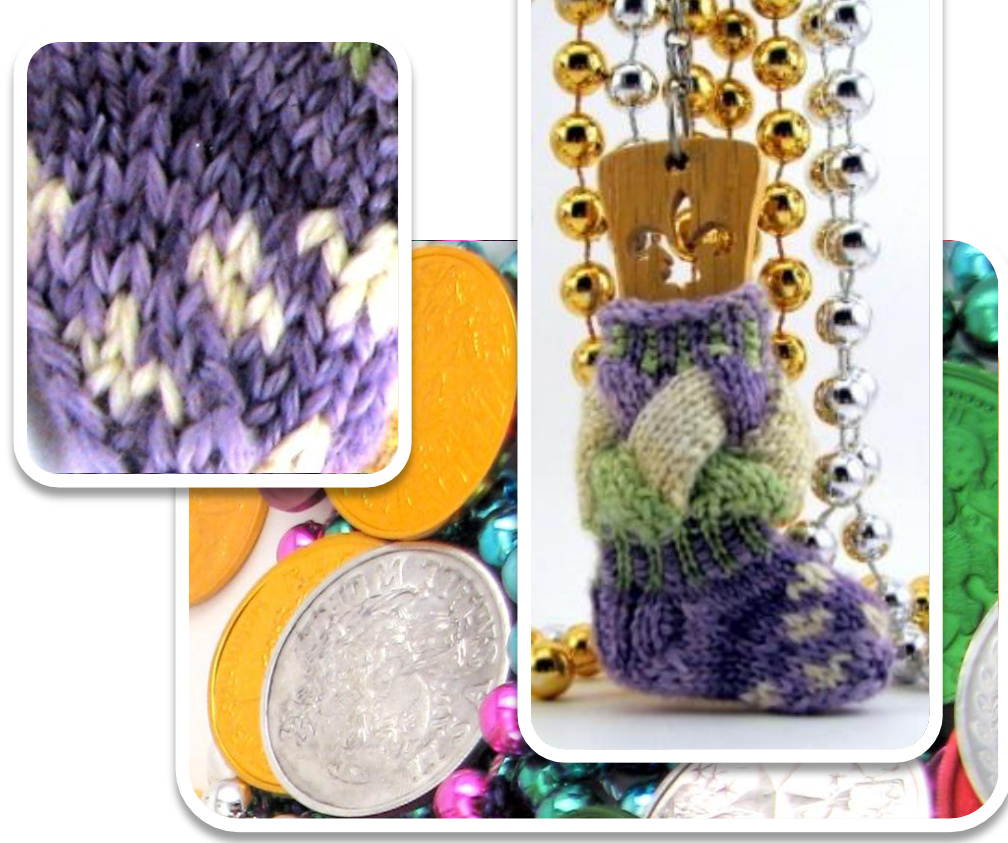
Wee Viny Sock Club Merch 2011 by Meg Bekewell Here in Detroit, Mardi Gras is Paczki Day - a day to indulge in sinfully rich pastries, fried in oil, filled with fruit or custard, and glazed or iced or coated in sugar, in the Polish tradition. In New Orleans (where my sister lives), the French colonists' celebration of “Fat Tuesday" has morphed into an entire season of revelry, filled with parades and picnics, floats and festivals, costumes for kids and adults alike. Wherever you are, whether or not Mardi Gras is a part of your heritage, enjoy a bit of knitting today. The Wee Tiny Mardi Gras Sock is all dressed up in a divine silk and wool yarn in Mardi Gras colors of purple, gold, and green, with entrelac diamonds and a fleurde-lys motif on the foot. This one's for you, Sister!
MATERIAL
Gauge is not critical, but 8 sts and 14 rows per inch in stockinette gives a sock about 21%2"cuff to heel and 2" heeI to toe. Beyond Basic Knits Divine Sock, 50% Merin0/50% Silk 12 yards main color (MC), Under the Lilacs, purple 8 yards contrast color 1 (CC1), Seagrass, green 8 yards contrast color 2 (CC2), Golden Dreams, gold Set of 5 US size 1/2.25mm DPNs Optional: set of 5 DPNs one size smaller, if your gauge in in rows is Iooser than your gauge in the round
ABBREYIATIONS
Pattern and photos ① 2011 Meg Bakewell For personal use only. K2tog: Knit 2 together. 1 st decreased. P2tog: Purl 2 together. 1 st decreased. SI: Slip the next st, purlwise. SSK: Slip each of the next 2 sts individualy, knitwise, then knit them together through the back Ioops. TW: Turn work.
BEGIN PATTERN
Using MC, cast on 24 sts. Divide sts evenly among 4 needles and join for knitting in the round, being careful not to twist. Round 1: K all sts in MC. Round 2: (K1 MC, P1 CC1), repeat to end of round. Remember to always bring CC1 yarn to the back so that it is not stranded across the right side. Rounds 3-6: Repeat round 2. Break CC1 after round 6. Round 7: Repeat round 1.
ENTRELAC
The entrelac technique creates the appearance of woven ribbons of knitted fabric, but in fact it consists of several sections of knitting worked back in forth in rows. These are connected to each other by picking up sts along the edge of one piece to begin the next. The entrelac portion of the sock is fairly long if stretched out to full Iength, but it is meant to be pushed down so the diamonds puff out somewhat. However, if your gauge in rows is substantially looser than your gauge in rounds, you may want to go down one needle size for the entrelac section.
Entrelac tier one: Four Mc tricngles.
Rows 1-2: K2, TW, p1, sI1. Rows 3-4: K3, TW, p2, sI1. Rows 5-6: K4, TW, p3, sI1. Rows 7-8: K5, TW, p5, sI1. Row 9: K6. First triangle is done. Repeat rows 1-9 three more times. Break MC.
Entrelcc tier two: Four cc2 rectcngles.
Look at the first MC triangle, with the wrong side facing. Along the edge with the slipped sts, pick up 6 sts onto the free needle. Using CC2 and the needle that is holding the sts from the triangle to the right, purl these 6 sts. Rows 1-2: K5, sl1, TW, p5, p2tog. The p2tog is worked with one st from the CC2 and one st from the MC triangle. Rows 3-12: Repeat rows 1-2 five more times. After row 12, all sts from the MC triangle have been used. \*With wrong side facing and still using CC2. pick up and purl 6 sts from the adjacent edge of the MC triangle to begin the next rectangle. Repeat rows 1-12 for the next rectangle. \* Repeat from \* to \* for 3rd and 4th rectangles. Break CC2.
Entrelac tier three: Four Cci triangles.
Set up: Using CC1 and with right side facing, pick up and knit 6 sts along the side of the CC2 rectangle with the slipped sts, TW. ROws 1-2: P6, TW, sI1, R4, SSK, TW. Rows 3-4: P5, TW, sI1, R3, SSK, TW. ROws 5-6: P4, TW, sI1, R2, SSK, TW. Rows 7-8: P3, TW, sI1, R1, SSK, TW. Rows 9-10: P2, TW, sI1, SSK, TW. Rows 11-12: P1, TW, SSK, TW. Continuing with CC1, repeat set up and rows 1-12 three more times. There should now be 6 sts on each of the 4 needles, and you are ready to resume knitting in normal rounds. Do not break CC1. It is a good idea to weave in the yarn ends you have at this point, because it's easier to do it now than when the sock is done.
LOWER LEG
Round 1: K all sts using CC1. Note: There may be somewhat of a gap between the triangle sts, so knit the first round tightly. Round 2: (K1 CC1, p1 MC), repeat to end of round. Note: Remember to always bring MC yarn to the back so that it is not stranded across the right side. Rounds 3-6: Repeat round 2. Break CC1.
HEEL PLAP
Note: The slipped sts at the start and end of even numbered rows (below) will be used to pick up sts for the gusset, so it's important that the working yarn not cover them up. So, for the first slipped stitch, hold the yarn in front, slip the stitch, then move the yarn to the back for the first knit stitch. For the last slipped stitch, keep the yarn in back after the Iast knit stitch, slip the last stitch, then turn work for the right side row. Set up: Arrange the next 11 sts on one needle. The heel flap will be worked on these 11 sts using MC only. Row 1: (K1, p1) to last st, k1. Row 2: Sl1, (k1, p1) to Iast 2 sts, k1, sl1. Rows 3-12: repeat rows 1-2 five more times.
HEEL TURN
Row 1: K7, k2t0g, k1, TW, sl1, p4, p2tog, p1, TW. Row 2: S11, k5, k2tog, TW, s11, p5, p2tog, TW. Using one needle, Sl1, k6, pick up and k 6 sts along the edge of the gusset. Using a second needle, K across 13 sts of instep. Using a third needle, pick up and knit 6 sts along the other side of the heeI flap. K 3 more sts onto the third needle. You are at the bottom of the foot and the new beginning of round. Stitch arrangement should be 11/13/10 on needles 1/2/3. (34 sts tota1)
# FAQ: How do you know which date Mcrdi Gras will be?
Upcoming Merdi Gras detes
It's easy...Easter is the first Sunday after the first full moon following the Spring Equinox, Ash Wednesday is 46 days before Easter, and Mardi Gras is the day before Ash Wednesday! March 8, 2011 February 21, 2012 February 12, 2013 March 4, 2014
FOOT
Round 1: K8, k2tOg, k15, SSK, k7. (32 sts remain) Round 2: K7, k2tog, k15, SSK, k6. (30 sts remain) Round 3: K6, k2tog, R15, SSK, k5. (28 sts remain) Round 4: K5, k2tog, R15, SSK, R4. (26 sts remain) Round 5: K4, k2tOg, k15, SSK, k3. (24 sts remain) Slip one st from needle 2 to needle 3, so that st arrangement is 6/12/6 on needles 1/2/3. Fleur-de-Iys pattern begins in round 6. Be sure to twist MC and CC2 on the back of the work when there are more than 3 sts in a row worked in one color. Long floats in such a small sock make it difficuIt to maintain proper tension. MC SSSK with MC CC2 stranded colorwork DCC2 duplicate st no stitch Round 6: (K1 MC, k1 CC2, R4 MC.) Repeat 3 more times. Round 7: (K3 CC2, k3 MC.) Repeat 3 more times. Round 8: Repeat round 6. Round 9: (K3 MC, k1 CC2, k1 MC.) Repeat 3 more times. Round 10: (SSK MC, k1 MC, R3 CC2.) Repeat 3 more times. (20 sts remain) Round 11: (SSK MC, k1 MC, R1 CC2, k1 MC.) Repeat 3 more times. (16 sts remain) Break CC2. Round 12: (SSK, k2.) Repeat 3 more times. (12 sts remain) Round 13: (SSK, k1.) Repeat 3 more times. (8 sts remain) Round 14: SSK 4 times. (4 sts remain)
FINISHING
Break MC and thread through remaining 4 sts. Using duplicate st, add 2 more fleur-deIys motifs in the MC rows near the ankle as shown in chart. Weave in ends.
Lcissez les bons temps rouler!
La Petite hausseffe Poisson d'Avril
a knitting pattern for the Wee Tiny Sock Club April 201l by meg Bakewell BraveLittleKnitter.etsy.com "The Litfle April Fish Sock" will always be a reminder for me of what can happen when the amount of work that must be done dramatically exceeds and the amount of time there is to do it. When I conceived this design. I had in mind the French April Fools' Day tradition - attaching a paper fish to someone's back unnoticed as ajoke. This spring. I fooled myself into thinking that it would be no problem to complete my dissertation while running a sock club. and of course still being mom and wife. Wrong! Though the dissertation got written and I defended on schedule (and passed!). the sock kits for April went out more than a wee bit late. The silver lining to this cloud was. without a doubt. the patience and good will, advice and support. encouragement and congratulations from the wee tiny sock knitters. I will always be grateful for this kindness. As any fool can see. all you brave little knitters are the best in the world!
materials
apbreviations
Sundara Sock 100% superwash merino yarn about 22 yards/20m limited edition colorway "Tree sap waking up' Set of 5 US size 1 (2.25 mm) DPNs Tapestry needle for weaving in ends Sewing needle for sewing on beads (eyes) Brown or black sewing thread Two 2.5mm beads
pattern and photos @ 20ll Meg Bakewell for personal use only EOR End of round K2tog Knit 2 together Kfb Knit into the front and back of the st P2togPurl 2 together SI Slip the st. purlwise unless otherwise indicated SSK Slipthe next 2 sts individually knitwise. then Knit them together though the back loops. Tbl Through the back loop. TW Turn work. W&T Wrap and turn On a knit row: Bring the working yarn to the front, slip the next st purlwise bring the yarn to the back again. turn work. slip the first st purlwise. On a purl row: Bring the working yarn to the back. slip the next st purlwise. bring the yarn to the front again. turn work. slip the first st purlwise. Yarn over
Begin Pattern
Cast on 48. Divide sts evenly among 4 DPNs and join for knitting in the round. Round l: Knit all sts. Round 2: (Kfb. k3. SSK. k2tog. k2. kfb, kl) four times. Round 3: (K4, SSK. k2tog. K4) four times. (40 sts) Round 4: (Kfb. k2. SSK. k2tog. Kl. kfb. kl) four times. Round 5: (K3. SSK. k2tog. k3) four times. (32 sts) Round 6: (Kfb. Kl. SSK. k2tog. kO. kfb. kl) four times. Round 7: (K2. SSK. k2tog. k2) four times. (24 sts) Round 8: Knit all sts. Round 9-18: Follow rounds 9-18 from Chart 1. or written instructions below. Note: For YO's before a purl st. bring the yarn to the front under the needle, then over the needle to the back. and finally back under the needle to the front for the purl st. For YO before knit st. bring the yarn to the front under the needle. then over the needletothebackfor theknit st. Round 9: \*YO. k2togtbl. pl., kltbl. pl. kltbl. repeat from \* to EOR. Round 10: \*YO. pl. k2togtbl. kltbl. pl. kltbl, repeat from \* to EOR. Round ll: \*YO. kltbl. pl. k2togtbl. pl. kltbl. repeat from \* to EOR. Round 12: \*YO. pl, kltbl. pl, k2togtbl. kltbl, repeat from \* to EOR. Round 13: \*YO. kltbl. pl, kltbl. pl, k2togtbl, repeat from \* to EOR. Round 14: \* K2togtbl. pl. kltbl, pl. kltbl, YO. repeat from \* to EOR. Round 15: \* K2togtbl. kltbl. pl. kltbl. YO. pl, repeat from \* to EOR. Round 16: \* K2togtbl. pl. kltbl. YO. kltbl. pl, repeat from \* to EOR. Round 17: \* K2togtbl. kltbl. YO. pl. kltbl. pl. repeat from \* to EOR. Round 18: \* K2togtbl. YO. kltbl, pl. kltbl. pl, repeat from \* to EOR. Set up for Round 19-23: Knit the first st of the next round through the back loop and slip it onto needle 4. (5/6/6/7 sts on needles 1/2/3/4) Slip 1 st from needle 2 to needle 1. one st from needle 3 to needle 2. and one st from needle 4 to needle 3. (6 sts on each needle again) Rounds 19-23: Repeat rounds 9-13. Round 24: Knit.

Heel Flap
Slip all 6 sts from needle 2 onto needle 1. Heel flap willbe worked back and forth in rows on needle l. Row l: (Sll, kl) to end. Row 2: Sll. p to end. Row 3: Sl. k2. (sl. kl) to last st. kl. Row 4: Repeat row 2. Rows 5-12: Repeat rows 1-4 two more times.
Heel turn
Row 1: Sl. k6. k2tog. kl. tw Row 2: Il. p3. p2tog. pl. tw Row 3: Sl1. k3. k2tog. kl. tw Row 4-5: Repeat rows 2-3. Row 6: Repeat row 2. Row 7: Sll. k5. 6 sts remain on heel needle.
Foot
Using heel flap needle (Needle 1). pick up and knit 6 sts along edge of heel flap. plus I additional st in the corner between the heel flap and the instep sts. (13 sts on needle 1). Knit across the next 12 sts (instep sts) using needle 2. (12 sts on needle 2) Using needle 3. pick up and knit 1 st in the corner between the instep and the heel flap. plus 6 sts along the edge of the heel flap. Knit 3 sts from needle 1 onto needle 3. You are now at the center of the bottom of the foot. new beginning of round. (10/12/10 sts on needles 1/2/3). Note: The gusset decreases alternate between ssk and k2tog to break the strong line of decrease sts that normally appears with gusset decreases.
Foot, continved
Round 1: Knit 2 last 2 sts of needle 1, k2tog. k12. k2tog. k to EOR. Round 2: Knit 2 last 2 sts of needle 1, ssk. kl2. ssk. k to EOR. Rounds 3-6: Repeat rounds 1-2 two more times. (20 sts remain after round 6) Round 7: K3. p4. k6. p4. k3. Round 8: Knit all sts. Round 9-12: Repeat rounds 7-8 two more times. Round 13-15: Knit to last 2 sts of needle 1, ssk. k2tog. knit to last 2 sts of needle 2. ssk. k2tog. kto EOR. (8 sts affer round 15) Break yarn and pullthrough remaining 8 sts.
Fin (make 2)
Note: The fins are worked flat. in garter st. with short rows using the wrap and turn technique. Some patferns call for the wraps to be picked up and knit together with the live sts. but there is no need to do that here. because the wraps are completely hidden by the garter st. backward loop method and leaving a 6-8" tail for sewing the fin to the fish. cast on 8 s Rows I-2: Knit all sts. Row 3: K5. w&t. k5. Rows 4-12: Repeat rows 1-3 three more times. Row 13: Knit all sts. Bind off all sts. Weave in the bind off tail
Finishing
Weave in yarn ends on sock. Using cast on tail and being careful not to sew through to the opposite side of the sock. sew fins to fish bodyjust above the gusset decreases, angled so that the fin covers the heel of the sock. Just above the toe decreases. using sewing needle and thread. sew a bead to each side for the eyes. Go blow some bubbles! @
Chart 1
Symbols
| t | t | 0 | 18 | t | knit tbl | |||
| t | t | 17 | 0 | yarn over | ||||
| t | t | 16 | und | |||||
| t | t | 15 | X | k2tog tbl | ||||
| 0 | t | t | 14 | |||||
| A | t | t | 13 | |||||
| t | K | t | 0 | 12 | ||||
| t | A | t | 0 | 11 | ||||
| t | t | 0 | 10 | |||||
| t | t | A | 0 | 9 |
Random Space Filler: A few of my favorite French words
Some of myhighschol Frenchhas stayed withme altheseyears. eventhough I rare get achance tousei. Here area few of my favorite words. un pamplemousse rose - a pink grapefruit un hibou - an owl lananas - the pineapple (it's fun to say!) apprivoiser - to tame la grenoull at le parapluie - the frog and the umbrella Je ne puis pasjouer avec toi. dit le renard. Je ne suis pas apprivoisé. Une chauve sourie - a bat (the flying kind. literally. a bald mouse)"I can't play with you." said the fox. "I'm not tame." (Le Petit Prince. by la bourdonnement des mouches - the buzzing of flies Antoine de Saint-Exupery) I'abeil et le miel - bee and honey le soleil et la lune - the sun and the moon la licorne - unicorm la chenille et le papillon- the caterpillar and the butterfly
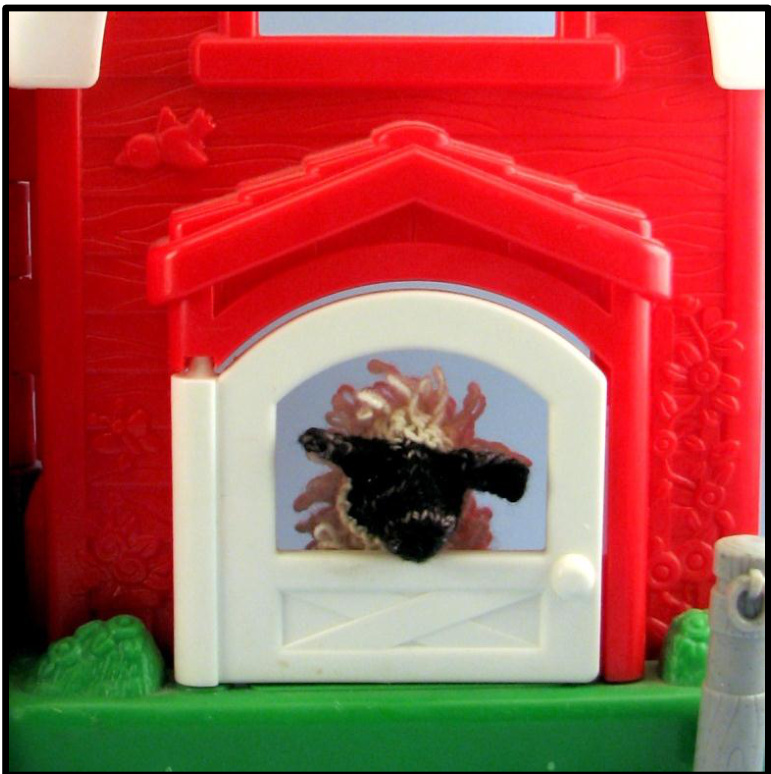
She! he woul we e without them? (el nittin alpaca orcotton, suesel)ThisIttl lom is madeusing a eretystanar cuffdown sock construction fut he makes a cute fingerueet. is woly locts are create using a log stitch overteleganeeortionfthe sock,anissweetlacfaceisstockingstich anis earsare maefgarter stitch. Blis eyes are ind of feady (hee hee) but assure you, hes very frienady!
materials
Cherry Tree illuper ock elect f% erine Main color (C): %atural, about & yards Contrast color (CC): Black, about f yards et of2 U size f (2.25 mm) D0s Tagestry needle for weaving in ends Sewing needle for sewing on beads (eyes) Brown or Black sewing thread Jwe size beads

Abbreviations
K&tog nit & together P&tog OPurl 2 together g1 Slig the st, gurlwise unless otherwise inaicated SSK Sligthe next & sts inaividually knitwise, then knit them together though the bact loops. J61 Jhrough the back loop. JJurn work. rag an8 turn On a knit row: Bring the working yarn to the front, slip the next st purlwise, bring the yarn to the Back again, turn work, slip the first st gurlwise. On a gurl row: Bring the working yarn to the back slip the next st purlwise, bring the yarn to the front again, turn work, slig the first st gurlwise.
Begin Oattern
Using MC, cast on 18 and divide evenly among 3 needles. Join for knitting in the round. Be sure to read the notes about the loop stitch on the next page before beginning. Round 1: K all sts. Round 2: \*Purl into the front of the first st, then, without dropping it off the needle, make a loop (see Note 1 on next page), and purl into the back leg of the st, then drop the st off the left hand needle. Insert the left needle into the back of the 2 sts just created, purl them together (p2tog, see Note 2 on next page).\* Repeat from \* to \* to end of round. Rounds 3-14: Repeat rows 1-2 six more times.
eel Flag & Turn
Rearrange sts so that the last 9 sts of round 14 are on one needle. These 9 sts will be used for the heel flap. Divide the other 9 sts between 2 additional needles. Turn work so you are ready to work across the heel flap sts. Row 1: sl 1, p 8. Row 2: Sl 1, work next 7 sts as for row 2 of leg, k1. Rows 3-6: Repeat rows 1-2 two more times. Row 7: repeat row 1. Row 8: Sl 1, work 6 sts in loop st, W&T. Row 9: P5, W&T. Row 10: Work 4 sts in loop st, p3.
Gusset, Foot, Toe
Pick up and knit 4 sts along edge of heel flap, k9, pick up and knit 4 sts along the other side of the heel flap, k4. This is the bottom of the heel and the new beginning of round. Rearrange sts so there are 9 on needle 1, 9 on needle 2, and 8 on needle 3. Round 1: Purl all sts. Break MC yarn and switch to CC. Round 2: K all sts. Round 3: K to last 3 sts of needle 1, k2tog, k11, SSK, k to end of round. Rounds 4-9: Repeat rounds 2-3 three more times. (18 sts remain after round 9) Round 10: K all sts. Round 11: K to last 2 sts of needle 1, k2tog, ssk, k to last 2 sts of needle 2, k2tog, ssk, k to end of round. (14 sts remain) Round 12: K all sts. Rounds 13-14: Repeat round 11. (6 sts remain after round 14) Break yarn and thread through remaining 6 sts.
Bars (make 2)
Using CC and leaving a 6-8" tail to sew ear to head, cast on 5. Row 1: K all sts. Row 2-6: Sl 1, k4. Row 7: Sl 1, k2tog, k2. Row 8: Sl 1, k3. Row 9: Sl 1, k2tog, k1. Row 10: Sl 1, k1, pass the slipped st over the knit st, bind off remaining 2 sts.
Finishing
Weave in bind off tail of ears toward the center of the ears to make a nice rounded edge. The cast on edge is the side of the ear that will be sewn to the head. For the left ear, with cast on edge at the bottom, fold the right third of the ear over. Sew the cast on edge of the folded ear to the head at the interface between MC and CC, with the lower edge of the ear at about halfway between the bottom of the sole and the top of the instep, and the folded edge toward the sole of the foot/the top of the sheep's head. Be careful not to sew the sock shut while you are doing this! Repeat for the right ear, but this time folding the left third of the ear before attaching it. Sew a bead just in front of each ear for eyes. Weave in remaining ends.
hetes about the oog Stitch
Note 1: In round 2 of the loopy stitch used for the body of the sheep, you will purl into the front and then the back leg of each st. Between these two purls, you need to “make a loop". There are at least a couple different ways to do it. I'm a thrower, so for me, holding the yarn in my right hand, it's comfortable to wrap the yarn under my left thumb, and then back up over the top of my thumb to the left-hand needle to form the second purl st. It also works to simply form a loop of yarn, hold it down with your thumb, and then make the second purl st. You may find a different technique that works for your style of knitting. In any case, your loops should be about %" long. The kit includes a generous amount of yarn, but if your loops are too loopy, it may not be enough! Note 2: Purling the 2 sts together locks the extra loop in place so it won't be pulled out, so until the p2tog is complete, be careful not to pull too hard on the sts. You may (or may not!) find it helpful to hold the loop with your thumb until the p2tog is done. When the p2tog is done, you can give the loop a quick tug to tighten it up. The tightened loop should be about % inch long. Another way to tighten the loops is to insert a tapestry needle in the loop and pull out. I prefer to tighten each loop as I go along, but you could also wait ^til the end of a needle or a round and do them all at once.
Baa, baa, wee sheep. have you any wool? Yes, sir, yes, sir, a wee bag full!