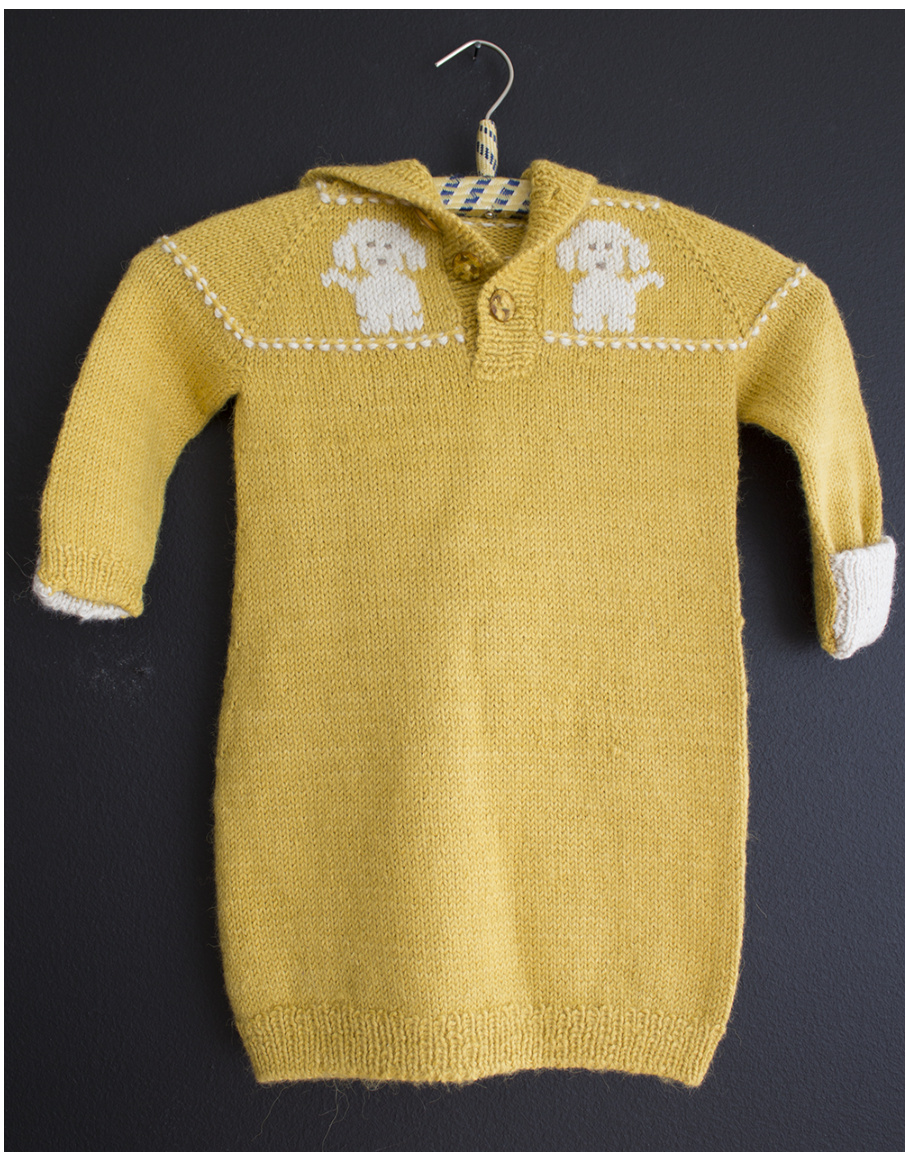
GEISLI BABY BUNTING DRESS
by Kristbjorg Olsen
Description
Geislis knitted from the top down, starting with the hood, using provisional cast on. Stitches on top of the hood are weaved together with Kitchener stitch (grafting). Sleeves are with fold over mitten cuffs. The embroidered puppies on the yoke are done with duplicate stitch and 2x2 rows with ,Tiny Bobbles Stitch". On the back there is also one embroidered flower. The size of Geisli is for about 3-6 months, nonetheless it was used as a home coming outfit for my grandson. My daughter just folded the sleeves up half and managed to let it look as it fitted her little/big boy. Geisli is made with 100% Alpaca yarn so it is incredibly soft and warm but you could use any soft woolyarnwith the samegauge(23sts30 rows=10x10 cm). This pattern has some eccentric little things which in some cases might not be crucial for the outcome, feel free to skip those if you don't consider themgood practice.
Materials
Yarn: Fl60 100% Alpaca from Handrjon.is Hafnarfiroi - The dress is 278 gr and each skein 50 gr. Any soft wool or Alpaca yarn with the same gaugewilldofine. · Needles: Double pointed needles size 3,5 mm and 2,5 mm (for the rib), 1 x 40-60 cm circular needle size 3,5 mm. · Blunt sowing needle to bind off and weave in ends. Crochet hooktopick up stitches.
Gauge
23 sts 30 rows = 10x10 cm stocking stitch.
Methods
Provisional cast on (video): https://youtu.be/ T7OwOpC6CY?list=PLeSMzHjMiUzhrefeQeORR1KrjQvkPhRS0 · Invisible ribbing bind off (video):https://youtu.be/23uJSGokBDA?list=PLeSMzHjMiUzhrefeQeORR1KrjQvkPhRS0 · Picking up stitches (see tips) · Kitchener stitch (grafting): http://www.learn2knit.co.uk/knitting/joining.php · Tiny Bobbles Stitch (see stitch pattern) · Duplicate Stitch for the embroidered puppies (video): https://youtu.be/ZbdZ1eH10lU · Cast on in the middle of your work (video min: 2:02): https://youtu.be/bTgT7kE1c k Also see tips at the end of the document.
Start here
Hood
Using size 3,5 mm dpn cast on 76 sts with provisional cast on (see tips). Work back and forth in stocking stitch until the hood measures 20 cm. Note: You might want to switch to your circular needle (3,5 mm) as the stitches are quite many but knit at least 2 rows with dpn as to not get your stitches turning ormessed up.
Decrease
Next row decrease 12 sts evenly across the row (64 sts).
Yoke
Next row put markers as follows: k12, pm, k6, pm, k28, pm k6, pm, k12.
Increase
\*\*\* Next row: Increase by knitting both in front and back of a last stitch before a marker and first stitch after a marker (8 sts increase). Repeat from \*\*\* two more times (88 sts in total) Go on to work the tiny bobbles stitch.
Tiny Bobbles Stitch
Stop increasing while working the two pattern rows. Change the color of the working yarn (from yellow to white) Row 1: (right side): k1 \*(k1, yo, k1) into one stitch, sl 1 wyib; rep from \* k1 Change back to original yarn (from white to yellow) Row 2: p1 \*Knit together the (k1, yo, k1) witch were done in one stitch in row 1 and sl 1 wyib (the same stitch as was slipped in row 1)\* p1. Next row: Increase by knitting both in front and back of a last stitch before a marker and first stitch after a marker (8 sts increase). Nextrow:Purl all. Repeat from \*\*\* until there are 182 sts in total. Work again Tiny Bobbles Stitch in the same way as before (two rows). Work 4 rows kniting on the front purling on the back, without increasing.
Divide for Armholes
On the right side: k28, cast on 5 sts, put 35 sts on a stitch holder, k56, cast on 5 sts, put 35 sts on a stitch holder, k28, cast on 6 sts (total 122 sts).
Body
Join in circle and knit 10 rows. Increase Beneath each armhole increase 1 st in every 5 rows (2 sts). Until there are 144 sts. Knit until the dress measures ca.46 cm from the shoulder down. Work one row increasing: \*k9, m1, repeat from\* Knit one row. Switch to size 2,5 mm needles and start working the ribbing \*k1, p1\* for 11-12 rows. Bind off using Invisible ribbing bind off Note: You need to have a long tailto work this bind off.It worked for me tohave the yarn ca. 3 times the circumference of the knitting.
Sleeves
Sleeves areknitted in circle. Place the 35 sts from the stitch holder onto dpn needles. Start by picking up stitches from the center of the underarm, then knit all 35 stitches, pick up stitches from the second half of underarm and put a marker. This marks the beginning of the row. If there are now more than 44 stitches in total, decrease some of the side stitches in the next row, otherwise just knit the next row. Note: When picking up the stitches, pick one stitch from each of the 5 sts that were made for the body and then pick more stitches to the sides. With the side stitches rather aim for the horizontal thread between stitches instead of the stitches themselves. This in my experience prevents holes forming.I picked up in total 11 sts from each underarm. You need to pick up at least 9 sts in total from each underarm. Place stitches evenly on a set of four double pointed needles.
Decrease
\*\*\* Knit 8 rows. Next row: k2, k2tog, knit to the last 4 stitches, ssk, k2. Repeat from \*\*\* 4 times, 38 sts are now on the needle. Knit until there are 57 rows from the second Tiny Bobbles Stitch.
Ribbing and fold over mitten cuffs
Put 2 markers 19 sts apart. The markers should separate stitches that face front from stitches that face back on the sleeve. For the next 6 rows: Keep on knitting in circle as follows: Work the 19 sts facing front with ribbing \*k1, p1\* and use size 2,5 mm needles but keep on knitting the back of sleeve with size 3,5 mm needles. Next 2 rows: Keep doing the same but now purl the stitches on the back of sleeve. Bind off front stitches Use Invisible ribbing bind off to bind off the 19 stitches in front sleeve (the ribbing).
Fold over mitten cuff
Switch to white yarn, use size 2,5 mm needles and work 22 rows, ribbing \*k1, p1\*. In the first row increase by kfb in first and last stitch (21 sts). Bind off using Invisible ribbing bind off. Fold the mitten upward and sow both sides to the sleeve with a fine stitch.Ifind it best to use the horizontal threads between the stitches on the sleeve for the seam.
Ribbing for Hood and Negline
Weave together stitches on top of the hood using Kitchener stitch. Pick up stitches (make sts) along side of the hood and neckline, one stitch from every single row to prevent holes (see tip). Use size 2,5 mm needle. Knit one row and decrease stitches as follows: \*k6, k2tog\* where the buttons/button holes go and \*k5, k2tog\* on the hood. Work 5 rows ribbing, back and forth \*k1, p1\*
Buttonholes
Buttonholes row 1: Choose on witch side you want the buttonholes. If you are starting to work on the side you want the buttonholes then: Work 8 sts ribbing, bind off 3 sts, work 7 sts ribbing, bind off3 sts, work 7 sts ribbing, bind off 3 sts, work ribbing to the end of the row. If however you are starting from the opposite end then: Work ribbing until 31 sts are left on the needle, cast of 3 sts, work 7 sts ribbing, cast of 3 sts, work 7 sts ribbing, cast of 3 sts, work 8 sts ribbing.Buttonhole bind off is just regular bind off. Buttonholes row 2: Work ribbing and cast on 3 sts in the gaps were you bound off 3 sts in the previous row (see tips: Cast on in the middle ofyourwork). Work ribbing until total rows are 11 then bind off using Invisible ribbing bind off. Fasten buttons and sow stuck the bottom of ribbing to the body.
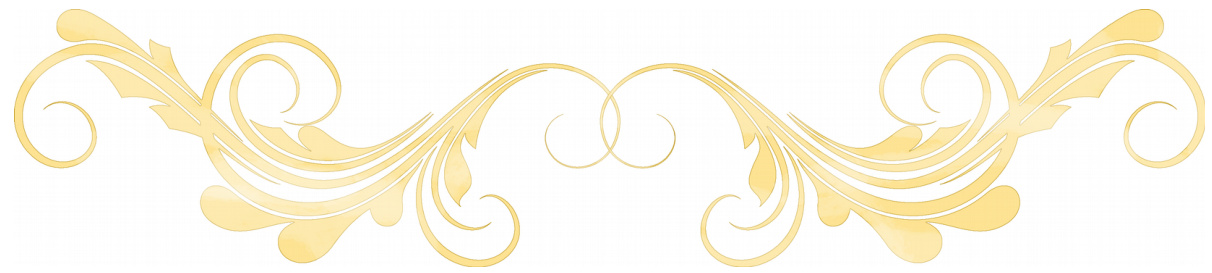
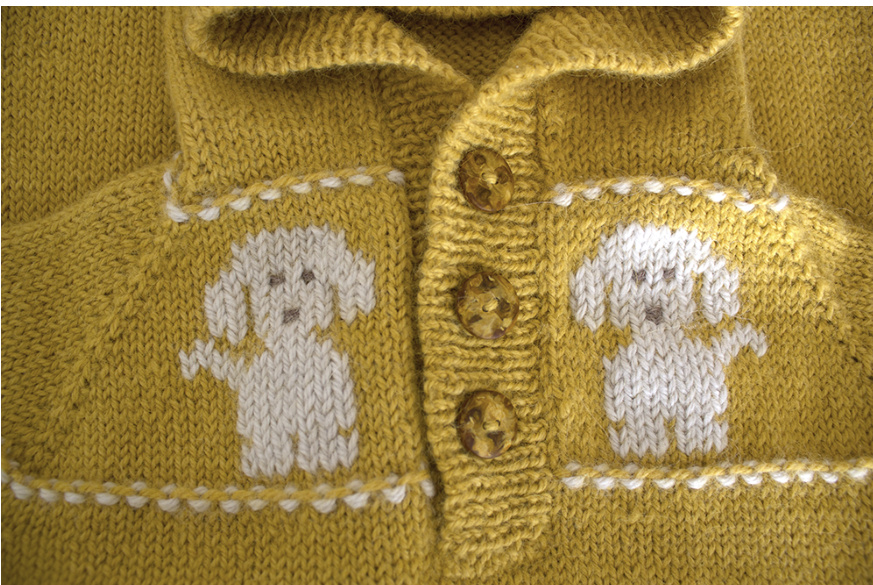
Puppy Pattern for Yoke Embroidery
Before starting to work on the puppies, mark the area for each puppyas toget them inthe same place on each side. Do this for example with a needle and contrasting color yarn. Each puppy is 13 sts wide and 20 rows high. Then use Duplicate Stitch for the embroidery.Video: https://youtu.be/ZbdZ1eH10lU
Kristbjorg Olsen's Designs - copyright 2016 - email: kristbjorgolsen@gmail.com - Kristbjorg Olsen's Ravelry Store http://www.ravelry.com/patterns/library/geisli-baby-bunting-dress
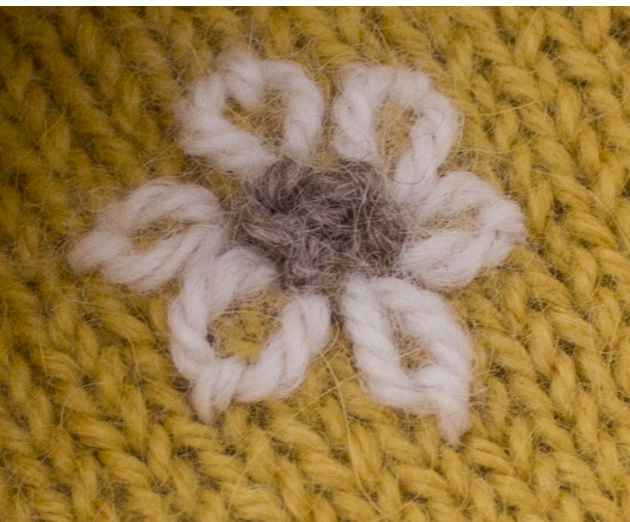
Embroidered Flower
No description for the flower other than the image. The center of the flower however is done with somethingcalled Frenchknots.
Abbreviations
k-knit kfb-knit in front and back of stitch k2tog-knit 2 stitches together m-marker m1 - (make one) Work to the place where the increase is to be made. With the left needle, pick up the horizontal thread between the stitches by inserting the needle front to back, then knit this stitch through the back. p-purl pm-put marker sl - slip ssk - slip slip knit, slip the next 2 stitches, one at a time, on to the right needle, knitwise. Insert the left needle into the fronts of these two stitches and knithem together. st - stitch sts-stitches wyib-with yarn in back yo-yarnover \*-repeat
TIPS
Provisional cast on
Take the time to make a test! Use double pointed needles with for example 20 stitches. Do it slowly and notice wellhow the stitches are formed both on the needle and on the thread underneath. For each stitch on the needle one gets created on the thread. Stitches on the thread are created between stitches on the needle. Take care of, keeping the stitches from turning on the needle. When you cast on for the dress use double pointed needles, not circular. With circular needle it is not possible to keep the stitches from turning. The DPN should be ok if you keep the 74 stitches close to each other so that they don't drop off or use a stopper. Use scrap yarn similar to the width of your working yarn but in different color.
Picking up stitches
When you pick up stitches for the rib. Pick up the horizontal thread for each and every row to prevent holes. I always find it best to do this with a crochet hook, sticking the crochet hook underneath the horizontal thread and draw the working yarn through to make a stitch. When I several stitches on the crochet hook I transfer them on to the knitting needle from the backend of the crochet hook. This is maybe a little awkward but it works fine.
Cast on in the middle of your work
I recommend to use knitted cast on when doing the buttonholes and the underarm stitshes for the body.It's more sturdy and looks better. This is very simple. See video (min: 2:02): https://youtu.be/bTgT7kE1c_k Happy knitting Kristbjorg