Zombie Mitts & Mittens
Cold hands, dead heart. Okay, this pattern might be a little bit intimidating to look at, as there is some math involved, but I promise that if you follow instructions like good Zombie Minions, you will get through it just fine. This pattern does not include a thumb gusset, for simplicity's sake, but there are instructions on the last page for adding one if you are so inclined. Step 1: Decide whether you will be making fingerless mitts or full mittens. Step 2: Choose yarn and needles. Step 3: Do a gauge swatch using your chosen yarn and needles.
Cheater's Gauge Swatch:
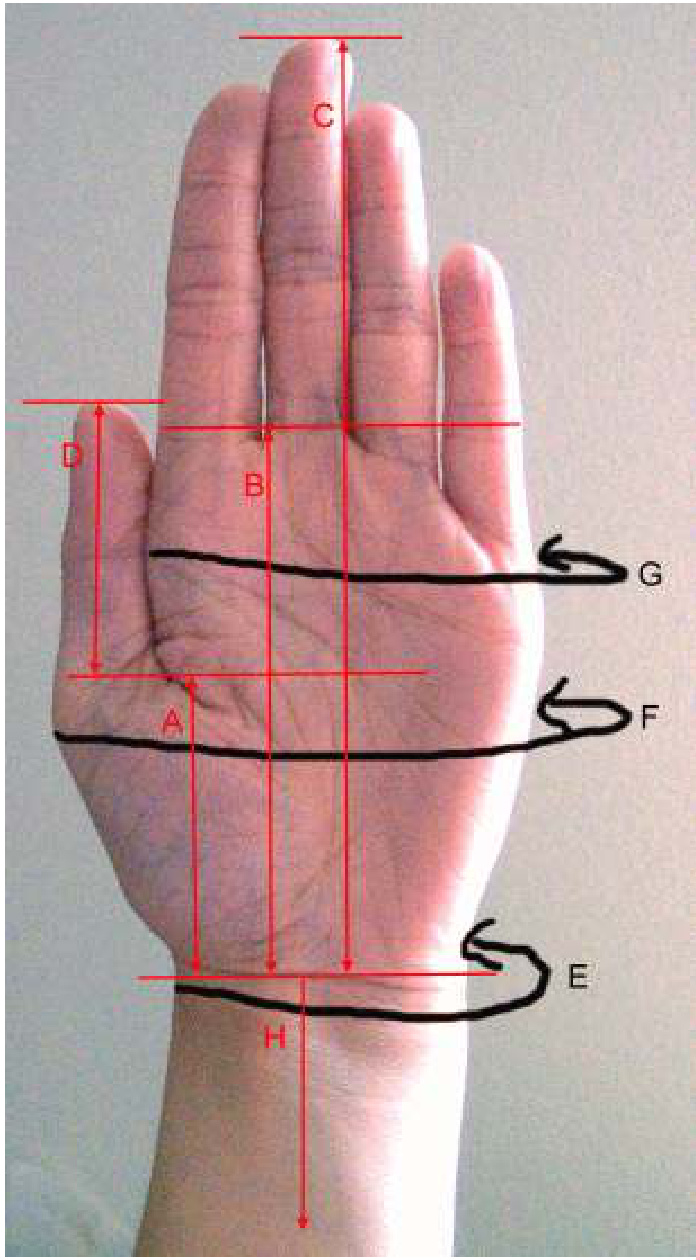
CO your expected SPI x 4 (or SPcm x10) plus 8 sts. For a “round’ swatch, work each row from right to left,then pull yarn loosely back to the right, so that all rows are worked from the right side. Row 1: K Row 2: P Row 3: K Row 4: P Row 5: K Row 6: P4, K many, P4 Repeat rows 5 & 6 until the central stockinette portion measures 4 inches/ $\mathrm{[0\;cm}$ in length, then: Row 7: P Row 8: K Row 9: P Row 10: K You can cheat and only make the stockinette portion of your swatch 2 inches/5 cm long if you will have a lot of chance to adjust if your row gauge was a little off (true for this pattern), but don't skimp on the width- stitch gauge is harder to adjust for. Step 4: Measure your stitch and row gauge, and enter them here (choose imperial or metric now, and stick with whichever you choose). StitchGauge $=$ rows per inch/cm RowGauge $=$ stitches per inch/cm Step 5: Measure the hand of the intended recipient. A: Length from Wrist to Crease of Thumb:. B: Length from Wrist to Base of Midle Finger: C: Length from Wrist to Tip of Middle Finger:. D: Length from Crease to Tip of Thumb: E: Circumference of Wrist: F: Circumference of Hand at Widest, Including Thumb: G: Circumference of Palm at Widest, Without Thumb: H: Whatever Cuff Length you like:.
Fingerless Mitts
Keep those stumps where we can see them! First, let's get the math out of the way. (I will reference these in the pattern with their Roman Numeral from this page.) I. E x Stitch Gauge $=$ II. I, rounded up to nearest multiple of 4 -- CO Stitches II.F xStitchGauge $=$ StitchesAtWidestPart ofThumb IV. G x Stitch Gauge $=$ V. IV, rounded to nearest multiple of 4 -- Stitches After Thumb VI. $\mathrm{III}-\mathrm{II}=$ VII. VI, rounded up to nearest even number - Increased Stitches VIII. VII / $2=$ Needed Increase Rows IX. A x Row Gauge $=$ Available Increase Rows X. If IX is less than VIII, ${\mathrm{VIII-X}}=$ Double Increase Rows XI. $\mathrm{D}\!{\mathrm{X}}-\!\mathrm{X}=\!$ Single Increase Rows XII. If IX is more than VIII, $\mathrm{{IX}\mathrm{-}\,\mathrm{{VIII}\mathrm{{=}}}}$ No- Increase rows. XIII. $\mathrm{H}+\mathrm{A}=$ length at widest part of thumb XIV. $\mathrm{III}-\mathrm{V}=\phantom{0}$ Thumb Stitches XV.XIV $/2=$ Thumb Stitches removed on each “end' of the round XVI. $\mathrm{B+H=}$ Total Length XVII. $X\mathrm{VI}-{}^{1}\!/_{2}$ inch or $1\;\mathrm{cm}=1$ Length Before Ribbing CO (Il) stitches plus 1, or don't count your slip knot as a stitch. When joining into a round, slip first stitch/slip knot to the right needle without working it. Check to make sure your round is not twisted, then work the first stitch. At the end of the first row, work the slipped stitch/knot together with the last stitch of the row. Work K2P2 ribbing until cuff measures (H). If your IX value was less than your VIll value, work (X) double increase rows, then (XI) single increase rows. If it was not, work (VIII) single increase rows, then K plain for (XIl) rows. Single increase Row: K2, M1, K to last 2 sts, M1, K2. Double decrease Row: K2, M1, K1, M1, K to last 3 sts, M1, K1, M1, K2
K 1 row plain.
You will now remove some of the stitches from the round to make the thumb. If you want added length to the thumb, transfer these stitches to waste yarn. If you do not, bind them off. Thumb Separation Row: If you are transferring sts to waste yarn, transfer first and last (XV) sts of the row to waste yarn. K the remaining sts. If you are binding off undo (XV) sts at the end of the plain row, BO (XIV) sts, then K back around to the bind-off point. Either way, rejoin into a round with the remaining stitches and continue. K plain until mitt measures (XVII). Work K2P2 rib until piece measures (XVI), and bind off loosely. If you wanted more length to the thumb, pick up the stitches from waste yarn and add length until you have the desired amount of thumb, then bind off loosely. Repeat for second Mitt, and Enjoy!
Full Mittens
Keep your body parts to yourself! I. E x Stitch Gauge $=$ II. I, rounded up to nearest multiple of 4 - CO Stitches II.F xStitchGauge $=$ StitchesAtWidestPart of Thumb IV. G x Stitch Gauge $=$ V. IV, rounded to nearest multiple of4 - Stitches After Thumb VI. $\mathrm{{III}-I I=}$ VII. VI, rounded up to nearest even number - Increased Stitches VIII.VII / $2=$ Needed Increase Rows IX. A x Row Gauge $=$ Available Increase Rows X. If IX is less than VIII, ${\mathrm{VIII-X}}=$ Double Increase Rows XI. $\mathrm{D}\!\mathrm{X}-\!\mathrm{X}=$ Single Increase Rows XII. If IX is more than VIII, $\mathrm{{IX}\mathrm{-}\,\mathrm{{VIII}\mathrm{{=}}}}$ No- Increase rows. XIII. $\mathrm{H}+\mathrm{A}=$ length at widest part of thumb XIV. $\mathrm{III}-\mathrm{V}=\phantom{0}$ Thumb Stitches XV. ${\mathrm{C}}{+}\mathrm{H}=.$ Total Length XVI. $\mathrm{IV}-8=$ Decreased Stitches XVII. XVI / $4=$ Double Decrease Rows XVIII. XVII / Row Gauge $=$ Length Of Decrease Portion XIX. $\mathrm{{XV}-X V I I I=}$ Length Before Decreases CO (II) stitches plus 1, or don't count your slip knot as a stitch. When joining into a round, slip first stitch/slip knot to the right needle without working it. Check to make sure your round is not twisted, then work the first stitch. At the end of the first row, work the slipped stitch/knot together with the last stitch of the row. Work K2P2 ribbing until cuff measures (H). If your IX value was less than your VIlI value, work (X) double increase rows, then (XI) single increase rows. If it was not, work (VIII) single increase rows, then K plain for (XIl) rows. Single Increase Row: K2, M1, K to last 2 sts, M1, K2. Double Increase Row: K2, M1, K1, M1, K to last 3 sts, M1, K1, M1, K2 K 1 row plain. You will now remove some of the stitches from the round to make the thumb. If you want added length to the thumb, transfer these stitches to waste yarn. If you do not, bind them off. Thumb Separation Row: If you are transferring sts to waste yarn, transfer first and last (XV) sts of the row to waste yarn. K the remaining sts. If you are binding off undo (XV) sts at the end of the plain row, BO (XIV) sts, then K back around to the bind-off point. Either way, rejoin into a round with the remaining stitches and continue. If you are likeme, with teenytiny pinkyfngers and want to avoid having a huge void in yor mitten, skip down to the row of Asterisks $(^{*})$ If you aren't feeling intrepid or have longer pinkies, work until piece measures (XIX), then begin decrease rows. You will need to move your Start-Of-Round point, depending on whether you are making the Left or Right mitten. On your first mitten, move the counter $^{1\!}/_{2}$ inch/1 cm FORWARD, on the second one, move it BACK. This makes the flat line at the top of your mitten lay correctly when your thumb has pulled the former start-ofrow a bit offkilter. You will also need to mark the halfway point of your round. Place these markers now. Decrease Row: K2, K2tog, K to last 2 sts of half, SSK, K4, K2tog, K to last 2 sts, SK, K2 Work decrease rows until you have 8 sts left.
\*\*\*\*\*\*\*\*\*\*\*
If you are feeling intrepid, you can shift your mittens a bit to decrease more on the pinky side than the index finger side. Only you can decide how much you need to shift things for your particular mutation, but can tell you how to do it. You originally have (XIX) rows that have decreases on both sides. You can split one (or more!) of these into two single decrease rows that only decrease on the pinky side. Just remember that you will need to start the single decreases earlier than you would start the double decreases. Modify from the instructions above, subtracting one row's worth from the length before the decreases for each row you split. Single Decrease Row: K to last 2 sts of half, SSK, K4, K2tog, K to end of row. Work desired number of single and double decrease rows, until you have 8 sts left. Binding off- No grafting: Turn mitten inside out. Place remaining stitches on one needle, alternating stitches from the two halves. K2tog, $\ast\mathrm{K}2$ tog,pass $1^{\mathrm{{st}}}$ stover $2^{\mathrm{nd}}$ st to bind off, repeat until there is only one st on the needle, then pull tail through final stitch and pull tight. Turn right side out and weave in ends. (Feel free to graft these stitches together instead if you know how and prefer that effect.) Finally, you finish the thumbs. Pick up the stitches from the waste yarn, and K each row until the thumb is (D) long from the inside crease to the tip. (Or just try it on and continue until it just barely covers your whole thumb. If you have 8 stitches or less, work 2 more rounds, then pullthe yarn through the stitches, pull tight, and weave in the end. If you have between 8 and 16 stitches, work 1 more round plain, then K2tog across the entire row (it's okay if you have one left over), pullthe yarn through the stitches, pull tight, and weave in the end. If you have 17 or more stitches, distribute the decreases through two rows to get down to between 5 and 8 stitches, pull the yarn through the stithes, pulltight, and weave in the end.
Optional Thumb Gusset:
Some people like thumb gussets, others consider them a waste of time, especially on fingerless gloves. Thus, I have not included them in the main pattern. They are not hard to add, however. After determining how many stitches you need to accommodate your thumb (XIV), subtract about one-fourth to one-third from that number, and follow the pattern using this new value. On the round after the thumb separation, instead of simply joining the remaining stitches into a new round, cast on the remaining stitches in the gap, then rejoin. If you bound off the thumb stitches, I recommend a Knitted Cast On. If you removed them to waste yarn, use the provisional cast-on of your choice, and pick up the bottoms of these stitches along with the original thumb stitches. Enjoy!


